
Authentication
Overview
In this section, you can get the instructions to authenticate the users coming to the chat. You can set how users are identified and authenticated. You can also set up lead collection forms to get information from the users before initializing the chat.
User details
You can set and update user details in kommunicateSettings function in the Kommunicate chat plugin script.
Here are the parameters you can pass in the plugin script to add the user information:
| Parameters | Type | Description |
|---|---|---|
| userId | String | This is your user's/visiter's ID. Kommunicate will generate a random ID if this is not defined. |
| userName | String | This is the display name of the user. Your team will identify the user by this display name. |
| String | Email ID of the user. If not online, the user will be notified by fallback emails sent to this email ID. | |
| password | String | This will be User's password. |
| imageLink | String | This will be the profile image of the user. |
| conversationTitle | String | All conversations will have this title. Once the conversation is assigned to one of your team, their name would come as the conversation title. |
| defaultMessageMetaData | Object | This will send defaultMessageMetaData with every message |
| authenticationTypeId | Integer | You can use this to authenticate userId and password from your server Set AccessToken URL and pass the value of 'authenticationTypeId' as "0" (Optional). |
User authentication
There are 3 ways to log in users into the chat.
1. Visitors
Whenever users come to your website, they are assigned a random ID by default. This behavior is best suited for anonymous users. Your anonymous users will be identified by pseudonyms. Our pseudonyms structure contains an adjective with a sea-creature name (For example, Jolly Shellfish). Add the below-mentioned setting to allow anonymous users into the chat:
| Parameters | Description |
|---|---|
| appId | A unique application ID assigned to your Kommunicate account. |
| conversationTitle | All conversations will have this title. Once the conversation is assigned to one of your team members, their name would come as the conversation title. |
Note: APP_ID is a unique application ID assigned to your Kommunicate account. You can get it from the Install section in Kommunicate Dashboard. Example:
var kommunicateSettings = {
    ...
    "appId": '<APP_ID>',
    "conversationTitle": '<CONVERSATION_TITLE>'
    ...
};
2. pre-chat lead collection
For collecting users' contact information before initiating the chat, use the preLeadCollection method. Once configured, users will see the form on click of the chat widget launcher icon. You can enable the pre-chat lead collection from the dashboard itself. Click here to go to pre-chat lead collection form.
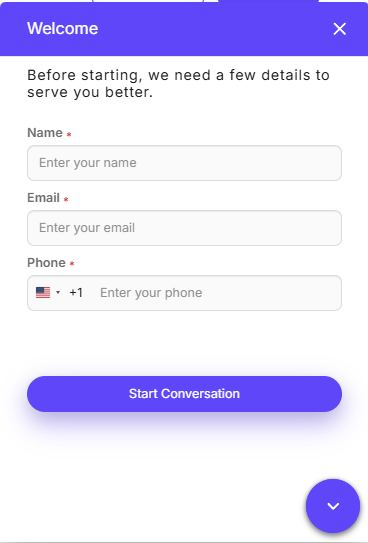
Note: At least one of the (name, email, phone) fields is required.
Adding custom properties in the pre-chat lead collection form
You can collect any custom information from the users as well. Just add the object for that particular information in the code. Let's say you want to collect your user's employment information, you can add that field in a similar manner.
Example
var kommunicateSettings = {
     ...
    "preLeadCollection": [{
            "field": "Name", // Name of the field you want to add
            "required": true, // Set 'true' to make it a mandatory field
            "placeholder": "Enter your name" // add whatever text you want to show in the placeholder
        },
        {
            "field": "Email",
            "type": "email",
            "required": true,
            "placeholder": "Enter your email"
        },
        {
            "field": "Phone",
            "type": "number",
            "required": true,
            "element": "input", // Optional field (Possible values: textarea or input)
            "placeholder": "Enter your phone number"
        },
        {
            "field": "Employer", // You can add any number of custom properties
            "required": true,
            "element": "select",
            "options":[{value:"value1"},{value:"value2"},{value:"value3"}], // Mandatory field (Incase of element:"select")
            "placeholder": "Enter employer name"
        }
    ]
    ...
};
3. Log in your existing users on Kommunicate
If the user has already logged into your website previously, then pass the user details to Kommunicate using the following setting:
| Parameters | Description |
|---|---|
| userId | It is the unique identifier for any user, it can be anything like email, phone number or uuid from your database. Note: Spacing and set of special characters ^!$%^&*() are not accepted in this parameter. |
| userName | Display name of the user. Your team will identify the user by this display name. |
| Email ID of logged in user. | |
| password | Password of logged in user. |
| authenticationTypeId | Default: 1,you can pass 1 for password verification from Kommunicate server and 0 for access token verification from client server. |
Example
var kommunicateSettings = {
    ...
    "userId": '<USER_ID>',
    "email": '<EMAIL_ID>',
    "password": '<PASSWORD>',
    "authenticationTypeId" : 1 // 1 for password verification from Kommunicate server and 0 for password verification from your server
    ...
};
Send user details to AI agent platform
User details can be sent to the AI agent platform by initializing a chatContext object with all the user details parameter and append it to Kommunicate settings by calling Kommunicate.updateChatContext method.
The right place to call this process is where you pass the onInit function in the installation script.
Example
...
"onInit": function () {
    var chatContext = {
        "userId": '<USERID>',
        "email": '<EMAILID>'
    }
    Kommunicate.updateChatContext(chatContext);
}
...
Updating user details after the plugin is initialized
Once the chat plugin is initialized and has returned success response, then you can use Kommunicate.updateUser(userdetail) method to update the user's details.
var kommunicateSettings = {
    ...
    "onInit": function () {
        // paste your code here
        var userdetail = {
            "email": '<EMAIL_ID>',
            "displayName": '<DISPLAY_NAME>',
            "imageLink": '<PROFILE_IMAGE_URL>',
            "metadata": {      // add userinfo you want to show in userinfo section of kommunicate dashboard
                "companyName": value1,
                "designation": value2,
                "linkedInProfile": value3
            }
        };
        Kommunicate.updateUser(userdetail);
    }
    ...
};
| parameters | description |
|---|---|
| Email ID to be updated. | |
| displayName | Display name of the user. Your team will identify the user by this display name. |
| imageLink | This will be the profile image of the user. |
| metadata | It is the extra information about the user. You can pass information such as the user's company name and designation. This information will be visible to your team in the Kommunicate dashboard. |