Sunshine Integration
Sunshine Integration
With Sunshine integration to Kommunicate, you can seamlessly incorporate Kommunicate's advanced GenAI chatbots into Zendesk's chat widget and, agents can efficiently manage assigned chats directly from the Zendesk dashboard.
Follow these steps to integrate Sunshine with the Kommunicate:
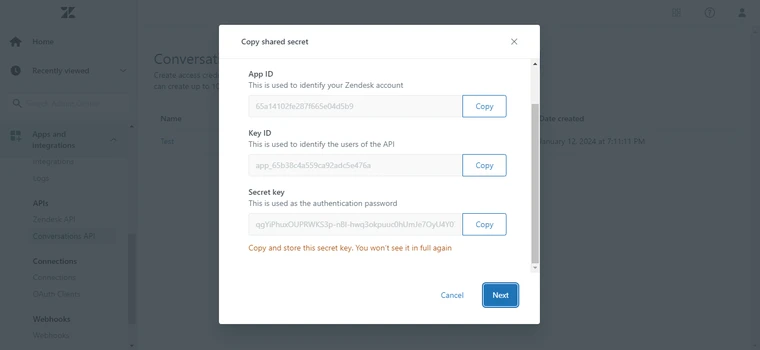
- Login to Zendesk -> Go to Admin Center -> Apps and Integrations -> Conversation Api -> Create Api Key-> Give a name to your Key and click on Next.

Copy the Information displayed on the following sheet as you cannot access it later.
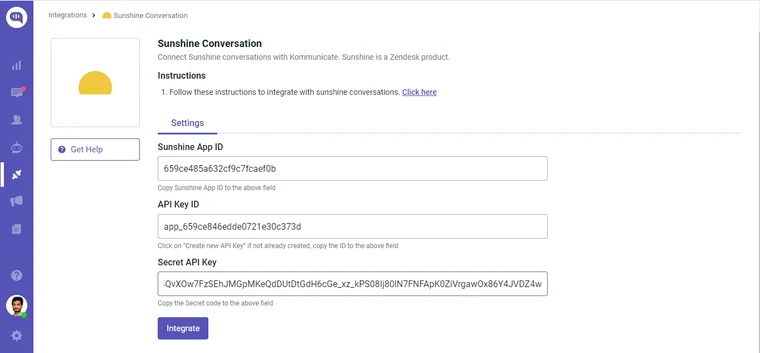
- Login to Kommunicate -> Go to Integrations -> Sunshine Conversation -> Fill the Details.
- Copy Integration ID from dashboard.
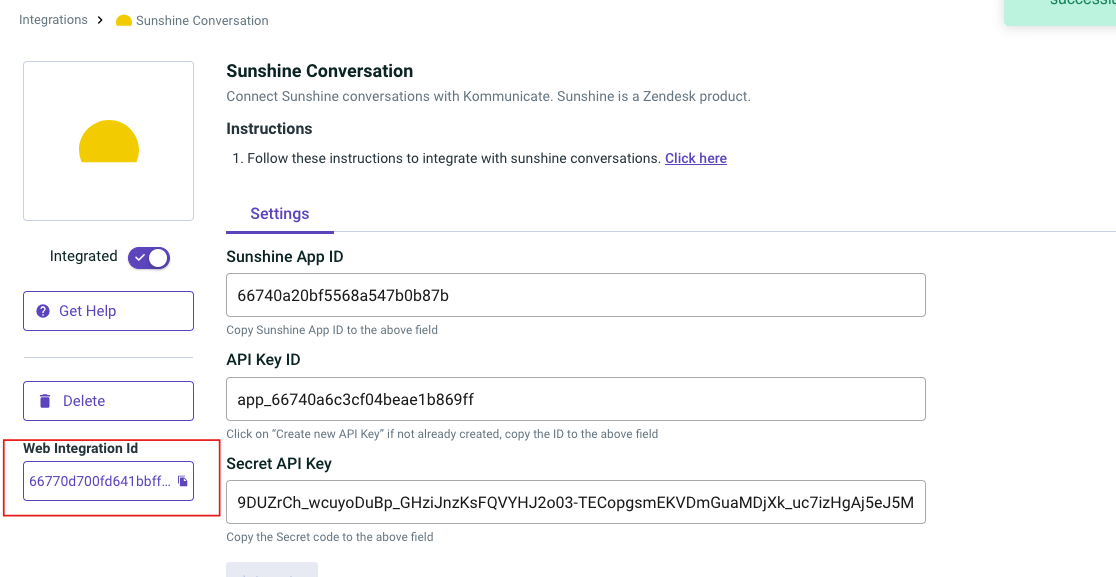
Note the integration ID here to use in the below script.
- Use the following script in the Head tag.
<script>

    !(function (o, d, s, e, f) {
        var i,
          a,
          p,
          c = [],
          h = [];
        function t() {
          var t = "5";
          try {
            if (!f) throw new Error(t);
            var e,
              n = "https://cdn.smooch.io/",
              r = "smooch";
            e =
              "string" == typeof this.response
                ? JSON.parse(this.response)
                : this.response;
            var o = f.match(/([0-9]+)\.?([0-9]+)?\.?([0-9]+)?/),
              s = o && o[1],
              i = o && o[2],
              a = o && o[3],
              p = e["v" + s],
              c = e["v" + s + "." + i + ".patch"];
            if (e.url || p || c) {
              var h = d.getElementsByTagName("script")[0],
                u = d.createElement("script");
              if (((u.async = !0), a)) u.src = c || n + r + "." + f + ".min.js";
              else {
                if (!(5 <= s && p)) throw new Error(t);
                u.src = p;
              }
              h.parentNode.insertBefore(u, h);
            }
          } catch (e) {
            e.message === t && console.error(e);
          }
        }
        (o[s] = {
          init: function () {
            i = arguments;
            var t = {
              then: function (e) {
                return h.push({ type: "t", next: e }), t;
              },
              catch: function (e) {
                return h.push({ type: "c", next: e }), t;
              },
            };
            return t;
          },
          on: function () {
            c.push(arguments);
          },
          render: function () {
            a = arguments;
          },
          destroy: function () {
            p = arguments;
          },
        }),
          (o.__onWebMessengerHostReady__ = function (e) {
            if ((delete o.__onWebMessengerHostReady__, (o[s] = e), i))
              for (var t = e.init.apply(e, i), n = 0; n < h.length; n++) {
                var r = h[n];
                t = "t" === r.type ? t.then(r.next) : t.catch(r.next);
              }
            a && e.render.apply(e, a), p && e.destroy.apply(e, p);
            for (n = 0; n < c.length; n++) e.on.apply(e, c[n]);
          });
        var n = new XMLHttpRequest();
        n.addEventListener("load", t),
          n.open("GET", "https://" + e + ".webloader.smooch.io/", !0),
          (n.responseType = "json"),
          n.send();
      })(window, document, "Smooch", "integration-id", "5");
    </script>
Use the following script inside the body tag.
<script>
      Smooch.init({
        integrationId: "integration-id", // Add the integration id here
        canUserSeeConversationList: false,
        businessName: 'Kommunicate',
        businessIconUrl: 'https://static.zdassets.com/sunco-accounts/sunco-dashboard/v19/43f8f7a97a52a609c850cdbdfac3107a.svg',
      }).then(function (data) {
          Smooch.createConversation({
            metadata: {
              isFirstTimeCustomer: true,
            },
          }).then((conversation) => {
            console.log("Hello Sunshine");
          });
      });
</script>
The following is an example of how to add the script.
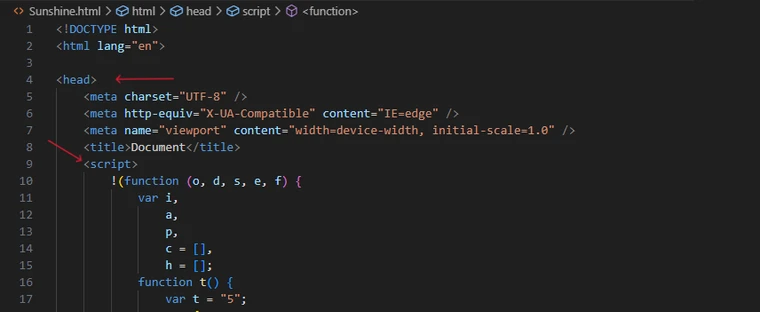
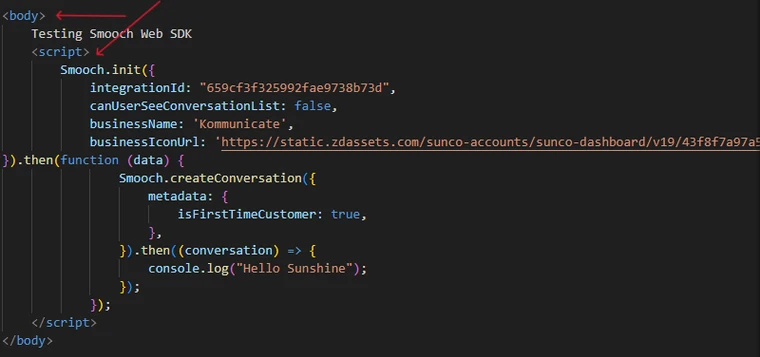
Replace integration-id with the integration-id that you got from step 3.
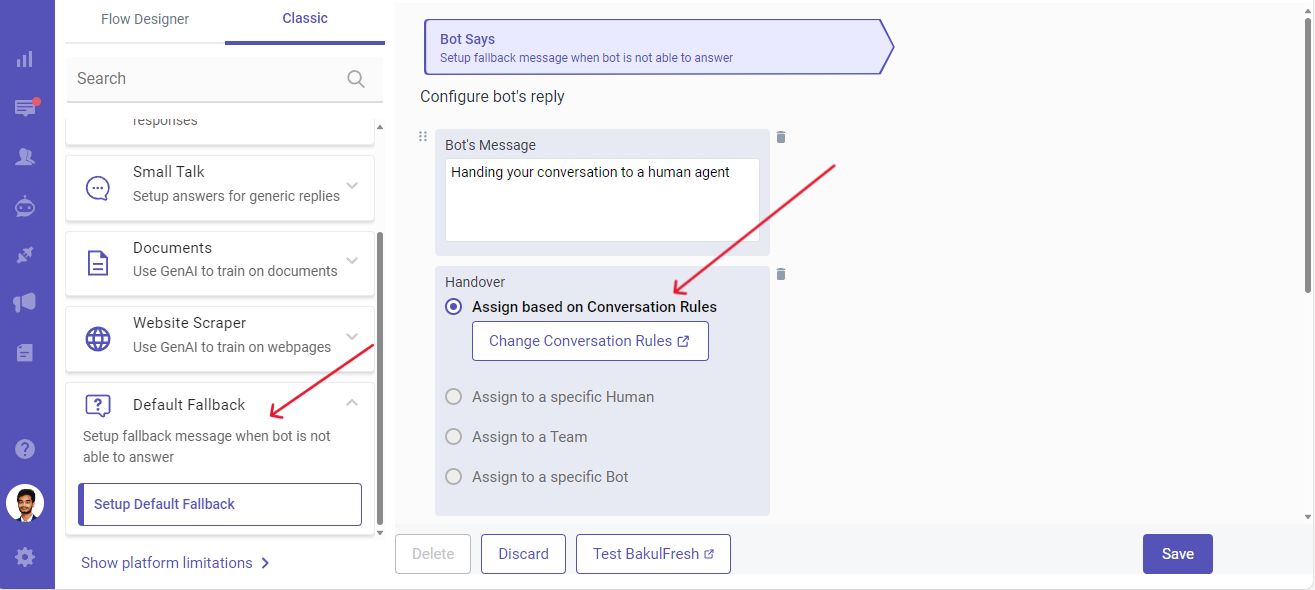
- To handover the conversation to the Zendesk agent, add the handover action in the Default Fallback section as shown below:
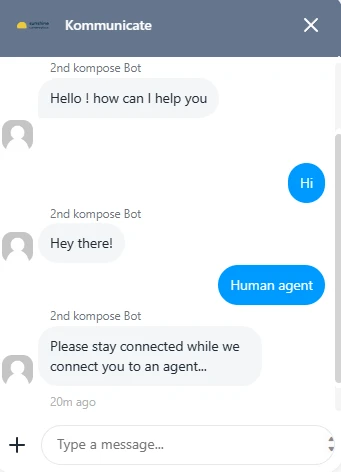
The following is what the chat widget looks like.
- To modify the bot's name, adjust the "businessName" field, and to alter the icon, update the "businessIconUrl" accordingly.
businessName: 'Kommunicate',
businessIconUrl: 'https://static.zdassets.com/sunco-accounts/sunco-dashboard/v19/43f8f7a97a52a609c850cdbdfac3107a.svg',
Resolving Kommunicate Conversations from Zendesk
This guide provides the steps to automatically resolve Kommunicate conversations when they are marked as resolved in Zendesk.
1. Create a Webhook in Zendesk
- Navigate to Admin Center in Zendesk.
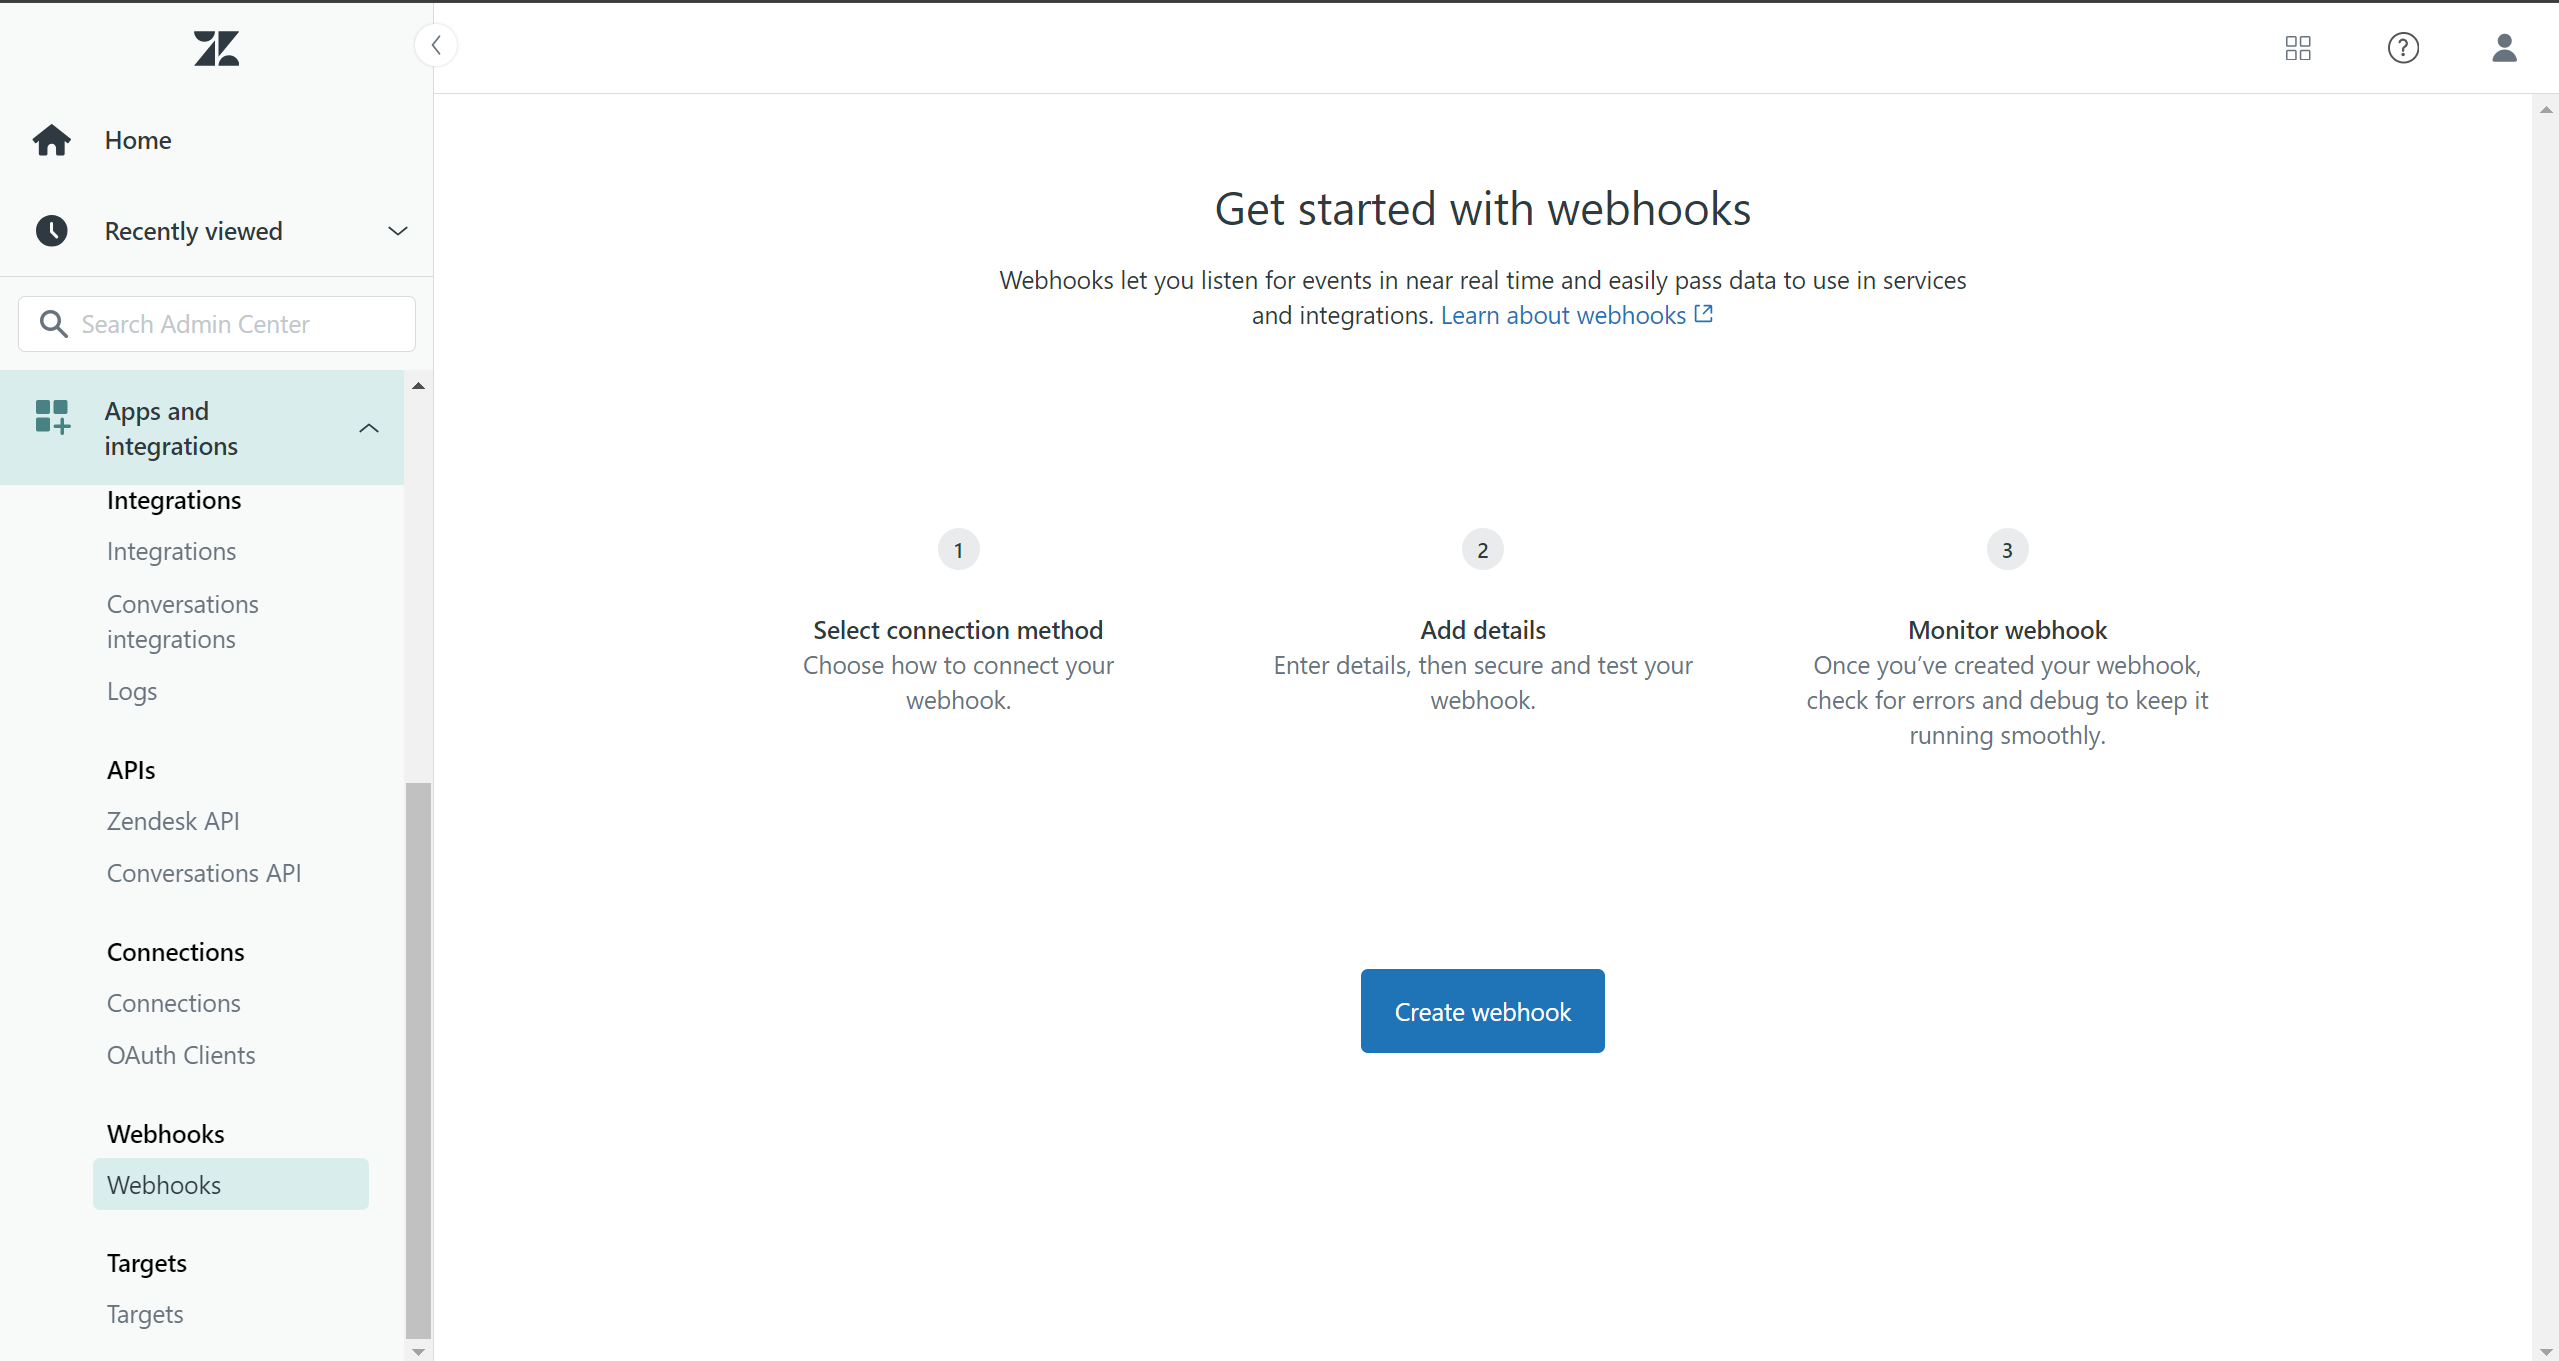
- Go to Apps and Integrations > Webhooks.
- Click on Create Webhook.
- Select Way to Connect: Trigger and Automation
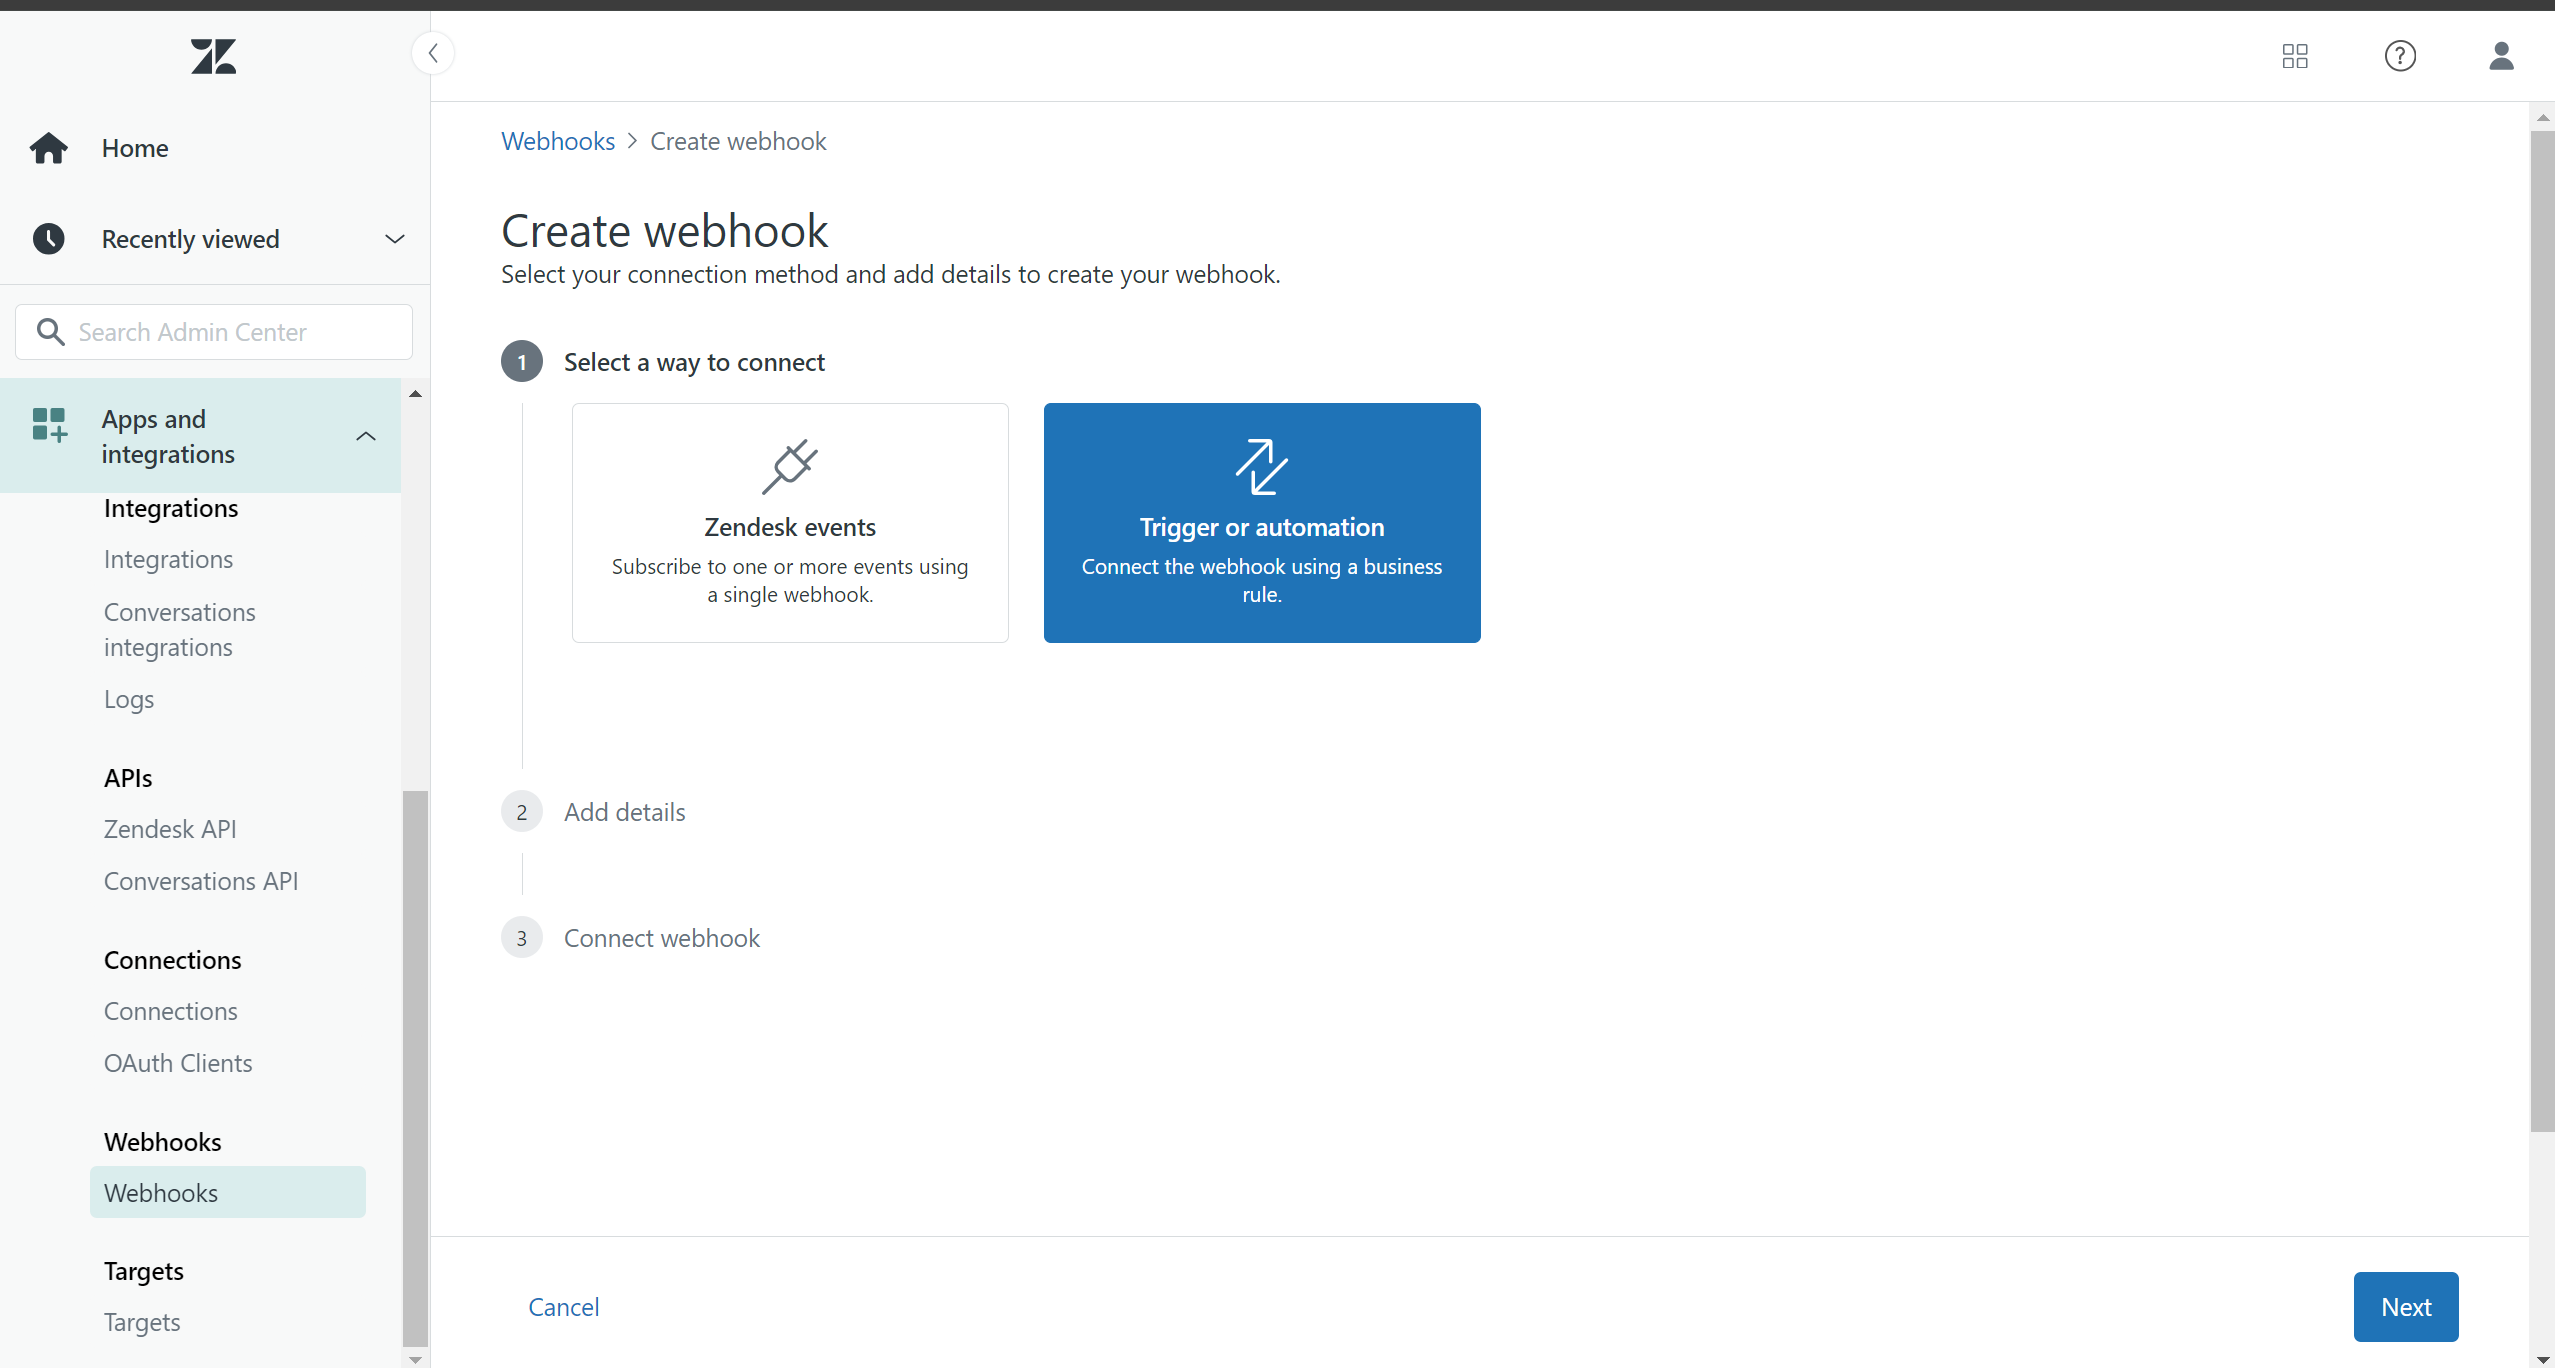
- Fill in the following details:
- Name: Close Ticket
- Endpoint URL:
https://omni-channel.kommunicate.io/zendesk-sunshine/webhook/<KOMMUNICATE_APP_ID> - Request Method: POST
- Request Format: JSON
- Authentication: none
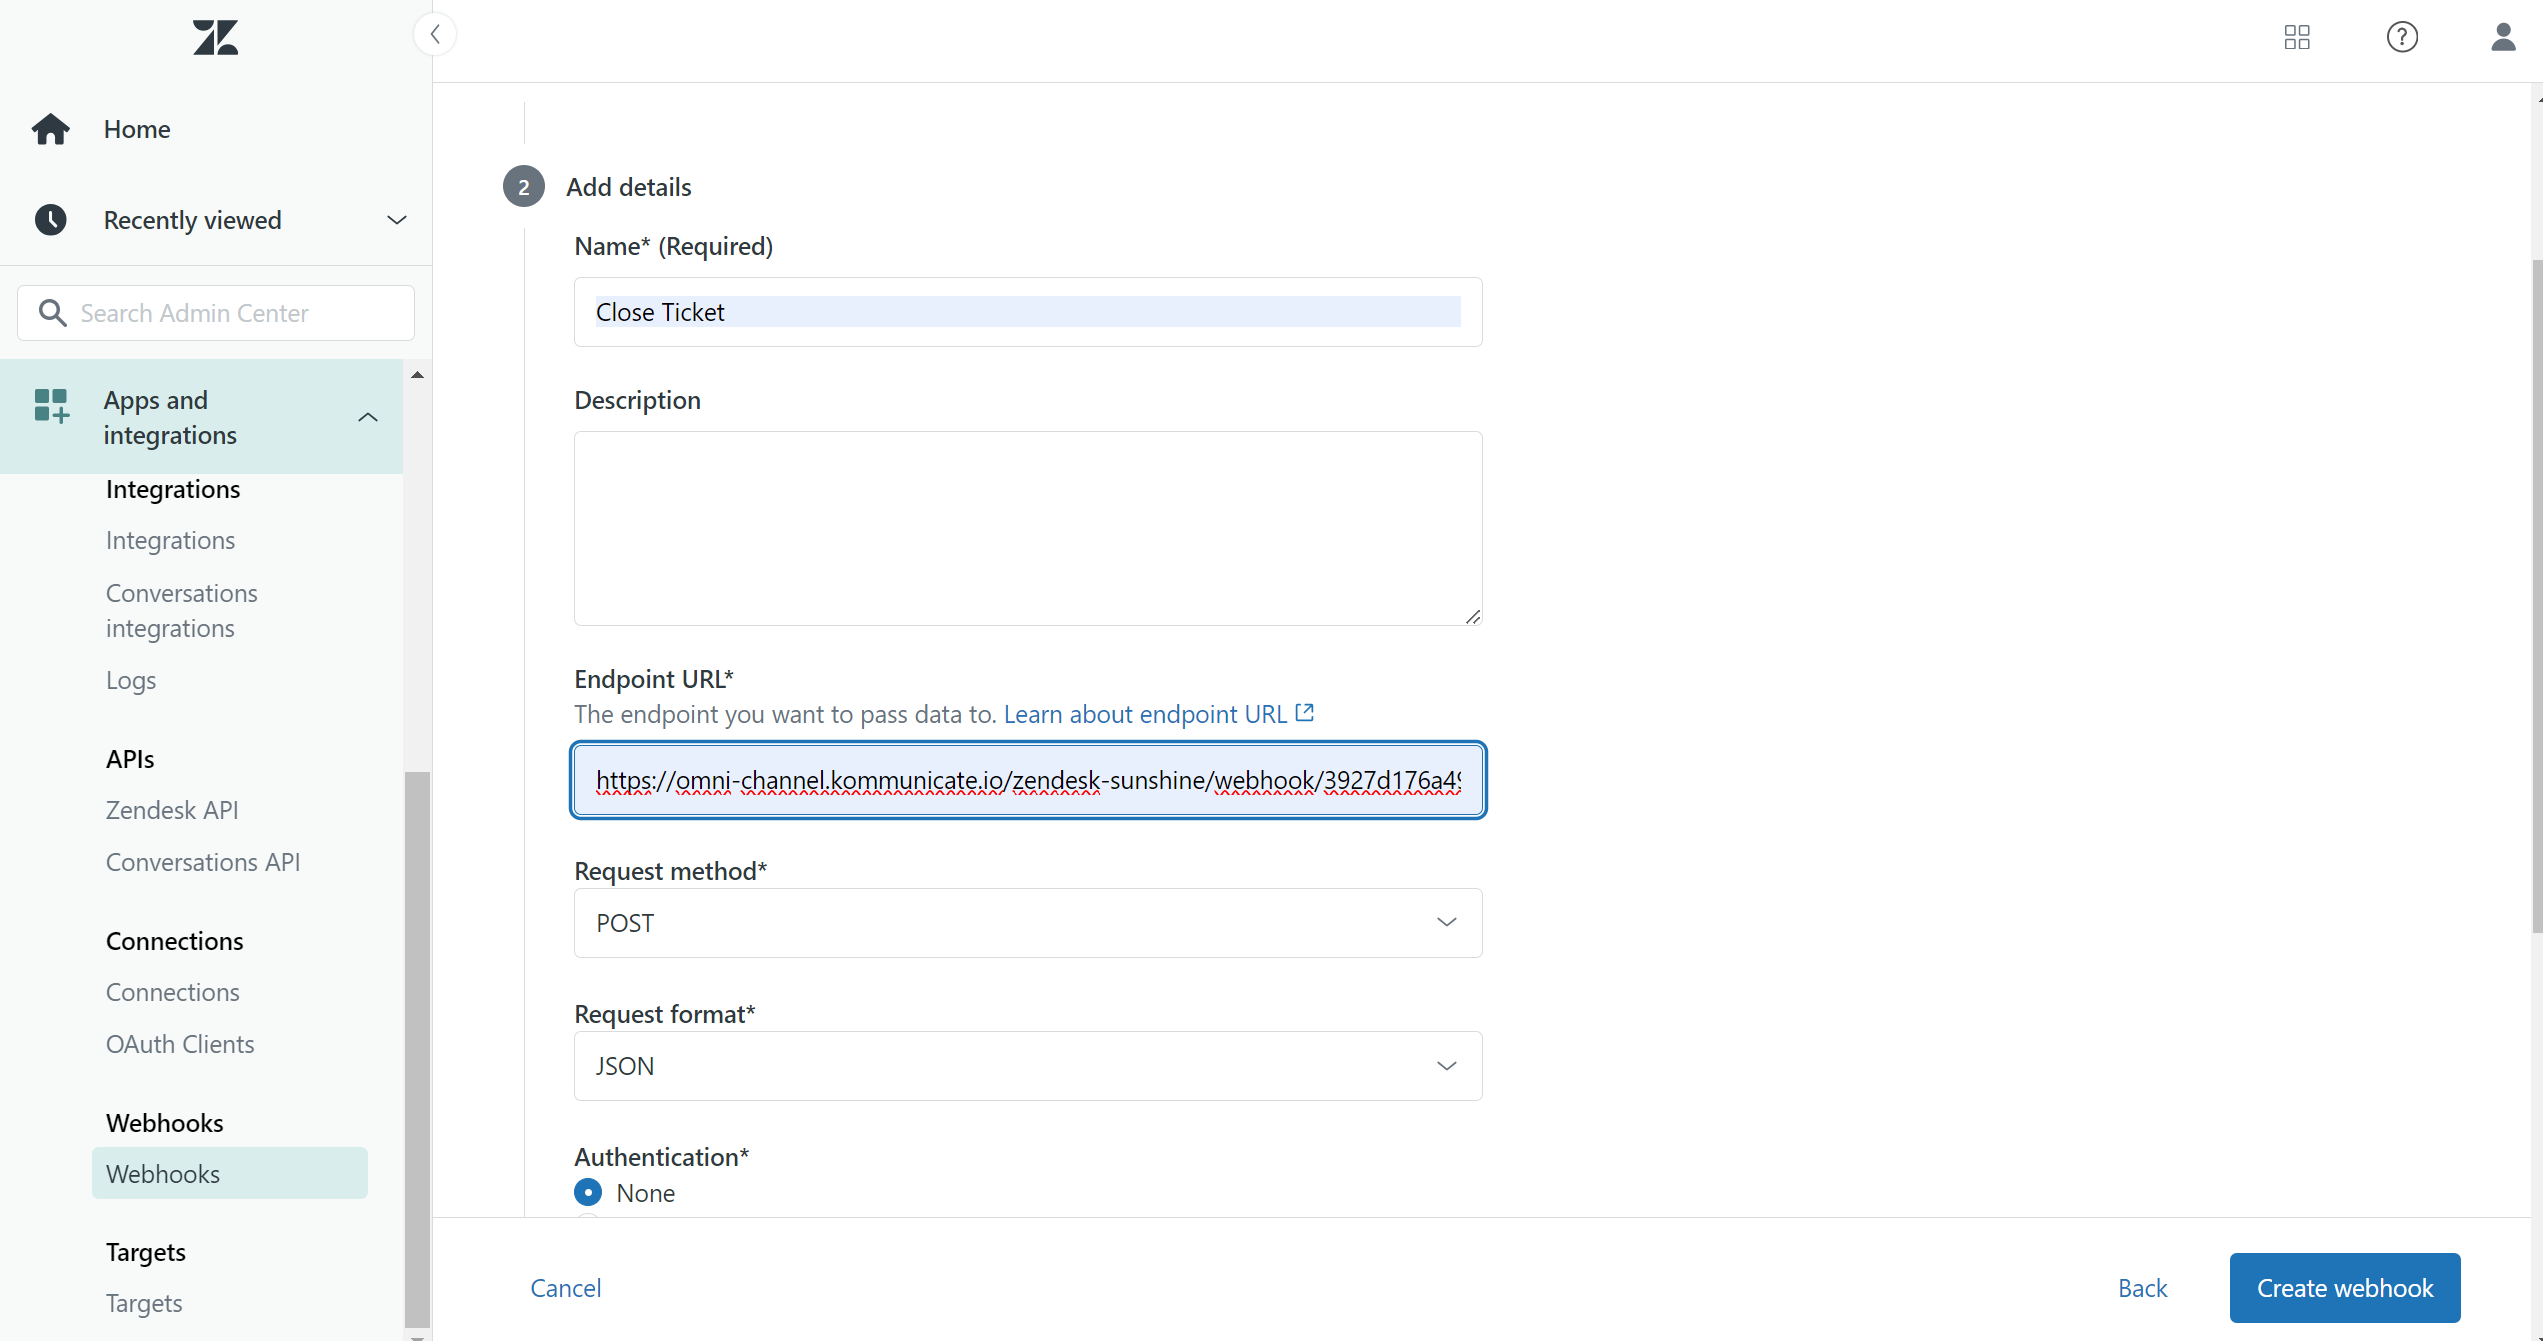
- Click on Create webhook to save webhook.
2. Get Zendesk API Token
- Navigate to Admin Center in Zendesk.
- Go to Apps and Integrations > Zendesk API.
- Enable Token Access if it is not already enabled.
- Click on Add API Token.
- Enter a name for the token and Copy the API token and store it securely. You will need it for the webhook configuration
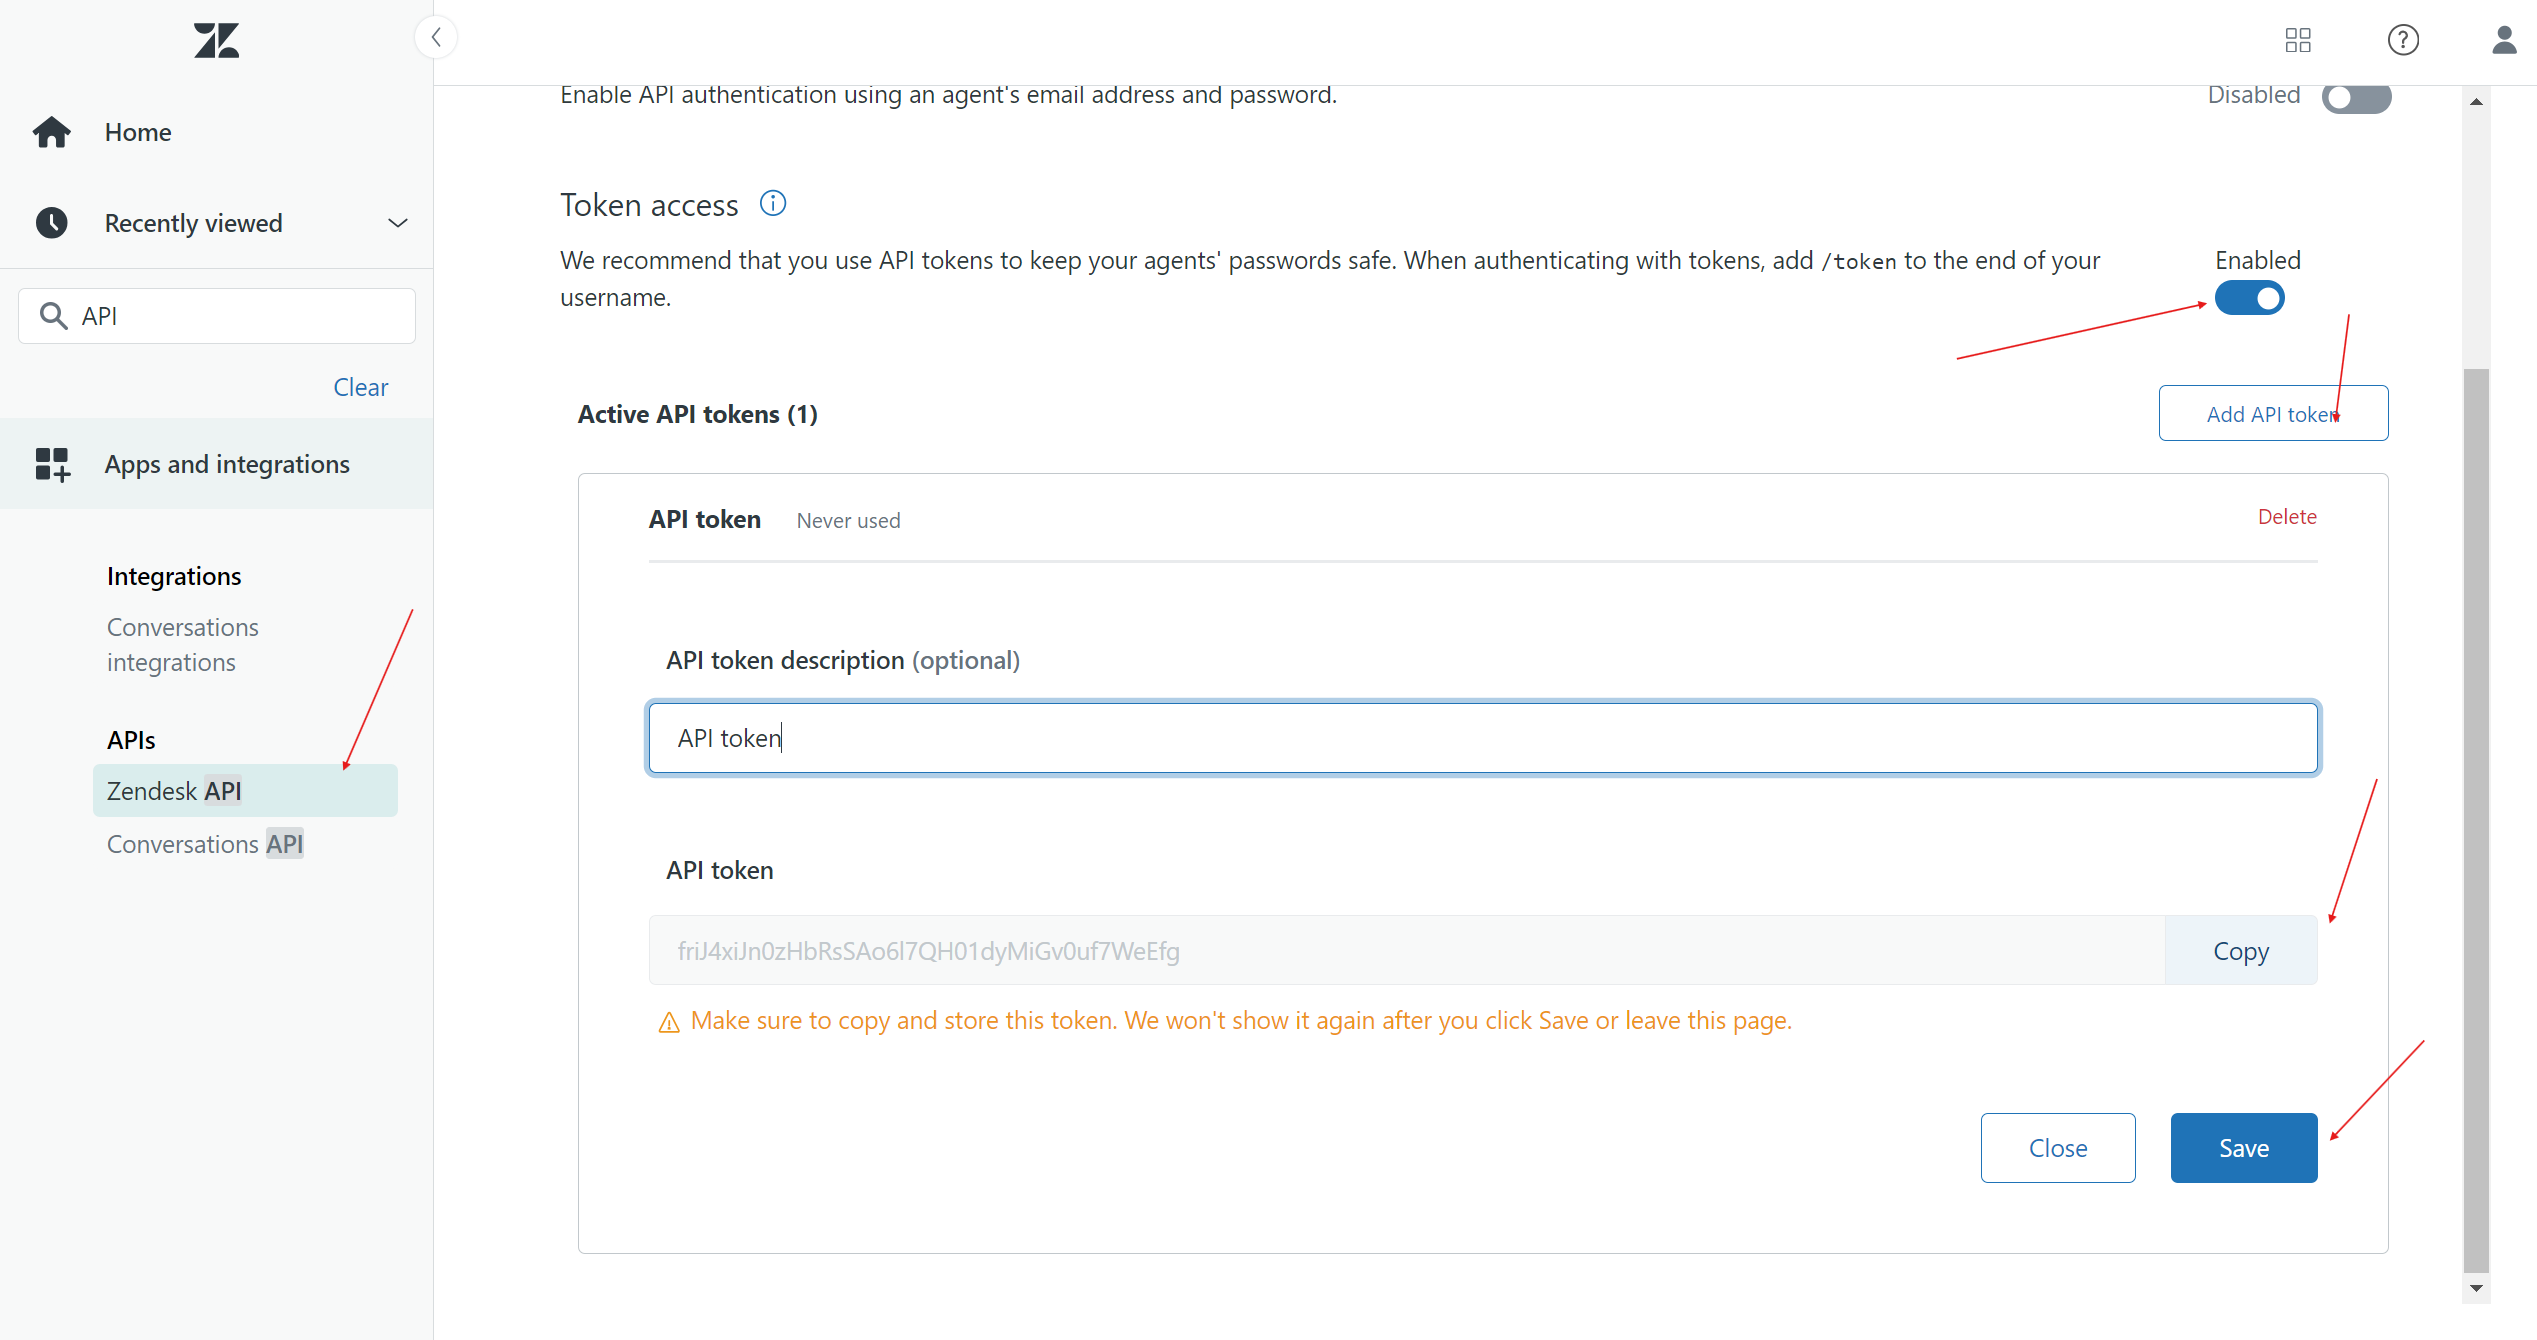
- click Save.
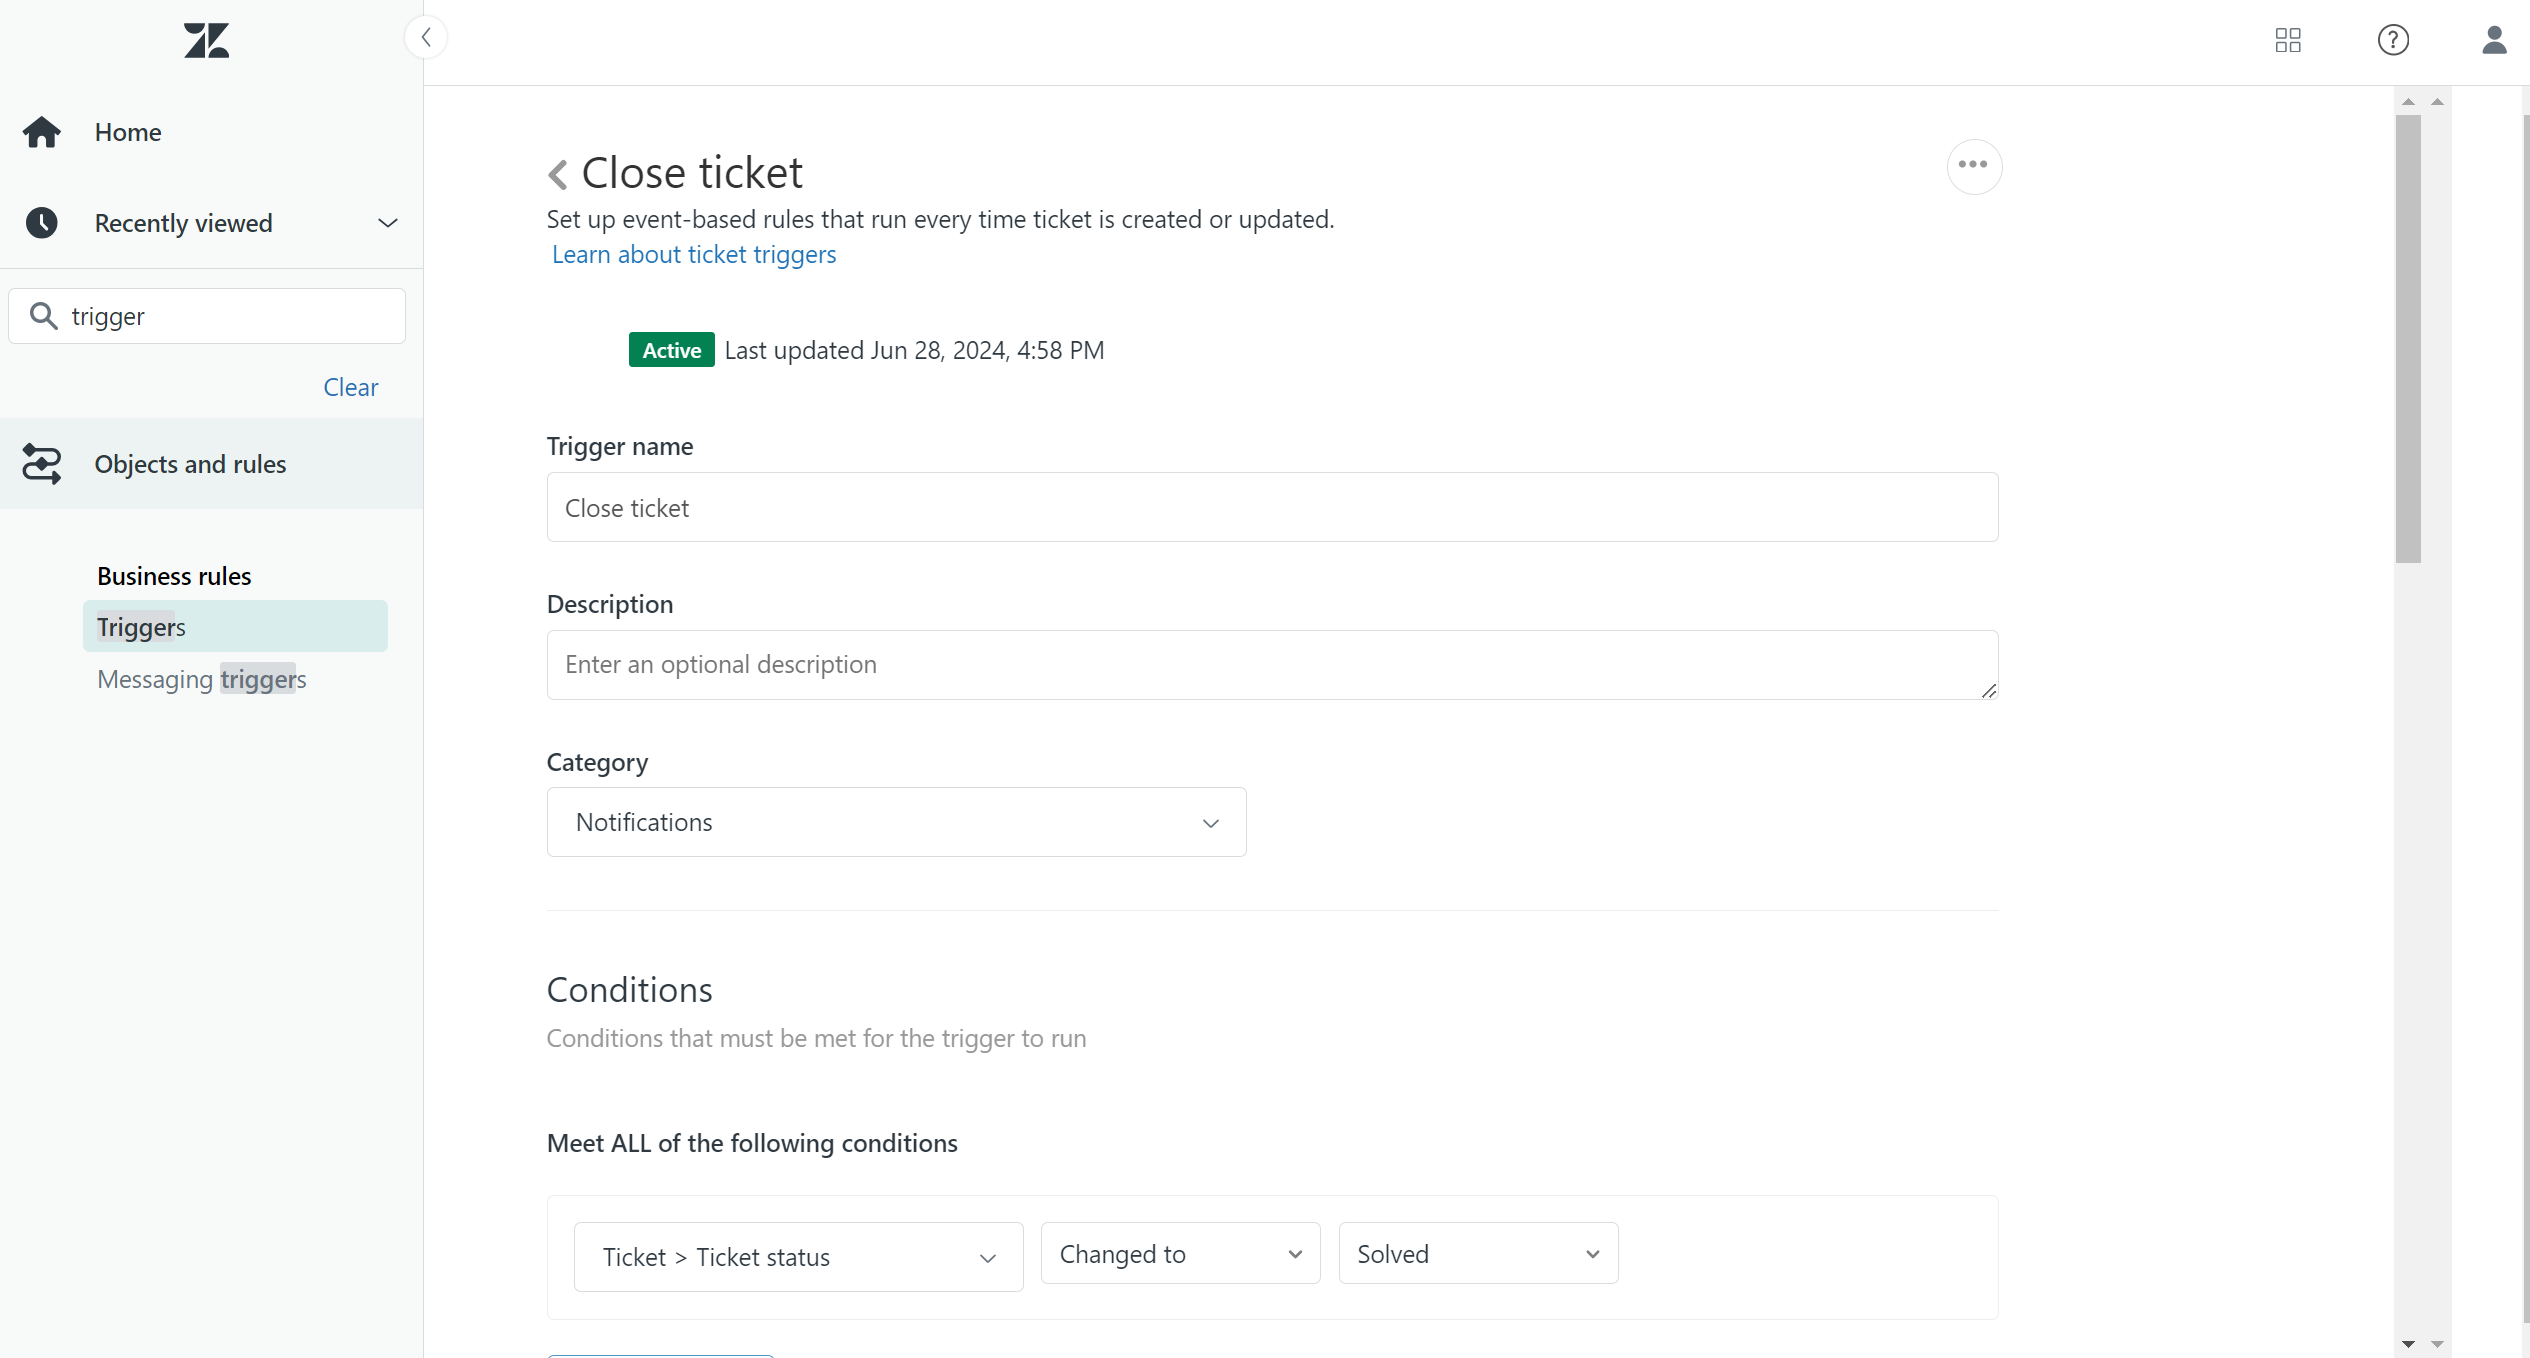
3. Create a Trigger in Zendesk
- Go to Admin Center > Business Rules > Triggers.
- Click on Create Trigger.
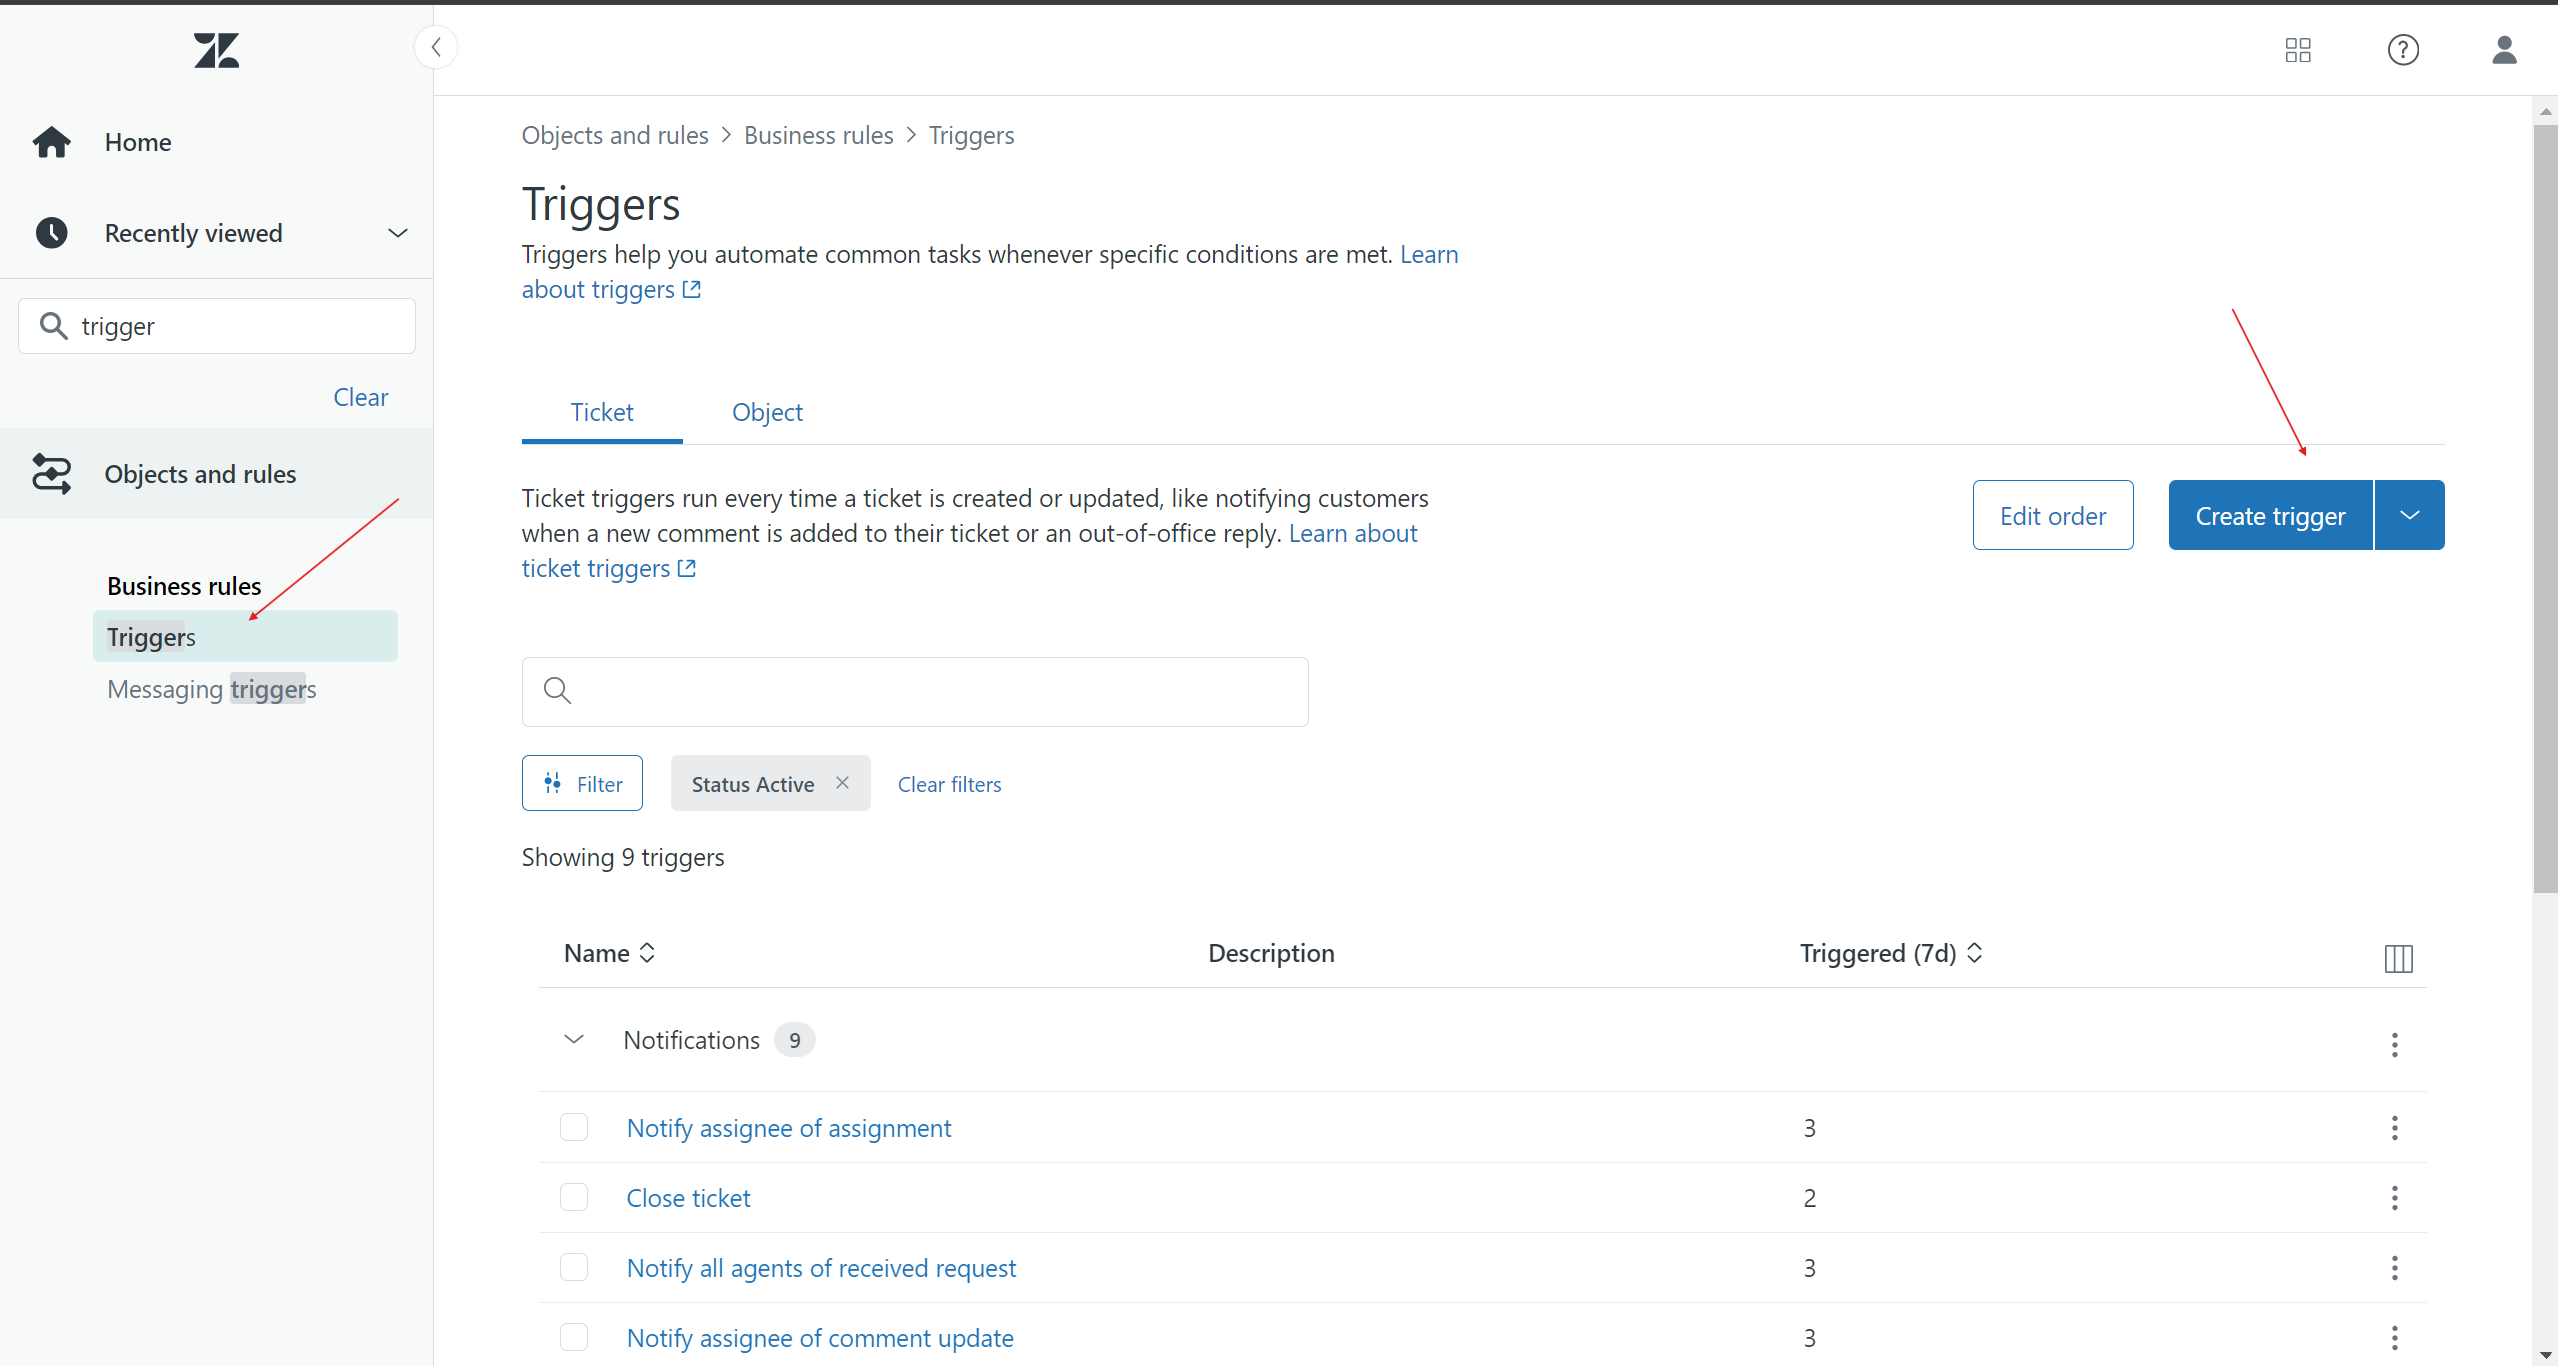
- Fill in the following details:
- Trigger Name: Resolve Kommunicate Conversation
- Conditions:
- Meet ALL of the following conditions:
- Ticket | Ticket Status | Changed to | Solved
- Meet ALL of the following conditions:
- Actions:
- Notifications > Notify Active Webhook:
- Webhook: Close Ticket
- Notifications > Notify Active Webhook:
While setting up the trigger, ensure you add the following JSON payload in the action:
 {
"events": {
    "ticketId": "{{ticket.id}}",
    "message": "CLOSE_TICKET",
    "userName": "<ZENDESK_USER_NAME>",
    "apiToken": "<API_TOKEN>",
    "subDomain": "<SUB_DOMAIN>"
   }
}
Note:
- The value of the 'message' key in the JSON payload should always be 'CLOSE TICKET'.
- Your <ZENDESK_USER_NAME> is the email address associated with your Zendesk account.
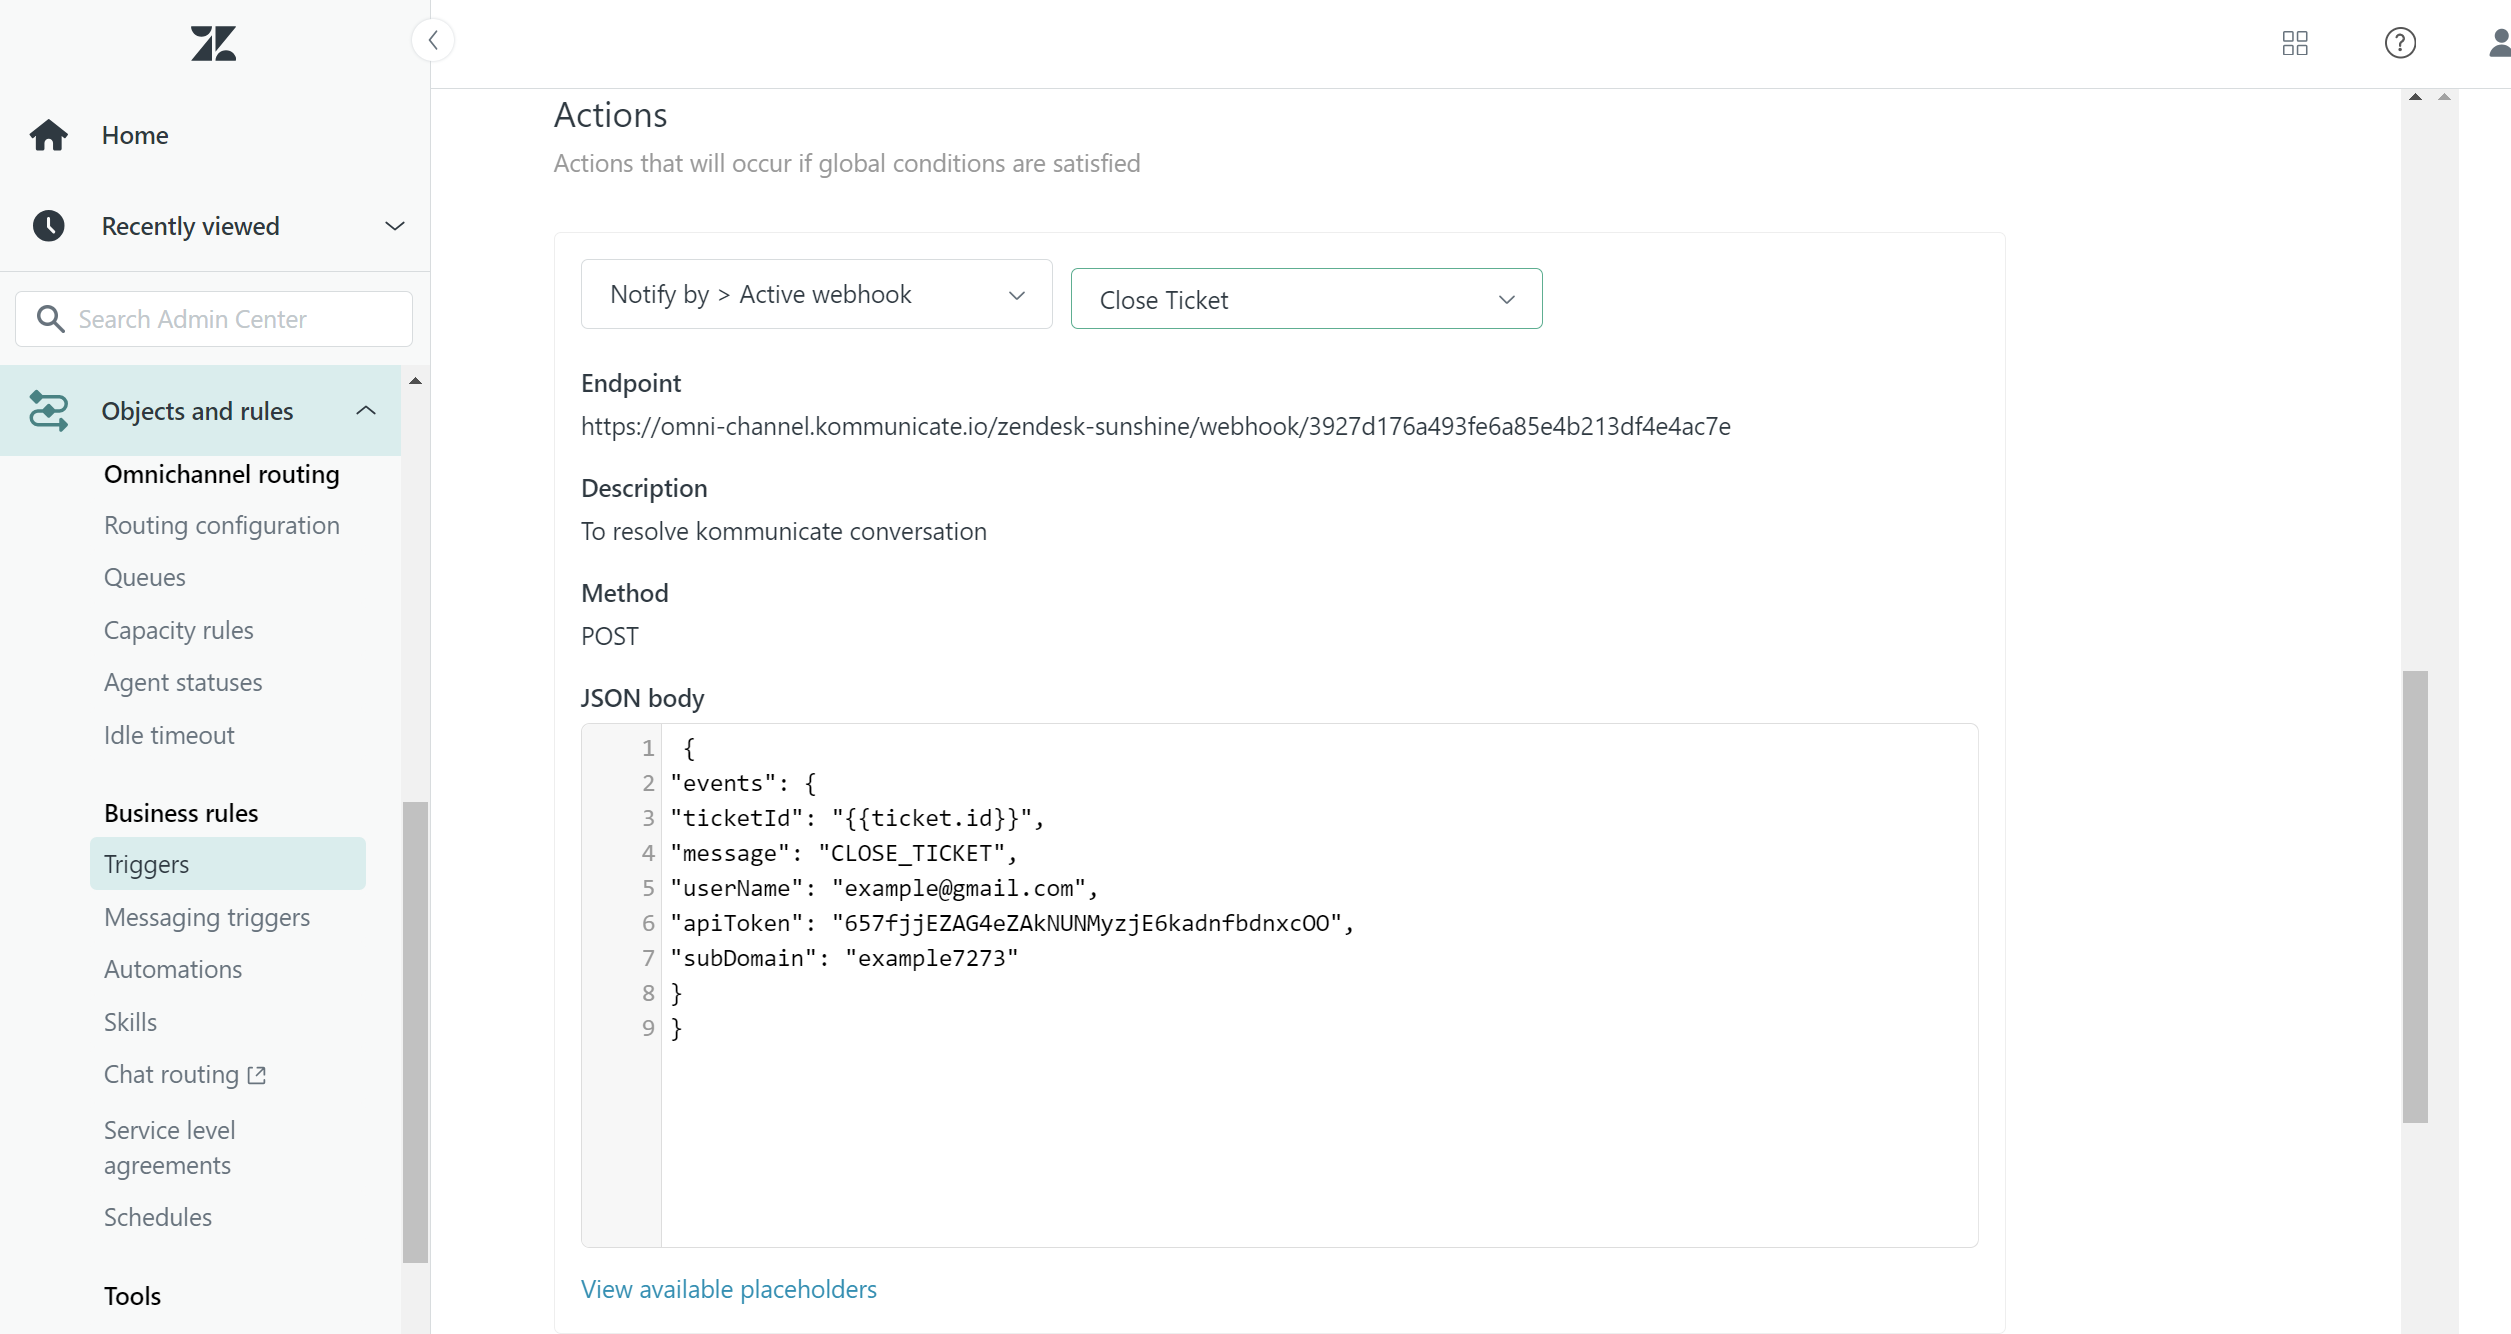
This payload ensures that the correct conversation ID is passed to the Kommunicate API for resolution.
