Integrate your bot with Kommunicate
Overview
Kommunicate has the provision to integrate any third-party (Dialogflow, Microsoft Bot Framework, IBM Watson etc) or custom-made bots in the website. You can deploy your bots to automate the repeated tasks and reduce the workload on your human agents. Bots can handle all the incoming conversations and when unable to answer, they can assign conversion to humans. In this section, learn how to:
- Integrate with any bot platform
- Assign all conversation to the bot
- Assign conversation to bot based on certain events
- Handoff the conversation to human if bot is not able to answer
- Use Rich messages to make conversations interactive
- Bot Events
Integrate with any bot platform
Kommunicate has the built in support for some bot platforms like Dialogflow and provides integration with other bot platforms by custom bot integration. Here is the list of supported platforms(we will add more platforms in due course) and the detailed instructions for integration:
Once you have integrated the bot you can let it handle all the incoming conversations. You can design your bot to collect the required detail and handoff the conversation to a human agent if its not able to answer.
Assign all the new conversations to the bot by default
Once you have integrated a bot, you need to enable the conversation rules for the bots.
Go to Kommunicate Dashboard -> Settings -> Conversation rules and enable "Assign new conversations to bot" and select the bot from drop down list.
Once this is done, all new incoming conversations will be assigned to the selected bot. You can test it out by starting a new conversation from your website and see how your bot reply. You can always design your bot to handoff the conversation to human agents if it's not able to answer.
Assign conversations to specific bots based on the webpage
If you wish to assign conversations to specific bots based on which webpage the conversation is started from, you can call Kommunicate.updateSettings() method in onInit callback function of our installation script.
For a brief detailed description of it please refer to Kommunicate update settings method.
Assign conversations to specific bots based on certain events
You can start group conversations with bot using startConversation(conversationDetail, callback).
  var conversationDetail = {
    "agentId": "<AGENT_ID>", // optional, if you don't pass agent Id, default agent will automatically get selected.
    "botIds": ["<BOT_ID>"], // array of bot Ids
    "assignee": "<ASSIGNEE>" //  agent/bot id who you want to assignee the conversation. if nothing is passed, conversation will be assigned to default agent.
  };
  Kommunicate.startConversation(conversationDetail, function (response) {
  console.log("new conversation created");
  });
Handoff the conversation to human if bot is not able to answer
Bot to human handoff comes in handy when the bot is unable to answer the customer or is unable to understand what the customer is saying. There are multiple ways of achieving this and it depends on the bot platform. You can refer to the following links to get detailed information on how to implement the handoff feature on different bot platforms.
- Bot to human handoff in Dialogflow
- Bot to human handoff in Amazon Lex
- Bot to human handoff in Custom Bot
Set-up the "Talk to Human" option
The user can be given an option to directly talk to a human agent.
Here is the example, when the user clicked on the button “Talk to Human” the bot handoff the conversation to the agent.
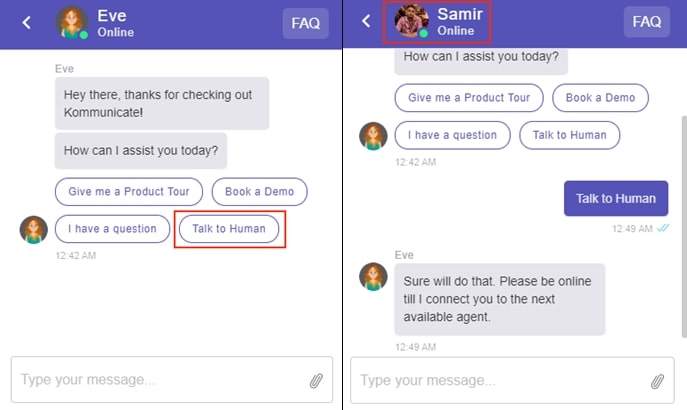
Below is the example for Dialogflow custom payload to add above shown menu option for transferring conversation to a human agent.
{
  "message": "How can I assist you today?",
  "platform": "kommunicate",
  "metadata": {
    "contentType": "300",
    "templateId": "6",
    "payload": [
      {
        "title": "Talk to Human",
        "message": "Talk to Human"
      }
    ]
  }
}
Here, the "Talk to Human" should be mentioned as follow-up intent and the following payload is passed to it.
{
  "metadata": {
    "KM_ASSIGN_TO": ""
  },
  "platform": "kommunicate",
  "message": "Please stay connected while we connect you to an agent..."
}
Set "KM_ASSIGN_TO": "<AGENT'S USER_ID>" if you want to assign the conversation to specific agent.
For Kompose, you have to create a button "Talk to Human", for that button create a separate intent and then add the above payload under the 'Custom' section
Use Rich messages to make conversations interactive
Your bot can be designed to send rich text messages to make conversations more interactive and useful. Here is a list of rich text messages supported by Kommunicate.
When setting an intent response in Dialogflow console, click on Add Response under DEFAULT tab and choose Custom Payload. Set below JSON as the response of the intent.
{
  "platform": "kommunicate",
  "metadata": {
  // valid JSON for any type of Kommunicate's Rich message.
  }
}
Pass any kind of Kommunicate supported Rich messages
Sample JSON for Suggested Replies
{
   "platform": "kommunicate",
   "metadata": {
       "contentType": "300",
       "templateId": "6",
       "payload": [{
           "title": "Yes",
           "message": "Cool! send me more."
       }, {
           "title": "No ",
           "message": "Don't send it to me again"
       }]
   }
}
Bot Events
Bot Events signify communication that can't be captured easily through text or voice. Examples include, clicking a 'Buy' button, adding an item to the shopping cart.
If you are using Dialogflow then visit Dialogflow Custom Events to know more.
Trigger event on bot platform
Call the following function to trigger an event on the bot platform.
var messagePxy = {
    "type": 5,
    "contentType": 10,
    "message": "Event: " + <EVENT_NAME>,
    "groupId": KommunicateGlobal.CURRENT_GROUP_DATA.tabId,
    "metadata": {
        "category": "HIDDEN",
        "KM_TRIGGER_EVENT": <EVENT_NAME>
    },
    "source": 1
};
Kommunicate.sendMessage(messagePxy);
For example if we want to trigger the welcome event, this is how we can do.
var messagePxy = {
    "type": 5,
    "contentType": 10,
    "message": "Event: " + "WELCOME",
    "groupId": KommunicateGlobal.CURRENT_GROUP_DATA.tabId,
    "metadata": {
        "category": "HIDDEN",
        "KM_TRIGGER_EVENT": "WELCOME"
    },
    "source": 1
};
Kommunicate.sendMessage(messagePxy);
Replace: <GROUP_ID> with the group id of the conversation in which you want to trigger the message.
GroupId value will be available in ’response’ of Kommunicate.startConversation call. Replace <EVENT_NAME> with the bot platform event name.
Working with Actions
Actions are the triggers which tell Kommunicate to perform certain tasks. Kommunicate exposes these actions to give more powers to your bot. The example of the actions are:
- Resolve a conversation
- Handoff a conversation to an agent
- Fetch the availability status of agents
- Update user detail
Your bot can make a action request by passing the action name in the actionRequest parameter in metadata.
Actions are supported with all bot platforms. In case of Dialogflow integration, the metadata can be set in custom payload. In case of custom bot platform it can be returned as the webhook response.
If you are working with Dialogflow fulfillment make sure you are using the correct format as mentioned here.
Resolve the conversation from bot
A bot can be configured to resolve the conversation when it is appropriate to do. It can be done by making an action request with the value resolveConversation to Kommunicate. Once the request is received Kommunicate will close the current conversation, notify the user and conversation will be moved to the resolve section of Kommunicate dashboard.
Here is how action request for resolving the conversation look like:
{
  "platform": "kommunicate",
  "message": "We are resolving this conversation. Please reach out to us in case of any more queries.",
  "metadata": {
    "actionRequest": "resolveConversation"
  }
}
Update user detail
You can design your bot to collect the user's detail and get it updated in kommunicate dashboard by making an action request. Follow below steps to set up the action request in Dialogflow.
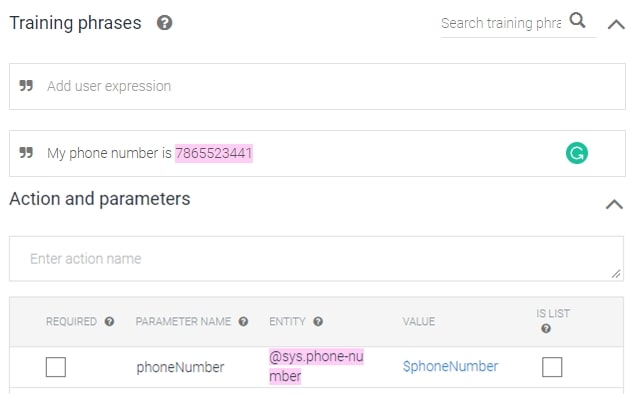
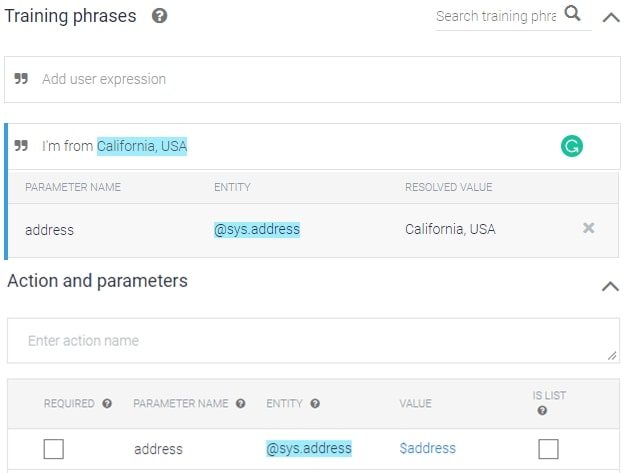
- Extract the user detail into Dialogflow parameters. The parameter names are predefined by Kommunicate. Here is how it looks in dialogflow console.
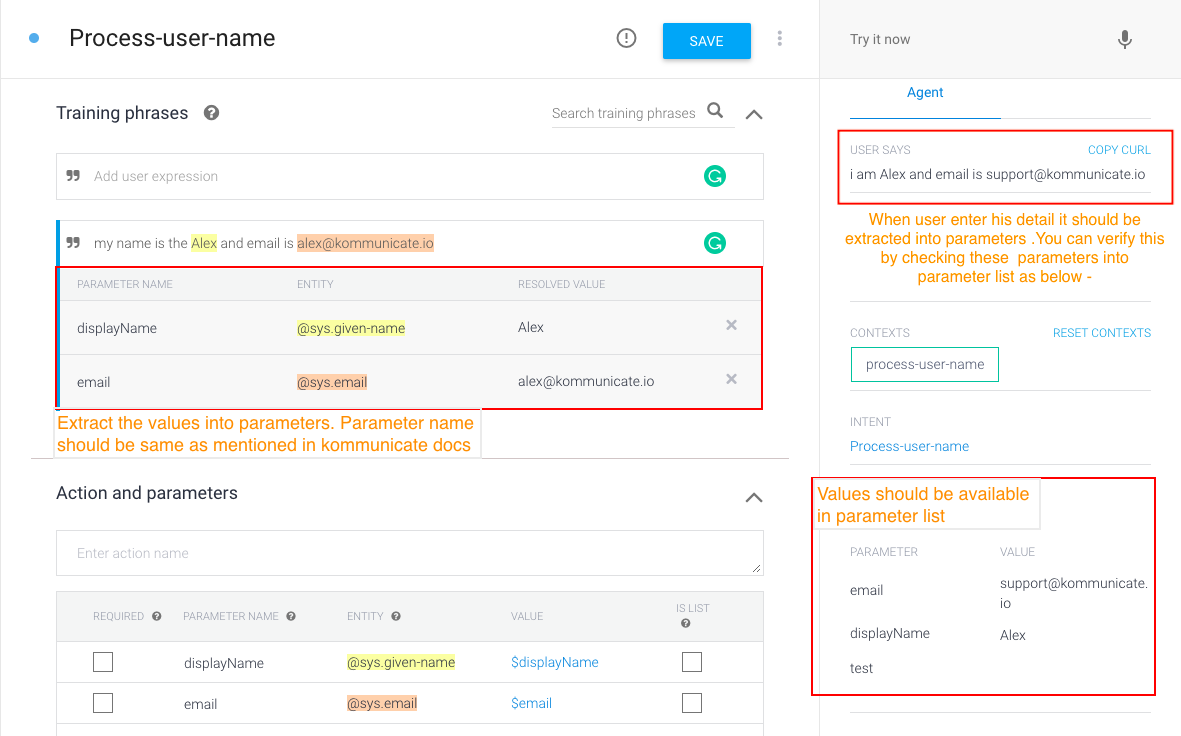
Below is the list of supported parameters:
| Parameter | Description |
|---|---|
| If this parameter is present, Kommunicate updates the user's email with this parameter's value. | |
| displayName | Updates the user's display name with this parameter's value. |
| imageLink | Updates the user's display picture with this parameter's value. |
| phoneNumber | Updates the user's phone number with this parameter's value. |
| metadata | Other custom parameters you want to get update in user info section on dashboard. |
- Set below JSON as custom payload in Dialogflow response section
{
    "message": "Thanks for the detail. Let me update it in the database",
    "platform": "kommunicate",
    "metadata": {
        "actionRequest": "updateUserDetail",
        "payload": {
            "email": "$email",
            "displayName": "$displayName",
            "imageLink": "$imageLink",
            "metadata": {
                "customParameter-address": "$customParameter-address",
                "customParameter-age": "$customParameter-age"
            }
        }
    }
}
Note that the user detail will be updated only if your Dialogflow bot is capable of extracting the values from user phrases and populate it in parameters. You can test this from Dialogflow try it out section. trigger the intent and check the parameter list on the bottom-right corner, if above mentioned parameters present then only kommunicate can update the user's detail.
The same can be achieved by using update user API but it requires you writing a webhook and call the user Update API with the collected information.
Below mentioned are some examples to extract user details like name, email, phone number, etc and get it updated on the Kommunicate dashboard
Example : To extract the username
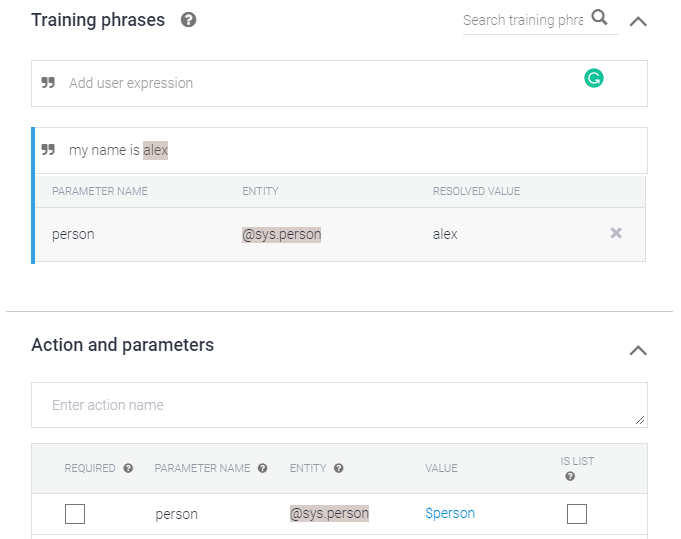
{
    "message": "Thanks for the details. Let me update it in the dashboard",
    "platform": "kommunicate",
    "metadata": {
        "actionRequest": "updateUserDetail",
        "payload": {
            "displayName": "$displayName"
        }
    }
}
Example : To extract the user email
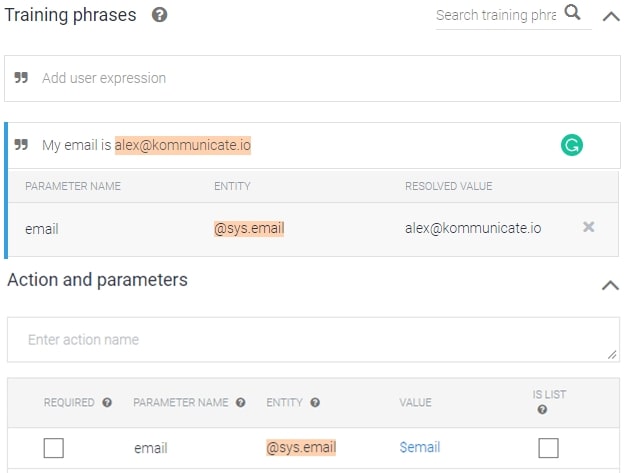
{
    "message": "Thanks for the details. Let me update it in the dashboard",
    "platform": "kommunicate",
    "metadata": {
        "actionRequest": "updateUserDetail",
        "payload": {
            "email": "$email"
        }
    }
}
Example : To extract the user phone number
{
    "message": "Thanks for the details. Let me update it in the dashboard",
    "platform": "kommunicate",
    "metadata": {
        "actionRequest": "updateUserDetail",
        "payload": {
            "phoneNumber": "$phoneNumber"
        }
    }
}
Example : To extract the custom parameters like address
The custom parameters you want to get update in the user info section on dashboard should be passed inside the "metadata".
{
    "message": "Thanks for the details. Let me update it in the dashboard",
    "platform": "kommunicate",
    "metadata": {
        "actionRequest": "updateUserDetail",
        "payload": {
            "metadata": {
                "address": "$address"
            }
        }
    }
}
Auto-tagging the conversation through bot
A bot can be configured to auto-tag the conversation when it is appropriate to do. It can be done by making an action request with the value addTags and the tags to be added. Once the request is received the bot will auto-tag the conversation in the dashboard.
Here is how action request for auto-tagging the conversation looks like:
{
  "platform": "kommunicate",
  "metadata": {
    "actionRequest": "addTags",
    "payload":{
    "tags":["Marketing","sales","tech"]
    }
  }
}
In the below example, 'Marketing' tag was used for the intent and the bot tagged the conversation as 'Marketing' in the dashboard when the user phrase got triggered.
