
Dialogflow Integration
Overview
Kommunicate provides a codeless integration with Dialogflow. You can easily integrate your Dialogflow agent from the AI agent section in the Kommunicate dashboard.
- Dialogflow ES Integration
- Dialogflow CX Integration
- Rich Messages
- Pass Custom data to AI agent platform
- Welcome message from AI agents
- Skip Dialogflow Welcome message
- Process documents attached by user
- Make your AI agent multilingual
- Working with Dialogflow fulfillment
- Working with custom actions
- Handoff the conversation to human if AI agent is not able to answer
- Extract WhatsApp Number in Dialogflow CX
- Dialogflow CX webhook
Dialogflow ES Integration
- Navigate to the Dialogflow console
- Start by building a new agent (AI agent), select an existing project, or leave it empty to create a new one.
- Create the intents (questions and answers) as per your business requirements.
- After setting up the intents, go to Settings, select "View All Agents," and choose the recently created agent. Click on the project ID on the subsequent page.


- Enable the Dialogflow API for the project.


- Click on Service Accounts from the IAM & Admin Panel.

- Click on Create a Service Account. After naming the account, select Role as a Owner.

- On the next page, click on three dots and select Manage Keys. Now you can add a new key and choose type as JSON.

The Private JSON key will be downloaded on your system.
As a final step, go to the Kommunicate dashboard, upload the key, and follow the steps to set up the AI agent.
Dialogflow CX Integration
- Navigate to Dialogflow Console and click on the CX version. On the next page, create a new or select an existing project.


- Create an agent


- Build your Dialogflow CX AI agent
Customize your Dialogflow CX AI agent to meet your specific requirements. Once the AI agent building is finished, access the Agent Settings option to generate a service account.


- Create a Service Account and enable Dialogflow API

- In this step, assign a role to the service account by selecting Owner/Editor as the designated role.

- Click on Manage Keys and Add a new JSON key.


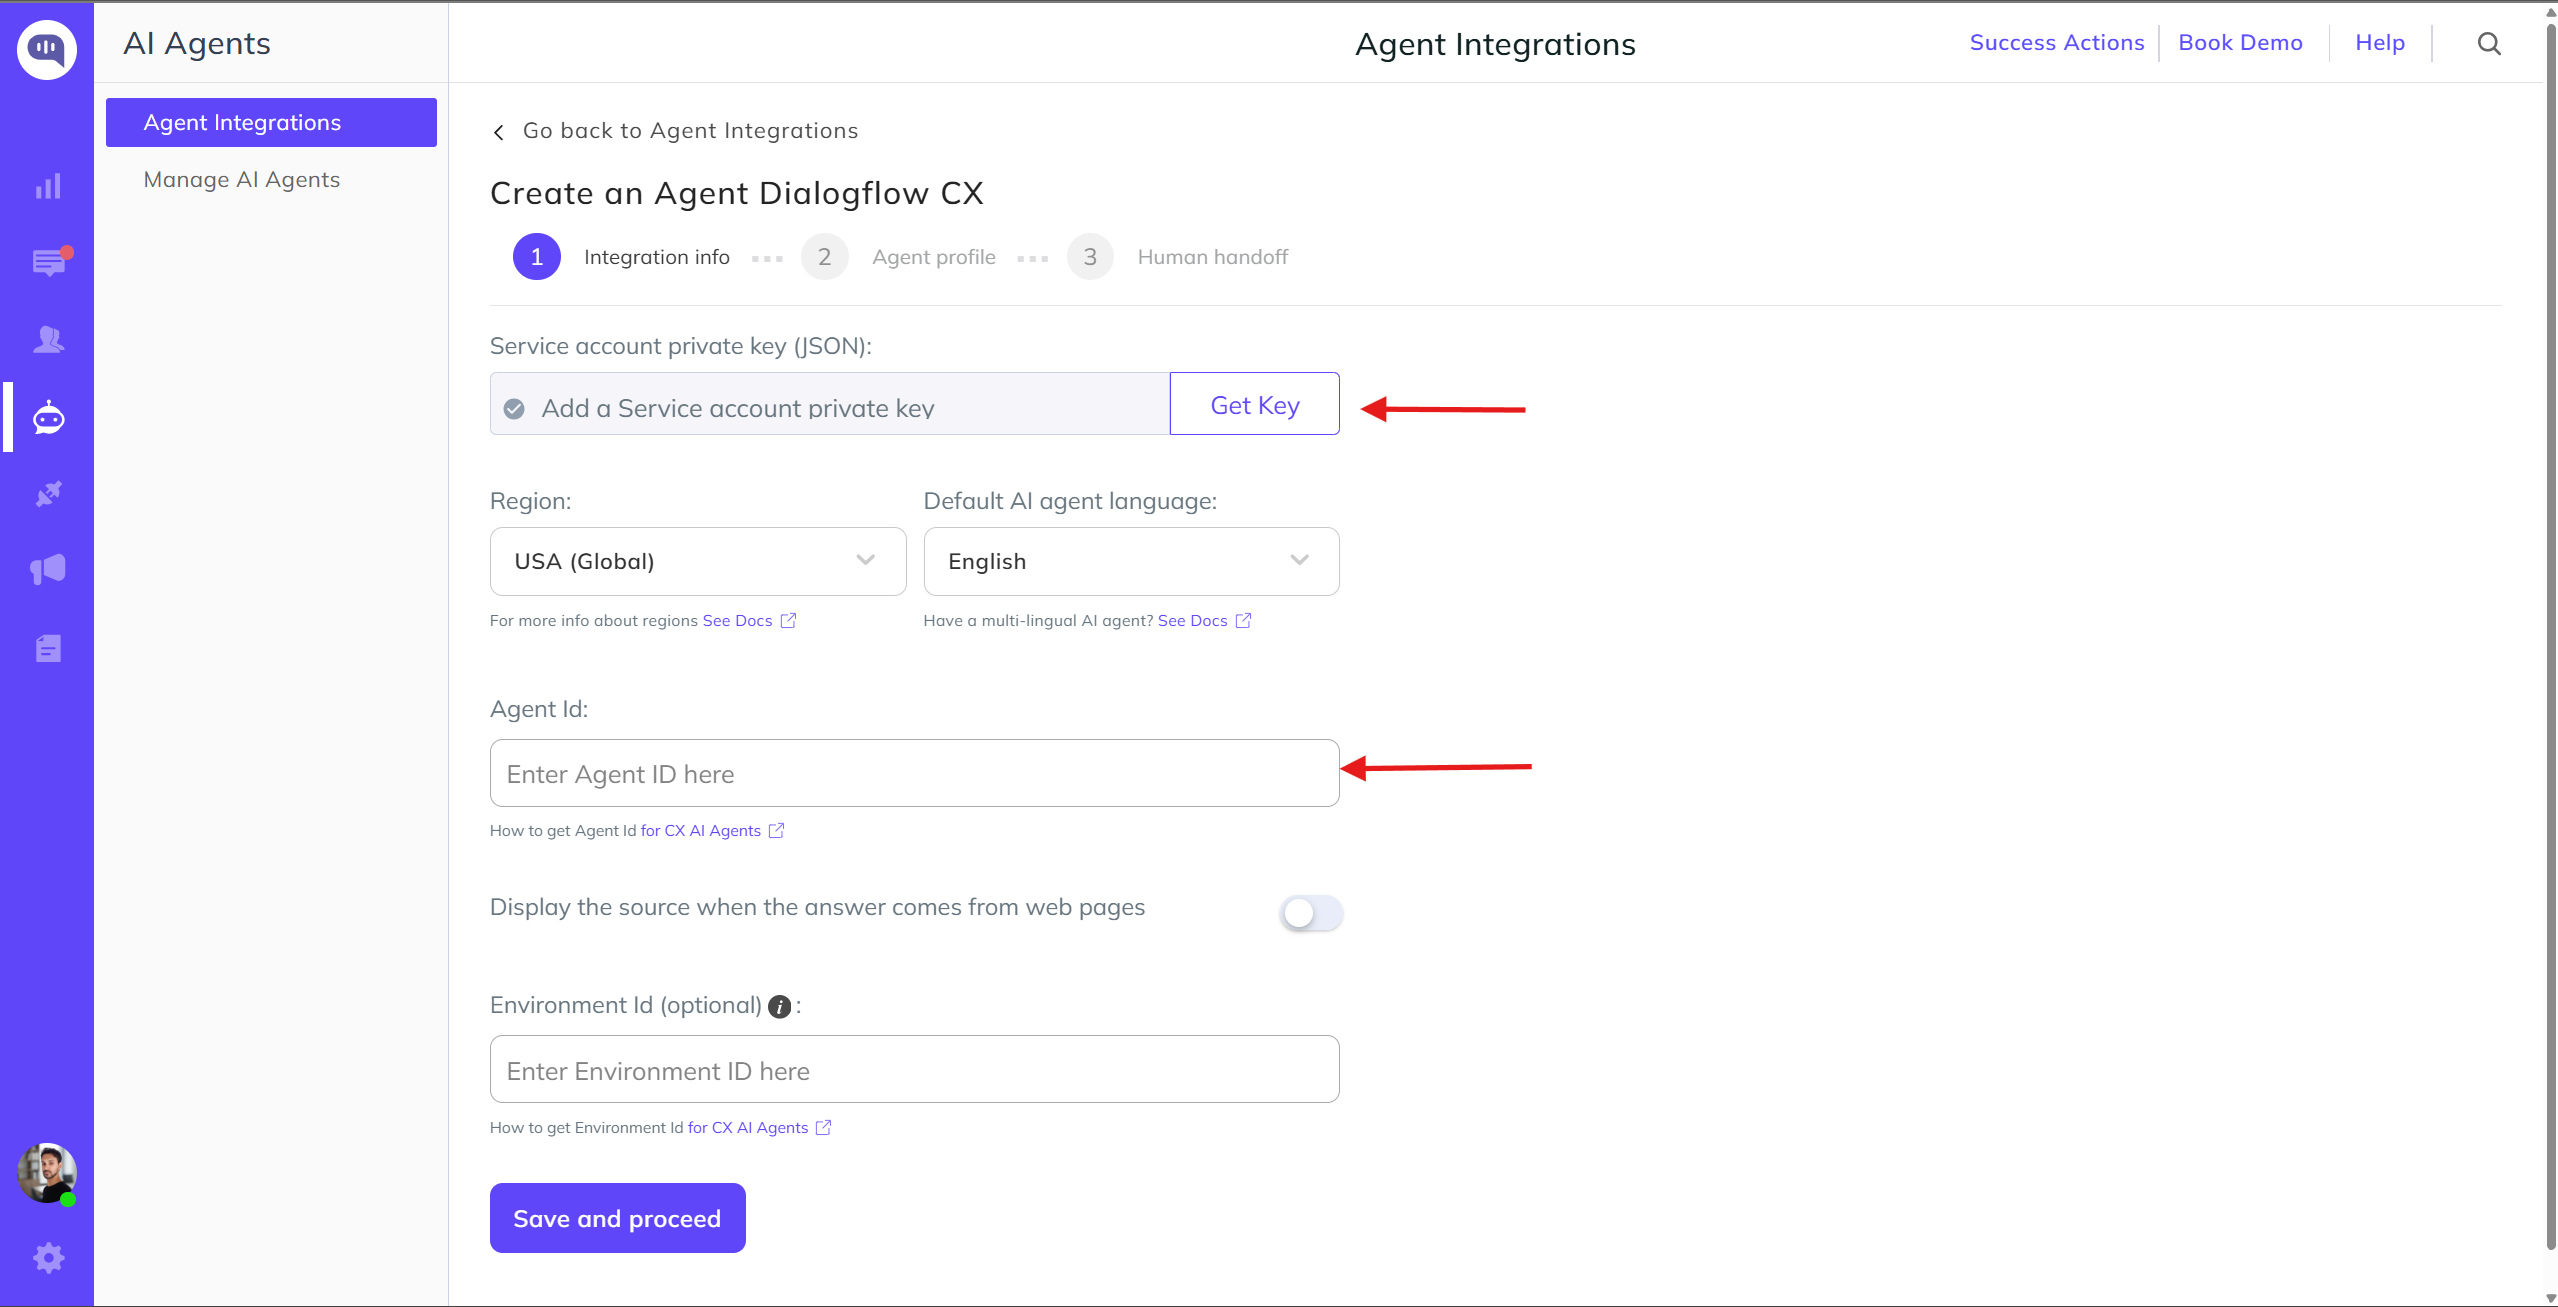
Upon clicking create a new key, a JSON file will be downloaded. Upload the service account key file in the Kommunicate dashboard, along with the Agent ID.
to get the Agent Id
Go to Dialogflow CX console >> Select the Project >> In the Agent you have created 'Copy ID'
It will be in the following format, projects/test-covid-rwvr/locations/global/agents/e2c5d8a3-f416-4f32-bfc9-d986d540abd here the Agent Id is e2c5d8a3-f416-4f32-bfc9-d986d540abdb Copy the Agent Id

Enter the Agent Id in Kommunicate Dashboard and then Save and proceed. Ensure that the Region and Default AI agent language in the Kommunicate dashboard are the same in your CX Console.
to get the Environment Id
Open the Dialogflow CX Console >> Choose your GCP project >> Select your agent >> Click the Manage tab.
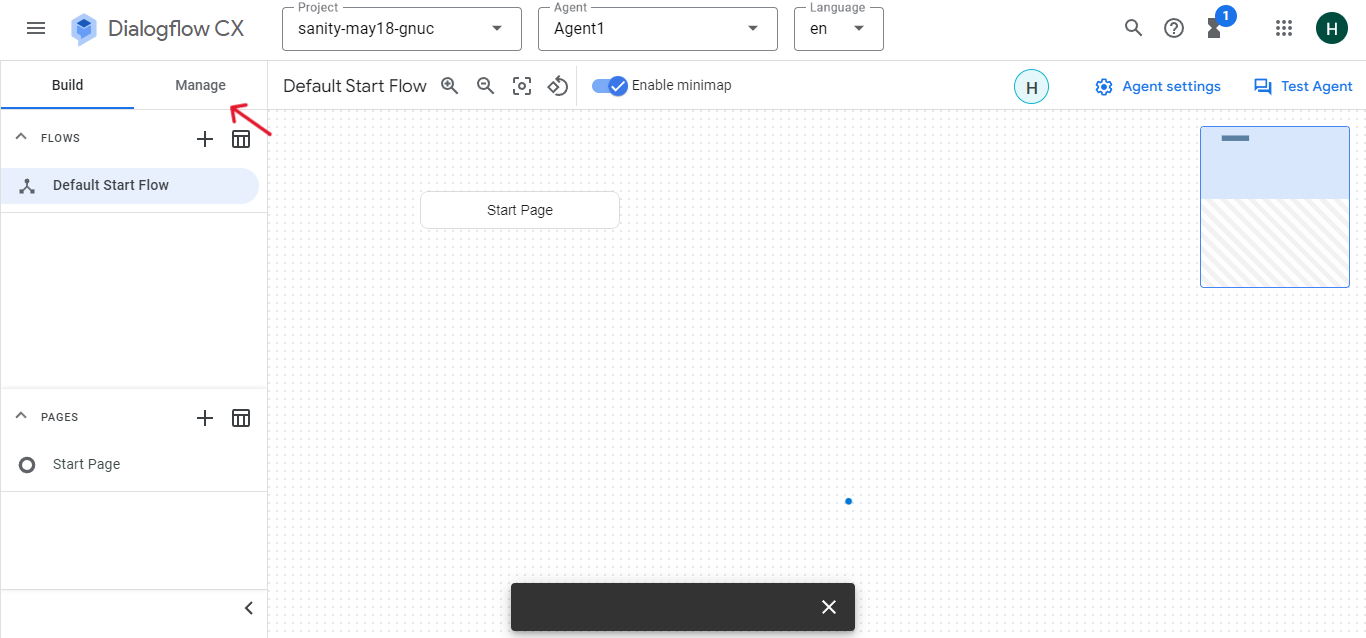
Click Environments

Create button and provide information
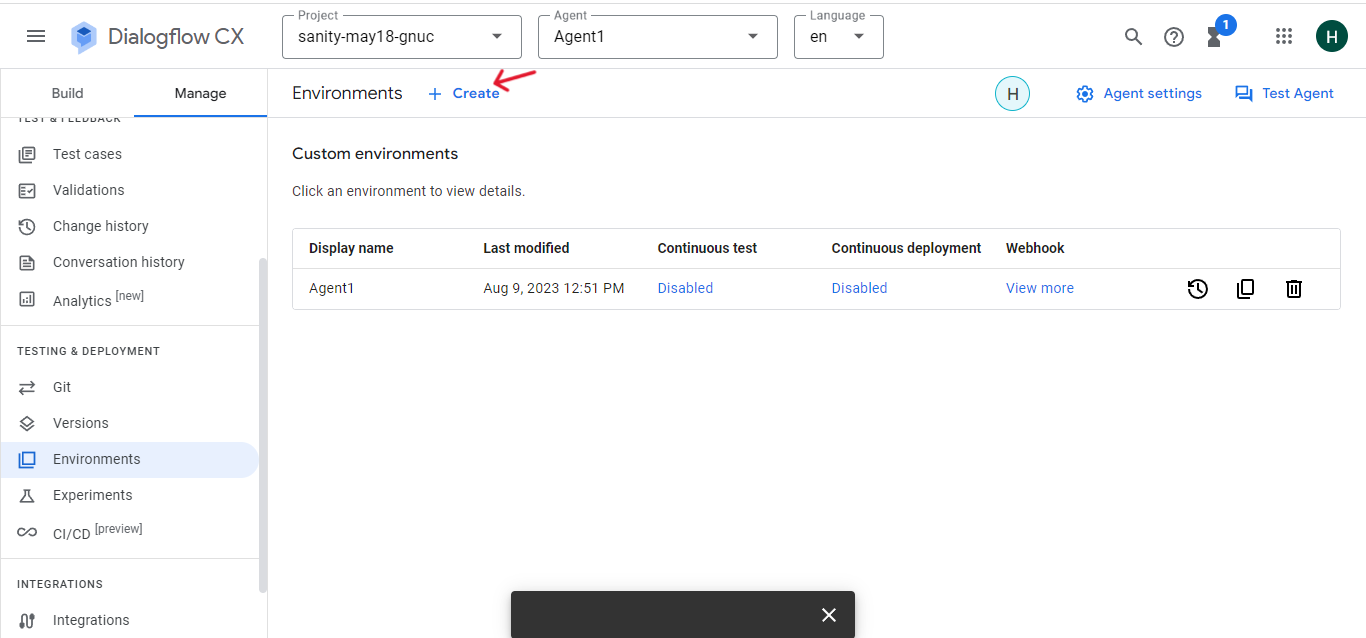
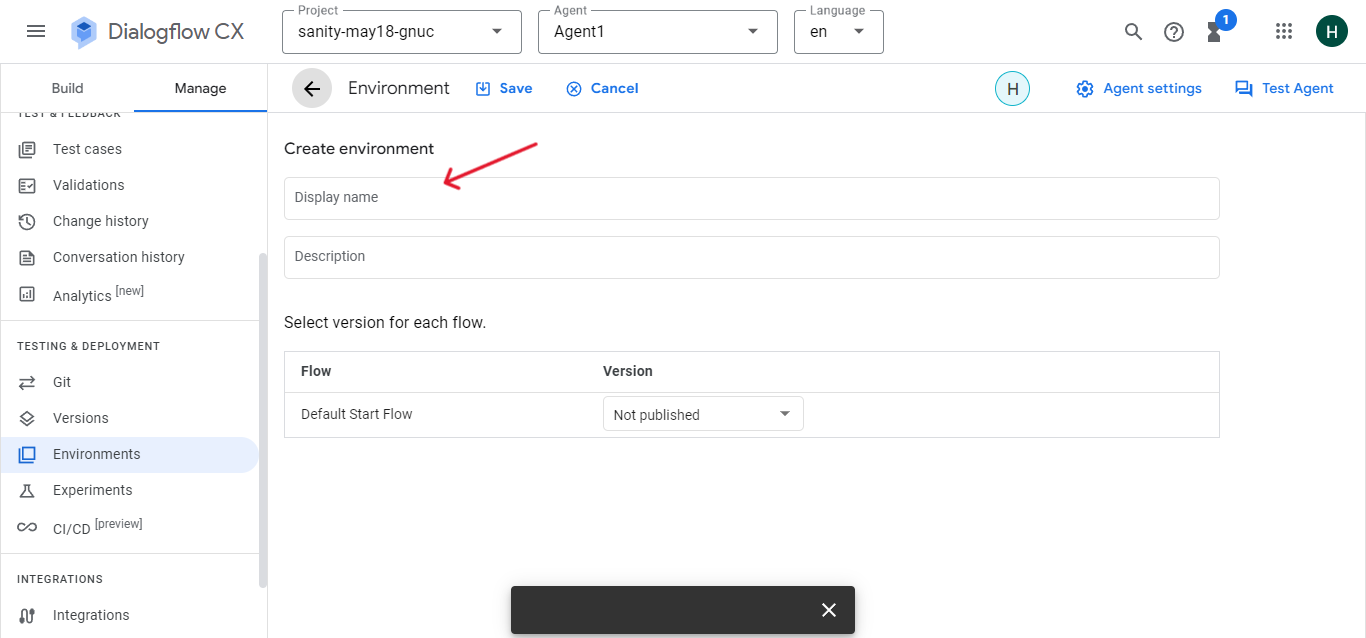
To copy an environment resource name that includes the environment ID, click the copy button near the right side of an environment in the list.
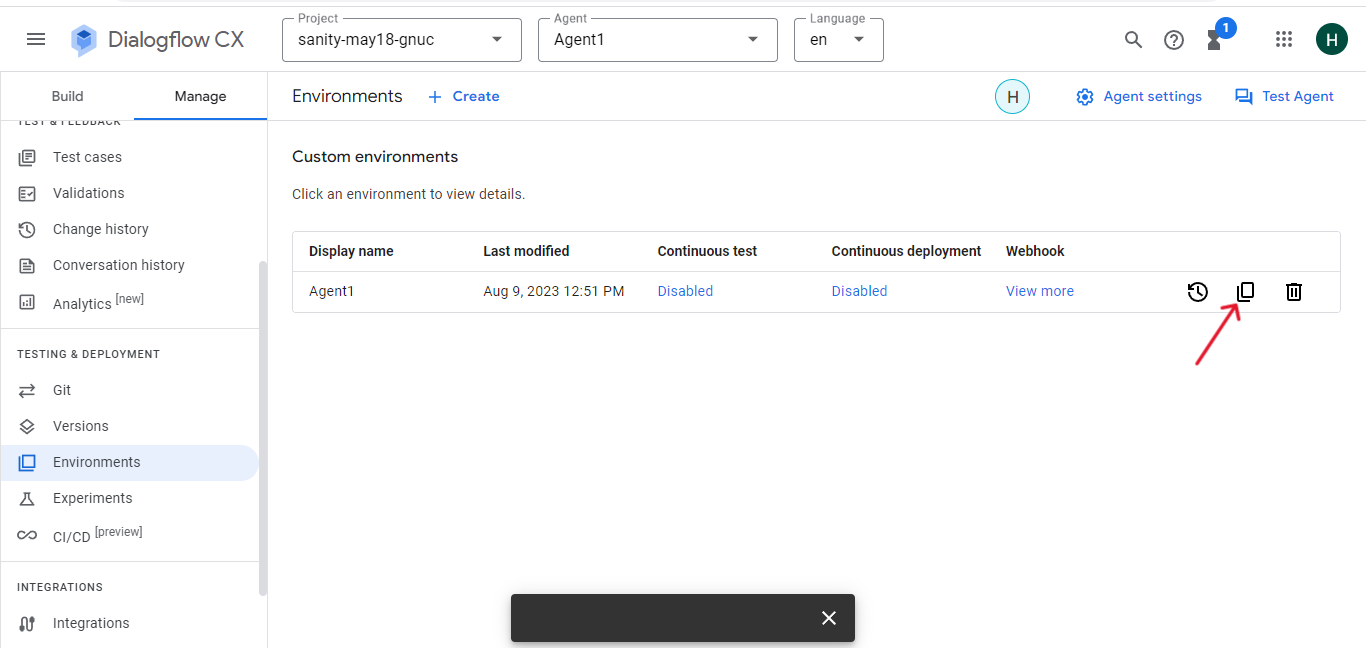
The environment name is displayed as follows:
projects/name-of-project/locations/us-central1/agents/54ccf3c4-6c41-9664-4b14-a40f5f0775b6/environments/507ba9c1-c034-8747-bd72-c939698c057e
Here the environment Id is 507ba9c1-c034-8747-bd72-c939698c057e
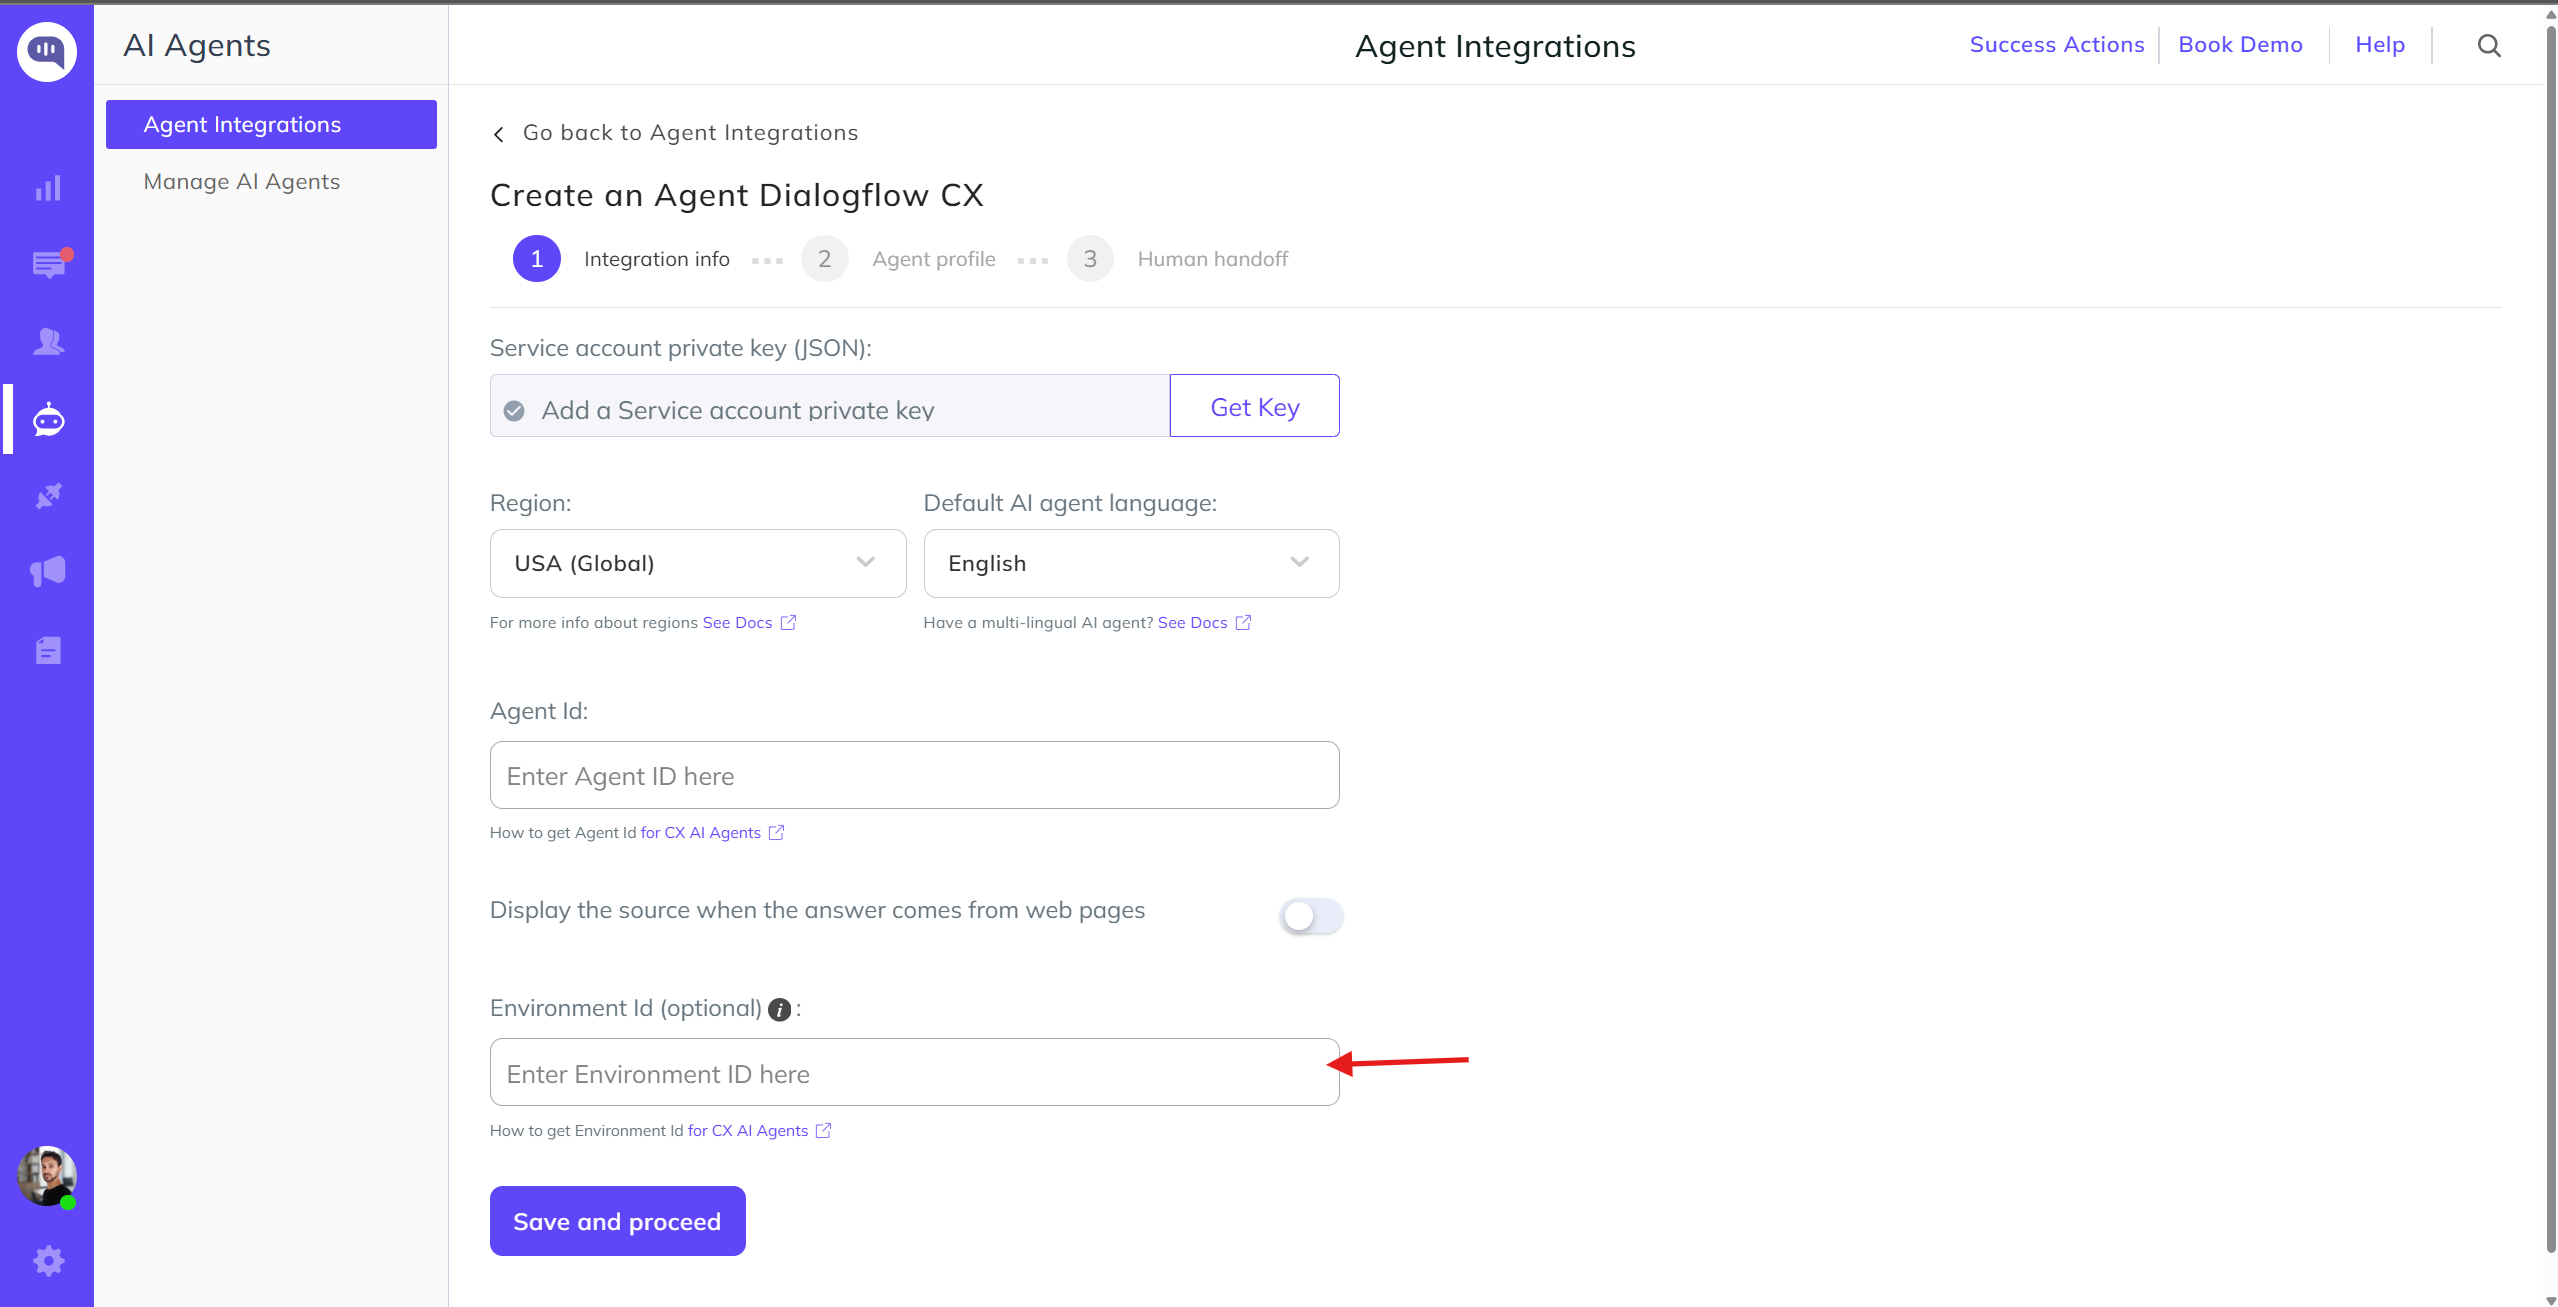
Enter the Environment Id in Kommunicate Dashboard and thenSave and proceed
On successful integration, the AI agent will be given an ID(botId) and will be listed under the Manage AI agents section. The AgentID will be used to identify the AI agent in the Kommunicate system.
rich messages
You can implement the rich messages using Google Assistant and the Custom payload.
Google Assistant
Use the Google Assistant to implement rich messages as it is an easier and simpler way to add rich messages without writing any code.
check out the following flow to add the Rich Messages:
Suggestion Chips
User Input Section

Select Google Assistant
Visit the Response section on Dialogflow and select the Google Assistant as given in the image below:

Add rich message Type

Add Suggestion Chips
Add the type of rich message you want to use, we have selected the suggestion chips.

Add the buttons as explained in the images, end-user will select one of the them.
Suggestion chips on widget

Error you might come across during the implementation

Link Button
Create a link button to navigate users to specified links. For example if you click on Rich Messaging (Rich messaging is a suggestion chip shown in above example) it will redirect the user to specified link.
Follow the given instructions to create the Link button:
Create the new intent with the training phrase Rich Messaging and add the link button as given in the following image:

Select the link button as a rich message type as shown below

Link button on widget

Dialogflow custom payload
Pass the Rich Messages metadata as custom payload in Dialogflow to render Rich Messages while using a Dialogflow AI agent. See how to set up Rich Messages in Dialogflow AI agent here.
Dialogflow fulfillment
Rich messages can be used with the Dialogflow fulfillment.
- Rich messages with custom webhook
- Rich messages with inline editor(using dialogflow fulfillment node library)
here are the code samples for rich messages with
dialogflow-fulfillmentlibrary.
Send message API
You can use Send message API to add Rich Messages.
Pass custom data to AI agent platform
Note: This feature is supported by only Dialogflow V2 APIs and only works if you're using dialogflow Fulfillment Library to handle your dialogflow AI agent requests. To know more about dialogflow fulfillment you can check out the official documentation.
Kommunicate allows you to send custom data to your Dialogflow AI agent. Create a chatContext object (having all the data you wish to pass to AI agent platform) and update it to Kommunicate settings by calling Kommunicate.updateChatContext method.
Custom data can be passed to AI agent platform using rich message as well, see this page to view more details.
The chat context object will be sent along with every message user sends. The best place to call this method is the onInit method you pass in the installation script.
Note: For ReactJS use -
window.Kommunicate.updateChatContext(chatContext);
var chatContext = {
  "key1":"value1",
  "key2":"value2"
}
Kommunicate.updateChatContext(chatContext);
Dialogflow will send this data in the configured webhook in originalDetectIntentRequest param.
"originalDetectIntentRequest": {
   "payload": {
     "key1": "value1",
     "key2": "value2"
   }
 }
Getting response using Inline Editor
The user details passed in chatContext object from Kommunicate chat widget can be accessed from Dialogflow's fulfillment code. This data is available in the request object as part of originalDetectIntentRequest parameter.
Example
...
exports.dialogflowFirebaseFulfillment = functions.https.onRequest((request, response) => {const agent = new WebhookClient({request,response});
            console.log('Dialogflow Request headers: ' + JSON.stringify(request.headers));
            console.log('Dialogflow Request body: ' + JSON.stringify(request.body));
            console.log('Data passed as chatContext from Kommunicate is: ' +JSON.stringify(request.body.originalDetectIntentRequest));
...
Follow the instructions in the respective platform section to accomplish the same on mobile SDKs. for more information, check the following
Welcome message from AI agents
When a conversation is routed through the AI agent, it will trigger a WELCOME event to the Dialogflow AI agent. You can enable default welcome intent in Dialogflow or create a custom event WELCOME.
This message is different from the Welcome Message you set in Kommunicate dashboard. If Welcome Message for AI agent and humans (configured from the dashboard) both are enabled, both welcome message will be sent to the users. We recommend disabling the Welcome Message from the dashboard in this case.
Custom Welcome messages from AI agents
When a new conversation is started and routed through the Dialogflow AI agent, Kommunicate triggers the Default Welcome Intent configured in Dialogflow console. However, you can customize a welcome message and set a different welcome message for your conversations dynamically. The events can be created on the Dialogflow console and pass the event in customWelcomeEvent parameter.
call this parameter in the onInit method you pass in the installation script.
...
onInit: function (status, data) {
            if (status == "success") {
                Kommunicate.updateSettings({ "customWelcomeEvent": "welcome_event_for_home_page" });
            }
        }
...
User's can update this setting dynamically when certain events occur on their website. This setting will be applied to all the new conversations that started after the update i.e. The conversation started after the setting is updated will trigger the new welcome event.
Also, this setting can be used to show different welcome messages on different pages of your website.
Skip Dialogflow welcome message
Skip the 'WELCOME' event from dialogflow by setting
"skipBotEvent":'["WELCOME_EVENT"]'
Skip Dialogflow welcome message through Settings
var defaultSettings = {
      "skipBotEvent": '["WELCOME_EVENT"]',
};
Kommunicate.updateSettings(defaultSettings);
Skip Dialogflow welcome message for a specific conversation
var conversationDetail = {
    "skipBotEvent":'["WELCOME_EVENT"]'
};

Kommunicate.startConversation(conversationDetail, function (response) { });
Send attachments and location to AI agent
When a user attaches a file or shares location, Kommunicate dispatches an event KOMMUNICATE_MEDIA_EVENT to your AI agent along with the attached file information. To receive the attachment detail you have to add KOMMUNICATE_MEDIA_EVENT to an intent and enable the fulfillment. This configuration looks like below in dialogflow dashboard:

If you have enabled the fulfillment in Dialogflow, you will receive the following data in originalDetectIntentRequest parameter.
This is sample JSON for file attachment:
{
    "attachments": [{
        "payload": {
            "size": "Size in bytes",
            "name": "Name of the file",
            "url": "URL of the file"
        },
        "type": "image/png" // media type (in form of type/subtype) . Use the regex 'type/*' to get the generic type
    }]
}
Sample JSON for the location message
{
    "attachments": [{
        "payload": {
            "lat": "Latitude",
            "lon": "Longitude"
        },
        "type": "location"
    }]
}
Make the AI agent multilingual
Note: Multilingual agents are supported only with Dialogflow V2 APIs
Kommunicate allows you to integrate your multilingual AI agent so that your AI agent can reply in the user's language. You need to pass the user's language tag to Kommunicate.
Language tags follow the HTTP/1.1 specification, section 3.10. Kommunicate will send this information with every message to the integrated AI agent platform. You can use the following method to update the user's language:
Kommunicate.updateUserLanguage("en-US");
You can call this method when kommunicate SDK is initialized. For example, if you are using web SDK you can put this inside onInit callback function in Kommunicate installation script.
Ask users their preferred language
You can configure your AI agent to let the user select their preferred language. Set below JSON as custom payload in dialogflow.
{
  "message": "Please select your language",
  "platform": "kommunicate",
  "metadata": {
    "contentType": "300",
    "templateId": "6",
    "payload": [
      {
        "title": "Hindi",
        "message": "Hindi",
        "updateLanguage": "hi"
      },
      {
        "title": "English",
        "message": "English",
        "updateLanguage": "en"
      }
    ]
  }
}
you can pass any language tag supported by dialogflow in updateLanguage parameter.
Multilingual Dialogflow agents
When you integrate a Dialogflow AI agent, Kommunicate sets US English(en-US) the default language. This setting will be overridden by the user's language. Here is the list of languages supported by Dialogflow.
You need to pass the appropriate language tag in Kommunicate.updateUserLanguage("languageTag") method. Once this is set, only intents created in this language will be matched against user queries. If none of the intents is matched, Default Fallback Intent will be triggered. Here is more information on creating multilingual agent in Dialogflow.
Update user'S timezone
Dialogflow provides system entities to parse the data from user's query. When working with date-time you might need to consider the users timezone and send it to dialogflow. This can be done by updating the user's timezone by calling Kommucniate.updateUserTimezone method. You need to pass the timezone id as registered in IANA timezone db.
Kommunicate.updateUserTimezone("asia/calcutta"); // Kommunicate supports only timezone ids registered in IANA timezone database.
You can call this method when kommunicate SDK is initialized. For example, if you are using web SDK you can put this inside onInit callback function in Kommunicate installation script.
Working with Dialogflow fulfillment
This feature is only available with Dialogflow V2 APIs.
Fulfillment lets your Dialogflow agent call business logic on an intent-by-intent basis. Dialogflow supports two ways to configure the fulfillment for an agent. More information on the fulfillment configuration is available on Dialogflow docs.
- Custom webhook
- Create a webhook with the inline editor
Custom webhook
A webhook is a web server endpoint that you create and host. When an intent with fulfillment enabled is matched, Dialogflow will make an HTTP POST request to your webhook with a JSON object containing information about the matched intent. And your webhook should respond back with instructions for what Dialogflow should do next. More about the request and response format is available in Dialogflow docs. Then Dialogflow wraps webhook response into the response object depending on the API version you are using and send it to the client.
Kommunicate looks for the fulfillmentMessages array in webhook response. The element in this array can be a text message or a rich message supported by kommunicate. Every element is treated as an independent message and rendered into UI according to the data present.
Below is the sample fullfilmentMessage array for Dialogflow V2 APIs:
{
    "fulfillmentMessages": [{
        "payload": {
            "message": "Object1- this object renders the link button on the UI",
            "platform": "kommunicate",
            "metadata": {
                "contentType": "300",
                "templateId": "3",
                "payload": [{
                        "type": "link",
                        "url": "www.google.com",
                        "name": "Go To Google"
                    },
                    {
                        "type": "link",
                        "url": "www.facebook.com",
                        "name": "Go To Facebook"
                    }
                ]
            }
        }
    }, {
        "payload": {
            "message": "Object2 - this object renders this text string on the UI",
            "platform": "kommunicate"
        }
    }]
}
Create a webhook with the inline editor
Dialogflow provides some libraries designed to assist with building a fulfillment webhook. Below is the node js function with dialogflow fulfillment library which render the specified rich messages on kommunicate chat UI.
'use strict';

const functions = require('firebase-functions');
const {WebhookClient} = require('dialogflow-fulfillment');
const {Payload} = require('dialogflow-fulfillment');

process.env.DEBUG = 'dialogflow:debug'; // enables lib debugging statements

exports.dialogflowFirebaseFulfillment = functions.https.onRequest((request, response) => {
  const agent = new WebhookClient({ request, response });
  function welcome(agent) {
    agent.add(new Payload("PLATFORM_UNSPECIFIED", [{
      "message": "Do you want more updates?",
      "platform": "kommunicate",
      "metadata": {
        "contentType": "300",
        "templateId": "6",
        "payload": [
          {
            "title": "Yes",
            "message": "Cool! send me more."
          },
          {
            "title": "No ",
            "message": "Don't send it to me again"
          }
        ]
      }
    }]));
  }

  let intentMap = new Map();
  intentMap.set('Default Welcome Intent', welcome);
  agent.handleRequest(intentMap);
});
Here are the more samples for different rich messages.
Note: This payload is only for the inline editor. For a webhook, use the custom webhook payload.
Working with custom actions
Actions are the triggers which tell Kommunicate to perform certain tasks. An AI agent can request an action for Kommunicate to perform the below task:
Fetch the human agent'S availability status
Your AI agent can make a request to fetch the human agent's availability status. This information can be useful to decide if there are any human agents available to respond to the user's query. The AI agent can handover the conversation based on this information.
The AI agent makes this request by passing actionRequest parameter along with the action name fetchAgentAvailability in the custom payload. This parameter should be used with replyMetadata so that your AI agent will get the response of the action along with the message reply.
Here is an example to understand this:
Assume, you have designed a button Talk to Human. When a user clicks on this button, you want to handover the conversation only if your human agents are online. If none of the agents are online you want to display some other message. Here is the custom payload for this kind of button:
{
    "platform": "kommunicate",
    "metadata": {
        "contentType": "300",
        "templateId": "6",
        "payload": [{
            "title": "Talk to Human",
            "message": "I want to talk to a human",
            "replyMetadata": {
                "actionRequest": "fetchAgentAvailability"
            }
        }]
    }
}
When the user clicks on this button, Kommunicate will send the action response to your AI agent platform. See a sample response below:
{
"actionResponse": [{
        "payload": {
          "availabilityStatus": "away" // possible values - online, offline, away
        },
        "name": "fetchAgentAvailability"
      }],
}
Possible values for availability status are:
online- if at least one agent is onlineaway- if no agent is online and at least one agent is awayoffline- if none of the agents is neither online nor away.
Dialogflow, further, sends this data to your webhook as the part of originalDetectIntentRequest. You can get this information and decide whether to handover the conversation to any of the human agents or send any other message.
Enable/disable attachment based on the AI agent response
You can enable or disable the chat widget attachment icon based on the AI agent response. Use KM_ENABLE_ATTACHMENT property in metadata.
Note: By default the chat widget attachment icon will be enabled. You can disable it from kommunicateSettings object by setting attachment parameter to false.
This is the sample JSON to enable attachment
[{
  "message": "Please share the document",// This is your trigger message to ask for attachments from the user. You can customize the message accordingly
  "metadata": {
    "KM_ENABLE_ATTACHMENT": true
  }
}]
This is the sample JSON to disable attachment
[{
  "message": "Thanks for sharing the document",// This is your trigger message to disable the attachment icon from the chat widget. You can use this to disable the attachment icon once the user has shared the documents.
  "metadata": {
    "KM_ENABLE_ATTACHMENT": false
  }
}]
Extract WhatsApp Number in Dialogflow CX
This process consists of two major steps.
- webhook call
- Number Extraction
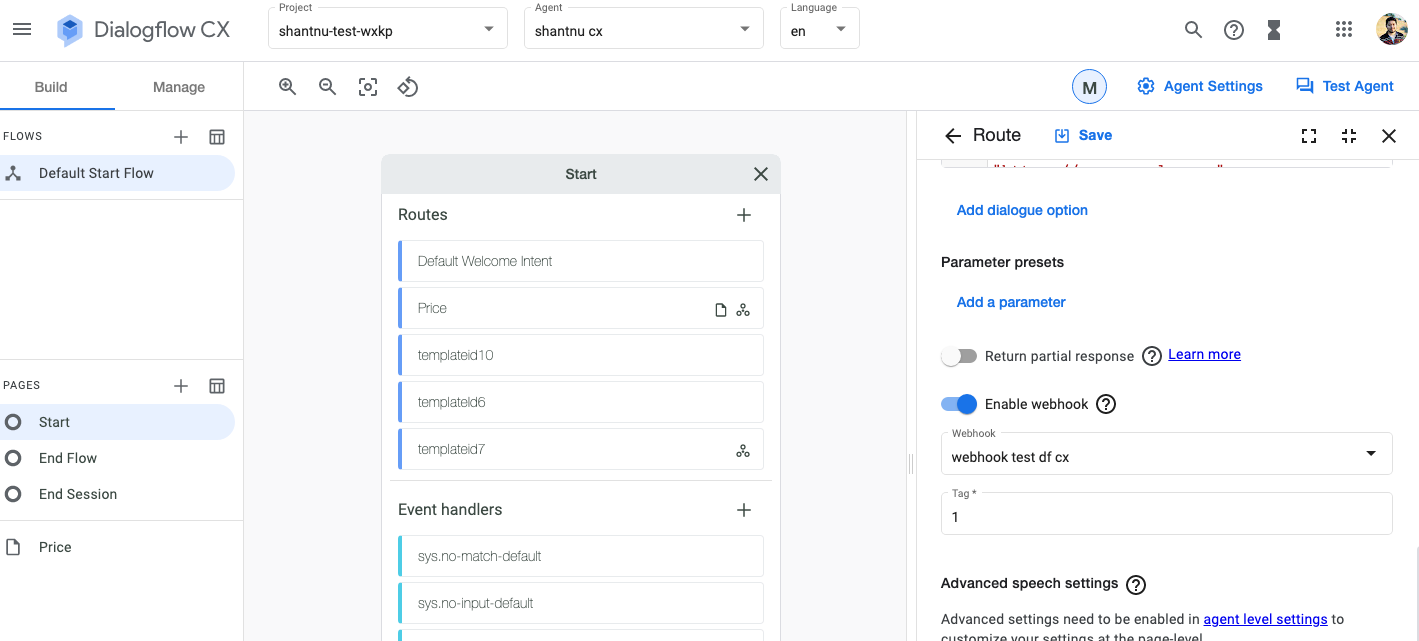
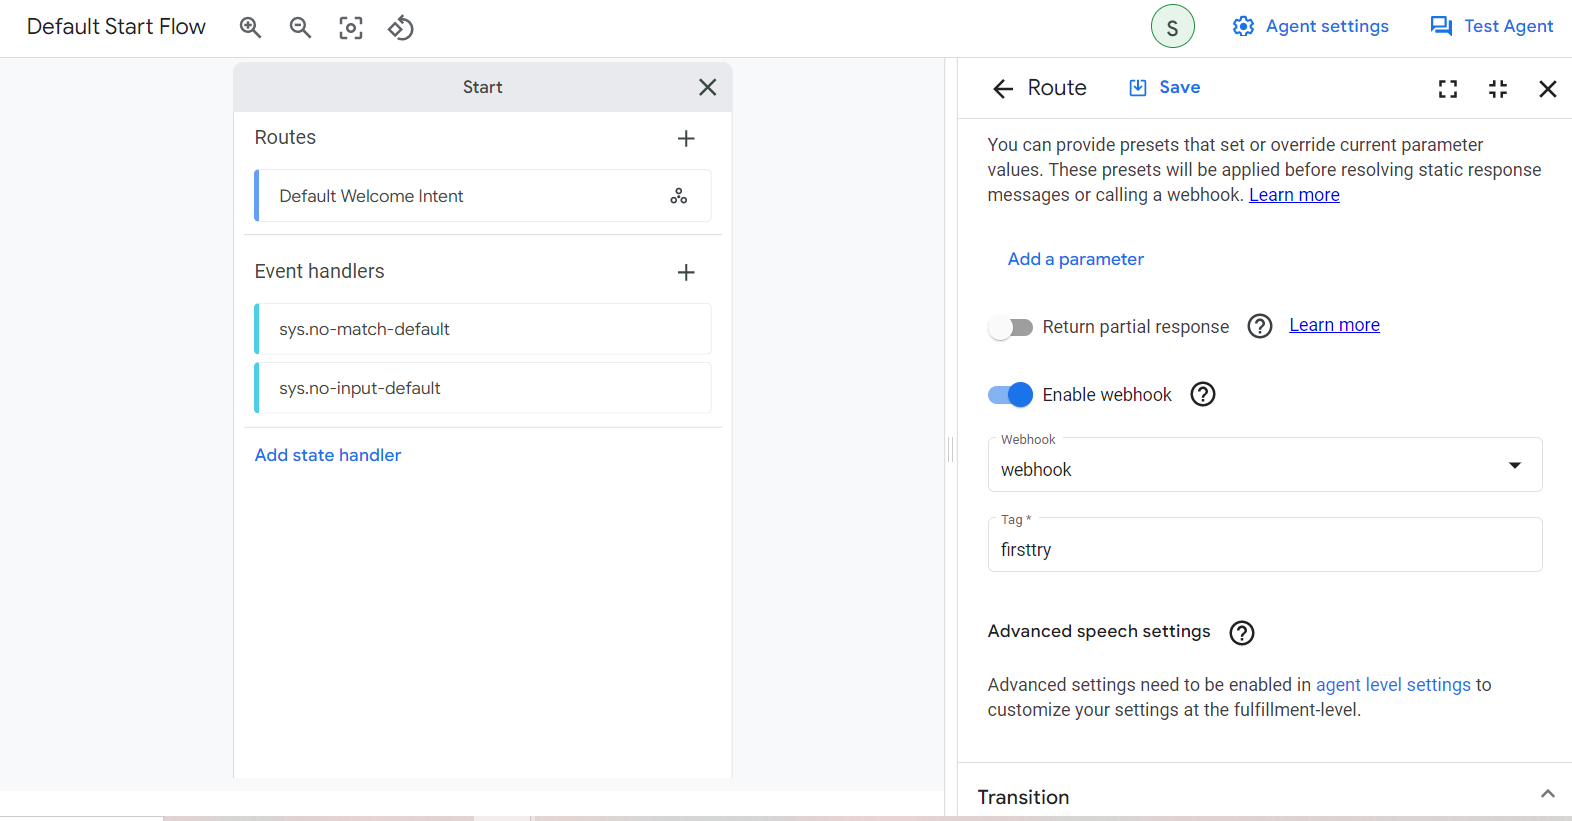
Enable webhook call for your intent
Enable the webhook call for the intent in which you want to get the user's phone number. Open your intent in Dialogflow, then on the right side you will see "Fulfillment", here, enable toggle saying "Enable webhook".
Get the phone number
Whenever this particular intent will be triggered, the whole payload consisting of multiple details will be sent to your server. The payload is like this:
{
    "detectIntentResponseId": "516196b7-69d4-4e0b-8a98-381853f64eff",
    "intentInfo": {
      "lastMatchedIntent": "projects/shantnu-test-wxkp/locations/us-central1/agents/c5fdf777-ea8f-4ba3-9fa1-aec8db3b1fa3/intents/627dabd0-31ec-4c1f-a292-0e209423cdb8",
      "displayName": "templateid7",
      "confidence": 1.0
    },
    "pageInfo": {
      "currentPage": "projects/shantnu-test-wxkp/locations/us-central1/agents/c5fdf777-ea8f-4ba3-9fa1-aec8db3b1fa3/flows/00000000-0000-0000-0000-000000000000/pages/START_PAGE",
      "displayName": "Start Page"
    },
    "sessionInfo": {
      "session": "projects/shantnu-test-wxkp/locations/us-central1/agents/c5fdf777-ea8f-4ba3-9fa1-aec8db3b1fa3/sessions/67423633"
    },
    "fulfillmentInfo": {
      "tag": "1"
    },
    "messages": [{
      "payload": {
        "message": "This is the sample json for list template",
        "platform": "kommunicate",
        "metadata": {
          "payload": {
            "headerImgSrc": "URL for header image",
            "elements": [{
              "description": "Description for the list item",
              "action": {
                "type": "link",
                "url": "https://www.google.com"
              },
              "imgSrc": "Thumbnail icon for list item",
              "title": "List item 1"
            }],
            "headerText": "Header text.",
            "buttons": [{
              "name": "See us on facebook",
              "action": {
                "type": "link",
                "url": "https://www.facebook.com"
              }
            }]
          },
          "contentType": "300",
          "templateId": "7"
        }
      },
      "responseType": "HANDLER_PROMPT",
      "source": "VIRTUAL_AGENT"
    }],
    "payload": {
      "from": "whatsapp:+919874543210",
      "applicationId": "27ce844bfc691713a25abf5bdcdffa574",
      "groupId": "67423633",
      "messageSource": "1",
      "botId": "df-cx-flmt-test-yw0vb",
      "attachments": []
    },
    "text": "templateid7",
    "languageCode": "en-US"
  }
In this payload, notice req.body.payload.from which is "whatsapp:+919874543210"
User's phone number is present along with extra characters. You can use this to get the phone number. A JavaScript example would be like:
"whatsapp:+919874543210".split(":")[1];** OR **const phoneNumber = req.body.payload.from.split(":")[1];
Voila! You have the phone number.
Dialogflow CX webhook
Using webhooks in Dialogflow CX is easy.
- Enable the webhook for your intent. If you have created a webhook already, you can select the webhook you want to use or create a new one.
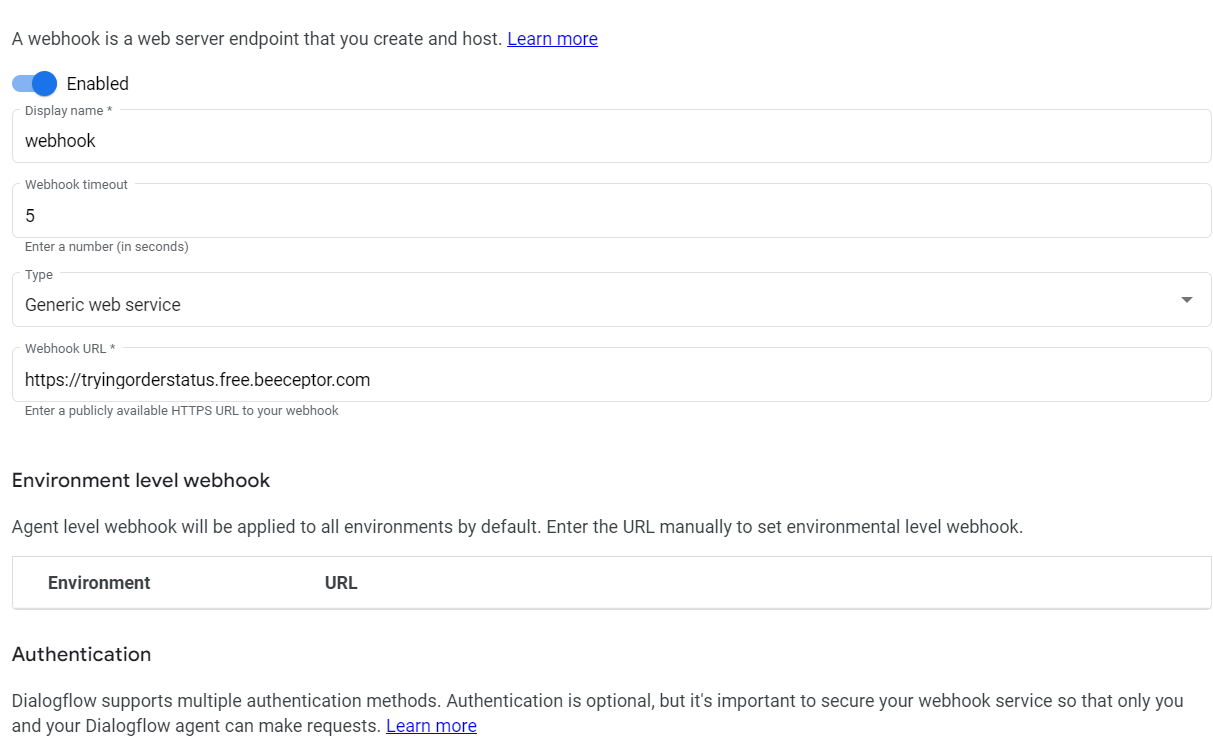
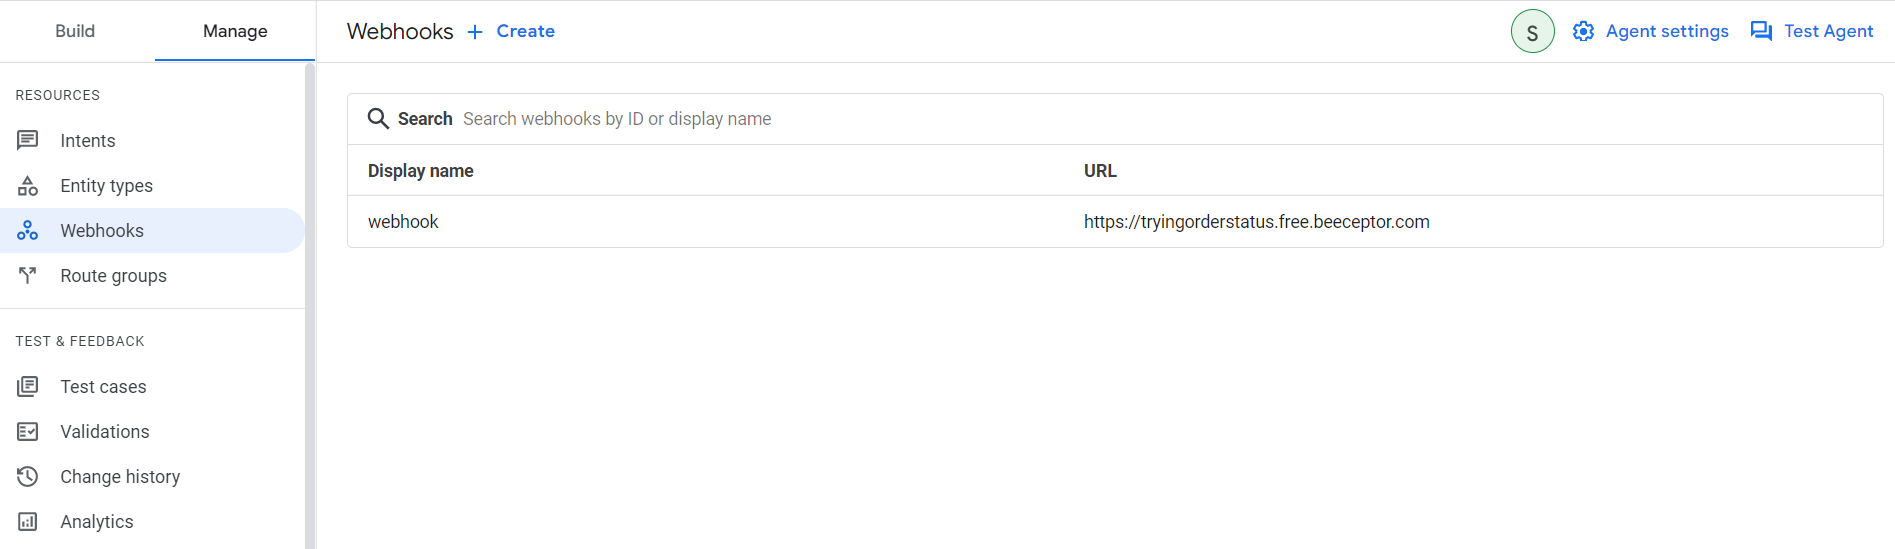
- You can also create the webhooks under Manage Section.
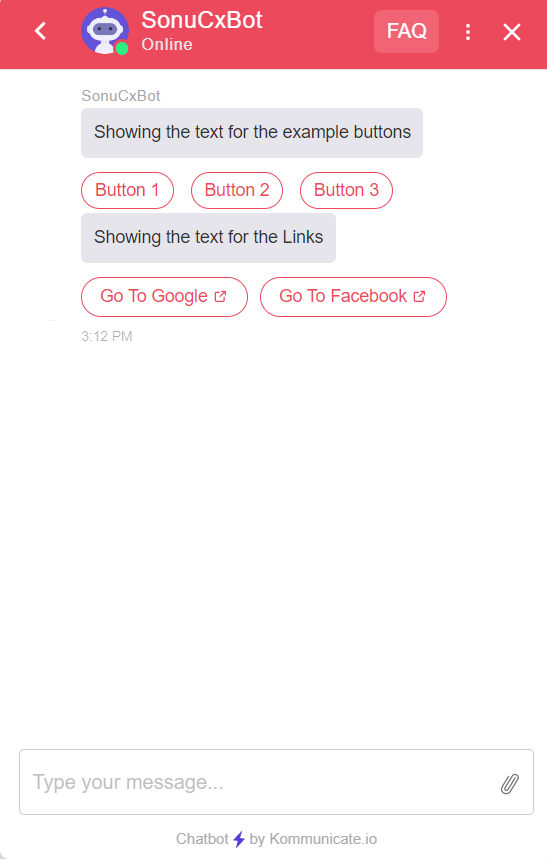
Here is an example of a webhook and response is being rendered on Kommunicate UI:
This is a sample payload sent from webhook:
{
    "fulfillmentResponse": {
        "messages": [{
                "payload": {
                    "message": "Showing the text for the example buttons",
                    "platform": "kommunicate",
                    "metadata": {
                        "contentType": "300",
                        "templateId": "6",
                        "payload": [{
                                "title": "Button 1",
                                "message": "Message for Example 1."
                            },
                            {
                                "title": "Button 2",
                                "message": "Message for Example 2"
                            },
                            {
                                "title": "Button 3",
                                "message": "Message for long button"
                            }
                        ]
                    }
                }
            },
            {
                "payload": {
                    "message": "Showing the text for the Links",
                    "platform": "kommunicate",
                    "metadata": {
                        "contentType": "300",
                        "templateId": "3",
                        "payload": [{
                                "type": "link",
                                "url": "https://www.google.com",
                                "name": "Go To Google"
                            },
                            {
                                "type": "link",
                                "url": "https://www.facebook.com",
                                "name": "Go To Facebook",
                                "openLinkInNewTab": false
                            }
                        ]
                    }
                }
            }
        ]
    }
}
Here it how it looks on Kommunicate AI agent UI:
refer to Dialogflow documents for more information:
Dialogflow ES webhook & Fulfillment
Update user detail
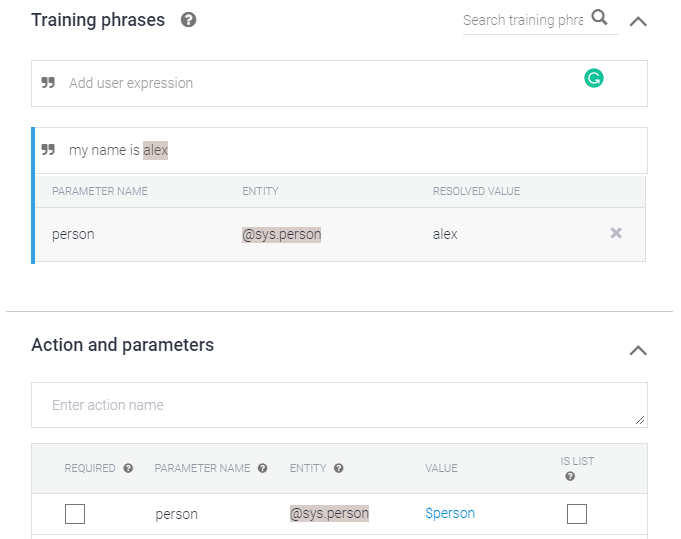
You can design your AI agent to collect the user's details and get it updated in kommunicate dashboard by making an action request. Follow the steps below to set up the action request in Dialogflow.
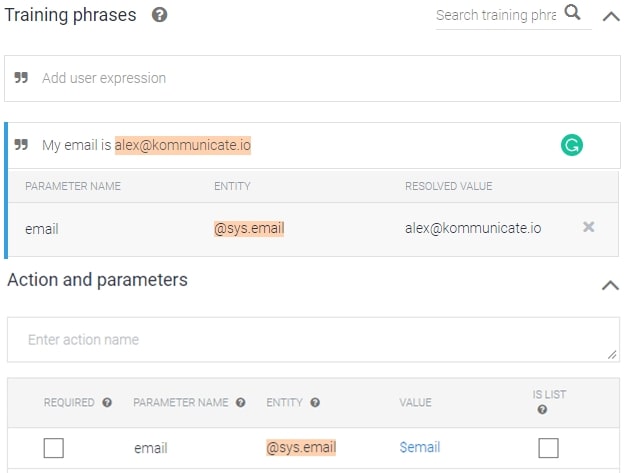
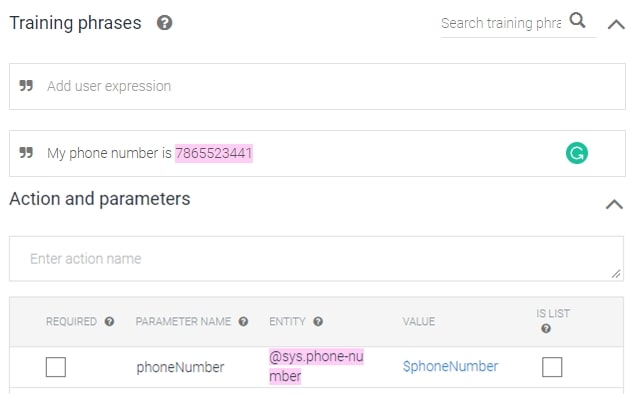
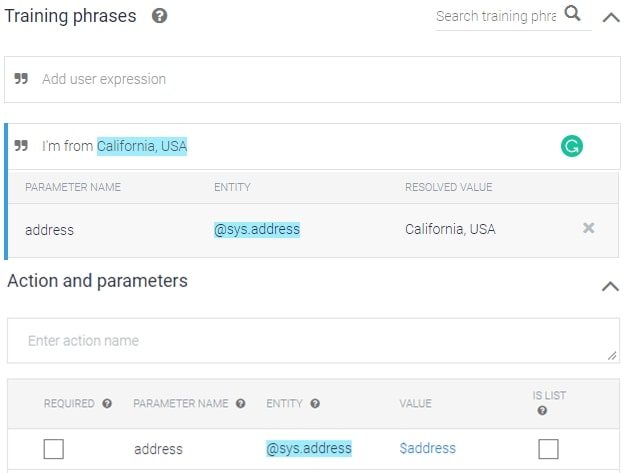
- Extract the user details into Dialogflow parameters. The parameter names are predefined by Kommunicate. Here is how it looks in the Dialogflow console.

Below is the list of supported parameters:
| Parameter | Description |
|---|---|
| If this parameter is present, Kommunicate updates the user's email with this parameter's value. | |
| displayName | Updates the user's display name with this parameter's value. |
| imageLink | Updates the user's display picture with this parameter's value. |
| phoneNumber | Updates the user's phone number with this parameter's value. |
| metadata | Other custom parameters you want to get update in user info section on dashboard. |
- Set the JSON below as a custom payload in Dialogflow response section
{
    "message": "Thanks for the detail. Let me update it in the database",
    "platform": "kommunicate",
    "metadata": {
        "actionRequest": "updateUserDetail",
        "payload": {
            "email": "$email",
            "displayName": "$displayName",
            "imageLink": "$imageLink",
            "metadata": {
                "customParameter-address": "$customParameter-address",
                "customParameter-age": "$customParameter-age"
            }
        }
    }
}
Note that the user detail will be updated only if your Dialogflow AI agent is capable of extracting the values from user phrases and populate it in parameters. You can test this from the Dialogflow try it out section. Trigger the intent and check the parameter list on the bottom-right corner. If the above-mentioned parameters are present then only kommunicate can update the user's detail. The same can be achieved by using the update user API but it requires you to write a webhook and call the user Update API with the collected information.
Below mentioned are some examples to extract user details like name, email, phone number, etc and get it updated on the Kommunicate dashboard
Example: to extract the username
{
    "message": "Thanks for the details. Let me update it in the dashboard",
    "platform": "kommunicate",
    "metadata": {
        "actionRequest": "updateUserDetail",
        "payload": {
            "displayName": "$displayName"
        }
    }
}
Example: to extract the user email
{
    "message": "Thanks for the details. Let me update it in the dashboard",
    "platform": "kommunicate",
    "metadata": {
        "actionRequest": "updateUserDetail",
        "payload": {
            "email": "$email"
        }
    }
}
Example: to extract the user phone number
{
    "message": "Thanks for the details. Let me update it in the dashboard",
    "platform": "kommunicate",
    "metadata": {
        "actionRequest": "updateUserDetail",
        "payload": {
            "phoneNumber": "$phoneNumber"
        }
    }
}
Example: to extract the custom parameters like address
The custom parameters you want to get updated in the user info section on the dashboard should be passed inside the "metadata".
{
    "message": "Thanks for the details. Let me update it in the dashboard",
    "platform": "kommunicate",
    "metadata": {
        "actionRequest": "updateUserDetail",
        "payload": {
            "metadata": {
                "address": "$address"
            }
        }
    }
}