
Installation
Step-by-step guide to install Kommunicate on Web, React JS, Angular JS, Vue JS, iframe, or CMS.
Overview
Kommunicate is a Gen AI-powered customer service automation platform. Kommunicate lets you add AI-powered AI agents and live chat to your website, enabling seamless conversations with your visitors and customers through a modern, customizable chat widget.
Installing Kommunicate is fast and easy. Just add a few lines of code in your website and you can start answering your support queries within a few minutes. Kommunicate can also be used with any of Website Builder.
Web installation
Step 1: Get the customized plugin script from the Kommunicate dashboard
Create your account by signing up for Kommunicate. You can sign up for free in Kommunicate. If you already have a Kommunicate account, log in to your account and go to the Install section and copy the script.
Or
You can copy the below script and replace the required parameters manually.
caution
Use web server to view HTML files as real-time updates will not work if you directly open the HTML file in the browser.
Script
Copy the JavaScript code from below and paste it just above the closing of the body tag (</body>) on every page you want the chat widget to appear.
<script type="text/javascript">
    (function(d, m){

    /*---------------- Kommunicate settings start ----------------*/

     var kommunicateSettings = {
      "appId": "<APP_ID>",
      "automaticChatOpenOnNavigation": true,
      "popupWidget": true
      /*
      "onInit": function (){
        // paste your code here
      }
      */
      };

    /*----------------- Kommunicate settings end ------------------*/

     var s = document.createElement("script");
      s.type = "text/javascript";
      s.async = true;
      s.src = "https://widget.kommunicate.io/kommunicate-widget-3.0.min.js";
      var h = document.getElementsByTagName("head")[0];
      h.appendChild(s);
      window.kommunicate = m;
      m._globals = kommunicateSettings;
    })(document, window.kommunicate || {});
</script>
Step 2: Add the customized Kommunicate plugin to your website
You can customize the plugin by passing below parameters in the kommunicateSettings object. Visit Settings -> Install section in Kommunicate dashboard to get default values for your account.
| Parameters | Type | Descriptions |
|---|---|---|
| appId | String | A unique application ID assigned to your Kommunicate account. |
| conversationTitle | String | All conversations will have this title until the conversation gets assigned to the AI agent/agent. After conversation assignment, the conversation title will be the name of AI agent/agent whom the conversation is assigned. |
| preLeadCollection | Array of objects | This will enable lead collection in chat. Users will be asked to enter the name, email and phone number when they start a conversation. |
| userId | String | This is your user's/visitor's user ID. Kommunicate will generate a random ID if this is not defined. |
| userName | String | This is the display name of the user. Agents will identify users by this display name. |
| String | Email ID of the user. If not online, the user will be notified by fallback emails sent to this email ID. | |
| onInit | Function | This function will be called after the chat plugin is initialized. Here, you can define the actions to be done after the plugin is initialized. |
| attachment | Boolean | Default: true if you want to disable the attachment option in the chat widget, set this parameter to 'false'. |
| emojilibrary | Boolean | Default: false Emoticons library will be available in the chat widget if this parameter is set to true. |
| locShare | Boolean | Default: false If you want to enable location sharing in the chat widget, set this parameter to true. |
| openConversationOnNewMessage | Boolean | Default: false If this parameter is set to true, the chat window will be opened whenever a new message comes in the chat widget. For more detail check openConversationOnNewMessage. |
| automaticChatOpenOnNavigation | Boolean | Default: false If the chat widget is open and the user navigates to some other section in the website or to some other tab, then keep the chat widget open with the current active conversation Note: Kommunicate.startConversation() method and msgTriggerTimeout option won't be compatible with this option. |
| popupWidget | Boolean | Default: false Setting this parameter to true will change the position of the "chat widget close button" which will now appear on the launcher icon itself, such that your users can open and close the chat widget from the same button. By default, when it is false, the close button appears at the top right corner of the chat widget. Note: The custom launcher icon is not supported if this option is set to true. |
| voiceInput | Boolean | Default: false set it true to enable the voice input. This feature is only supported in Google chrome versions >= 33.0 |
| voiceOutput | Boolean | Default: false set it true to enable the voice output. Voice output supports the file attachments and location. Also, you have an option to change the default voice output message for the attachment and location here. This feature is only supported in Google chrome versions >= 33.0, Edge, Firefox, Safari, Mozilla, and Opera. |
| appSettings | Object | This appSettings object can be used to override the values set from the dashboard's chat widget section. The values that can be overridden are explained here. |
| imageLink | String | Default: null - This will add the user's avatar image on the dashboard, pass the image link as a string that can be accessible on the internet (if the image is present in your local system then broken image will be displayed) |
| contactNumber | String | Default: null - Here you can pass the user's phone number which will be displayed on the dashboard-rightside user details panel, pass the phone number as a string. |
| quickReplies | String | You need to add the quick replies that need to be shown when clicked on the chat widget. |
| capturePhoto | Boolean | Default: false set it true to enable the Camera icon. Camera icon appears when you enable, and it will open the camera for mobile devices as soon as you click on the icon. NOTE: Camera of a laptop will not open, the feature will work only for mobile devices. |
| hidePostFormSubmit | Boolean | Default: false set it true to enable the feature. The form will hide itself post submission. |
| timeFormat24Hours | Boolean | Default: false set it true to enable the feature. Message timestamp will be shown in 24 Hours format. |
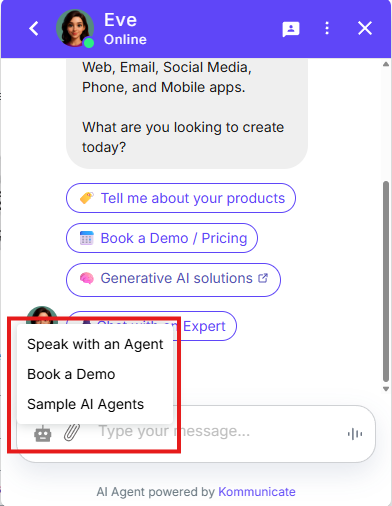
Trigger buttons in chat widget
Add the parameter "quickReplies" along with the respective quick replies inside the kommunicateSettings. An example script is mentioned below.
(function(d, m){
        var kommunicateSettings =
            {"appId":"APP_ID","popupWidget":true,"automaticChatOpenOnNavigation":true,"quickReplies":["Speak with an Agent","Book a Demo","Sample AI Agents"]};
        var s = document.createElement("script"); s.type = "text/javascript"; s.async = true;
        s.src = "https://widget.kommunicate.io/kommunicate-widget-3.0.min.js";
        var h = document.getElementsByTagName("head")[0]; h.appendChild(s);
        window.kommunicate = m; m._globals = kommunicateSettings;
    })(document, window.kommunicate || {});
text-to-speech
To enable Text-to-Speech using dashboard navigate here
Alternatively, set "voiceOutput":true, to enable it. You can also change the Voice rate, Voice Name or Language. Below is the sample code for the same:
(function(d, m){
        var kommunicateSettings = {
            "appId":"APP_ID",
            "popupWidget":true,
            "automaticChatOpenOnNavigation":true,
            "voiceOutput":true,
            "voiceName":"Google Deutsch", // Replace Google Deutsch with the voiceName or an array of voiceNames from Voice Names and Language.
            "voiceRate":1,
            "language": "en-US"
        };
        var s = document.createElement("script"); s.type = "text/javascript"; s.async = true;
        s.src = "https://widget.kommunicate.io/kommunicate-widget-3.0.min.js";
        var h = document.getElementsByTagName("head")[0]; h.appendChild(s);
        window.kommunicate = m; m._globals = kommunicateSettings;
    })(document, window.kommunicate || {});
speech-to-text
To enable Speech-to-Text using dashboard navigate here
Alternatively, set "voiceInput":true, to enable it. You can also change the voiceInputTimeout and Language. Below is the sample code for the same:
(function(d, m){
        var kommunicateSettings = {
            "appId":"APP_ID",
            "popupWidget":true,
            "automaticChatOpenOnNavigation":true,
            "voiceInput":true,
            "voiceInputTimeout": 5, //in sec
            "language": "en-US"
        };
        var s = document.createElement("script"); s.type = "text/javascript"; s.async = true;
        s.src = "https://widget.kommunicate.io/kommunicate-widget-3.0.min.js";
        var h = document.getElementsByTagName("head")[0]; h.appendChild(s);
        window.kommunicate = m; m._globals = kommunicateSettings;
    })(document, window.kommunicate || {});
Note: ""voiceInputTimeout": 5 " it is only used for Safari Browsers in Mac OS and iOS
Below are the details about the supported parameters for Speech-to-Text and Text-to-Speech:
| Parameters | Type | Description |
|---|---|---|
| appId | String | A unique application ID assigned to your Kommunicate account. You will get the appId from Install section |
| voiceOutput | Boolean | Default: false Set it true to enable the voice output |
| voiceInput | Boolean | Default: false Set it true to enable the voice input |
| voiceName | String OR Array | To set the voiceName to different languages Use any of the "voiceName" from the below table list. choose the voiceName based on the browser. |
| language | String | The lang property sets the language of the AI agent. Example: "language": "en-US" |
| voiceRate | Number | The rate property sets the speed at which the AI agent will be spoken at. Default value: 1 Any number between 0 to 10 |
Note: If you want to pass multiple voices for different operating systems and web browsers, you can pass the voice names in an array:
"voiceName":["Victoria", "Google US English", "Microsoft Aria Online (Natural) - English (United States)", "Samantha"],
Voice Names and Language
Get the complete list of available Voice Name and Language for different operating systems and web browsers:
Installation with Frameworks
React JS
There are two ways to integrate the Kommunicate chat widget into a React website or project.
Method 1: By installing the Kommunicate chat widget package using the npm command
- Use the below npm command to install the Kommunicate chat widget package
npm i @kommunicate/kommunicate-chatbot-plugin
- After installing the package, use the code to import it in index.js file
import Kommunicate from "@kommunicate/kommunicate-chatbot-plugin";
- Now, add the below to the index.js file
 Kommunicate.init("APP_ID", {
  automaticChatOpenOnNavigation: true,
  popupWidget: true
});
- Add your
APP_ID. You can get your APP_ID here
You can use the below Sandbox for Testing and checking the configuration:
Method 2: By creating Kommunicate Chat Component
Create new file chat.js inside src folder
In chat.js file and create Component named KommunicateChat
Add the following code inside componentDidMount
(function(d, m){
        var kommunicateSettings = {"appId":"<APP_ID>","popupWidget":true,"automaticChatOpenOnNavigation":true};
        var s = document.createElement("script"); s.type = "text/javascript"; s.async = true;
        s.src = "https://widget.kommunicate.io/kommunicate-widget-3.0.min.js";
        var h = document.getElementsByTagName("head")[0]; h.appendChild(s);
        window.kommunicate = m; m._globals = kommunicateSettings;
      })(document, window.kommunicate || {});
- Add your
APP_ID. You can get your APP_ID here

- Now, import KommunicateChat Component in App.js file

Note: If any Kommunicate functions need to be executed, the 'window' object must be declared before the function. Because the 'window' is a global object in the browser environment and allows the Kommunicate script file to be accessed from the React component.
Example: To launch a conversation after the chat widget is loaded, use
window.Kommunicate.launchConversation();
AngularJS
Install AI agent in the Angular component
Kommunicate's AI agent is compatible with the Angular framework.
To install the AI agent, open the Kommunicate Dashboard and navigate to Settings -> Install -> Web section.
Copy the JavaScript code to add the AI agent to the Angular application.
Paste the JavaScript code into the app.component.ts file inside ngOnInit().
Note: You might need to replace
windowwith(windows as any).
The code of the component should look like this
@Component({
  selector: "app-root",
  templateUrl: "./app.component.html",
  styleUrls: ["./app.component.scss"],
})
export class AppComponent {
  title = "my first app";
  ngOnInit() {

    //----------- AI agent's code --------------//
    (function (d, m) {
      var kommunicateSettings = {
        appId: "<YOUR APP-ID>",
        popupWidget: true,
        automaticChatOpenOnNavigation: true,
      };
      var s = document.createElement("script");
      s.type = "text/javascript";
      s.async = true;
      s.src = "https://widget.kommunicate.io/kommunicate-widget-3.0.min.js";
      var h = document.getElementsByTagName("head")[0];
      h.appendChild(s);
      (window as any).kommunicate = m;
      m._globals = kommunicateSettings;
    })(document, (window as any).kommunicate || {});
    //----------- AI agent's code end --------------//

  }
}
If you run the browser, you should see a chat widget screen pop up and that means your AI agent is ready.

Vue JS
To install the chat widget in the Vue.js component, either create a new component file or add the Kommunicate install code in your existing component file. A simple and effective way to solve this is by adding your external script into the 'Vue mounted()' section of your component.
Run any code editor and open your workspace folder to further navigate to the component file.
Note: Vue Components are one of the important features of Vue.js that create custom elements, which can be reused in HTML.
To install the AI agent, open Kommunicate and navigate to Dashboard ->Settings. Click on Install under the Configuration section. Copy the code and add it to your website or application.
Paste the JavaScript code into the component file inside the script tag. The code of the component should look like this:
<script>
export default {
    methods: {
    },
    mounted (){
      (function(d, m){
        var kommunicateSettings = {"appId":"YOUR_APP_ID","popupWidget":true,"automaticChatOpenOnNavigation":true};
        var s = document.createElement("script"); s.type = "text/javascript"; s.async = true;
        s.src = "https://widget.kommunicate.io/kommunicate-widget-3.0.min.js";
        var h = document.getElementsByTagName("head")[0]; h.appendChild(s);
        window.kommunicate = m; m._globals = kommunicateSettings;
      })(document, window.kommunicate || {});
    },
    data: function(){
    }
}
</script>
Note: Make sure you replace "YOUR_APP_ID" with your App ID provided in the install section.
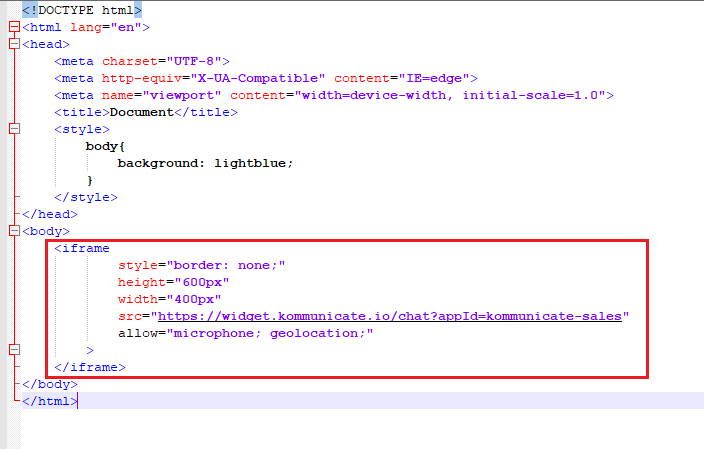
Install chat widget in iFrame
Add the following iframe in the HTML body of your application
<iframe
            style="border: none;"
            height="600px"
            width="400px"
            src="https://widget.kommunicate.io/chat?appId=YOUR_APP_ID"
            allow="microphone; geolocation;"
        >
</iframe>
Note: Replace "YOUR_APP_ID" with the APP_ID from the install section: https://dashboard.kommunicate.io/settings/install.
An example is provided below.
To assign the conversation to a particular team and agent, pass teamId and agentIds parameters.
<iframe
        style="border: none;"
        height="600px"
        width="400px"  src="https://widget.kommunicate.io/chatappId=YOUR_APP_ID&teamId=685828&agentIds=anuj%2Bop260623@kommunicate.io,pooja.poojagc@gmail.com&assignee=anuj%2Bop260623%40kommunicate.io" allow="microphone; geolocation;"
    >
</iframe>
Parameters:
teamId: The ID of the team to assign the conversation to,
agentIds: Comma-separated list of agent email addresses,
assignee: Email address of the default assignee.
Once the iframe loads, it automatically focuses on the text area, which causes the page to scroll up. To avoid this, use the parameter noFocus=true in your iframe URL as shown below.
<iframe
            style="border: none;"
            height="600px"
            width="400px"
            src="https://widget.kommunicate.io/chat?appId=YOUR_APP_ID&noFocus=true"
            allow="microphone; geolocation;"
        >
</iframe>
Install on website builders or Content Management Systems (CMS)
We have written step-by-step instructions if you are using website builder tools or CMS for your website: