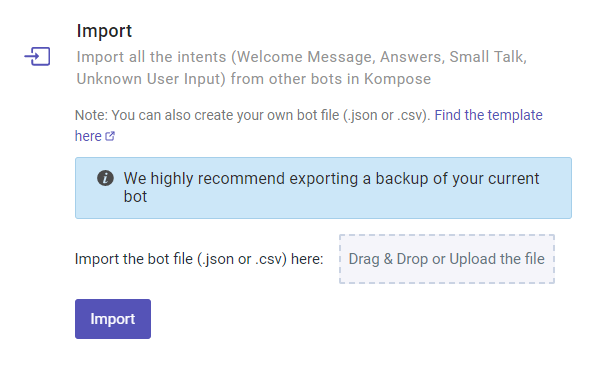
Import Kompose AI agent from file
Import using JSON file
Create your own JSON file and then import it to your Kompose AI agent.
The page will explain the template of the json file.
Details
The JSON file will be an object with attributes: "intents" and "languageCodes"
The value of intents attribute will be an array:
{
  "intents": [MyIntent,], // each intent in the array will be an object
  "languageCodes": ["en"], // a list of language codes (array of strings)
}
Each value in intents array will be a JSON object and represents an intent for your Kompose AI agent.
The structure of the object is:
{
  "name": "order_details", // a unique name for your intent (string)
  "category": "intent", // category of your intent, explained below (string)
  "content": "", // actions of your intent e.g. AI agent replies, rich messages etc. (array)
  "trainingPhrases": [""], // user messages that will trigger this intent (array)
  "languageCode": "en", // language code of the intent (string)
  "urlPatternList": [], // for welcome intents only (array)
  "fields": {} // extract entities e.g. phone number, email etc. (object)
}
The value of languageCodes attribute will be a list of languages that your AI agent will support. When creating an intent you've to pass languageCode from this list. That way each intent will be mapped to a particular language.
1. Types of Intents
Attribute: "category"
Value: <One of the strings mentioned below>
Each intent must have an attribute category
This attribute can have one of these four values:
A) Welcome event
"category": "welcome_event"
Adds a welcome event in the Kompose AI agent. You don't need to provide training phrases for these types of intents as they are triggered directly.
You can have multiple intents of this type, but only one should be the default intent.
For all other "welcome_event", you should provide a valid UrlPatternList value which is explained further in this document.
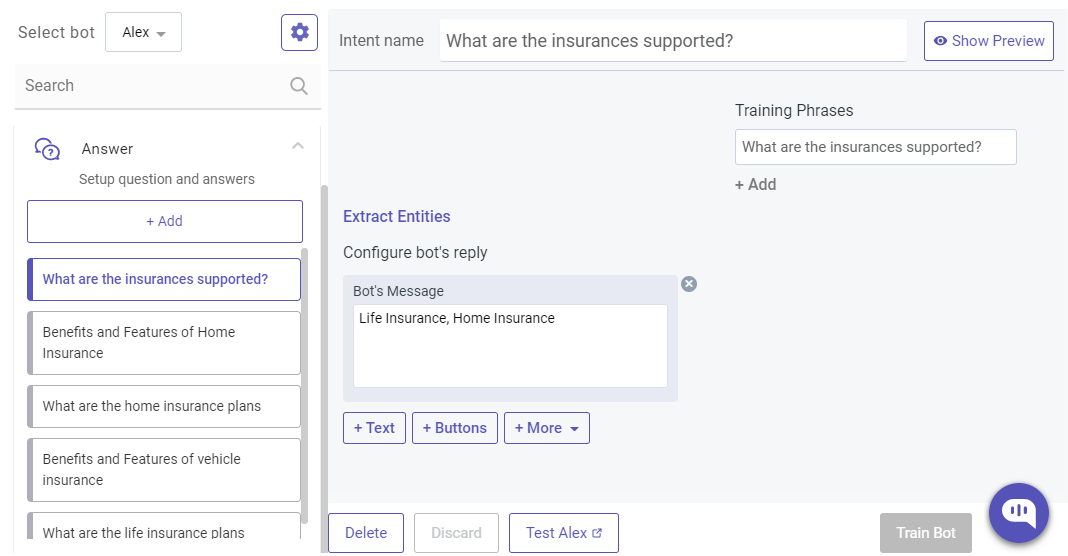
B) Answer
"category": "intent"
Adds an intent that is triggered based on the training phrases provided.
You can provide as many intents of this type as you want.
You can also extract entities in these intents. Read further to know more.
C) Small Talk
"category": "small_talk"
Adds a small talk type intent for your AI agent. You can provide as many intents of this type as you want.
D) Unknown User Input
"category": "fallback_intent"
Adds a fallback intent for your AI agent.
You don't need to provide training phrases for these types of intents as they are triggered directly.
Also, you can have only one intent of this type for your Kompose AI agent.
2. Intent Name
Attribute: "name"
Value: <A string with the name you want for the intent>
Provide the name you want for this intent.
Note: Each intent for your AI agent must have a unique name. So you can't use same name twice in your file and also you can't import intents with names already saved for your AI agent. If by mistake you import file with duplicate names, we will show you an error for the same.
3. Content
Attribute: "content"
Value: <An array defining all AI agent's reply>
This defines the action of the intent. This includes AI agent's replies, buttons, rich messages etc.
Your AI agent's reply can be text, buttons, image, rich messages, actions like assign to agent etc.
Just add the payload object you want in the array.
For AI agent Text Reply
Add a text reply by adding this value to the array.
{"message":"Your message here"}
For Buttons
{
  "message":"",
  "platform":"kommunicate",
  "metadata":
  {
    "contentType":"300","templateId":"6","payload":
    [
      {"title":"Button1","message":"Button1"},{"title":"Button2","message":"Button2"}
    ]
  }
}
For Attachments
{
  "message":"",
  "platform":"kommunicate",
  "metadata":
  {
    "contentType":"300",
    "templateId":"9",
    "payload":
    [
      {
        "caption":"Your-Caption","url":"http://your-image-url.com"
      }
    ]
  }
}
Adding custom payloads
For adding custom payloads such as rich messages or custom actions. Refer to the pages rich messages and custom actions.
Add the payload object similar to the way above for text, buttons etc.
4. Training Phrases
Attribute: "trainingPhrases"
Value: <Array of strings>
These are the user messages that will trigger this intent.
This value will be an array of user messages that will trigger this intent.
e.g. ["show me the catalog", "i want my order details"]
Note: You can't have same user messages triggering multiple intents. So they should be unique and shouldn't be already saved for your AI agent.
5. Language Code
Attribute: "languageCode"
Value: <A string with language code of this intent>
Intents will be grouped in languages using this language code.
e.g. en, it, pt.
Note: Make sure the language code you are passing here is also present at AI agent level, which is shown below in the sample JSON.
6. Fields (Optional)
Attribute: "fields"
Value: <An object containing some key, value pairs defined below>
You can add this option to extract entities for your intent.
There are three inbuilt entities in Kompose Currently:
"email": "@KOMPOSE_DEFAULT_ENTITY.EMAIL""phoneNumber": "@KOMPOSE_DEFAULT_ENTITY.PHONE_NUMBER""url": "@KOMPOSE_DEFAULT_ENTITY.URL""url": "@KOMPOSE_DEFAULT_ENTITY.NAME"
To add an entity add the above key value pairs in the object.
e.g.
{
  "fields": {
    "email":"@KOMPOSE_DEFAULT_ENTITY.EMAIL",
    "phoneNumber":"@KOMPOSE_DEFAULT_ENTITY.PHONE_NUMBER",
  }
}
Note: Only for intents with training phrases
7. Welcome intent based on URL (optional)
Attribute: "urlPatternList"
Value: <An array of conditions to match>
If you want to have welcome events based on the page user is visiting. Use this attribute.
You will provide an array of conditions in this, the intent will be triggered if any of these conditions is satisfied.
A condition will look like
{
  "type": 1, // can be either 1, 2, 3, 4
  "pattern": "" // string to match
}
Type can have one of these four values:
type: 1Will match if the page starts with the value provided in pattern.type: 2Will match if the page contains the value provided in pattern.type: 3Will match if the page ends with the value provided in pattern.type: 4Will match if the page is equal to the value provided in pattern.
e.g. a condition
{
  "type": 3,
  "pattern": "index.html"
}
means that it will be matched for all pages that ends with the string "index.html"
Sample JSON
{
    "intents": [
        {
            "content": [
                {
                    "message": "Hello"
                },
                {
                    "message": "",
                    "platform": "kommunicate",
                    "metadata": {
                        "contentType": "300",
                        "templateId": "11",
                        "payload": [
                            {
                                "name": "open form",
                                "action": {
                                    "type": "quickReply",
                                    "message": "open form"
                                }
                            }
                        ]
                    }
                }
            ],
            "urlPatternList": [],
            "category": "welcome_event",
            "name": "Default Welcome Intent",
            "trainingPhrases": [],
            "languageCode": "en"
        },
        {
            "content": [
                {
                    "message": "Submit your details",
                    "platform": "kommunicate",
                    "metadata": {
                        "contentType": "300",
                        "templateId": "12",
                        "payload": [
                            {
                                "type": "text",
                                "data": {
                                    "label": "Name",
                                    "placeholder": "Enter your name"
                                }
                            },
                            {
                                "type": "datetime-local",
                                "data": {
                                    "label": "Date"
                                }
                            },
                            {
                                "type": "submit",
                                "data": {
                                    "action": {
                                        "message": "form submitted successfully",
                                        "requestType": "postBackToBotPlatform",
                                        "formAction": "https://webhook.site/60aa44c5-2777-47b2-b35b-0a78476c831b"
                                    },
                                    "type": "submit",
                                    "name": "Submit"
                                }
                            }
                        ]
                    }
                }
            ],
            "urlPatternList": [],
            "category": "intent",
            "name": "open form",
            "trainingPhrases": [
                "open form"
            ],
            "languageCode": "en"
        },
        {
            "content": [],
            "urlPatternList": [],
            "category": "intent",
            "name": "form submitted",
            "trainingPhrases": [
                "form submitted successfully"
            ],
            "webhookKey": "home-mvgnt",
            "languageCode": "en"
        },
        {
            "content": [
                {
                    "message": "I apologize. I could not quite understand your last message. \n\nI am transferring the chat to the agent for further help."
                }
            ],
            "urlPatternList": [],
            "category": "fallback_intent",
            "name": "Default Fallback Intent",
            "trainingPhrases": [],
            "languageCode": "en"
        },
        {
            "content": [
                {
                    "message": "I am a virtual assistant beyond the human concept of gender."
                }
            ],
            "urlPatternList": [],
            "category": "small_talk",
            "name": "gender",
            "trainingPhrases": [
                "What's your gender"
            ],
            "languageCode": "en"
        }
    ],
    "webhooks": {
        "home-mvgnt": {
            "name": "home",
            "enabled": true,
            "url": "https://webhook.site/60aa44c5-2777-47b2-b35b-0a78476c831b",
            "authentication": {
                "key": "",
                "value": ""
            }
        }
    },
    "languageCodes": [
        "en"
    ]
}
Note: This is a webhook enabled JSON file.
Import using CSV file
In your CSV file, add your AI agent training phrases in the first column and AI agent reply in the second column.
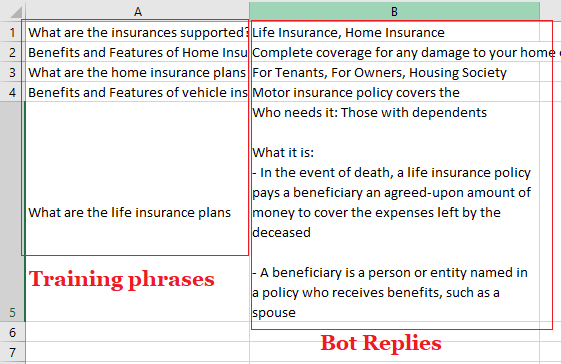
Once the training phrases and AI agent replies are added. The next step is to import the CSV file to your Kompose AI agent.
- Login to your Kommunicate dashboard.
- Navigate to the AI agent Integration section >> Select Kompose >> Select AI agent >> Click Setting >> Click Import >> Upload your CSV file
Once the CSV file is uploaded, the AI agent training phrases & AI agent replies will be reflected in the Answers section.