
Kompose GUI AI agent Builder
Overview
Kompose is a visual, GUI-based AI agent builder designed around natural language conversations for seamless human-computer interaction. Built for absolute simplicity, you do not need any coding experience to master Kompose. Its intuitive, drag-and-drop interface allows you to build, test, and deploy intelligent conversational workflows in minutes.
AI agent Integration with Kompose
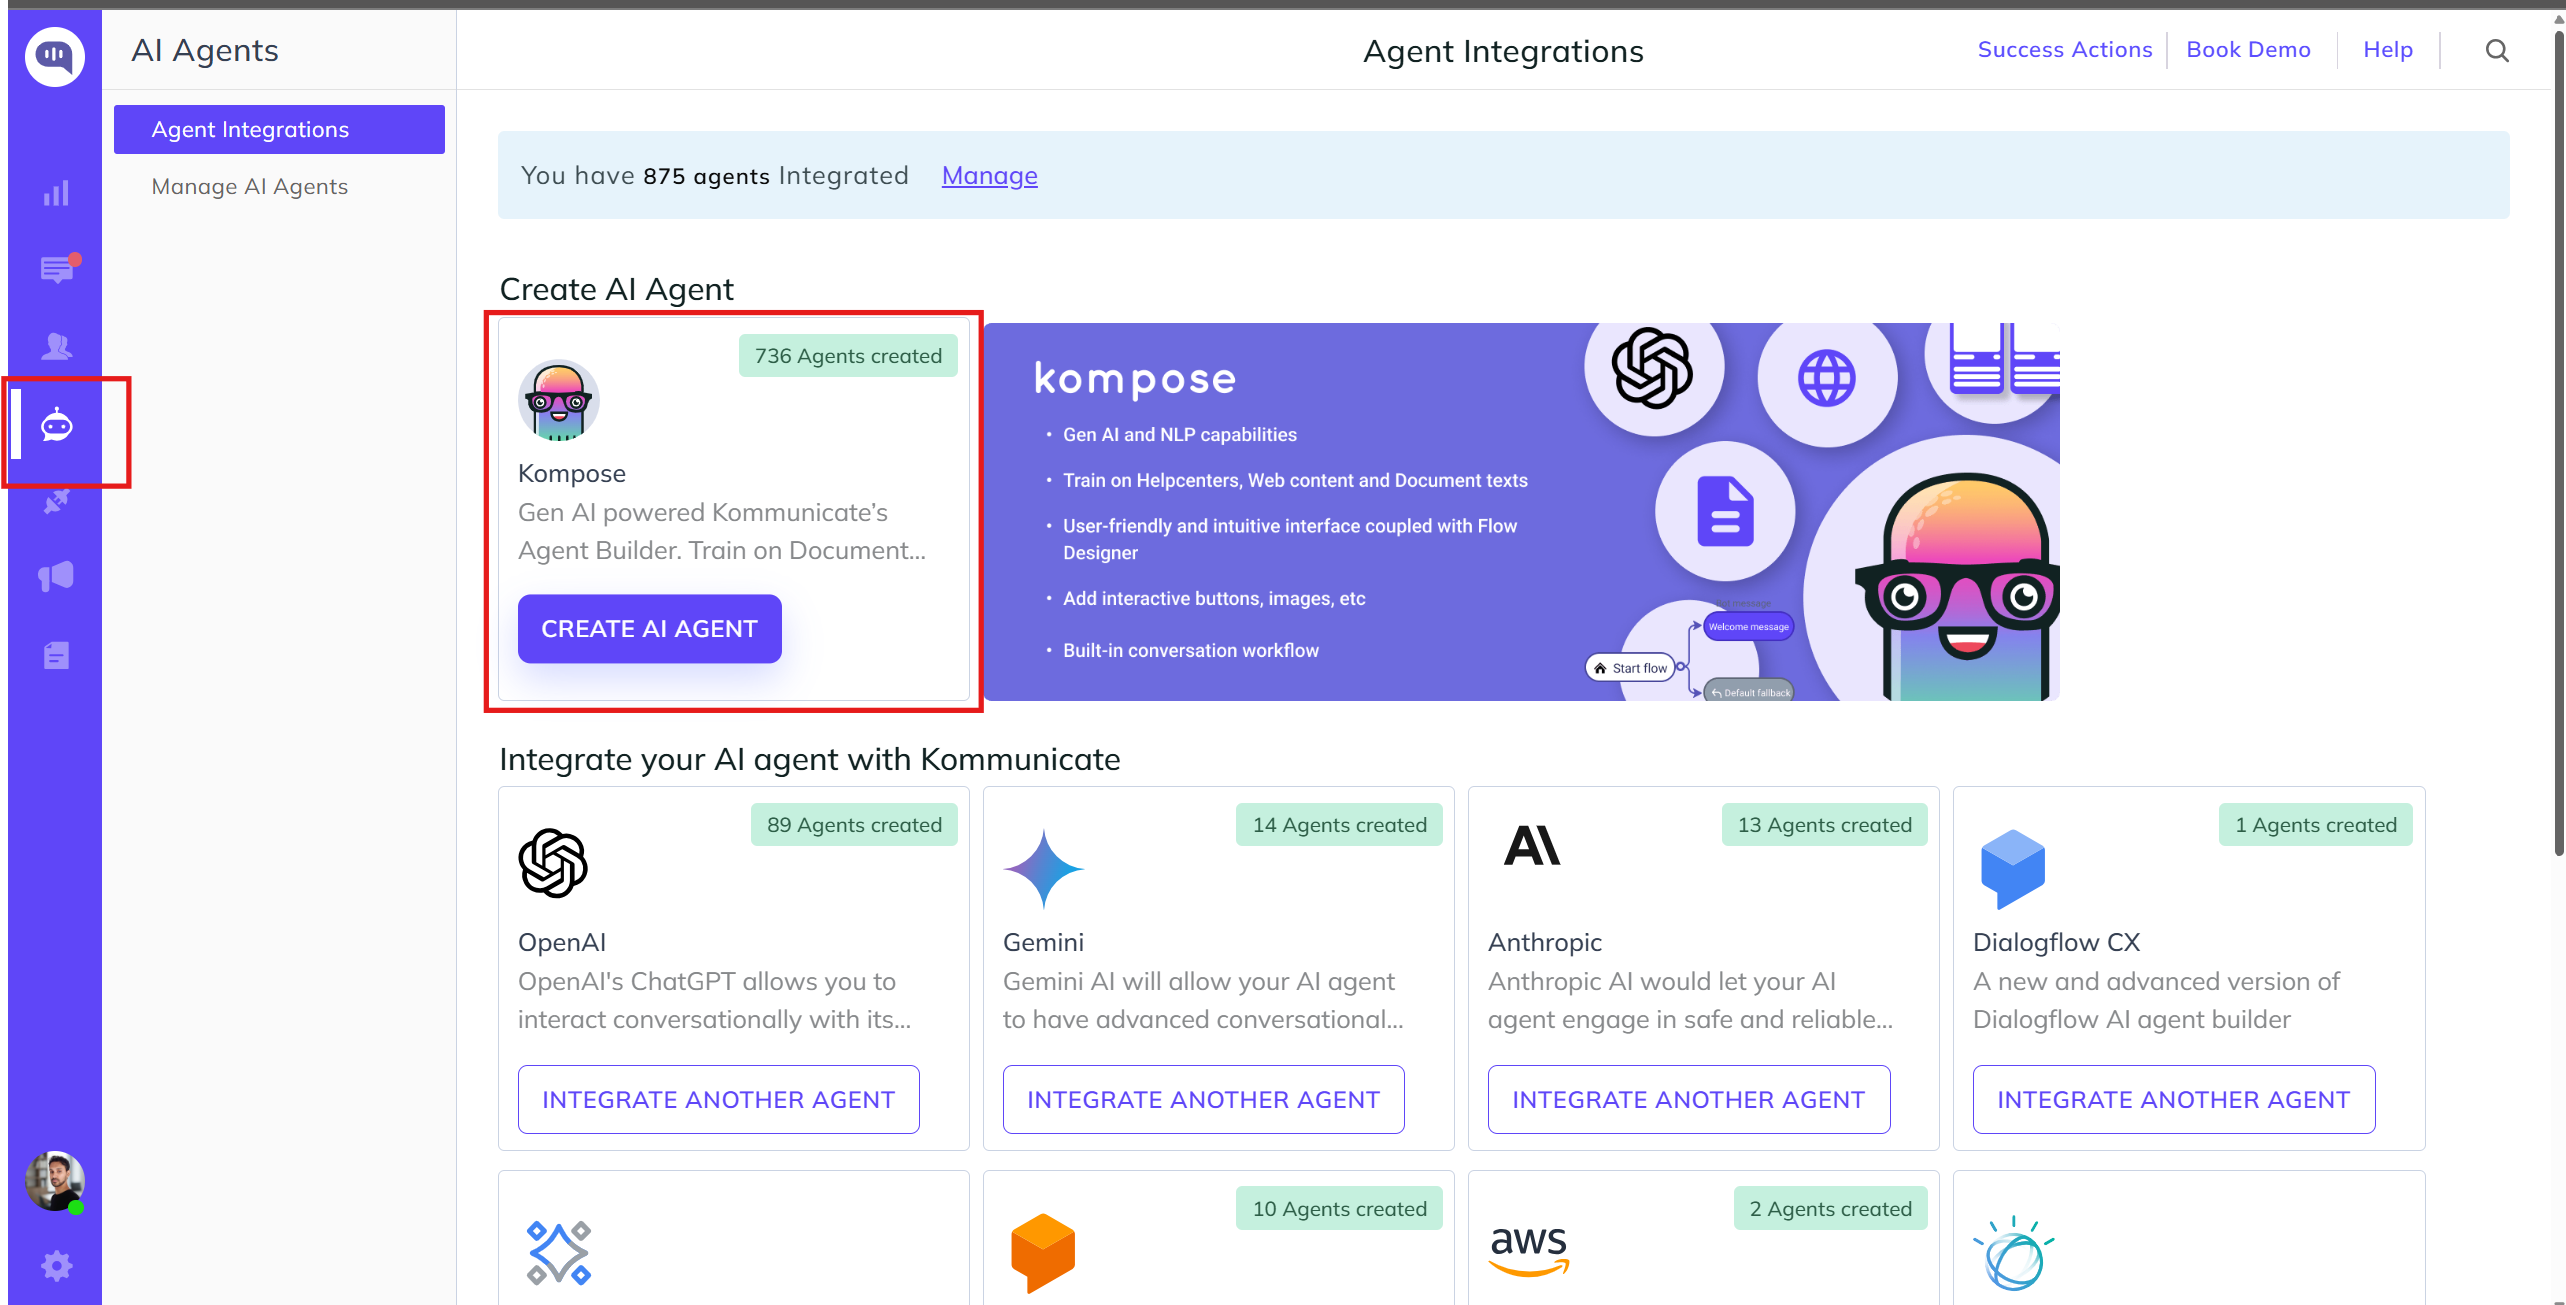
Navigate to the AI Agent Integration section and select Kompose - AI Agent Builder.
Tutorial Blog: Create an AI agent using Kompose AI agent builder
Video tutorial: Create an AI agent using Kompose AI agent builder in 5 minutes
Navigating the Kompose Workspace
Inside the Kompose AI agent builder, the workspace is split into two primary designer interfaces:
- Flow Designer: Build visual, branching conversational paths.
- Classic: Configure fundamental agent properties, knowledge bases, and fallback behaviors.
The Classic Designer
The Classic tab houses the core structural configurations for your AI agent. It includes a modular menu with a search bar to quickly locate configurations:
- Agent Profile: Customize your agent's identity, including its name, avatar, custom instructions, and language preferences.
- Welcome Message: Set up the initial greeting message or interactive rich cards that users see when opening the chat.
- Knowledge Source: Connect external data repositories, such as website URLs, documents, and Helpcenter URLs, so the agent can learn from them and extract answers.
- Intents (Q&A): Map explicit user queries to direct answers by training your agent on question-and-answer pairs, and connect it to databases through webhooks and APIs.
- Fallback & Handover: Manage what happens when your AI agent is stuck. You can set up custom failure responses and configure human handover routing to transition the conversation to a live human agent.
Intents (Q&a)
With the rise of Generative AI (GenAI), training a chatbot or AI agent has largely shifted toward uploading unstructured knowledge bases. However, intents remain an incredibly powerful tool in an AI architecture.
While GenAI is great for conversational fluidity, intents give us precise control over specific user paths, actions, and transactional workflows. Think of GenAI as an agent's brain for answering general questions and holding context, and intents as specific triggers for executing actions, routing users, or showing custom UI elements.
Why Use Intents in the GenAI Era?
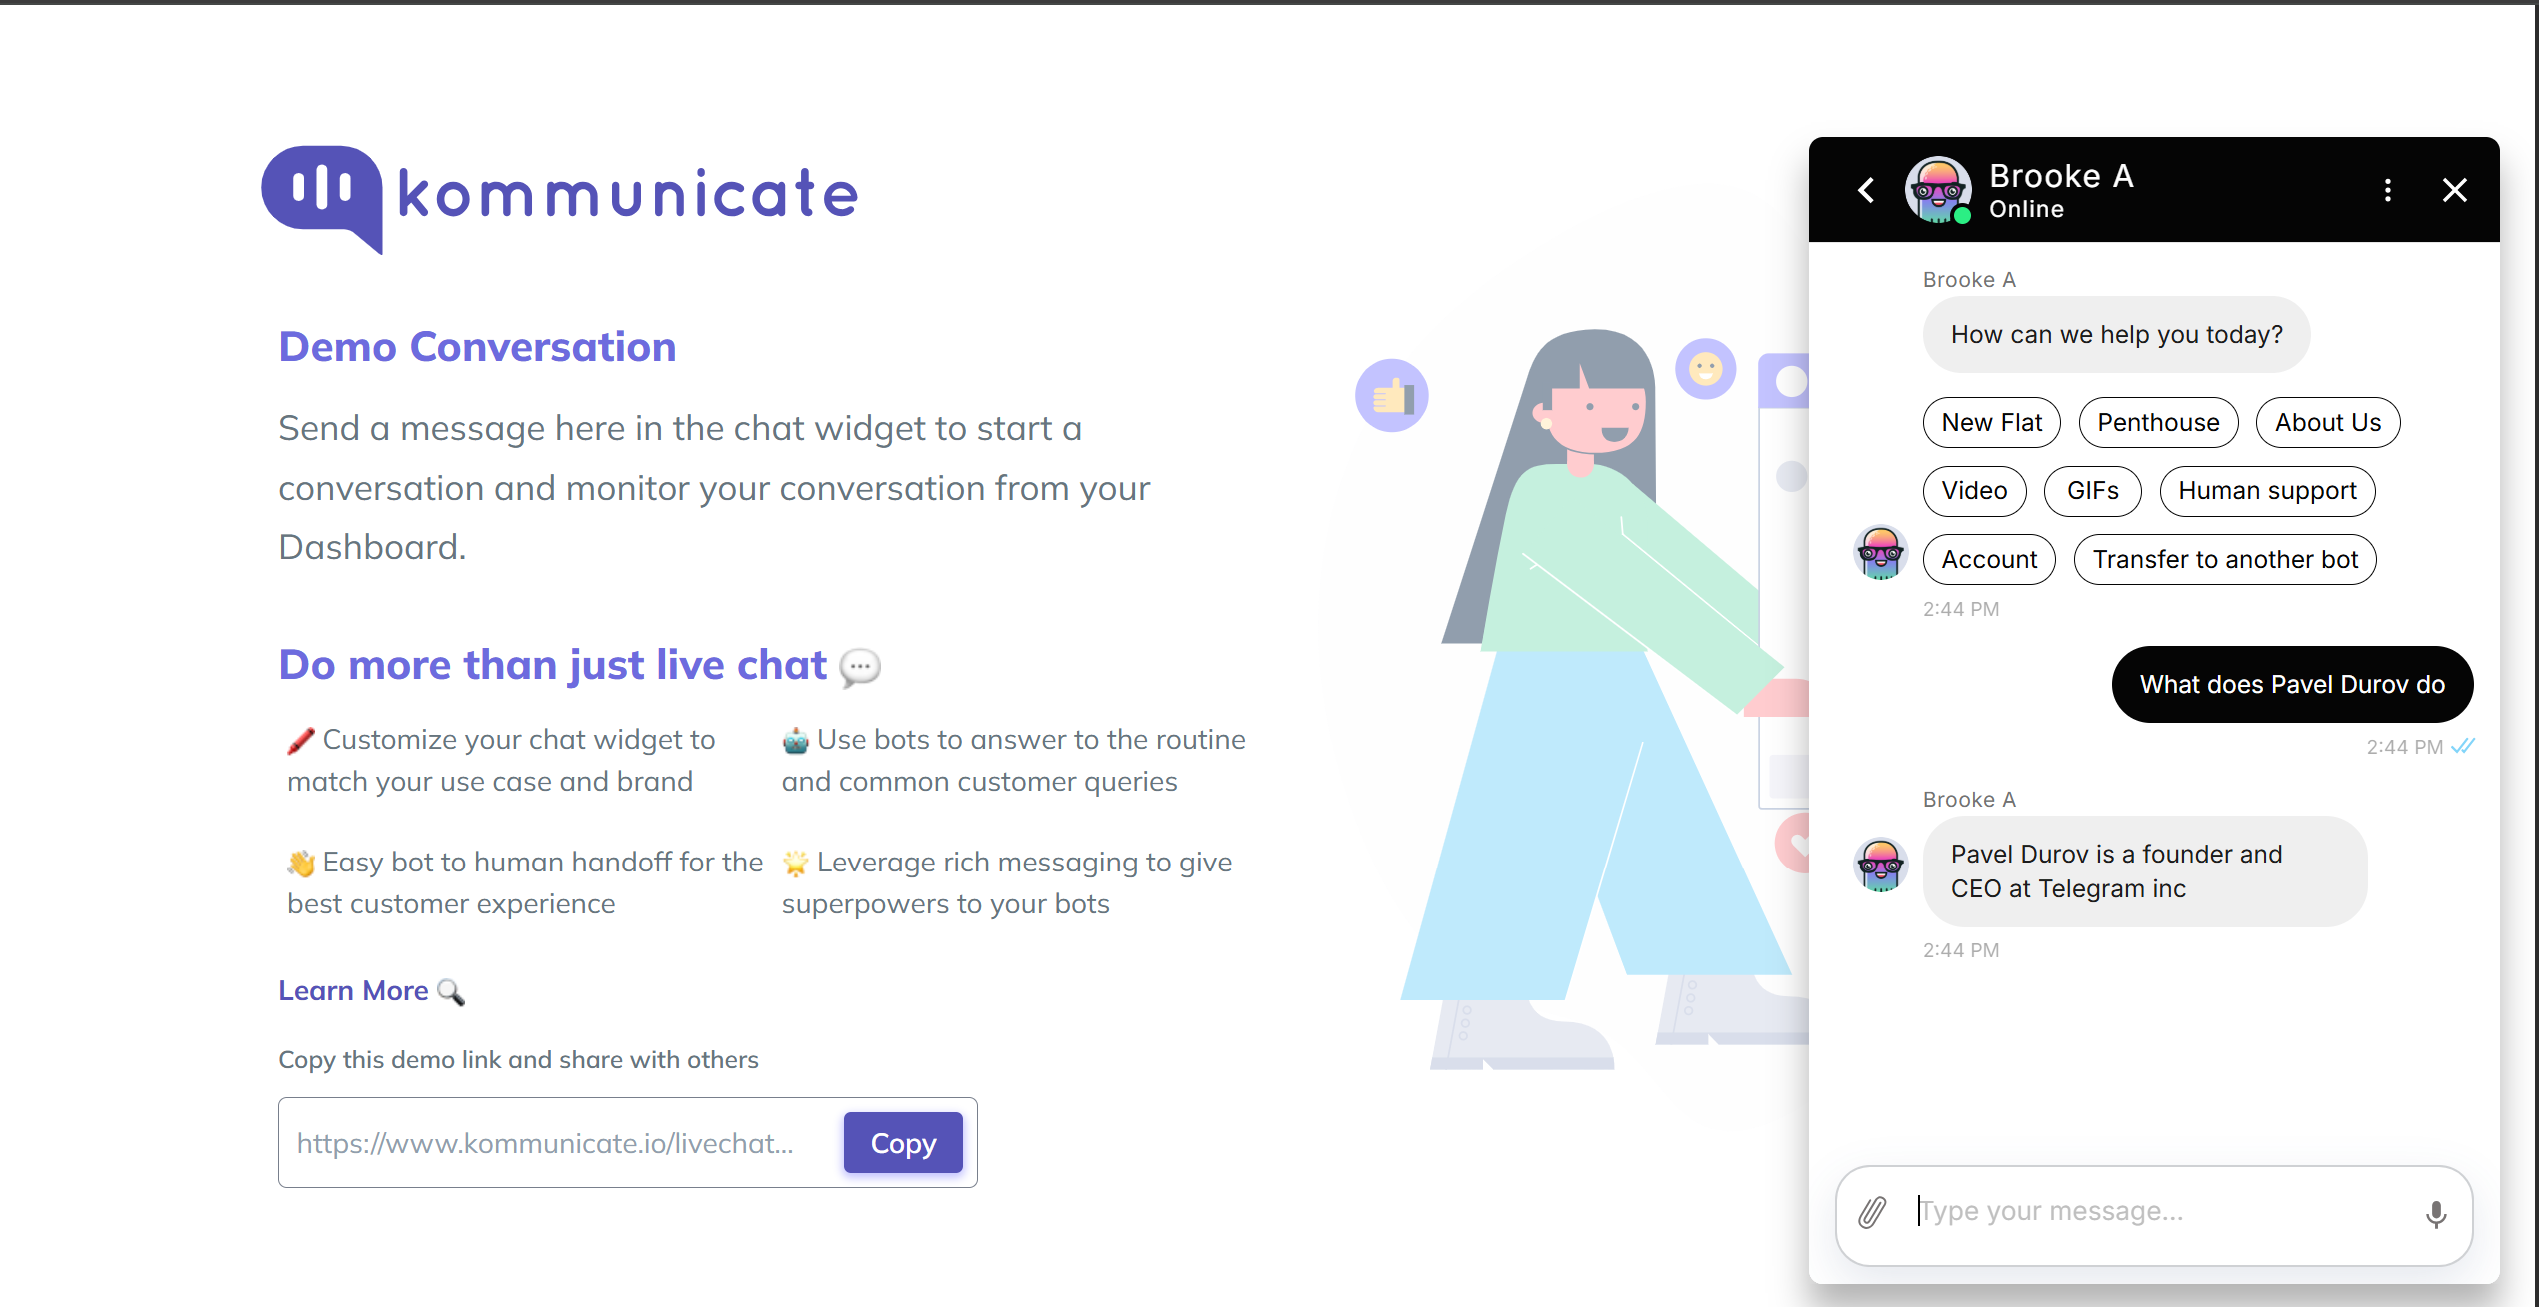
Intents allow you to intercept a conversation when a user hits a specific milestone or "junction." You can use them for:
- Strategic Human Handover: Route conversations to a live human agent at specific high-value moments. For example, if a user says, "I am interested in buying your enterprise product," you can immediately bypass the AI and hand off the lead to a sales representative.
- Rich Media & UI Elements: Instead of sending only plain text, an intent can trigger custom rich messages, upload structured images, or render interactive UI elements like buttons, lists, and forms.
- Custom Payloads: Pass structured backend data or configuration code directly to your application environment based on what the user said.
Dynamic Messaging via Integrations
Static responses are not always enough. If a user asks, "What is my order status?" or "How many credits do I have left?", your agent needs to talk to your servers.
Kommunicate's Dynamic Messaging allows your intent to fetch real-time data from your own systems and present it directly to the end user.
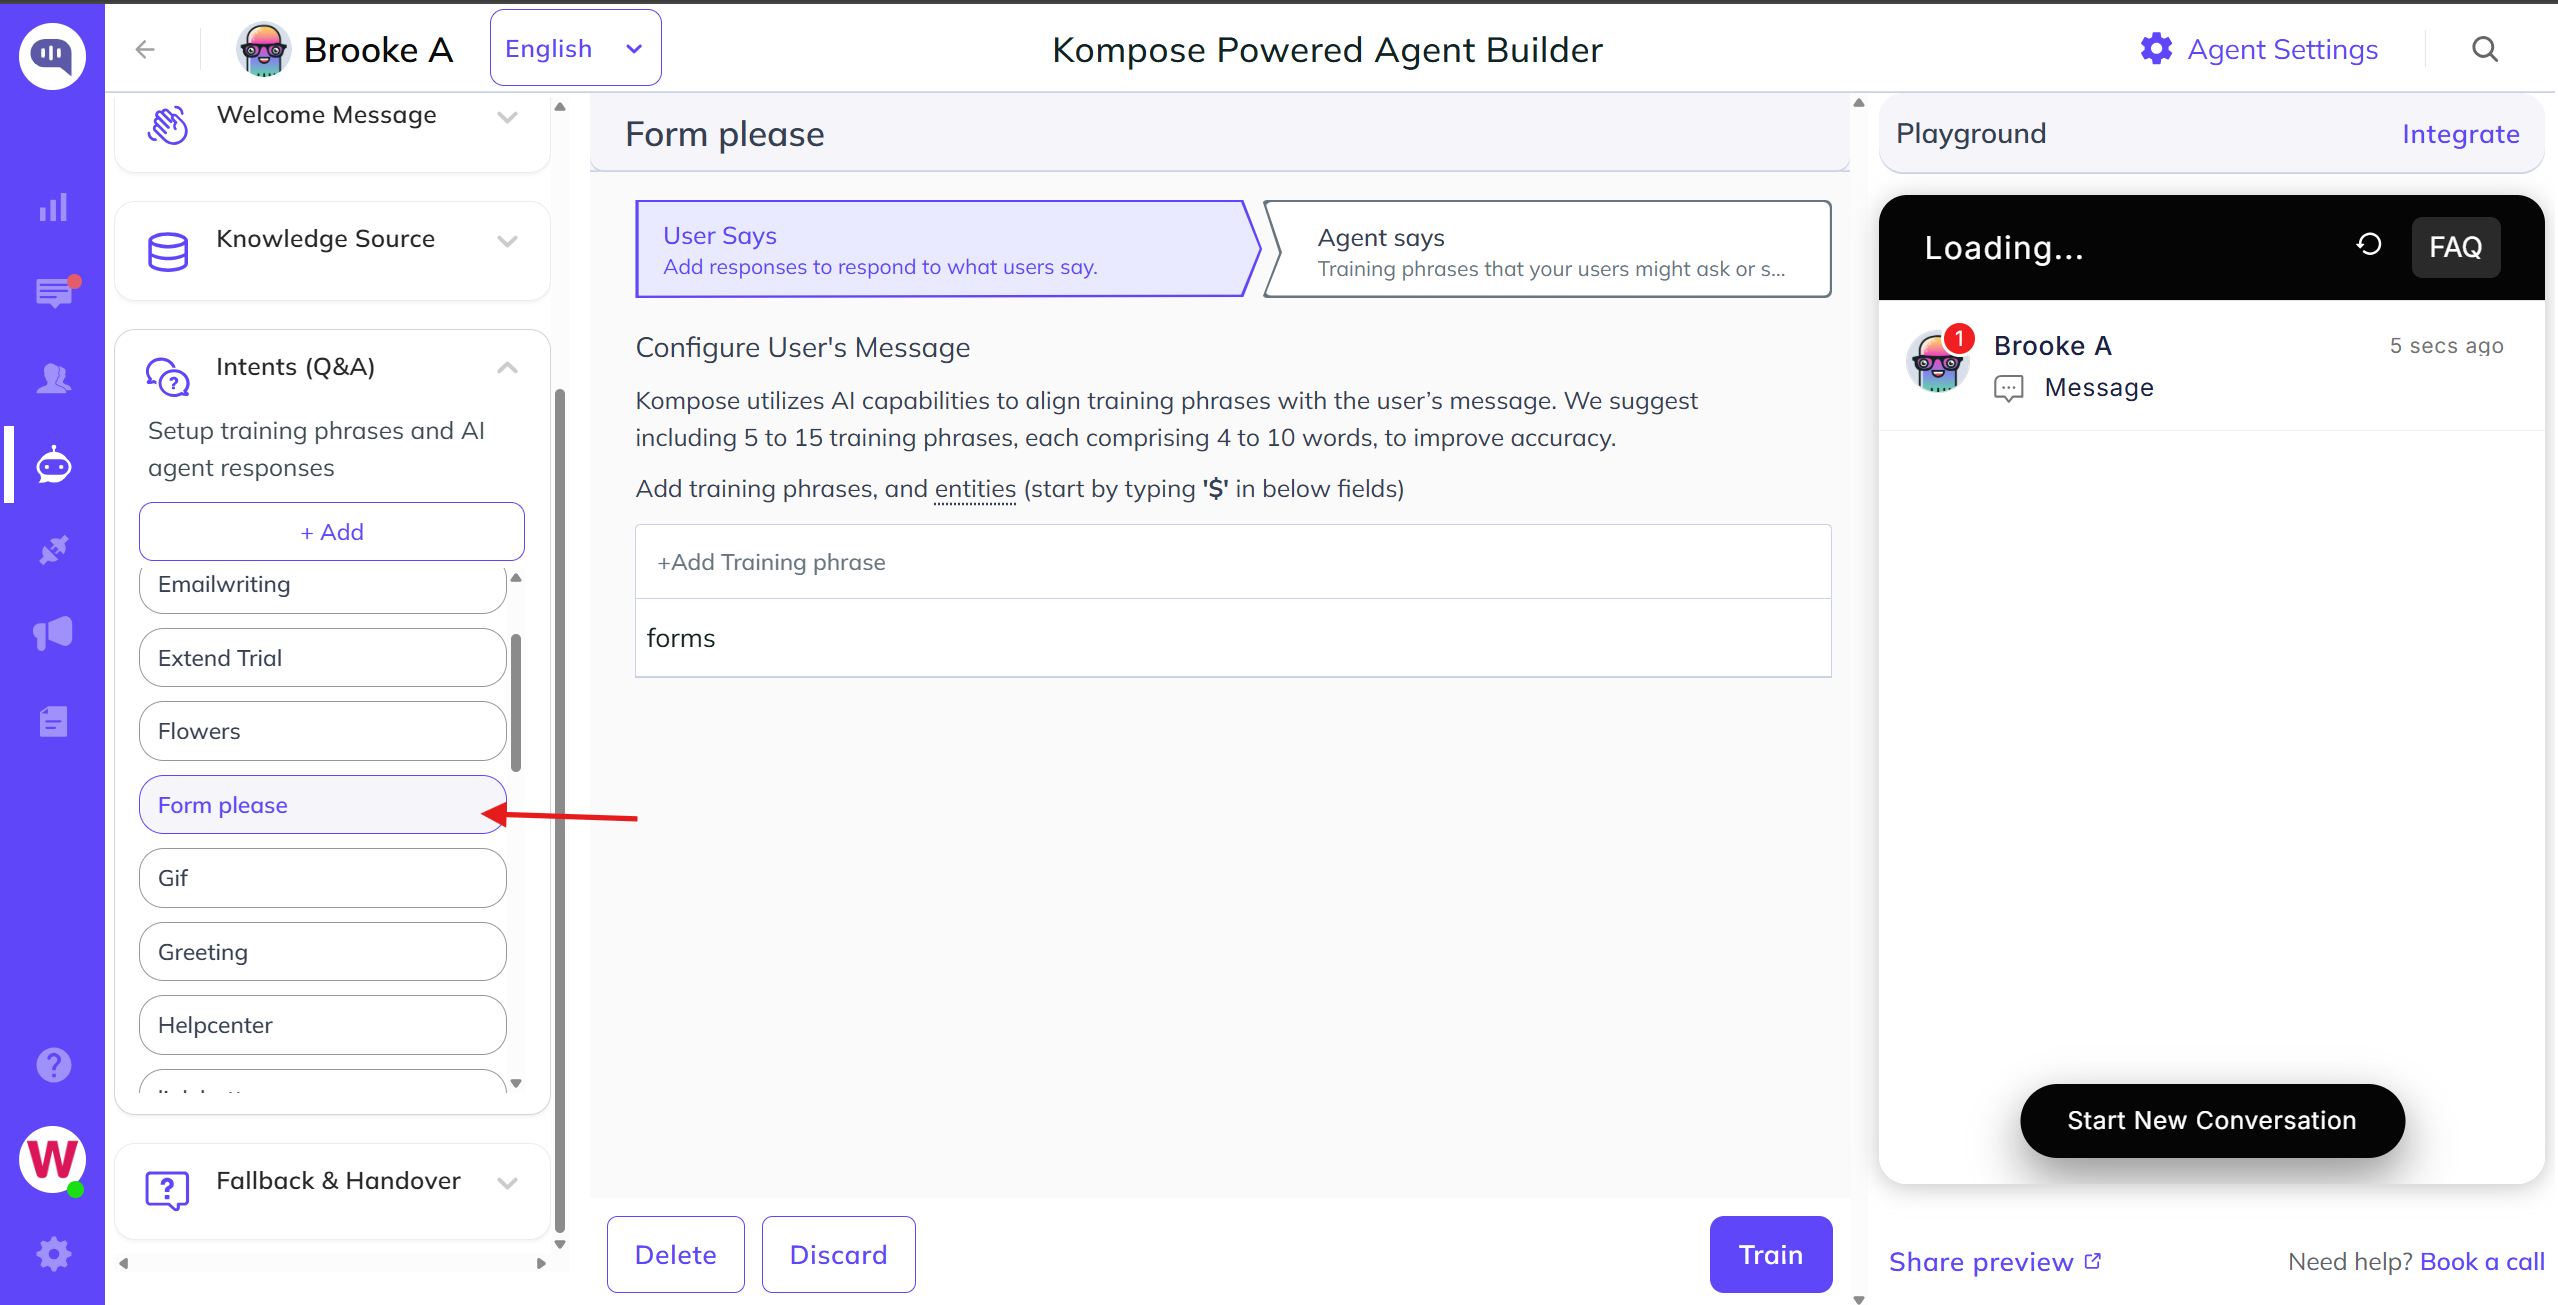
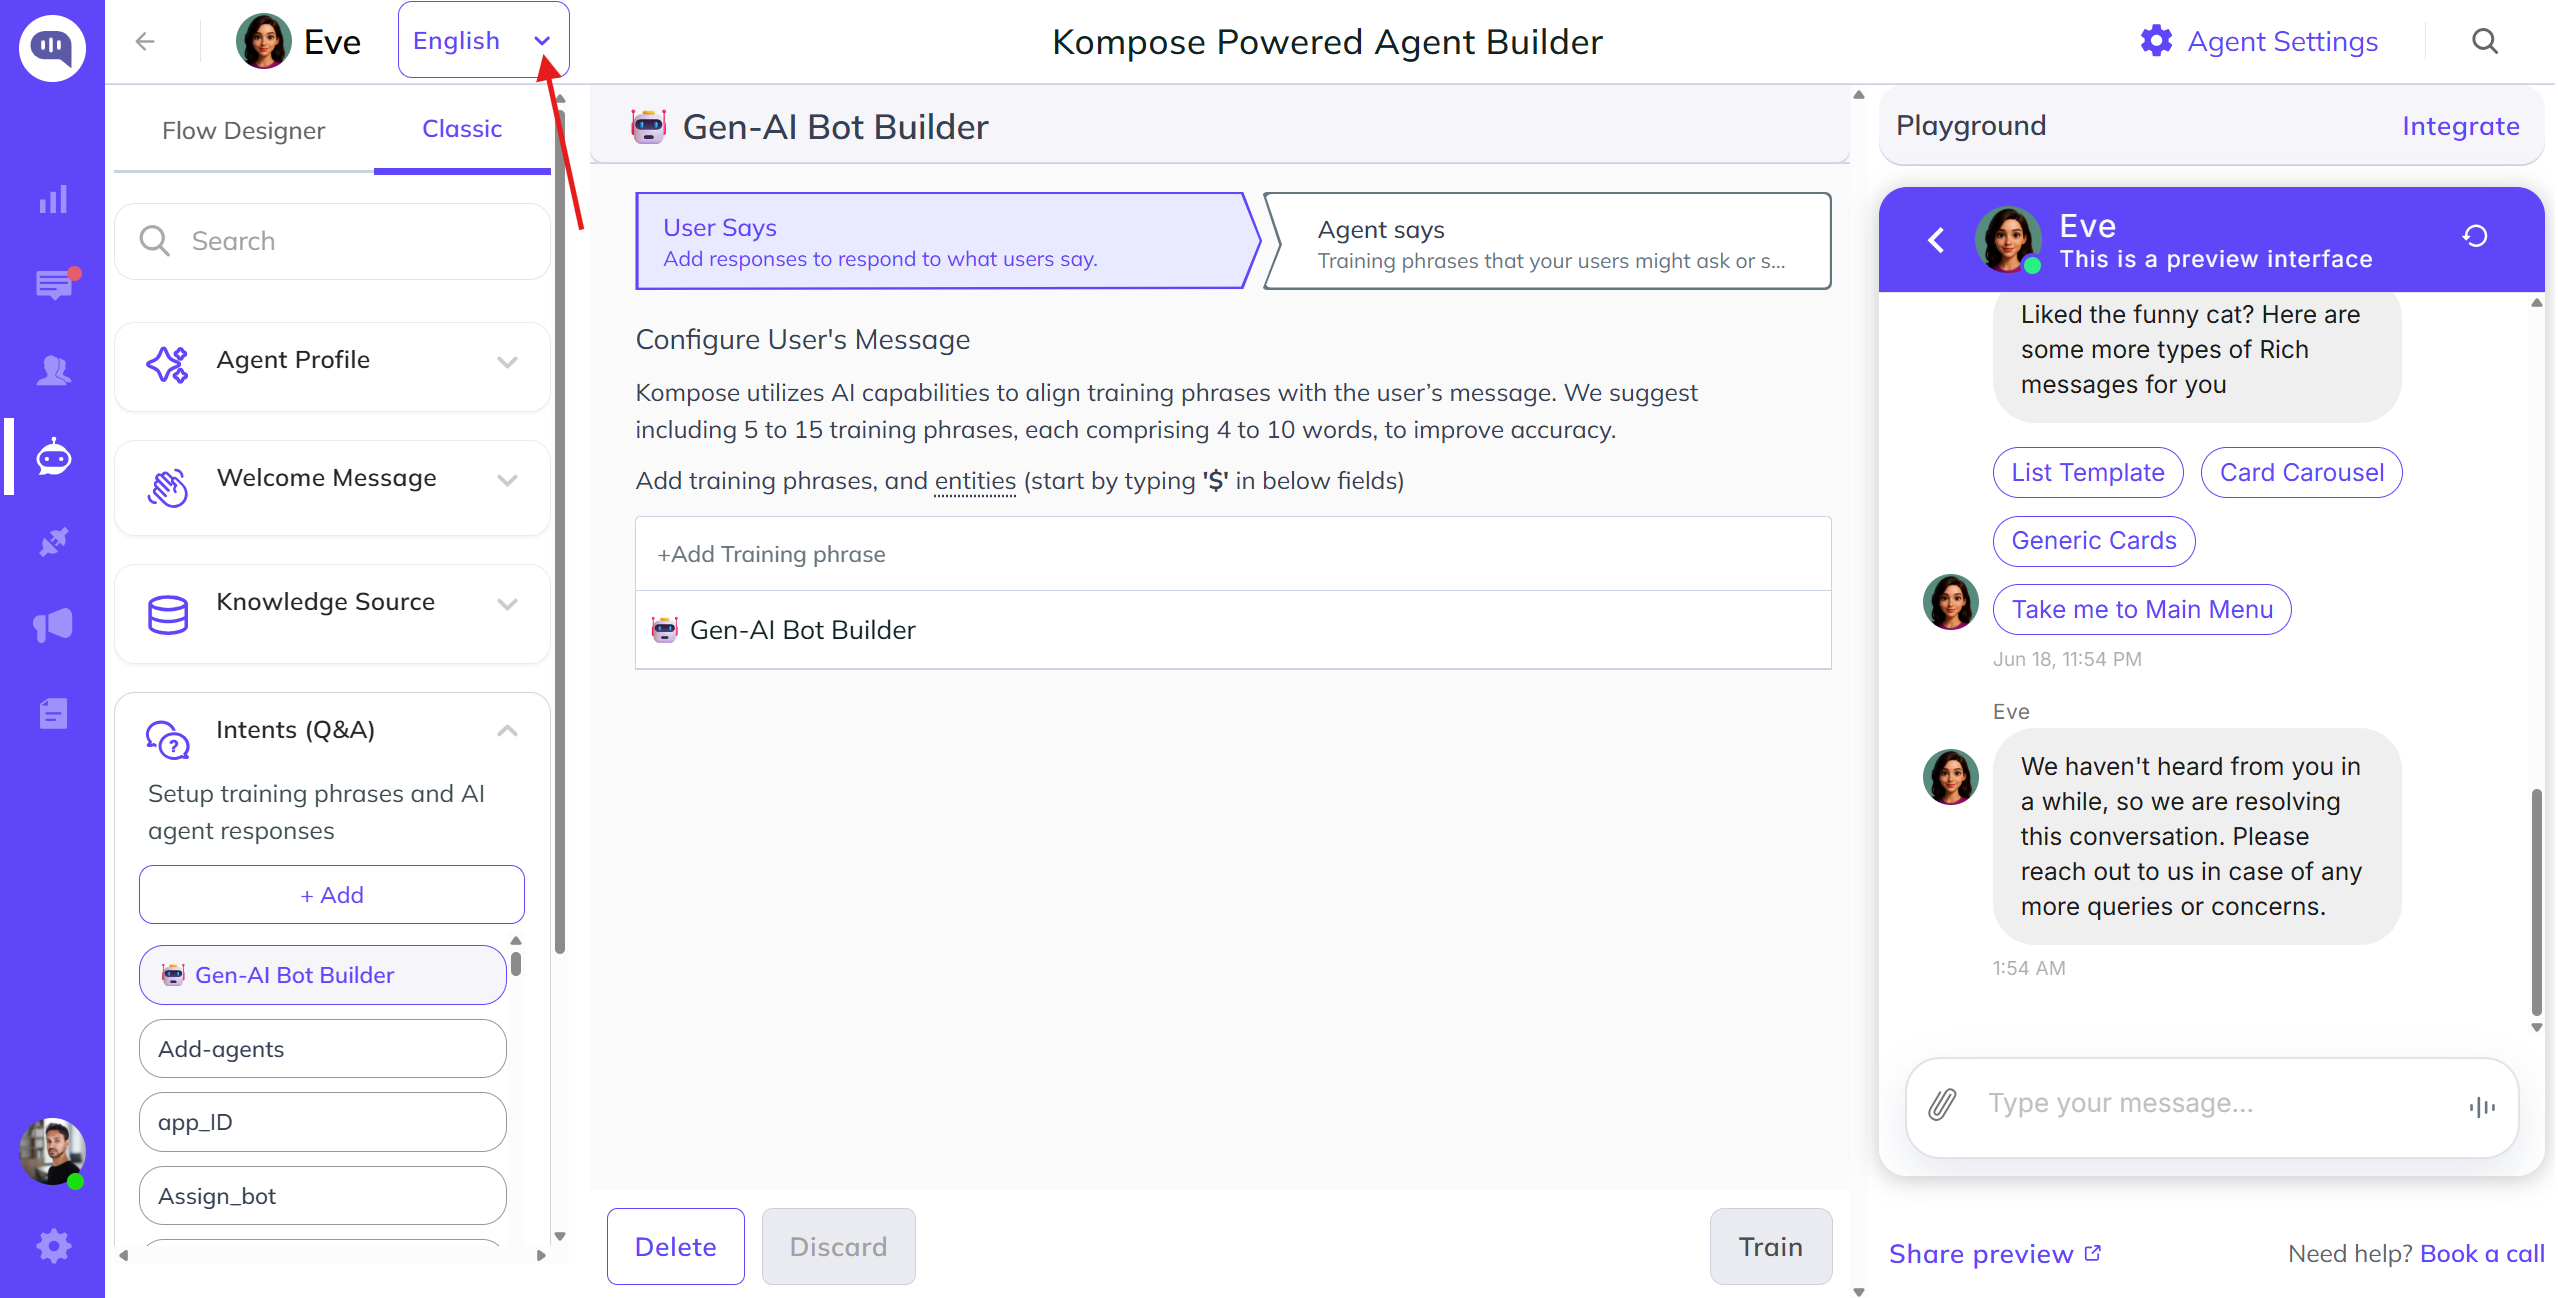
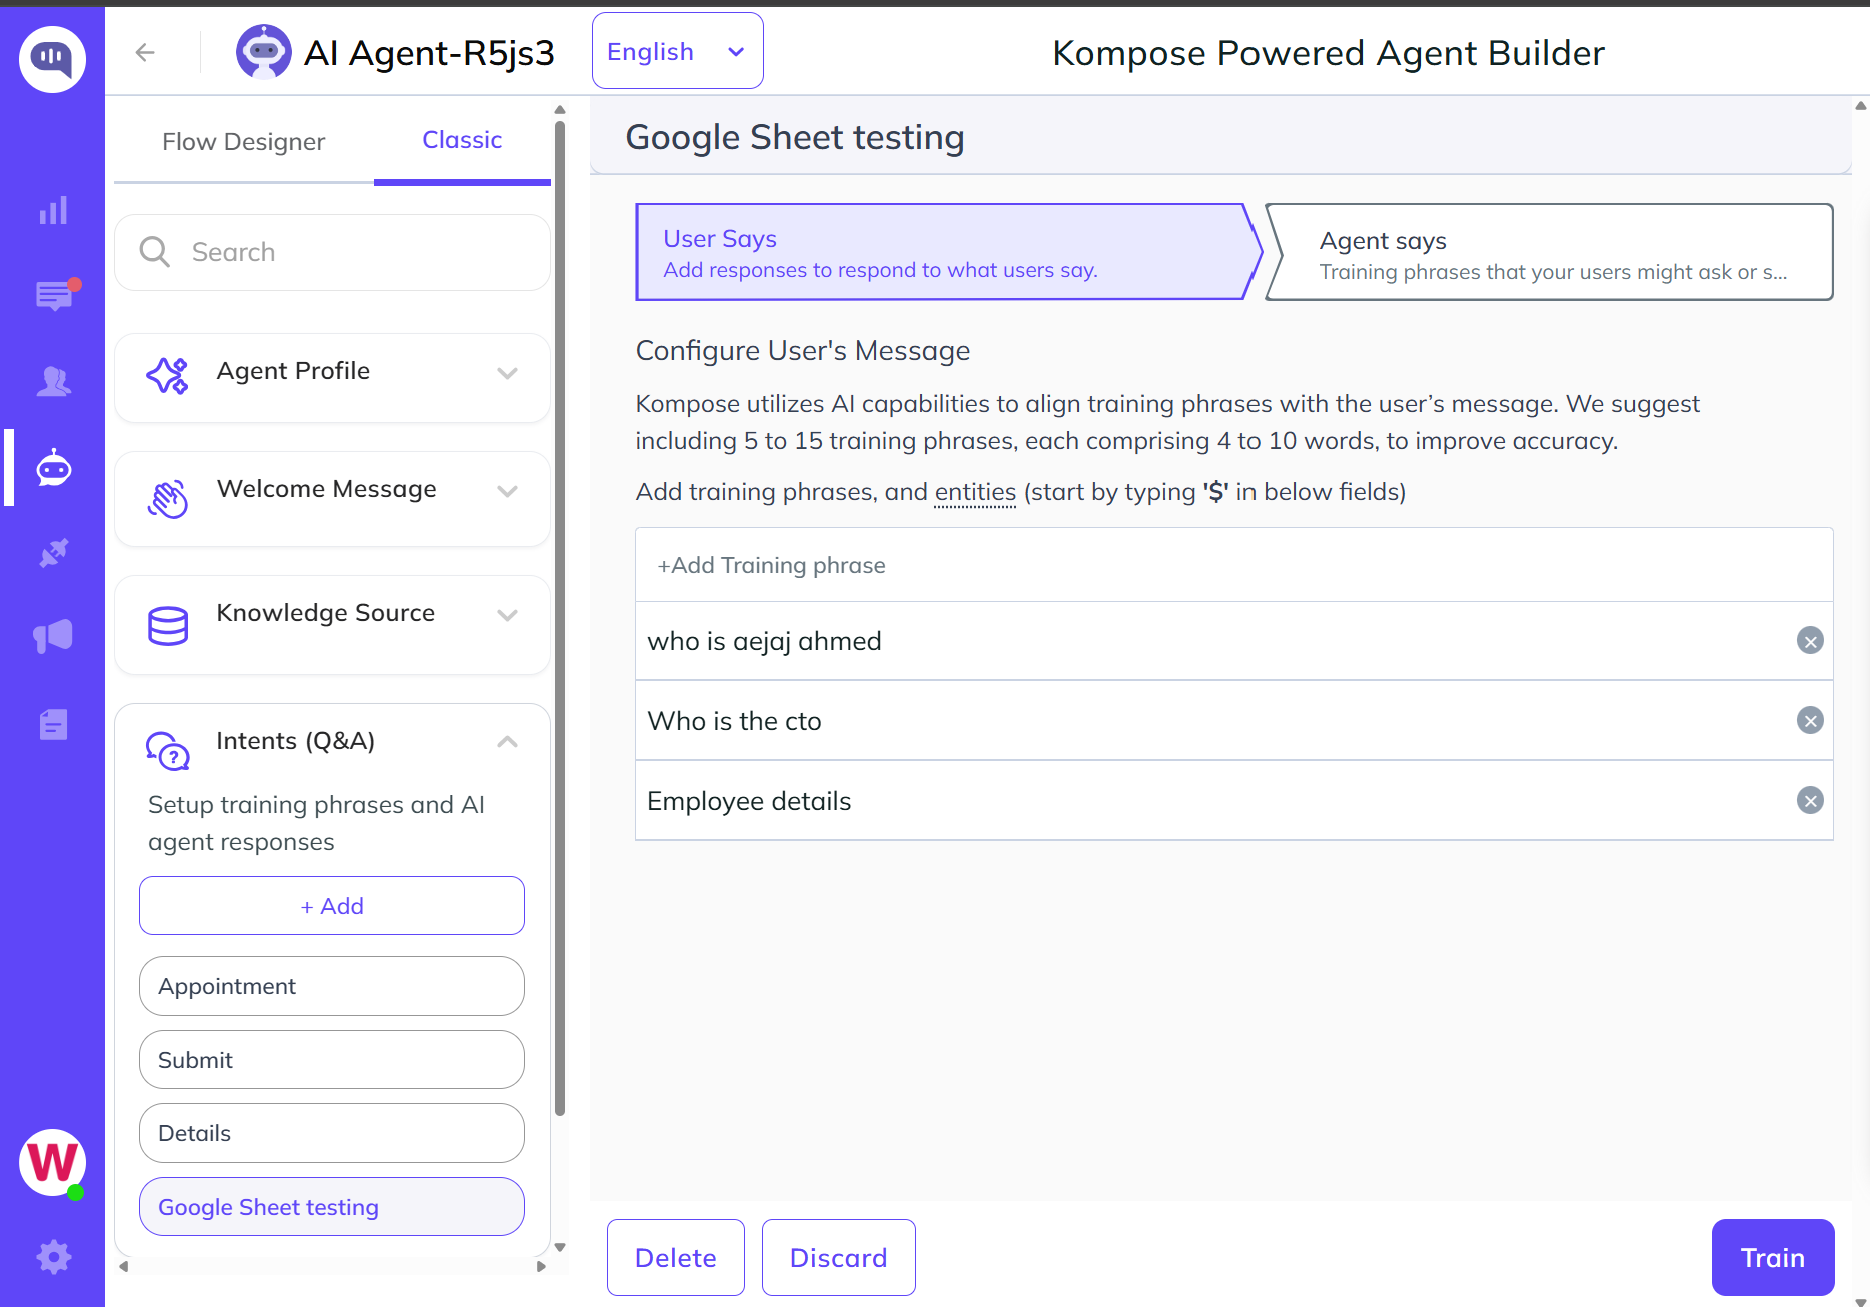
To get started with intents, you first need to define the trigger phrases that your users might type when they have a specific intent. Kompose uses AI capabilities to map phrase variations to the user's true message.
- Add Training Phrases: Click the
+ Add Training phrasefield to input different ways a customer might ask the same question. - Training Best Practices: For the best recognition accuracy, include 5 to 15 training phrases per intent. Each phrase should ideally contain 4 to 10 words.
- Extracting Entities: If you need to capture specific variables from the user's input, such as a city name, tracking number, or product type, add entities. Start by typing the
$symbol inside the training phrase field to tag and define variables.
Best Practices for High Accuracy
To ensure your agent triggers the correct intent only under the right context, keep these core rule-of-thumb principles in mind when writing your training phrases:
- Avoid repeating insignificant words: Make sure that non-contextual or filler words are not repeated across every training phrase within an intent.
- Maintain phrase volume: Add at least 3 to 4 training phrases for every intent to provide the natural language processing model with enough variation to learn effectively.
- Watch out for intent conflicts: Avoid using identical or highly similar phrases across different intents. If two distinct intents use the same phrasing, it creates an intent conflict, causing the AI agent to take the wrong action or enter a fallback state. Keep the vocabulary for each intent distinct and specialized.
AI agent to Human Handoff
An AI-to-human handoff ensures that your customers never hit a dead end. In Kompose, you can configure handoffs dynamically based on three core scenarios:
- Intent-Driven Handoff: When a user mentions a specific high-priority problem (e.g., login issues, payment failures).
- Conditional Request Handoff: When a user explicitly asks to speak to a representative (e.g., "Talk to a human").
- Fallback Handoff: When the agent is stuck or fails to understand the user.
Method 1: Intent-based Handoffs (Contextual & Direct Requests)
You do not have to wait for the AI agent to fail before transferring a conversation to a human. Train explicit intents to trigger an immediate handover when a customer reports a critical issue or directly asks for a representative.
Whether a user's intent is contextual or a direct request, both use the same setup in the Kompose UI:
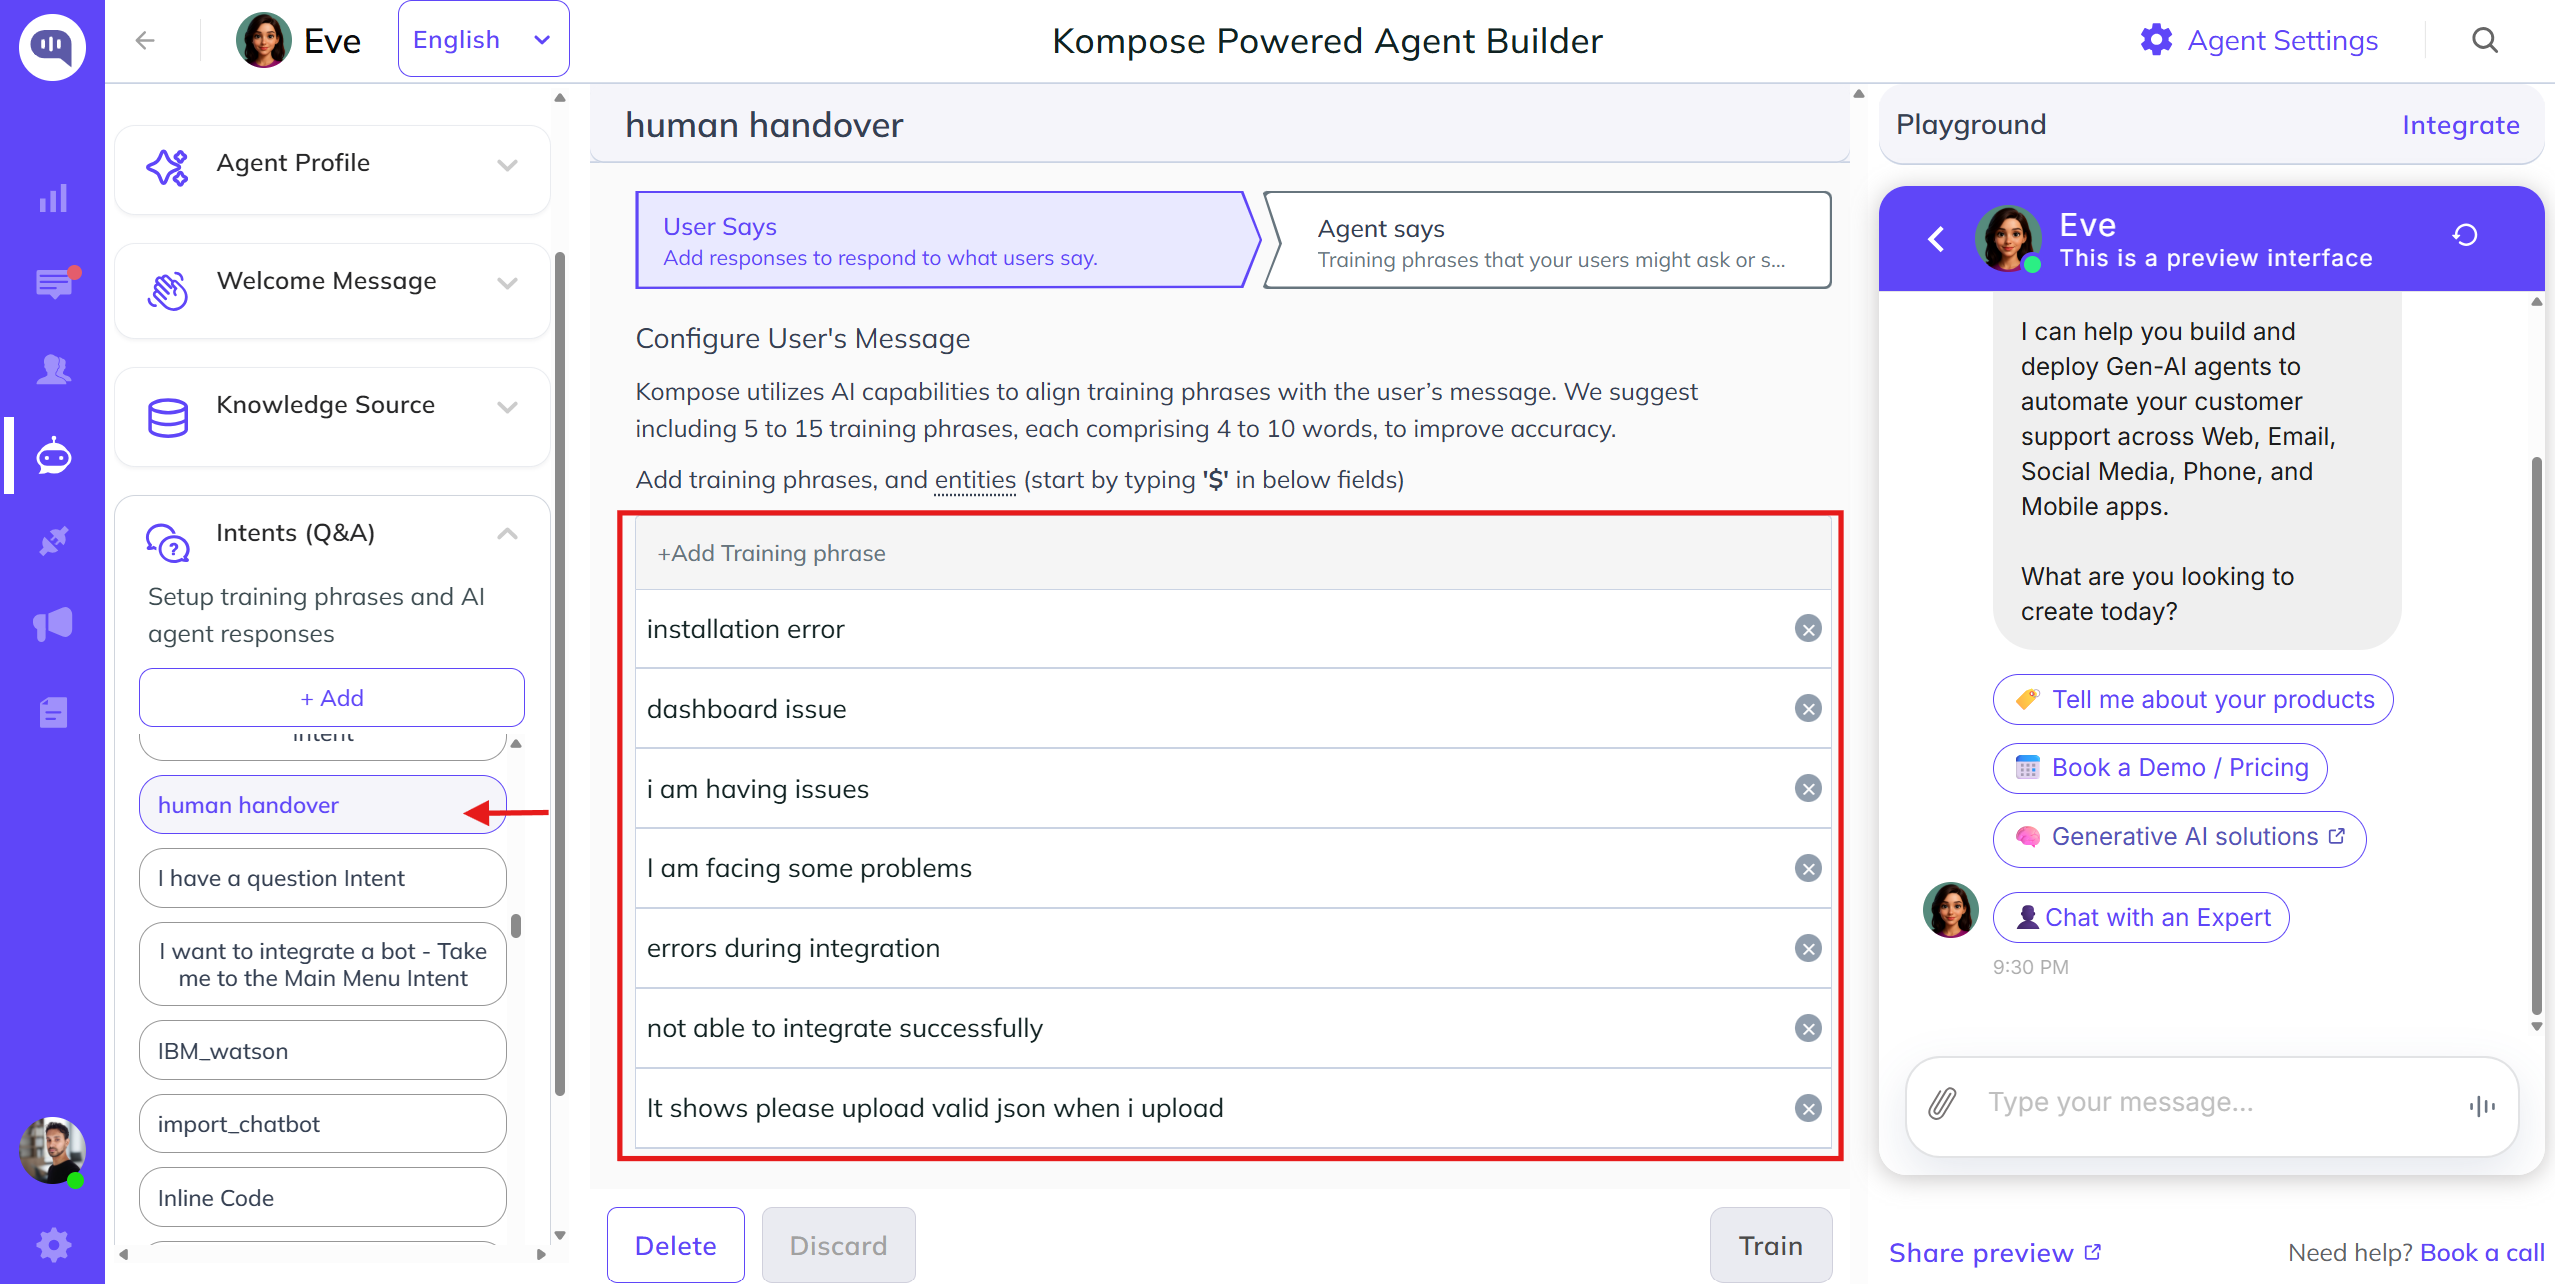
Scenario A: Contextual Issues (Problem-Driven): Trigger an immediate handoff for high-priority or sensitive roadblocks. Examples: "I am facing issues placing my order", "Login loop error", or "Unable to make a payment".
Scenario B: Direct Requests (Conditional Routing): Trigger a handoff when a user explicitly wants to bypass the AI. Examples: "Talk to a human", "Connect me to an agent", or "Speak to a representative".
To set this up, create a dedicated intent, such as Human Handoff, and add training phrases for either scenario, as shown below.
Under the Agent Says section, click More in the response toolbar and select Handover.
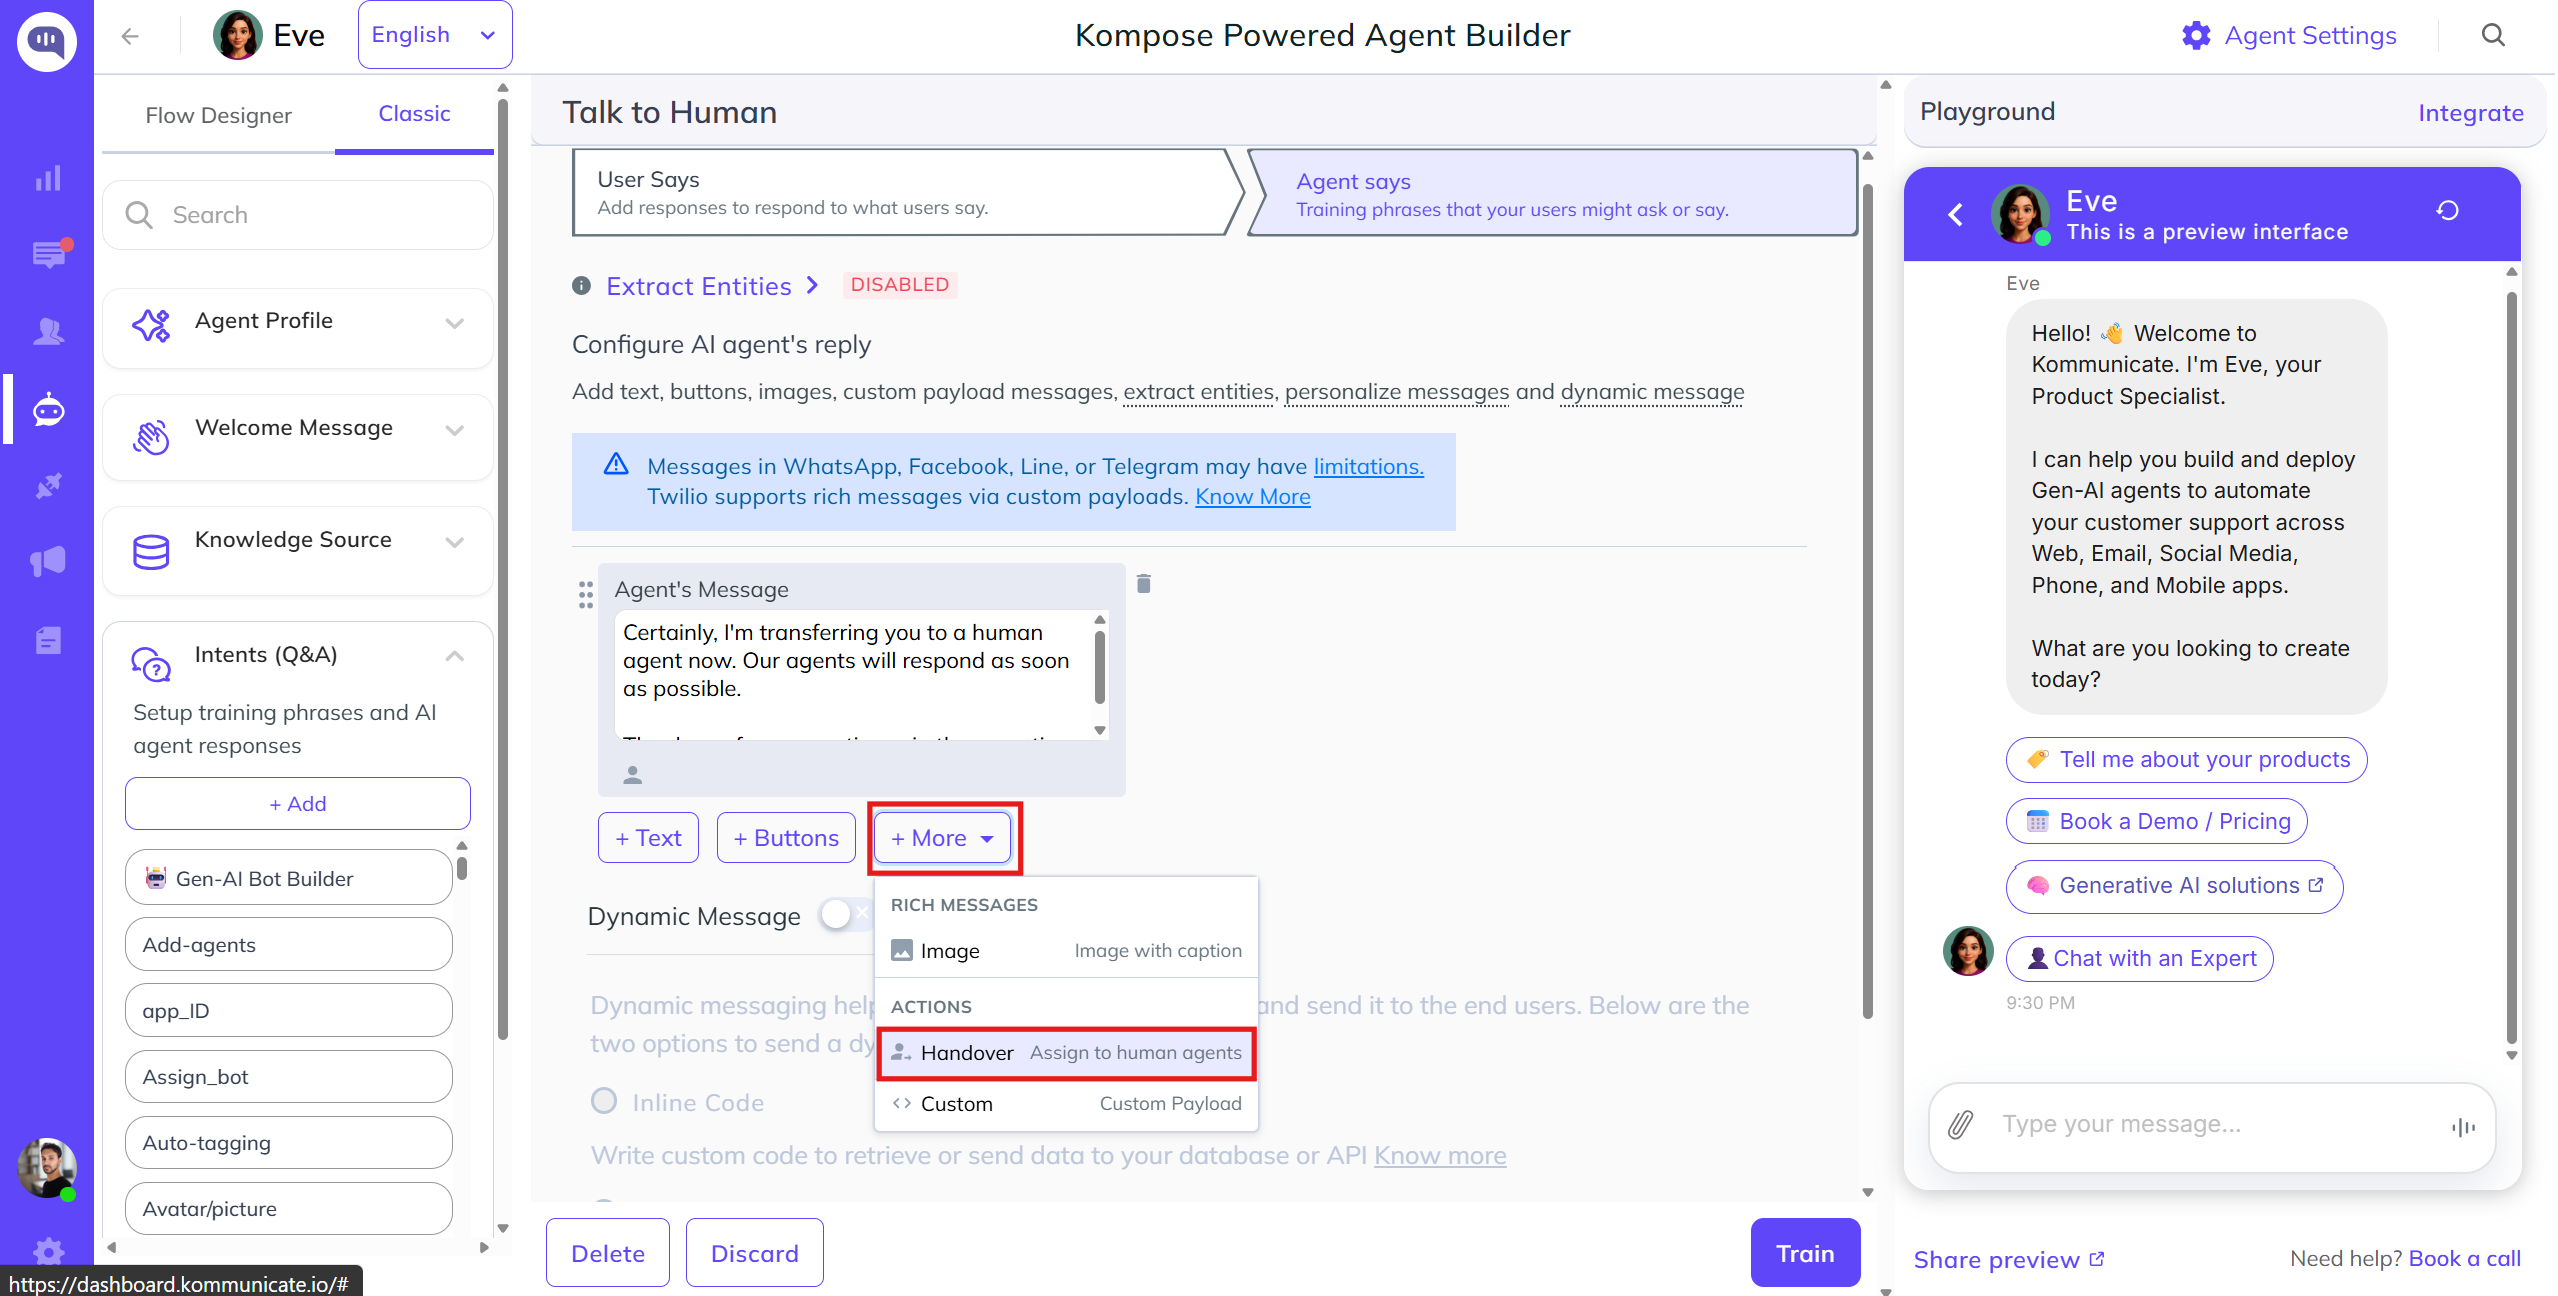
Select Assign to a specific human if you want these triggers routed to a designated specialist, or leave it blank to let your global dashboard routing rules distribute the conversation.
Method 2: Configuring Fallback & Handover Settings
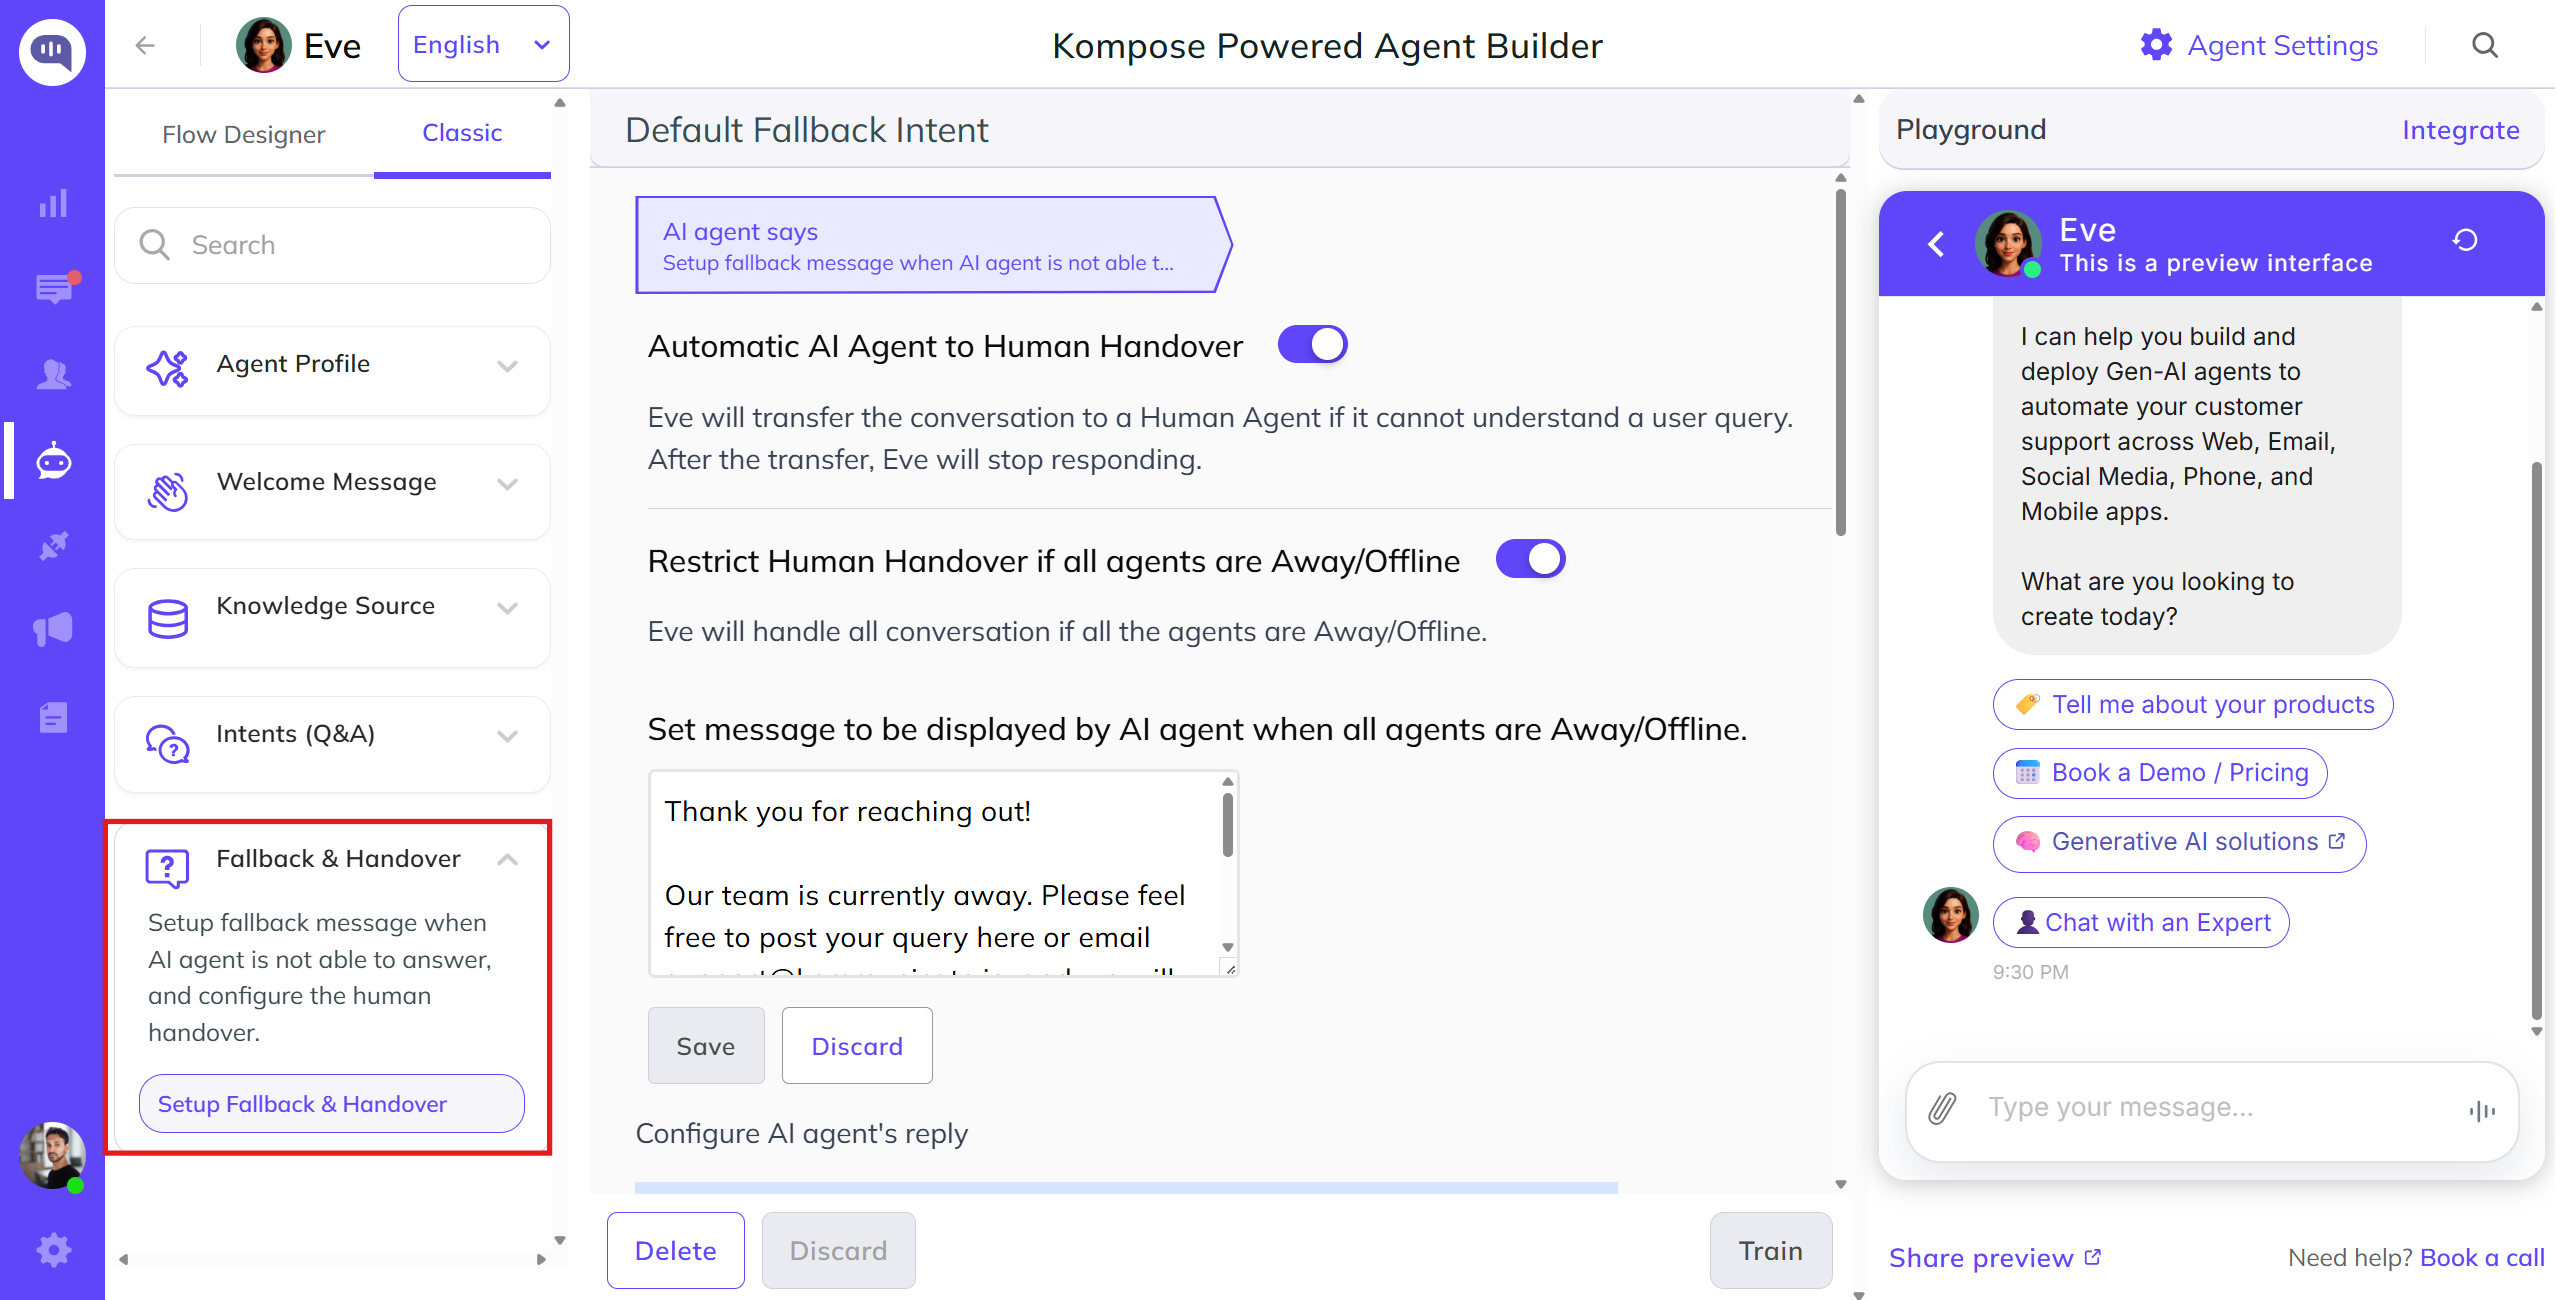
When your AI agent hits a conversational roadblock, you can manage the fallback behavior to maintain a high-quality user experience. As shown in the image below, navigating to Fallback & Handover in the left menu opens the Default Fallback Intent section.
Key settings include:
- Automatic AI agent to Human Handover: Use this toggle to allow the agent to automatically transfer the conversation to a human support agent if it cannot understand a user query. Once the transfer completes, the AI agent stops responding so the human can take over.
- Restrict Human Handover if all agents are Away/Offline: Enable this option to protect your queue when no live human agents are available. When enabled, the AI agent continues to handle all conversations if the entire human team is marked as Away or Offline.
- Set message to be displayed by AI agent when all agents are Away/Offline: If your human team is offline and handover is restricted, customize an out-of-office message here.
rich messages
You can enhance conversation flows by using interactive rich messages, such as Buttons, Lists, Cards, Images, Videos, and Forms, to create a more engaging experience for your users.
How to Add rich messages
Navigate to the Intent: Create a new intent or open an existing one, add your target training phrases, and go to the Agent Says section.
Access Custom Payload: Click More in the response toolbar and select Custom Payload.
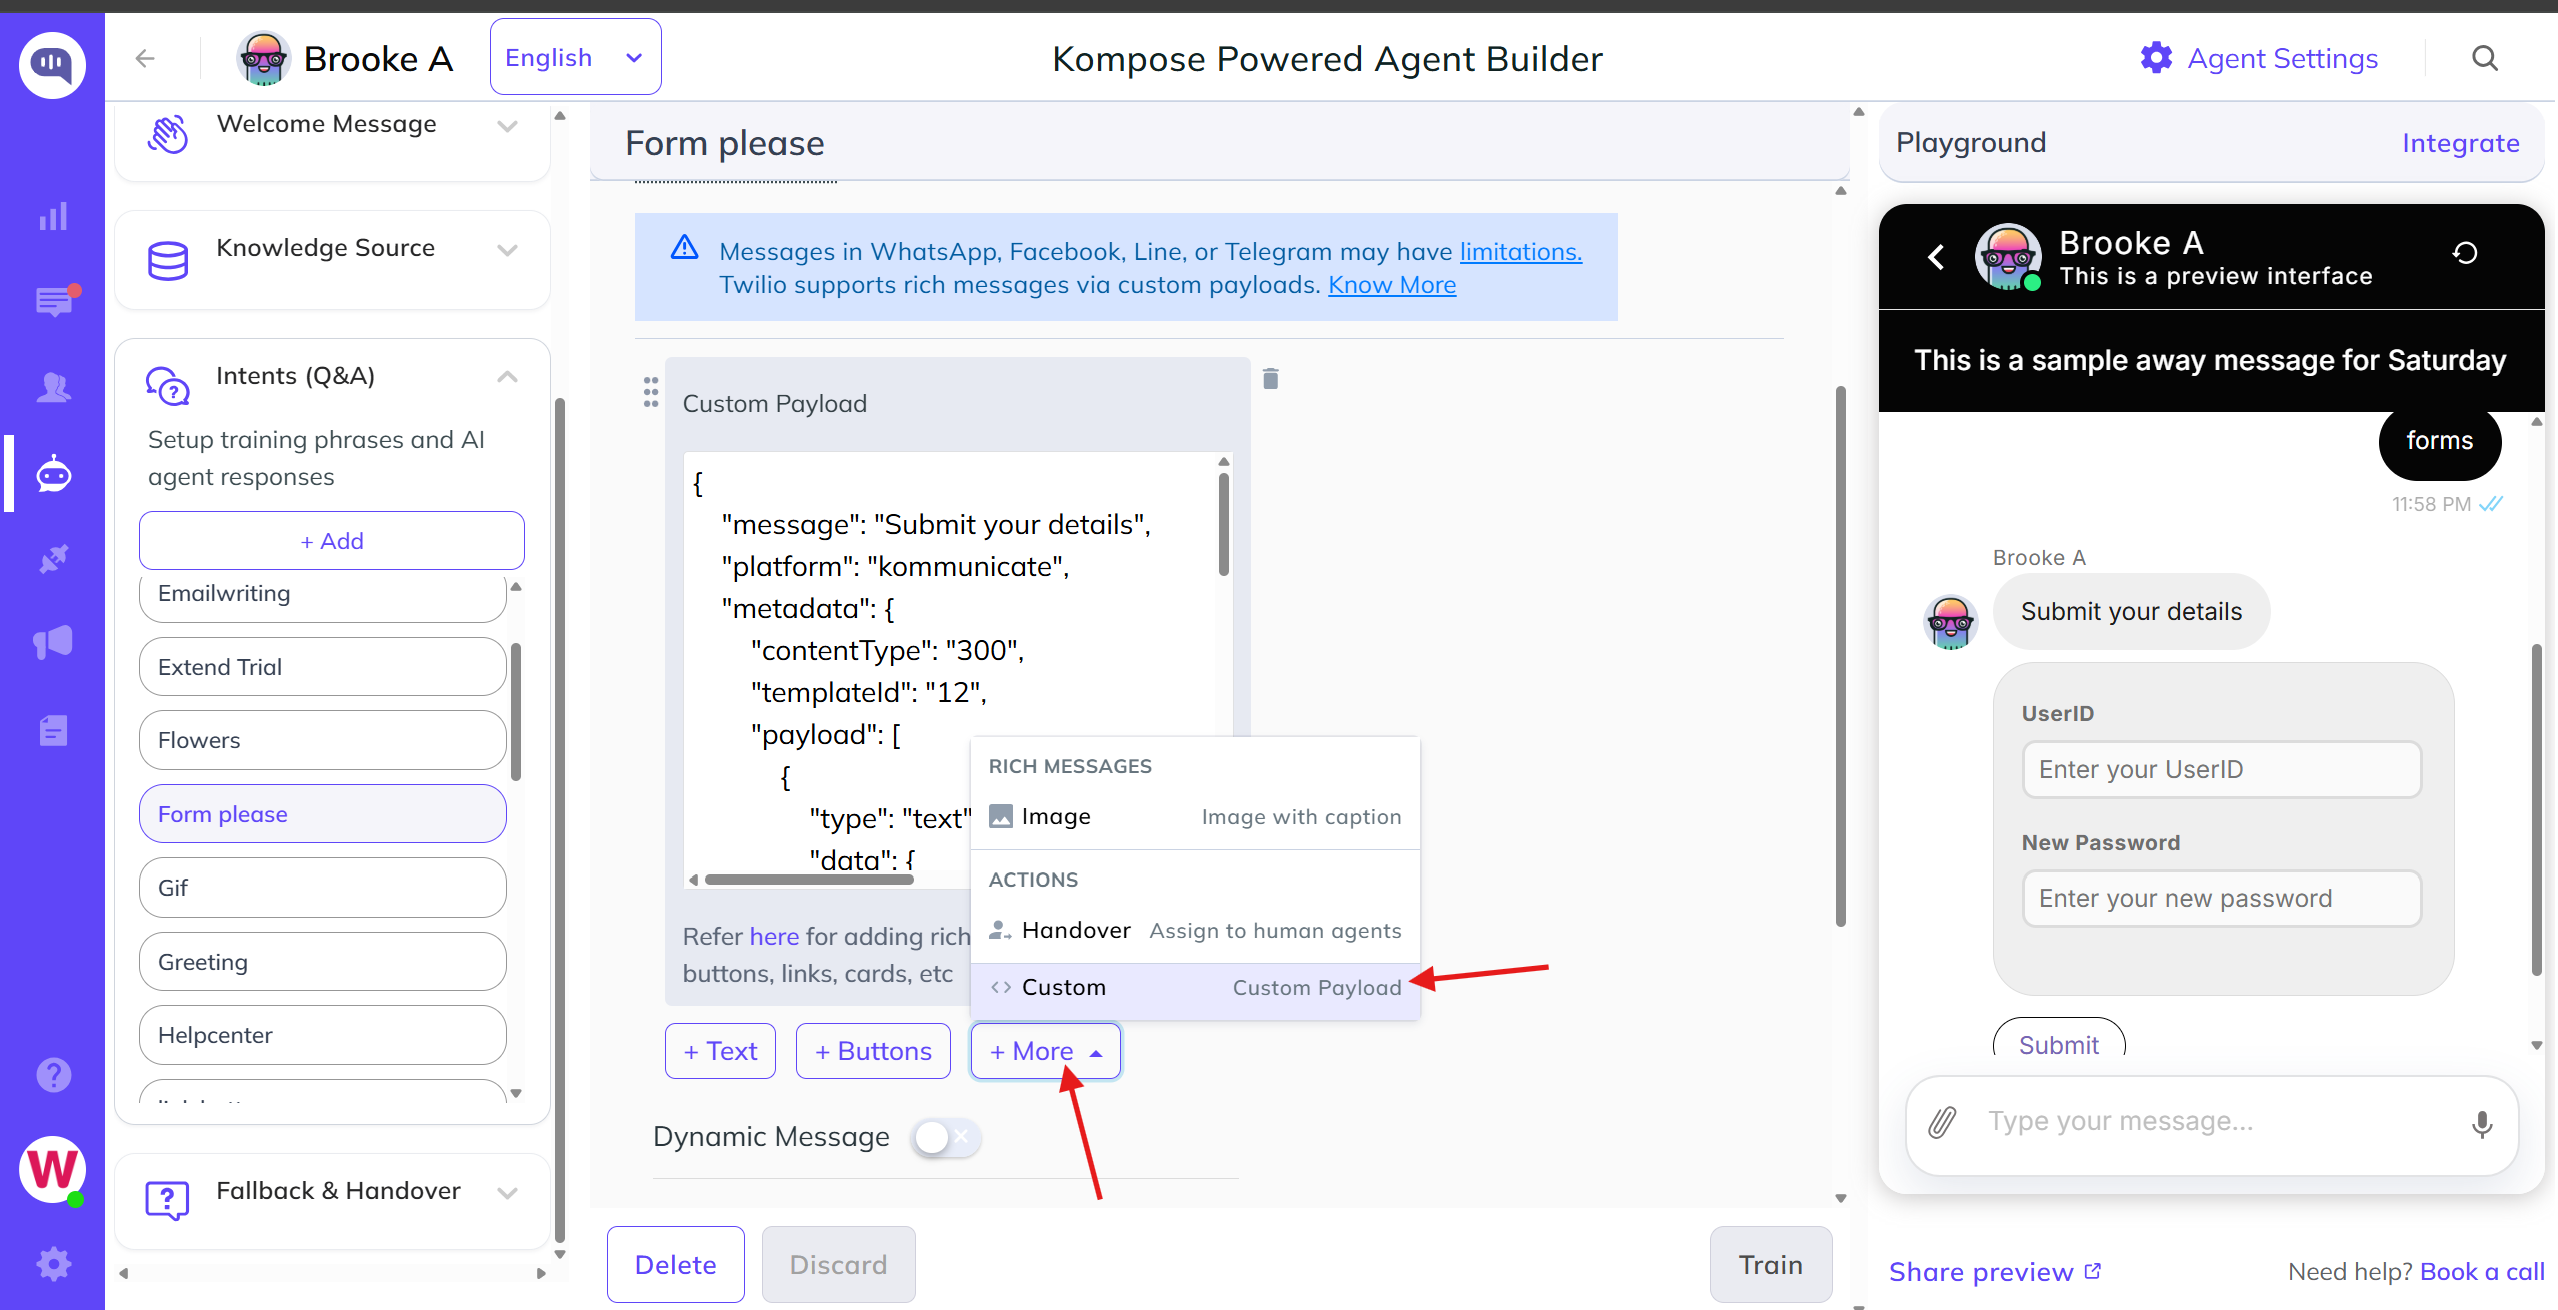
- Insert Code & Train: Paste your rich message JSON structure into the custom payload window, then click Train AI agent to save your updates.
You can copy pre-built, ready-to-use structural code snippets for all supported layout formats directly from the Message Types Documentation.
Extract Entities
Entities are used to identify, capture, and extract useful data from user inputs. Kompose supports extracting essential user data types like emails, phone numbers, and more directly from a conversation.
How to Add Entities
Select an Intent: Type your training phrases under the User Says section.
Select the Text: Highlight the specific word inside your training phrase that represents the variable data (or type
$inside the field to open the entity mapping trigger).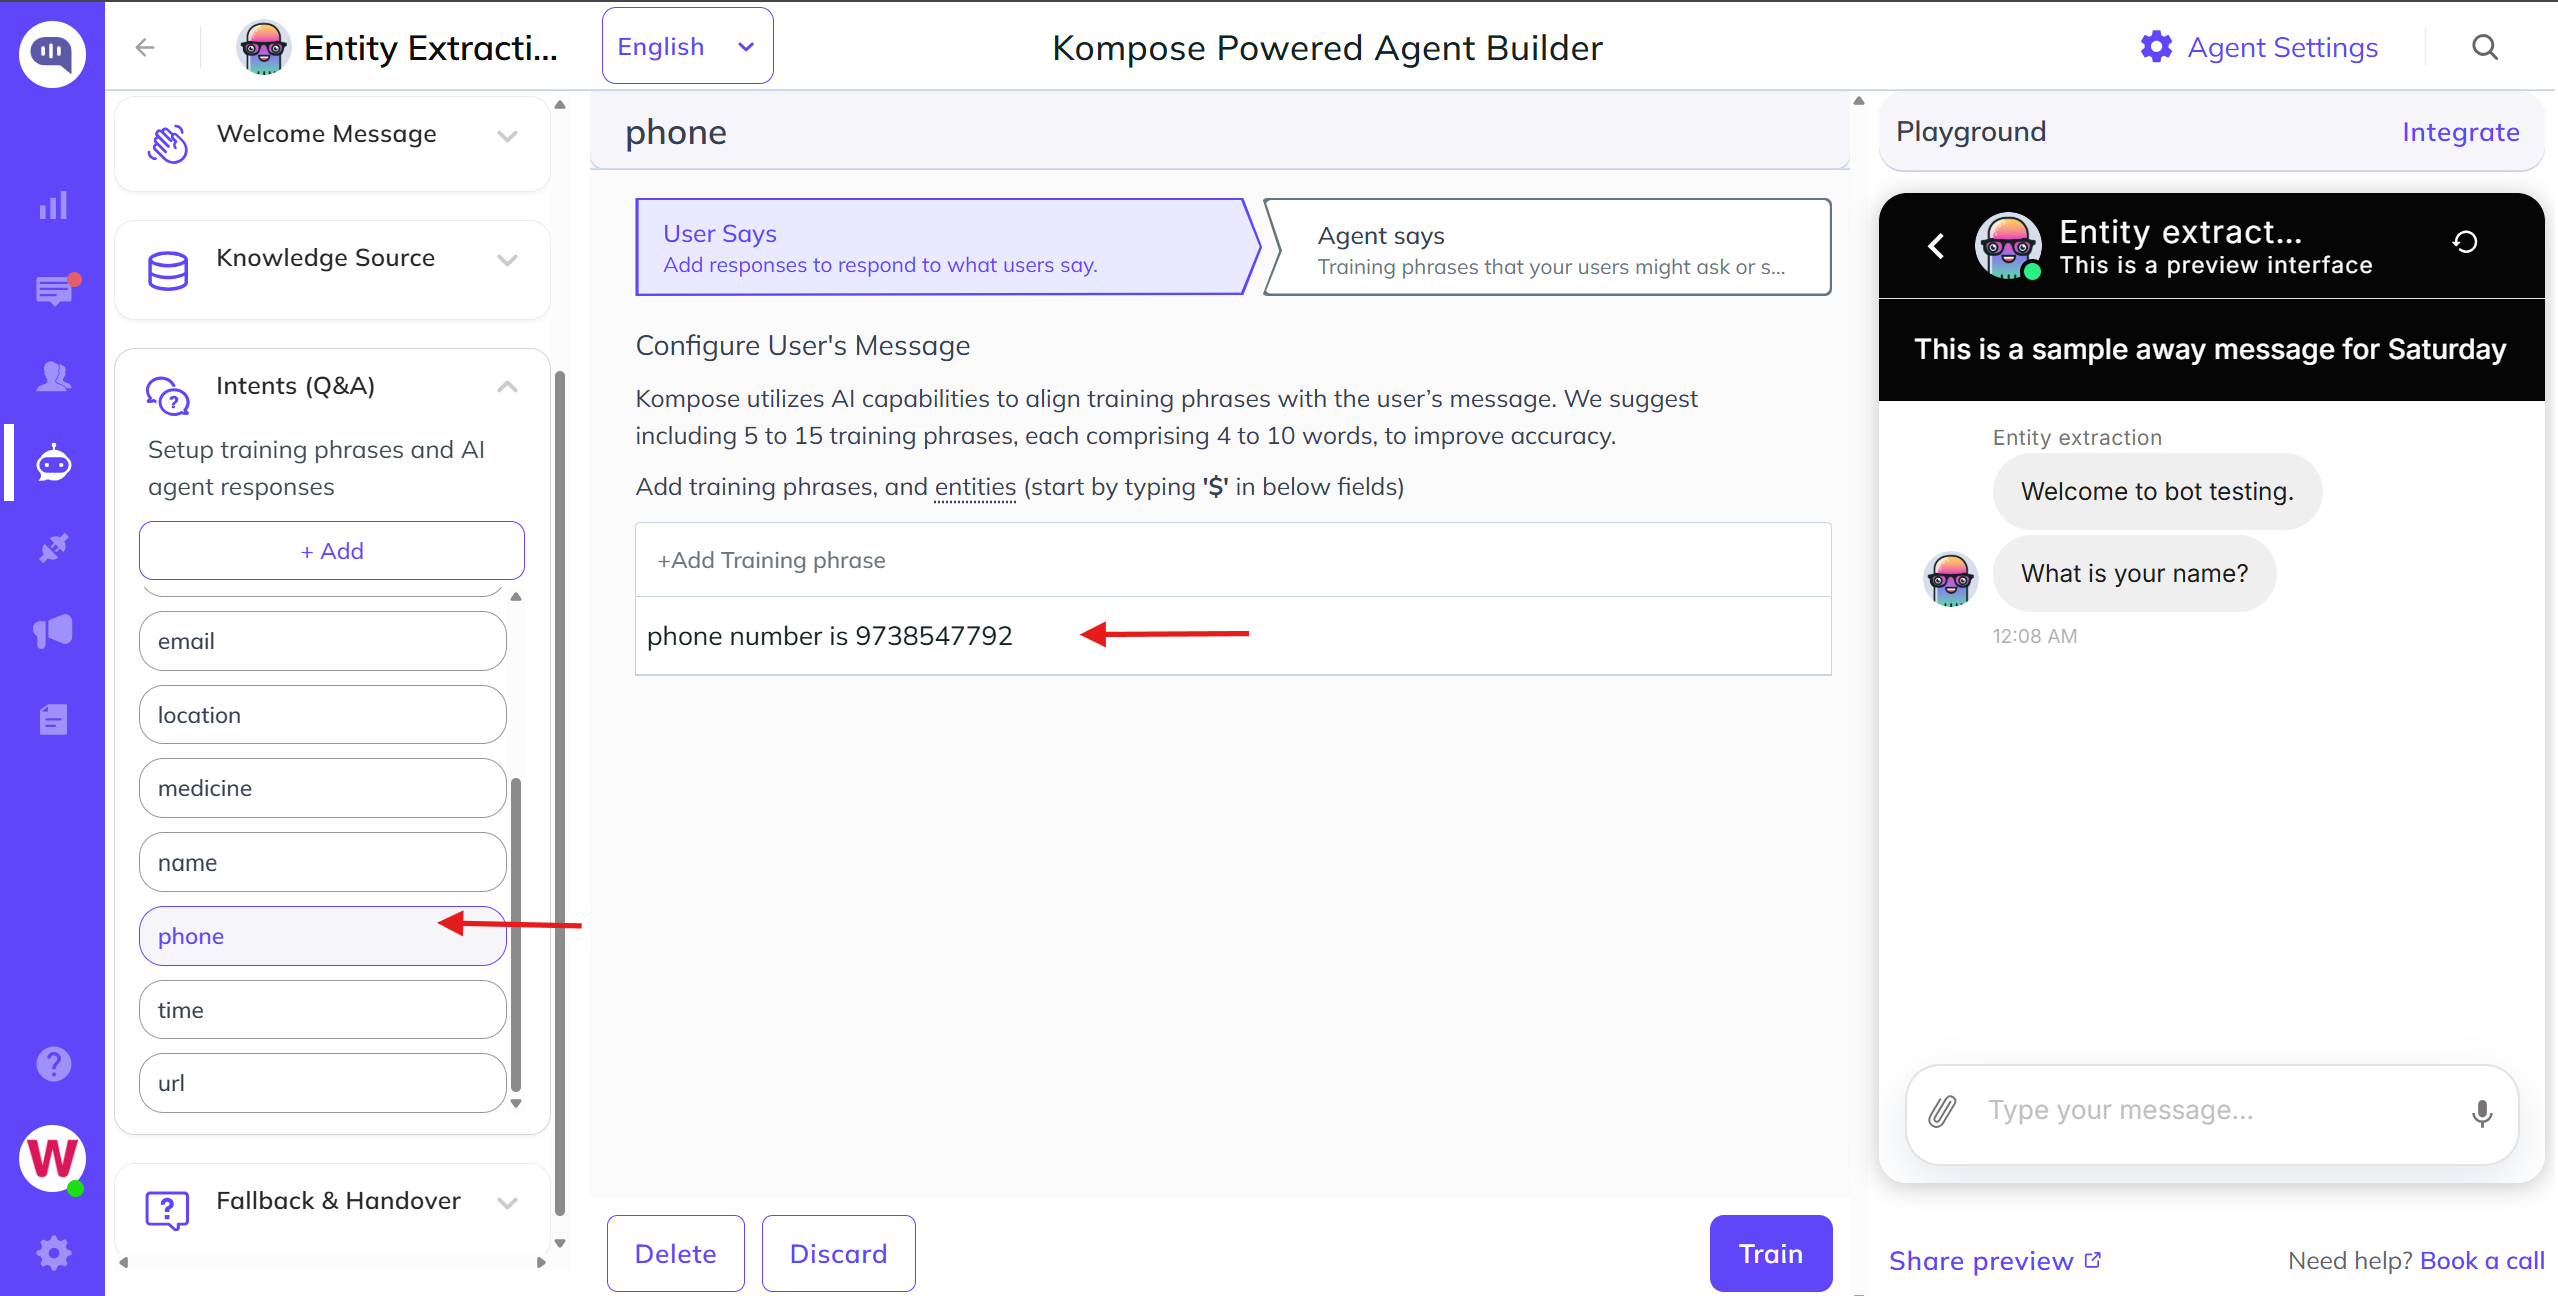
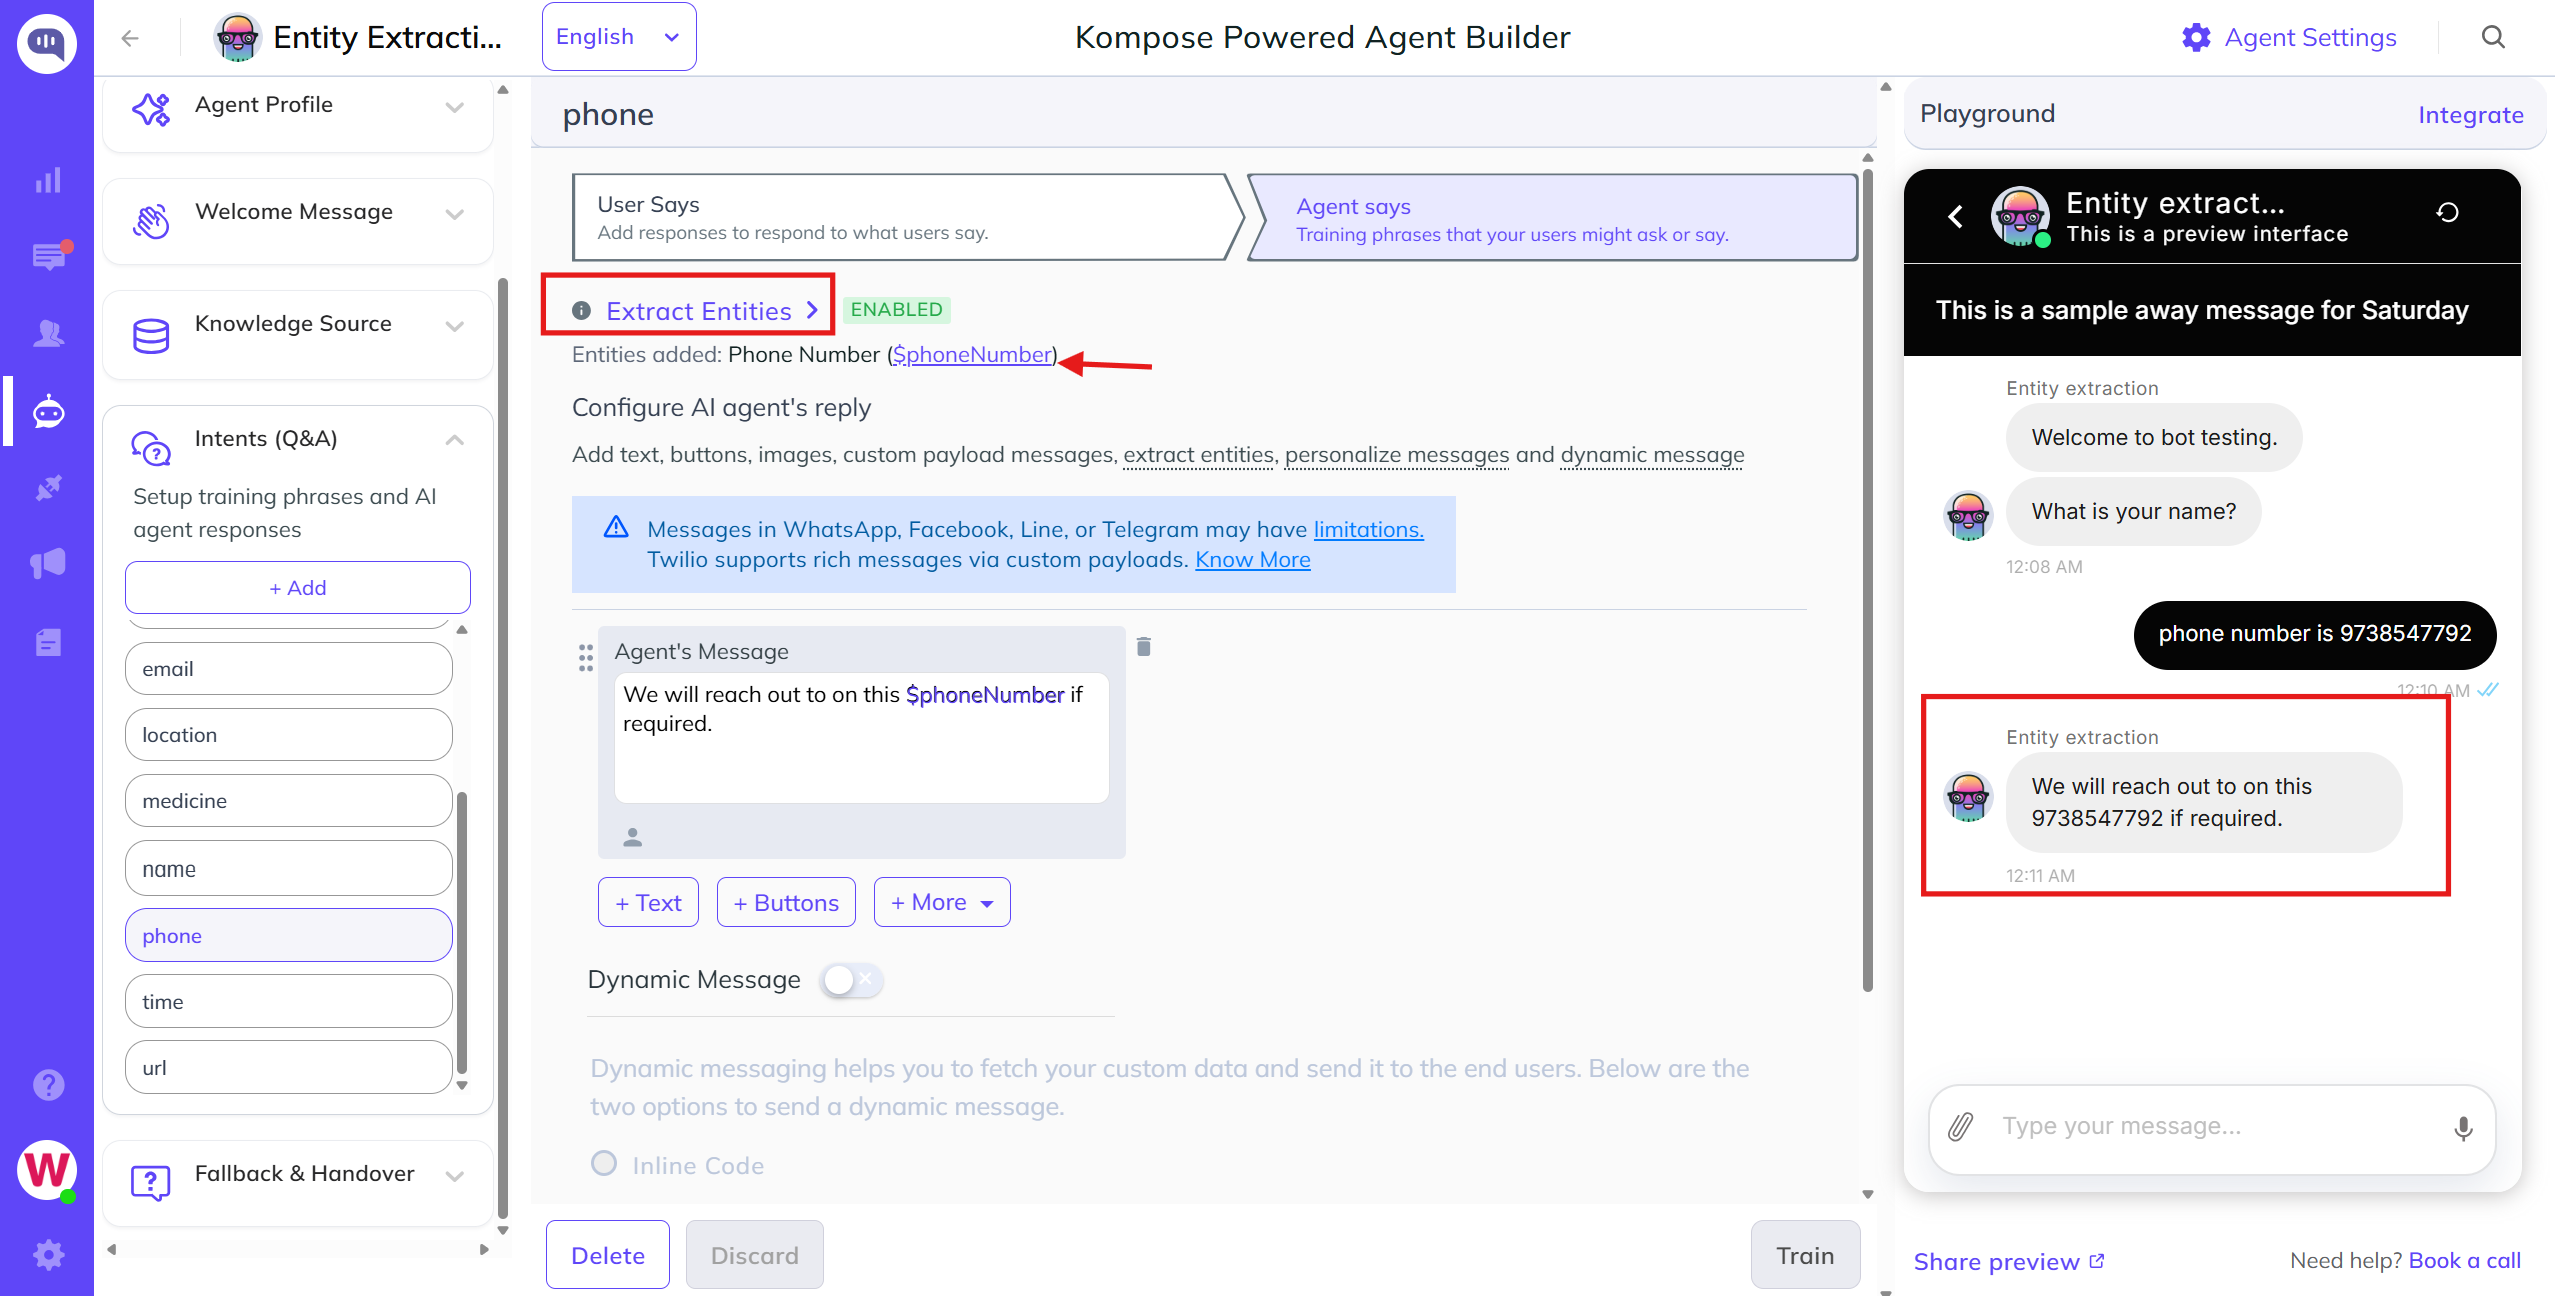
Map the Entity: Under the Agent Says section, choose the Extract Entity option and select the matching entity type you want to extract.
Custom Entities
Custom entities help identify and extract unique data types from end-user inputs. In the Kompose AI agent builder, you can create custom entities in two ways:
- Via the Intent Workspace: Create them from the Extract Entities dropdown in the Agent Says section.
- Via the Agent Settings Page: Pre-build and manage them from the central Entities tab.
Method 1: Creating Custom Entities within an Intent
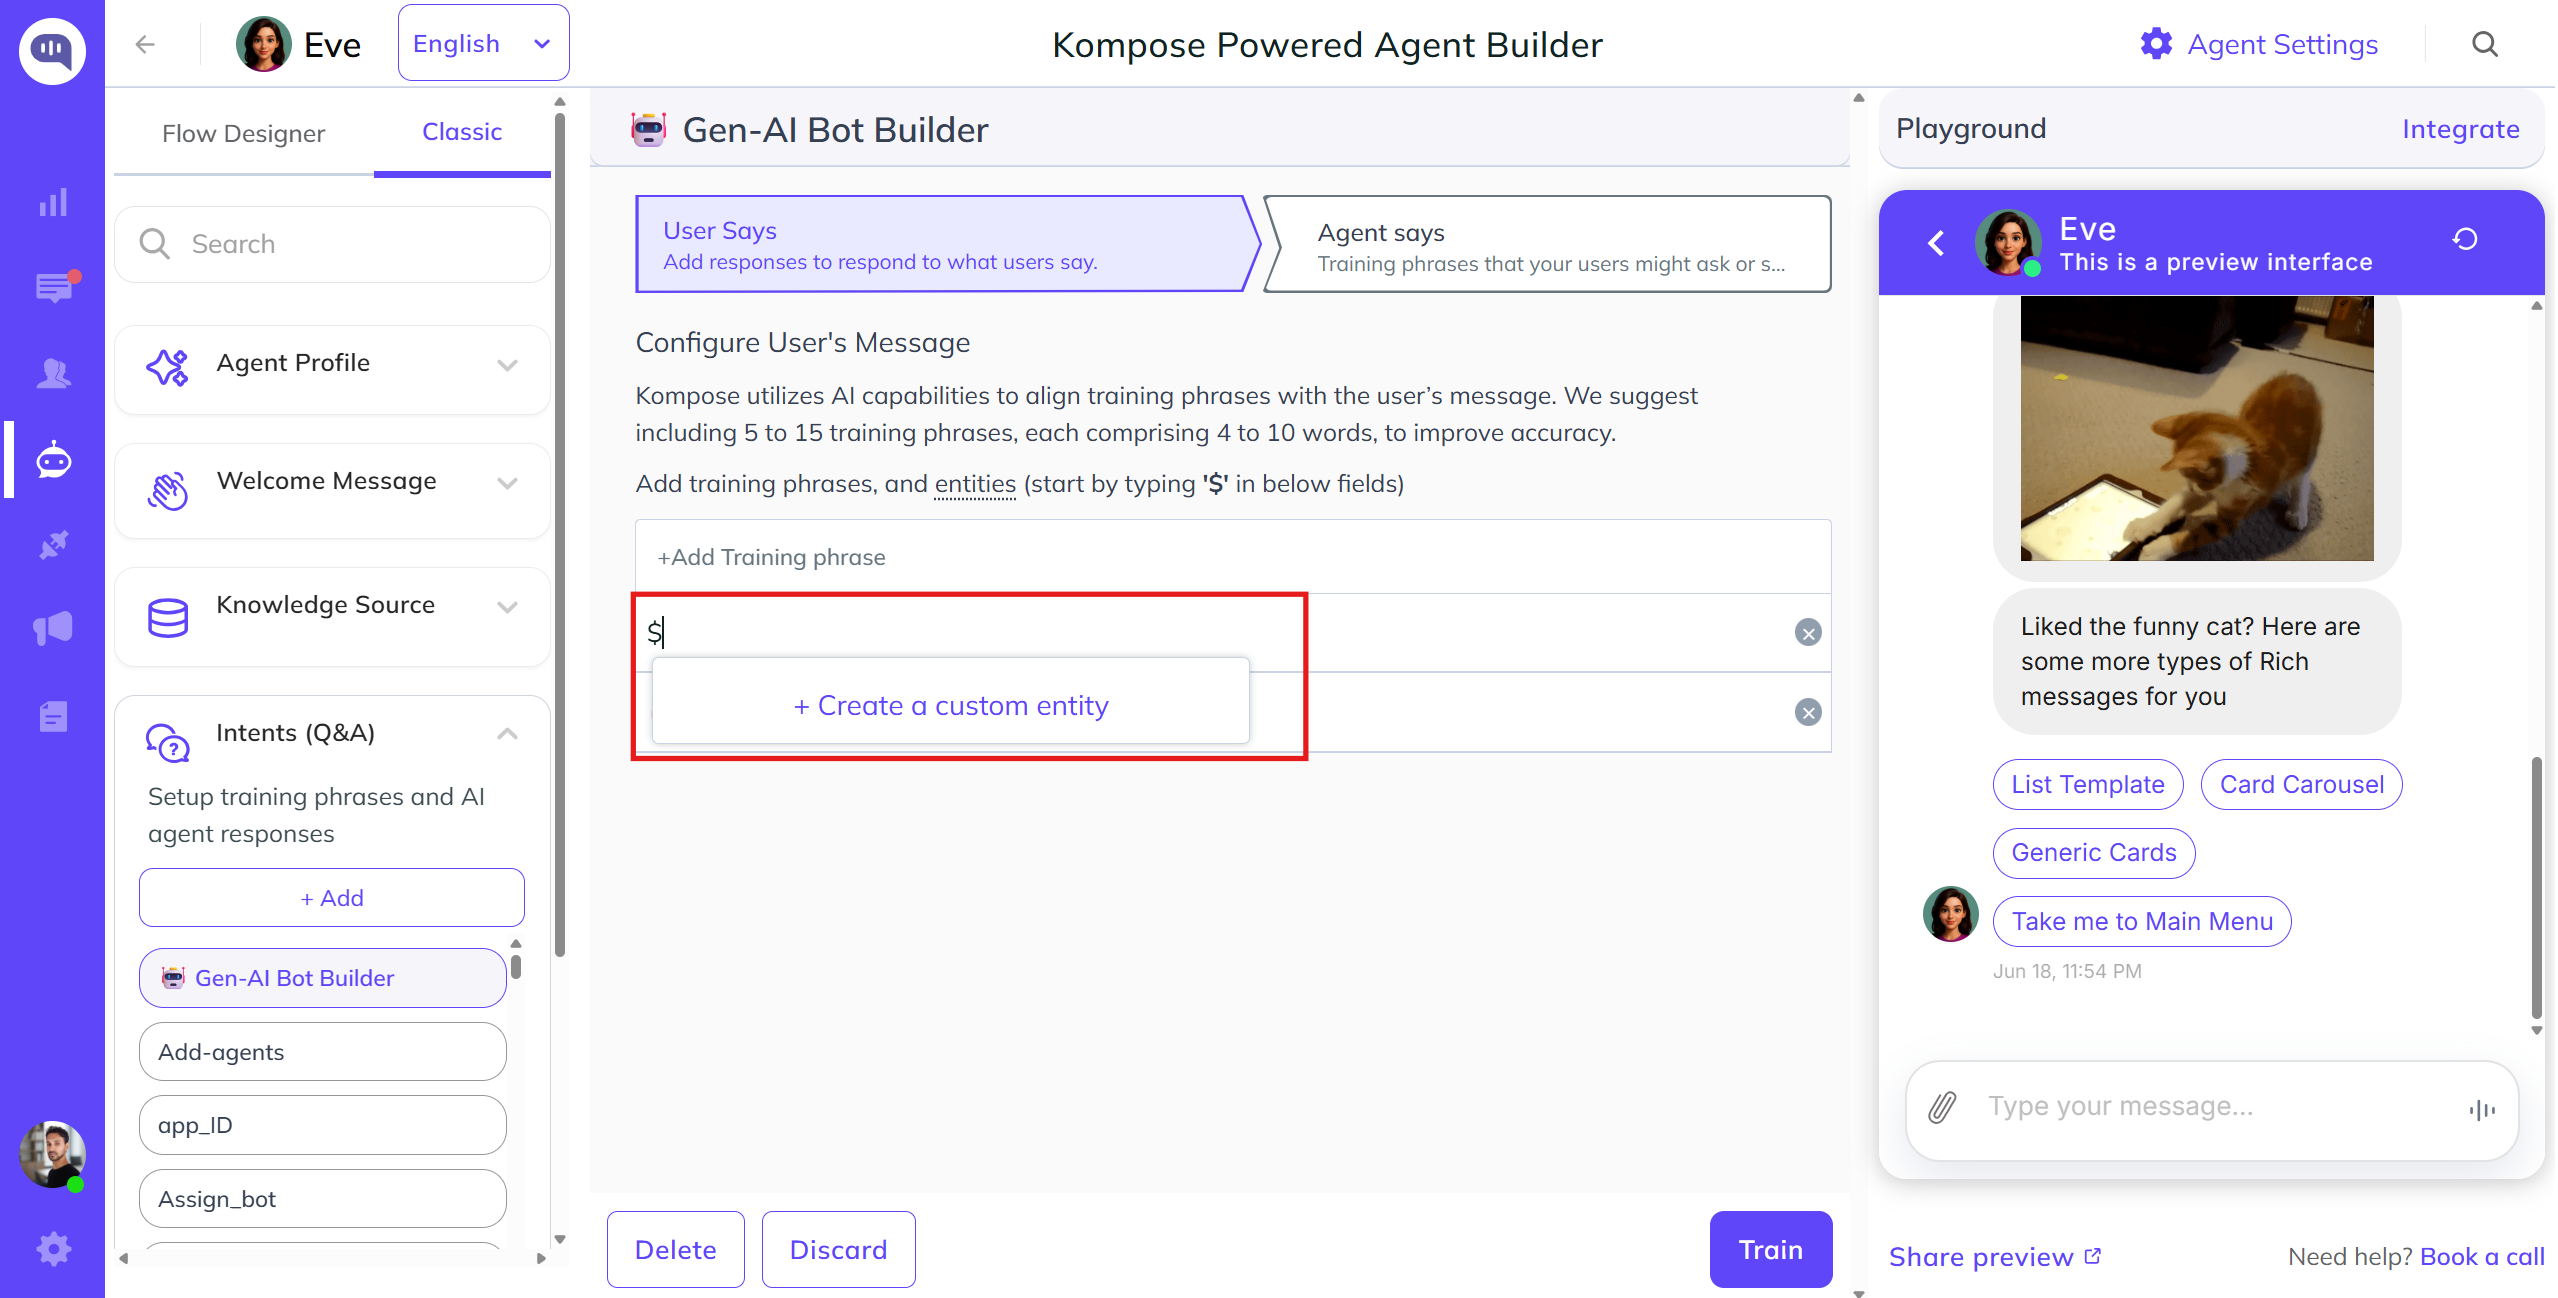
Step 1: Trigger the Entity Menu
Navigate to the User Says section of your intent. Inside any training phrase field, type the $ symbol. This opens an inline dropdown menu.
Step 2: Define the Entity Details
Click + Create a custom entity from the inline popup. This opens the modal window. Fill in the following configuration fields:
- Entity Name: Enter a recognizable name for the custom entity (e.g.,
Berries). - Variable Name: This field is auto-generated by the system based on the entity name you entered. You will use this system variable later in your messaging workflows.
- Add Values: Define your core entity classifications alongside alternative terms users might type:
- Enter value: Input the primary variation name (e.g.,
Berry). - Enter multiple synonyms separated by comma: Type the variations or alternatives separated by commas (e.g.,
Mulberry, Raspberry, Blueberry). - Note: Click the + Add Row link to include additional items and value types.
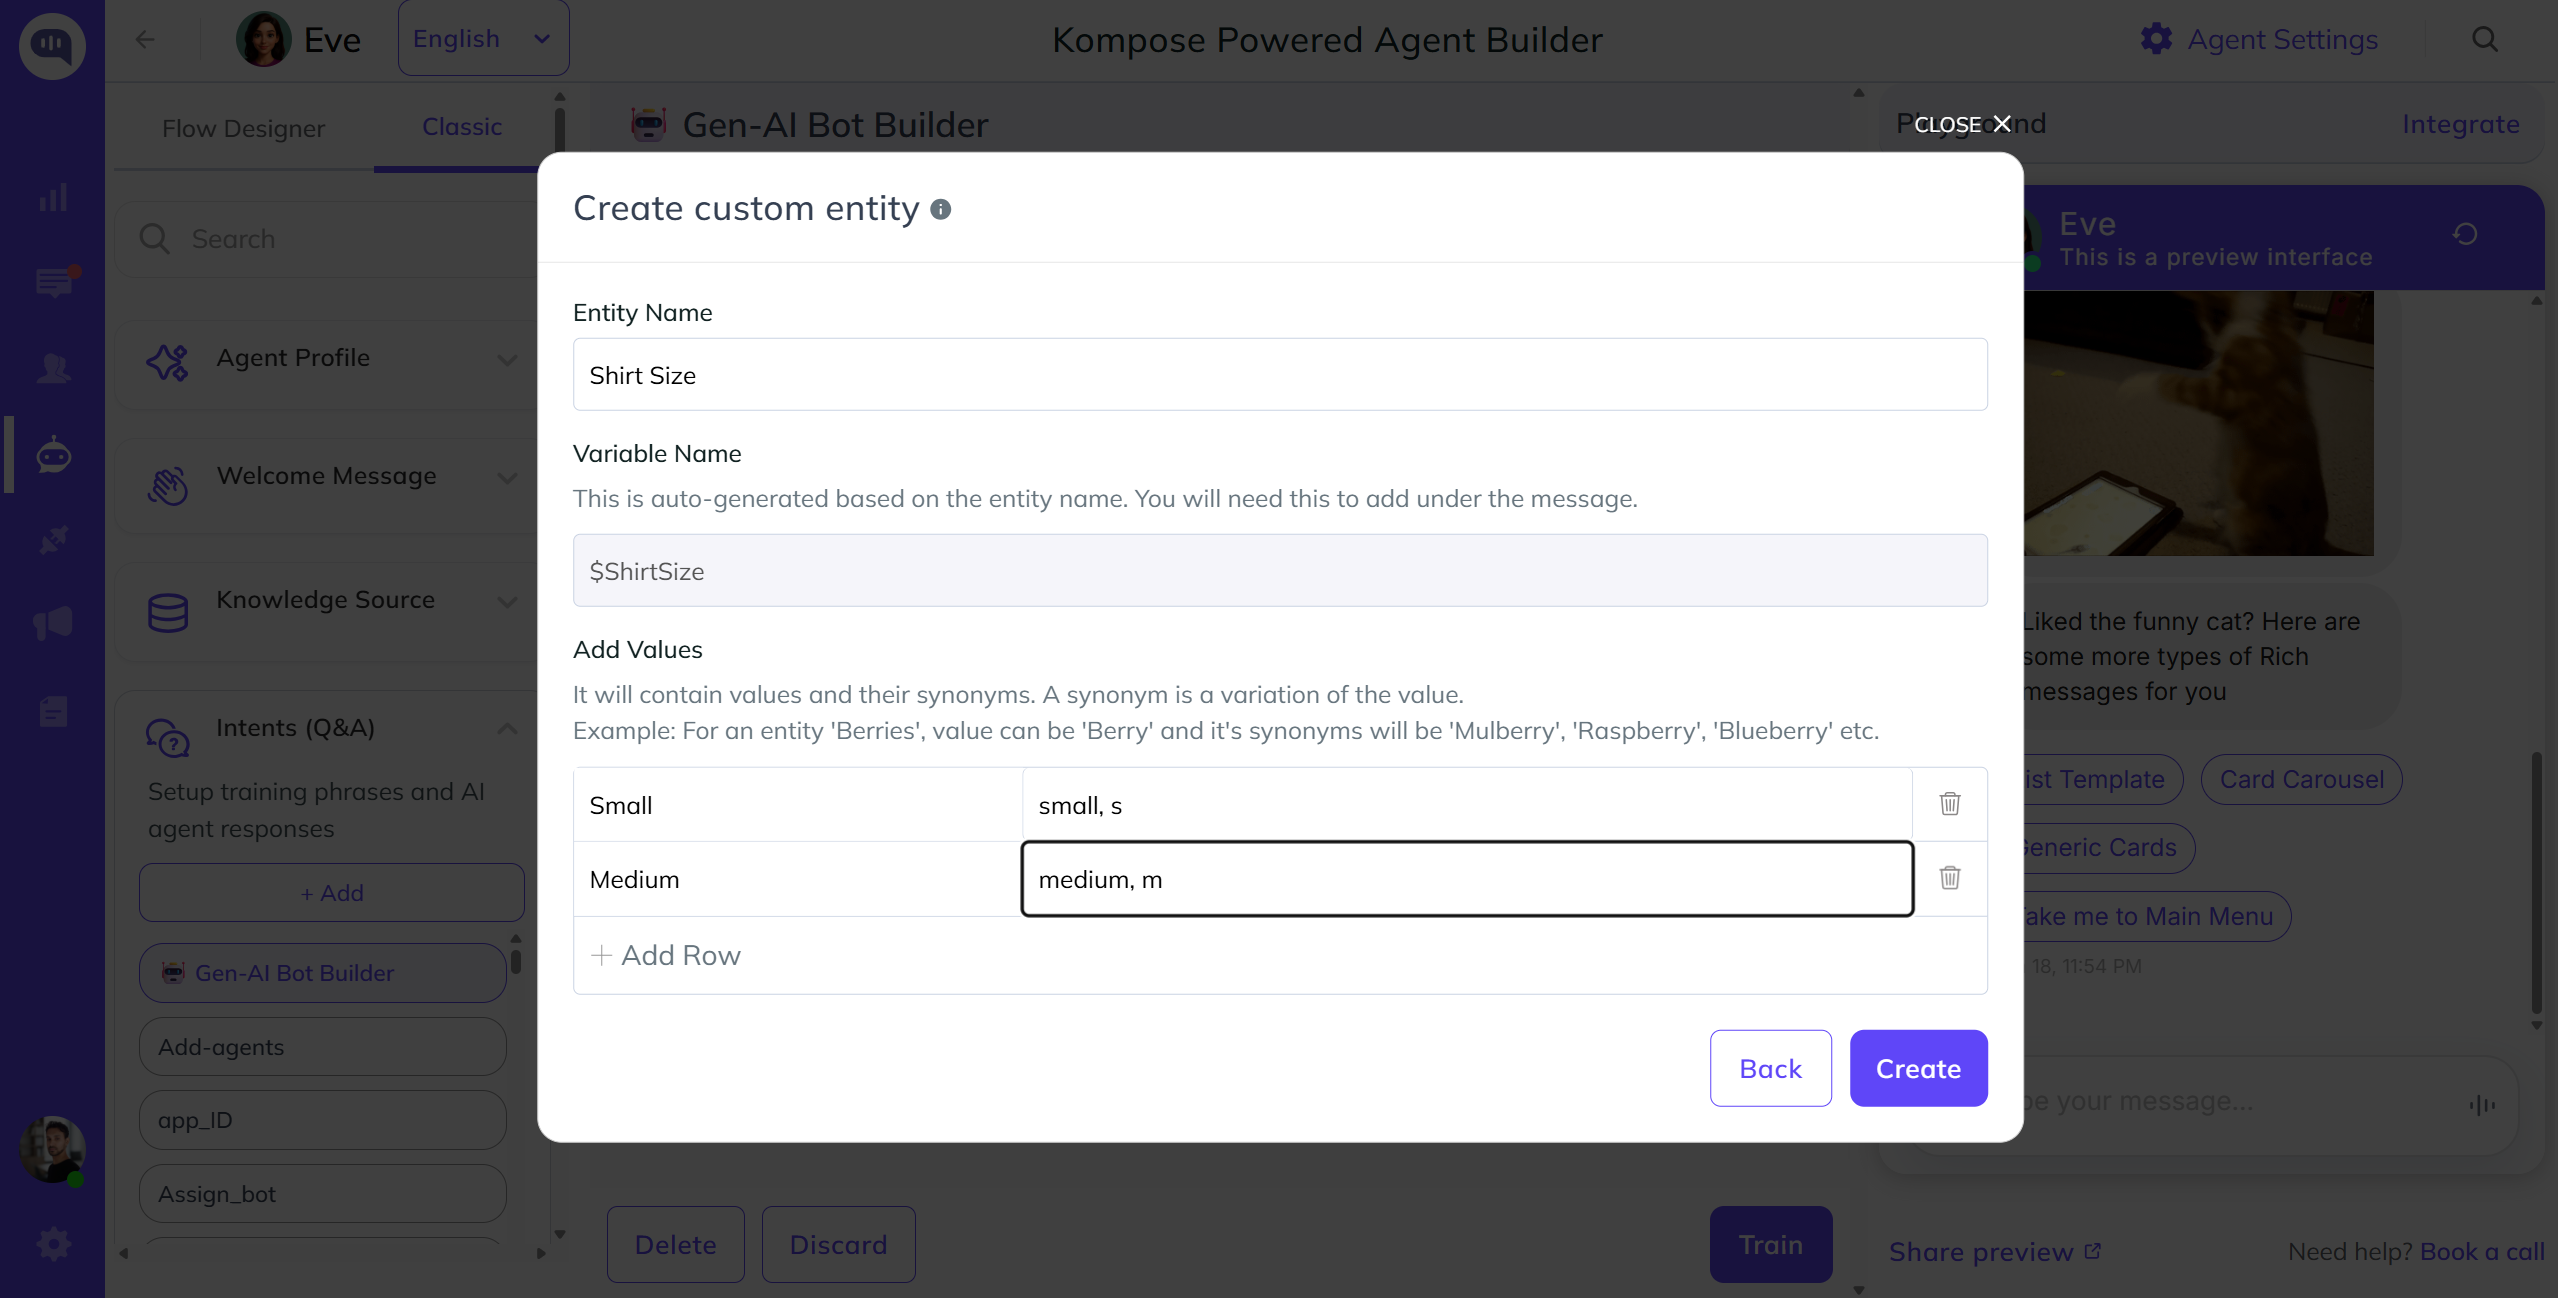
Click the Create button to finalize your new entity.
Step 3: Complete Training Phrases
Once created, selecting the entity maps it using its generated $variable_name directly within your phrase input field. Add several training phrases around this variable to help the AI extract it accurately in live test chats.
Method 2: Creating and Managing Entities via Kompose Settings
This method allows you to pre-build your database of custom entities before creating intents, giving you full control to edit, delete, or disable them later.
Step 1: Open Settings
Click the Agent Settings icon located in the top-right corner of the AI agent builder.

Step 2: Build the Entity
Click the Create Entity button, fill in all required value fields and synonyms, and save it.
Step 3: Manage Existing Entities
This section serves as a central hub. You can return here at any time to Edit, Delete, or Disable any existing custom entities.
webhooks in Kompose
The webhook feature in Kompose allows you to send dynamic responses to users directly from your own custom webhook server.
This is useful when you need to fetch and return live data from your databases, such as order statuses or account balances, or trigger automated responses based on custom backend logic.
Integrating webhook with Kompose
To connect a custom server to Kompose globally, configure your endpoint settings directly within the agent builder.
How to Access webhook Settings
Inside the agent builder, click the Agent Settings icon located in the top-right corner of the header, and select the webhook tab.
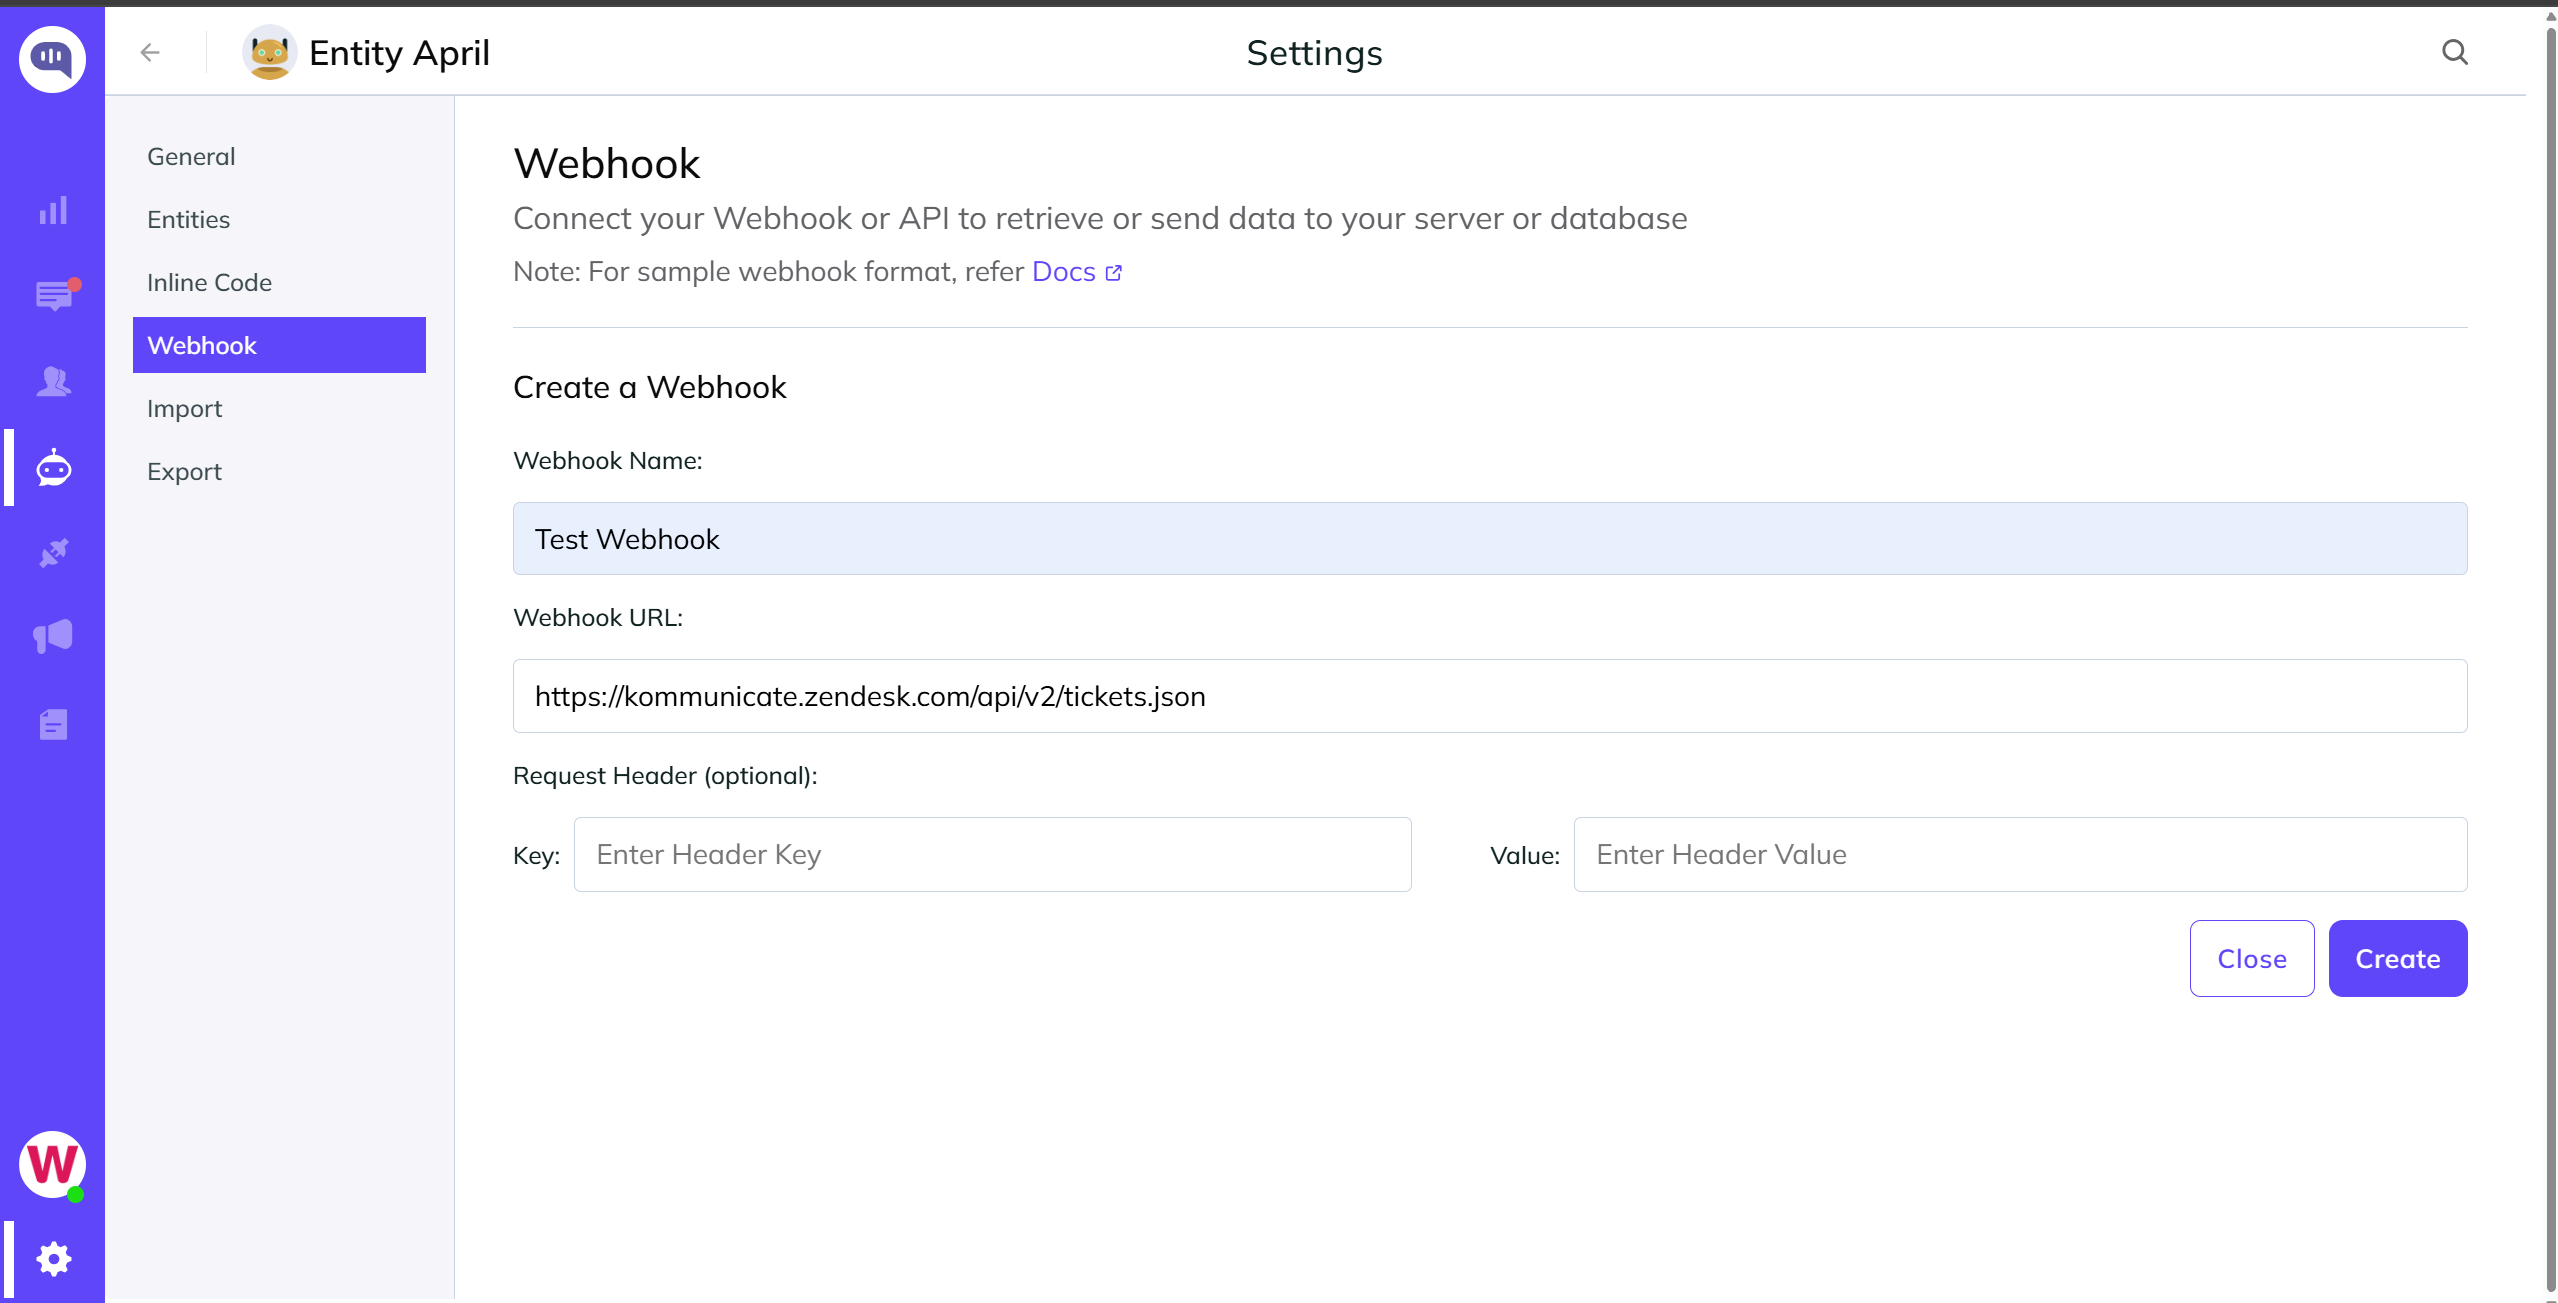
Configuring the Endpoint
In this section, provide the following details:
- webhook URL (Required): This is your backend server's public endpoint. It ensures that incoming messages or intent triggers captured by the AI agent are forwarded straight to your server.
- Request Headers (Optional): Add custom header key-value pairs, such as authentication tokens or API keys, to secure communication between Kommunicate and your backend.
Whenever an event triggers your webhook, Kommunicate forwards a POST request containing the conversational data to your server in the following format:
{
    "botId": "AI agent id who has received the message. This id is same as shown in dashboard.",
    "key": "unique id for every message",
    "from": "user id who has sent the message",
  "message": "message sent by user to the AI agent",
  "nlpResponse": [ { "message": "Greetings!" } ],
  "matchedIntent":"greetings.hello",
    "groupId": "conversation id",
    "metadata": "extra information with message",
    "contentType": "content type of the message (text, html, location, etc)",
    "applicationKey": "your APP_ID shown in Dashboard Install section",
        "source": "identifies if message is sent from web or mobile",
    "eventName": "events ie. WELCOME , KOMMUNICATE_MEDIA_EVENT etc",
    "createdAt": "message sent time"
}
Kompose sends the message to your webhook and waits for the response. The timeout limit for the webhook URL is 30 seconds. The webhook should return an array of messages in the following format:
[{
    "message": "A message can be simple as a plain text"
}, {
    "message": "A message can be a rich message containing metadata",
    "metadata": {
    "contentType": "300",
        "templateId": "6",
        "payload": [{
            "title": "Suggested Reply button 1",
            "message": "Suggested Reply button 1"
        }, {
            "title": "Suggested Reply button 2",
            "message": "Suggested Reply button 2"
        }]
    }
}]
Each object in the message array is rendered as a separate message in the Kommunicate chat widget.
Activating webhooks Inside an Intent
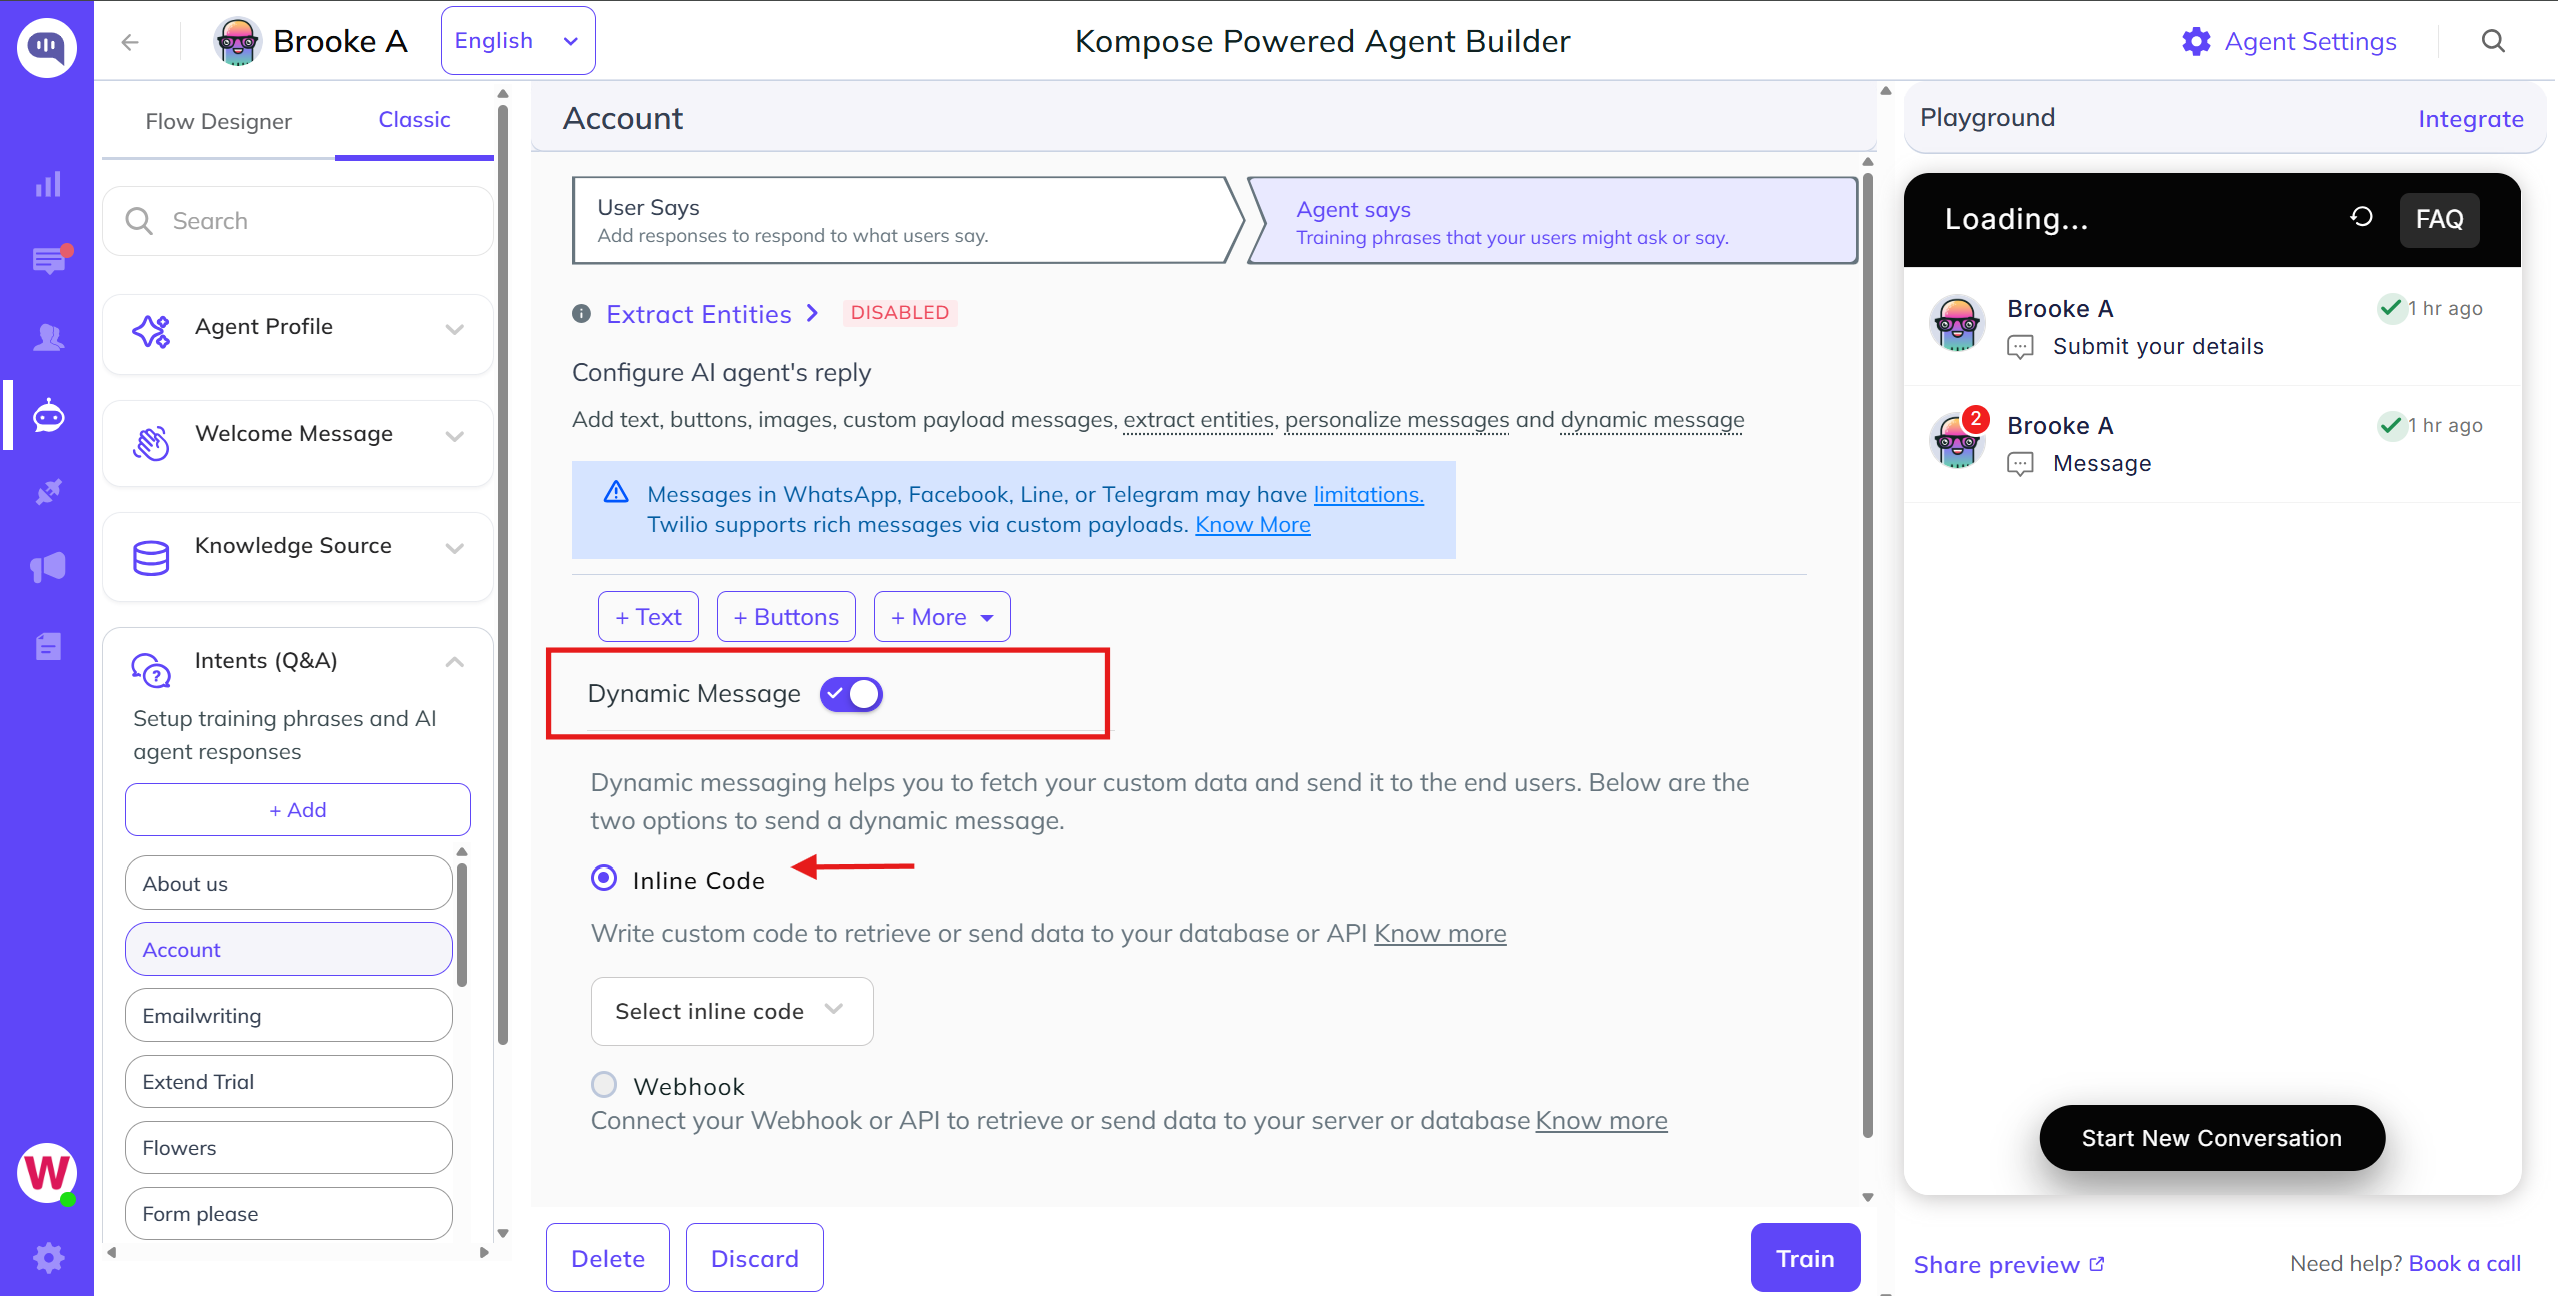
To use an existing global webhook configuration or set up a unique endpoint directly within a specific intent, toggle the response type from a static answer to a dynamic payload.
As shown in the image below, you can do this by enabling Dynamic Message.
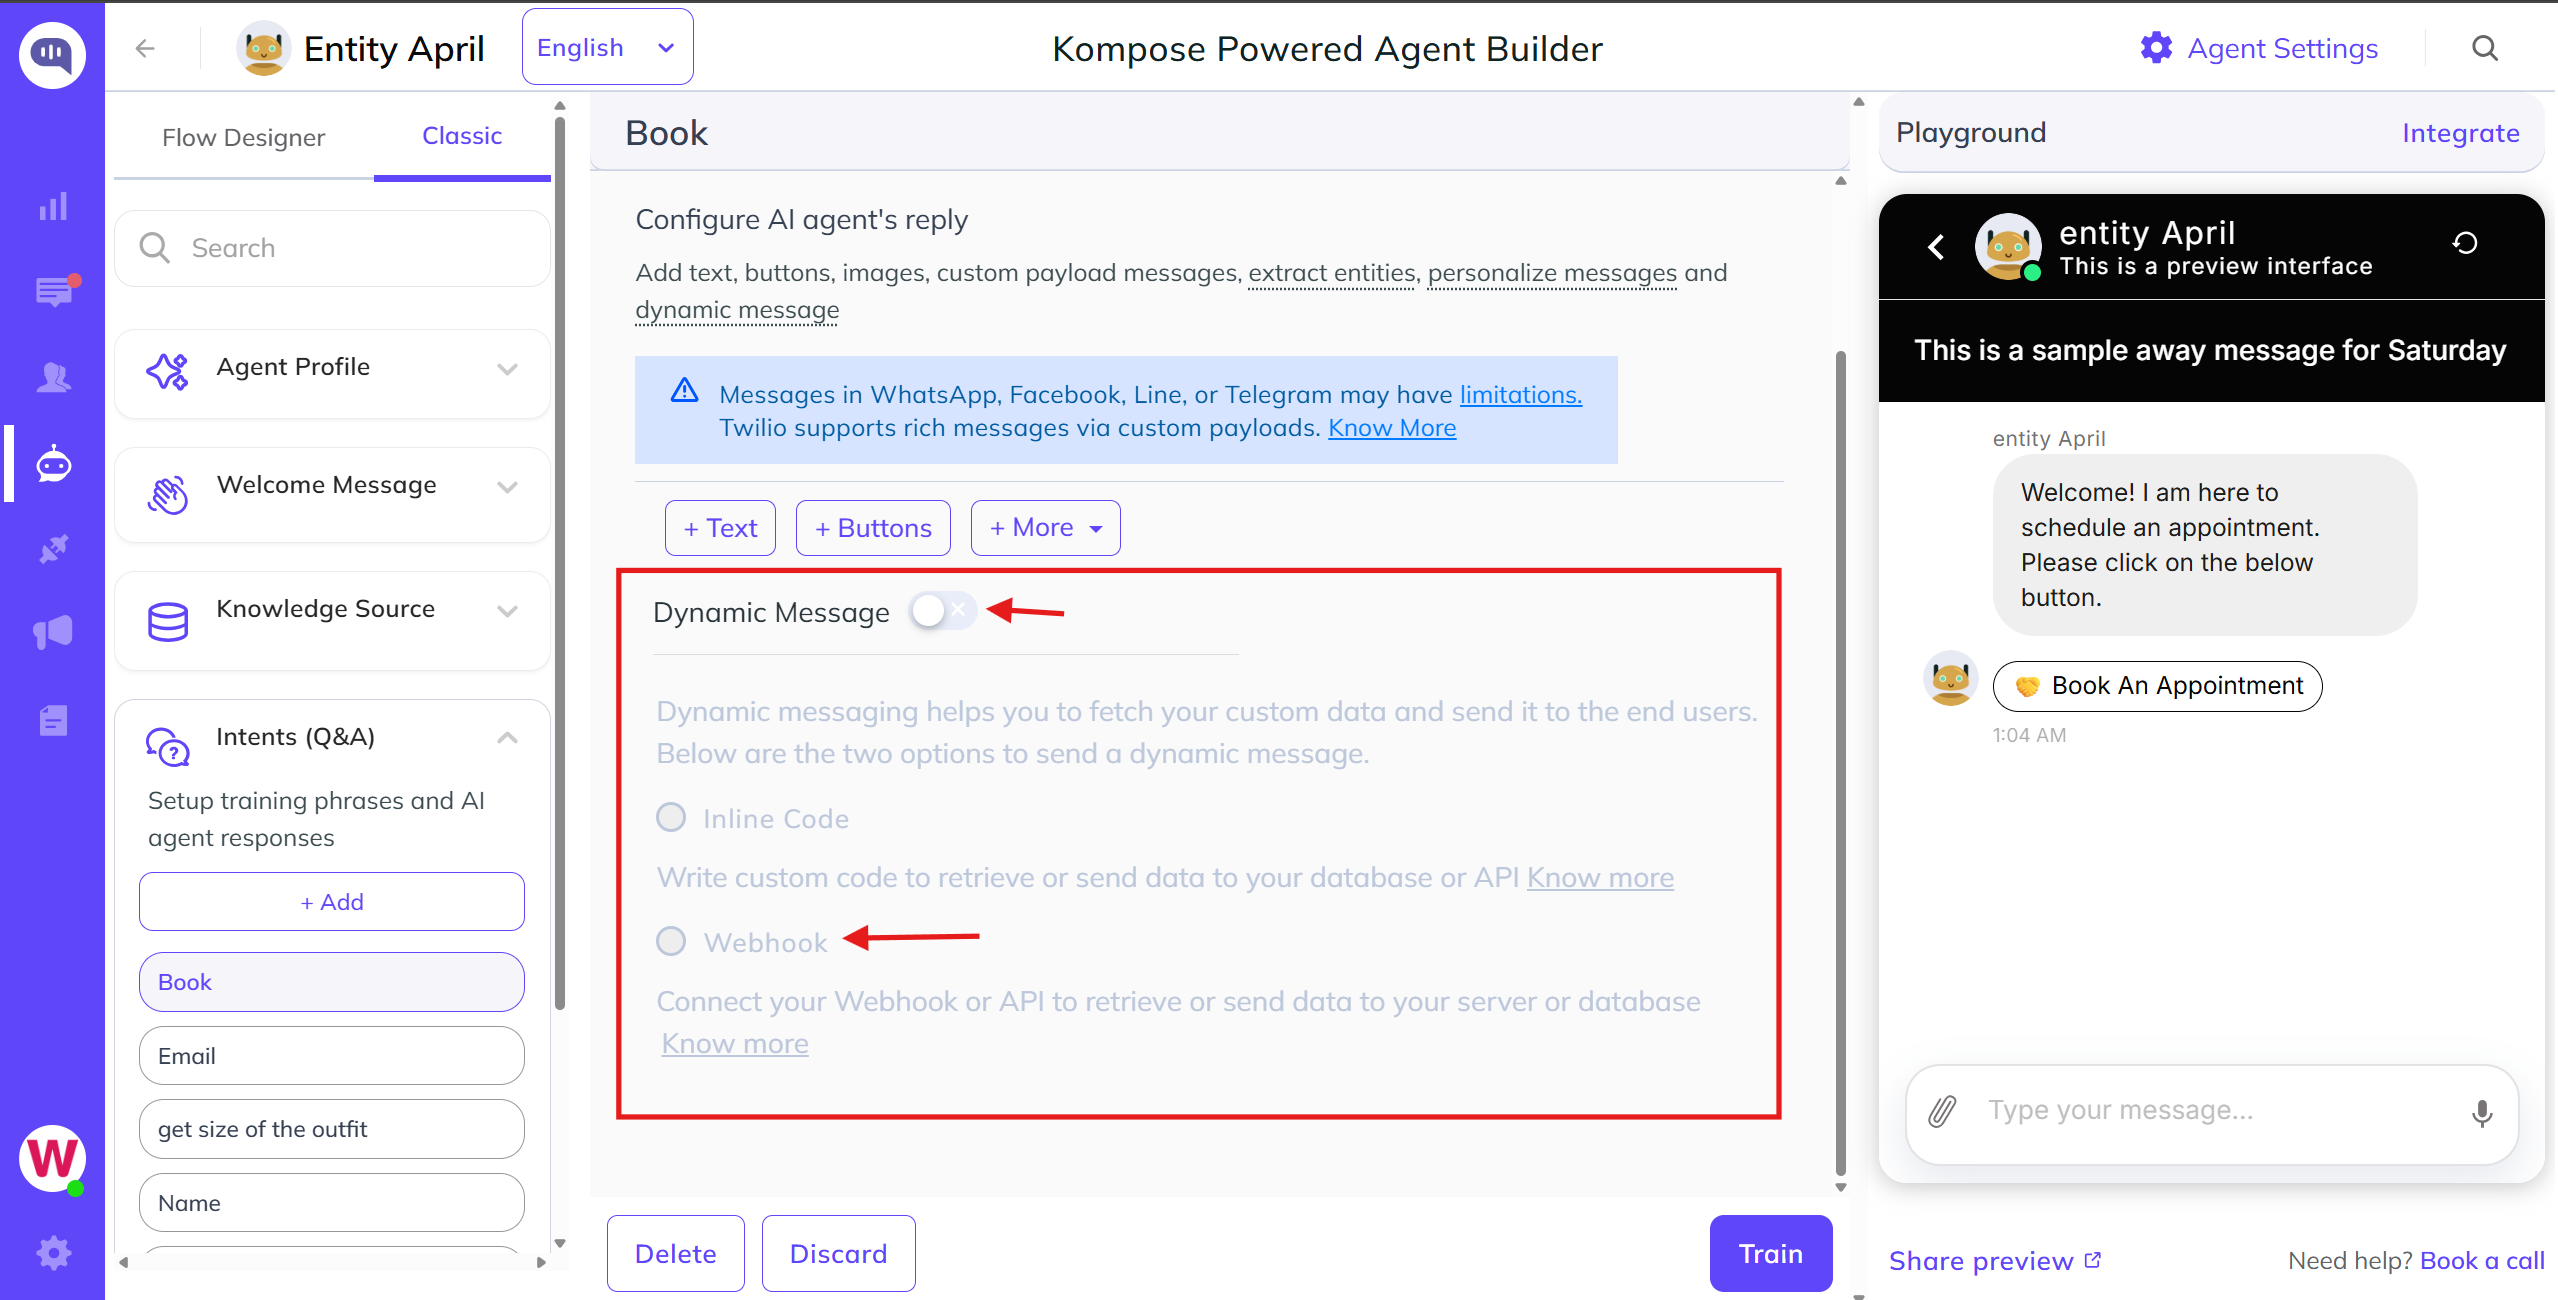
Give your webhook a name, enter your Webhook URL, and click Create.
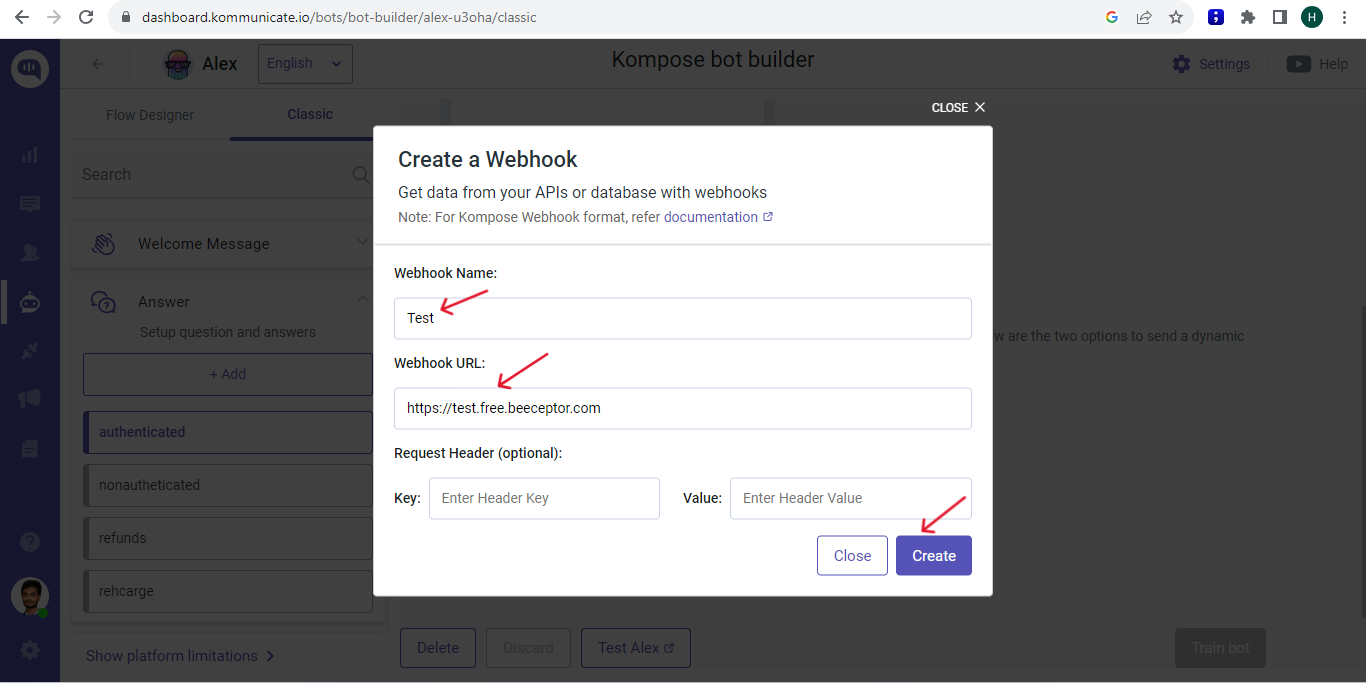
The intent is now integrated with a webhook.
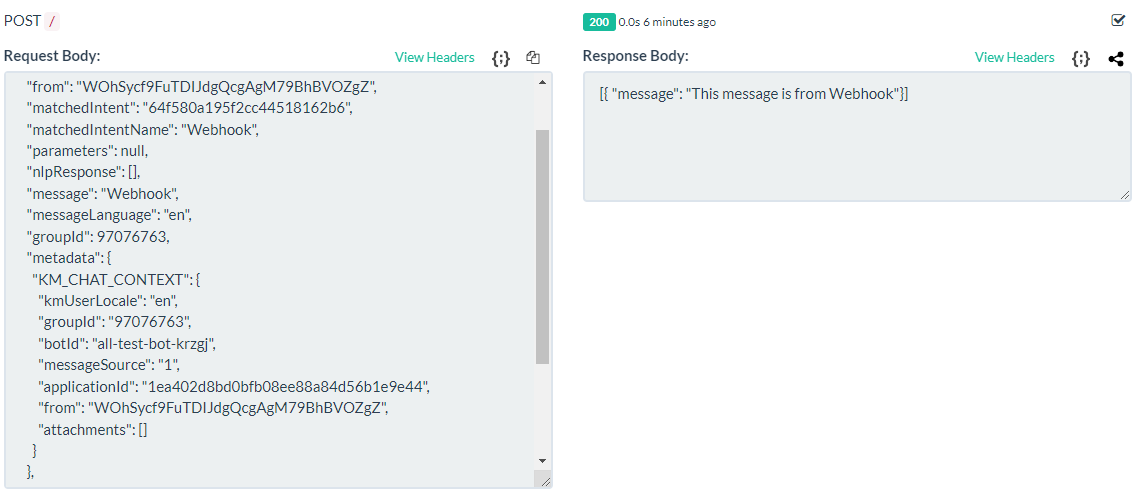
When you trigger the intent that uses the webhook, the message returned by the webhook is displayed.
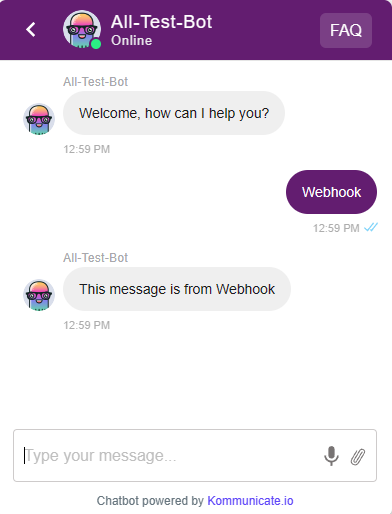
Beeceptor is used as an example.
The sample request and response bodies are shown below.
Welcome message from AI agents
Kommunicate sends specific events to your webhook in the eventName property. When a user creates a new conversation, Kommunicate sends eventName: WELCOME to your webhook. You can check this property in the payload and reply with a welcome message.
Skip AI agent welcome message
Skip the WELCOME event from Dialogflow by setting:
"skipBotEvent":'["WELCOME_EVENT"]'
Skip AI agent welcome message through Settings
var defaultSettings = {
    "skipBotEvent": '["WELCOME_EVENT"]',
};
Kommunicate.updateSettings(defaultSettings);
Skip AI agent welcome message for a specific conversation
var conversationDetail = {
    "skipBotEvent":'["WELCOME_EVENT"]'
};

Kommunicate.startConversation(conversationDetail, function (response) { });
Send attachments to AI agent
When a user attaches a file or shares a location, Kommunicate sends eventName: KOMMUNICATE_MEDIA_EVENT to your AI agent along with the attached file information. You can find the file information in the KM_CHAT_CONTEXT object in metadata.
Below is a sample webhook payload for a file attachment:
{
    "eventName": "KOMMUNICATE_MEDIA_EVENT",
    "metadata": {
        "KM_CHAT_CONTEXT": {
            "attachments": [{
                "type": "image/png", // media type in type/subtype format. Use the regex 'type/*' to get the generic type.
                "payload": {
                    "name": "file name",
                    "url": "file url",
                    "size": "size in bytes"
                }
            }]
        }
    },
    "createdAt": 1552638706610,

}
Attachment object for a location message:
{
    "attachments": [{
        "payload": {
            "lat": "Latitude",
            "lon": "Longitude"
        },
        "type": "location"
    }]
}
AI agent Events
AI agent Events signify communication that cannot be captured easily through text or voice. Examples include clicking a Buy button or adding an item to the shopping cart.
Trigger an Event on the Kompose Platform
Call the following function to trigger an event for the Kompose AI agent.
var messagePxy = {
    "type": 5,
    "contentType": 10,
    "message": "Event: " + <EVENT_NAME>,
    "groupId": KommunicateGlobal.CURRENT_GROUP_DATA.tabId,
    "metadata": {
        "category": "HIDDEN",
        "KM_TRIGGER_EVENT": <EVENT_NAME> // Name of the intent
    },
    "source": 1
};
Kommunicate.sendMessage(messagePxy);
For example, to trigger the welcome event, use:
var messagePxy = {
    "type": 5,
    "contentType": 10,
    "message": "Event: " + "WELCOME",
    "groupId": KommunicateGlobal.CURRENT_GROUP_DATA.tabId,
    "metadata": {
        "category": "HIDDEN",
        "KM_TRIGGER_EVENT": "WELCOME"
    },
    "source": 1
};
Kommunicate.sendMessage(messagePxy);
Replace <GROUP_ID> with the group ID of the conversation in which you want to trigger the message.
The groupId value is available in the response of the Kommunicate.startConversation call.
See events for all supported events.
Extracting WhatsApp Numbers in Kompose webhooks
When a user interacts with an agent through WhatsApp, you can programmatically capture their phone number through a webhook server.
How It Works
When a WhatsApp conversation triggers an intent configured with a webhook, Kommunicate forwards a data payload to your server.
Within this inbound payload, the userId parameter automatically contains the user's WhatsApp phone number, typically formatted with the country code, such as 1234567890. You can parse this ID on your backend to store the lead in a database, push it to a CRM, or trigger tailored notification workflows.
Step 1: Configure the webhook
Navigate to the Agent Builder, open the desired intent, scroll down to the response settings, enable Dynamic Messaging, and select the webhook box to link an existing webhook or create a new endpoint connection.
Step 2: Get the User Phone Number in your Code
Whenever that intent is triggered, the full payload is sent to your server as the request body. Here is how it looks:
{
  "botId": "meet-greet-inb71",
  "key": "5-69234790-1662023652048",
  "from": "whatsapp:+919872409999",
  "matchedIntent": "631077918f0d142ade8ea4ad",
  "matchedIntentName": "whatsappChat Intent",
  "parameters": {},
  "nlpResponse": [],
  "message": "whatsapp chat",
  "groupId": 69234790,
  "metadata": {
    "INTEGRATION_CHANNEL_MESSAGE_ID": "ABEGkZhyQFGIAgo6xNGrMtJa8P2_",
    "KM_CHAT_CONTEXT": {
      "groupId": "69234790",
      "botId": "meet-greet-inb71",
      "messageSource": "12",
      "applicationId": "a546470a05536fa2e39da333fb2c8ea9",
      "from": "whatsapp:+919872409999",
      "attachments": []
    }
  },
  "contentType": 0,
  "applicationId": "a546470a05536fa2e39da333fb2c8ea9",
  "source": 12,
  "createdAt": 1662023652051,
  "eventName": ""
}

Inline Code
If you do not have servers to host custom functions and API calls through webhooks, you can use Inline Code to write logic directly within the Kompose AI agent builder. This code executes automatically whenever its corresponding message intent is triggered. Like webhooks, Inline Code is treated as a Dynamic Message.
Step 1: Initialize the Inline Code Workspace
To start writing your script, first clear out any existing static text responses. Navigate to the Agent Says section of an intent and delete any static text blocks currently saved inside the response window.
- A modal opens. Enter a name for the code and add your script. Do not change the function name or arguments.
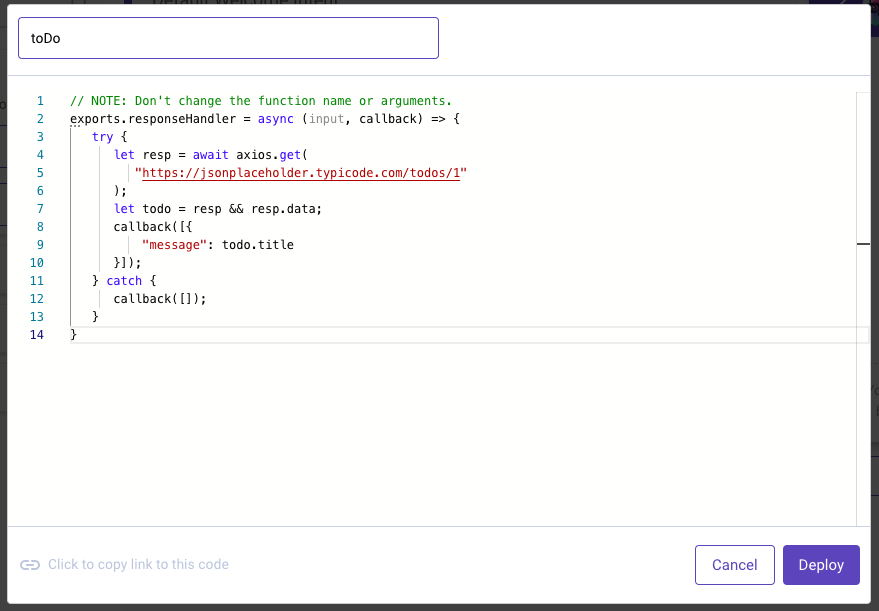
Click Deploy to make the inline code available for use.
- Select the inline code in the AI agent answer and click Train AI agent.
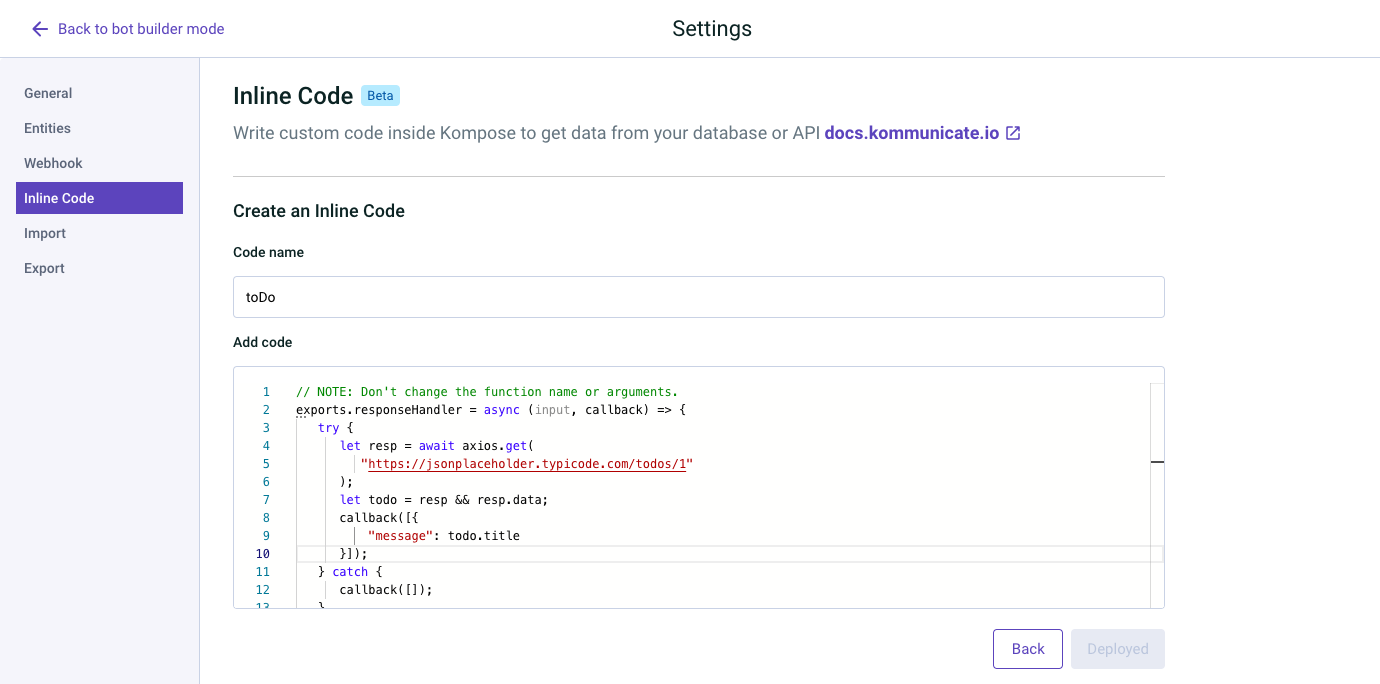
Alternatively, you can create Inline Code from the Kompose Settings page. You can also edit, disable, enable, or delete inline code from this page.
Inline Code Example
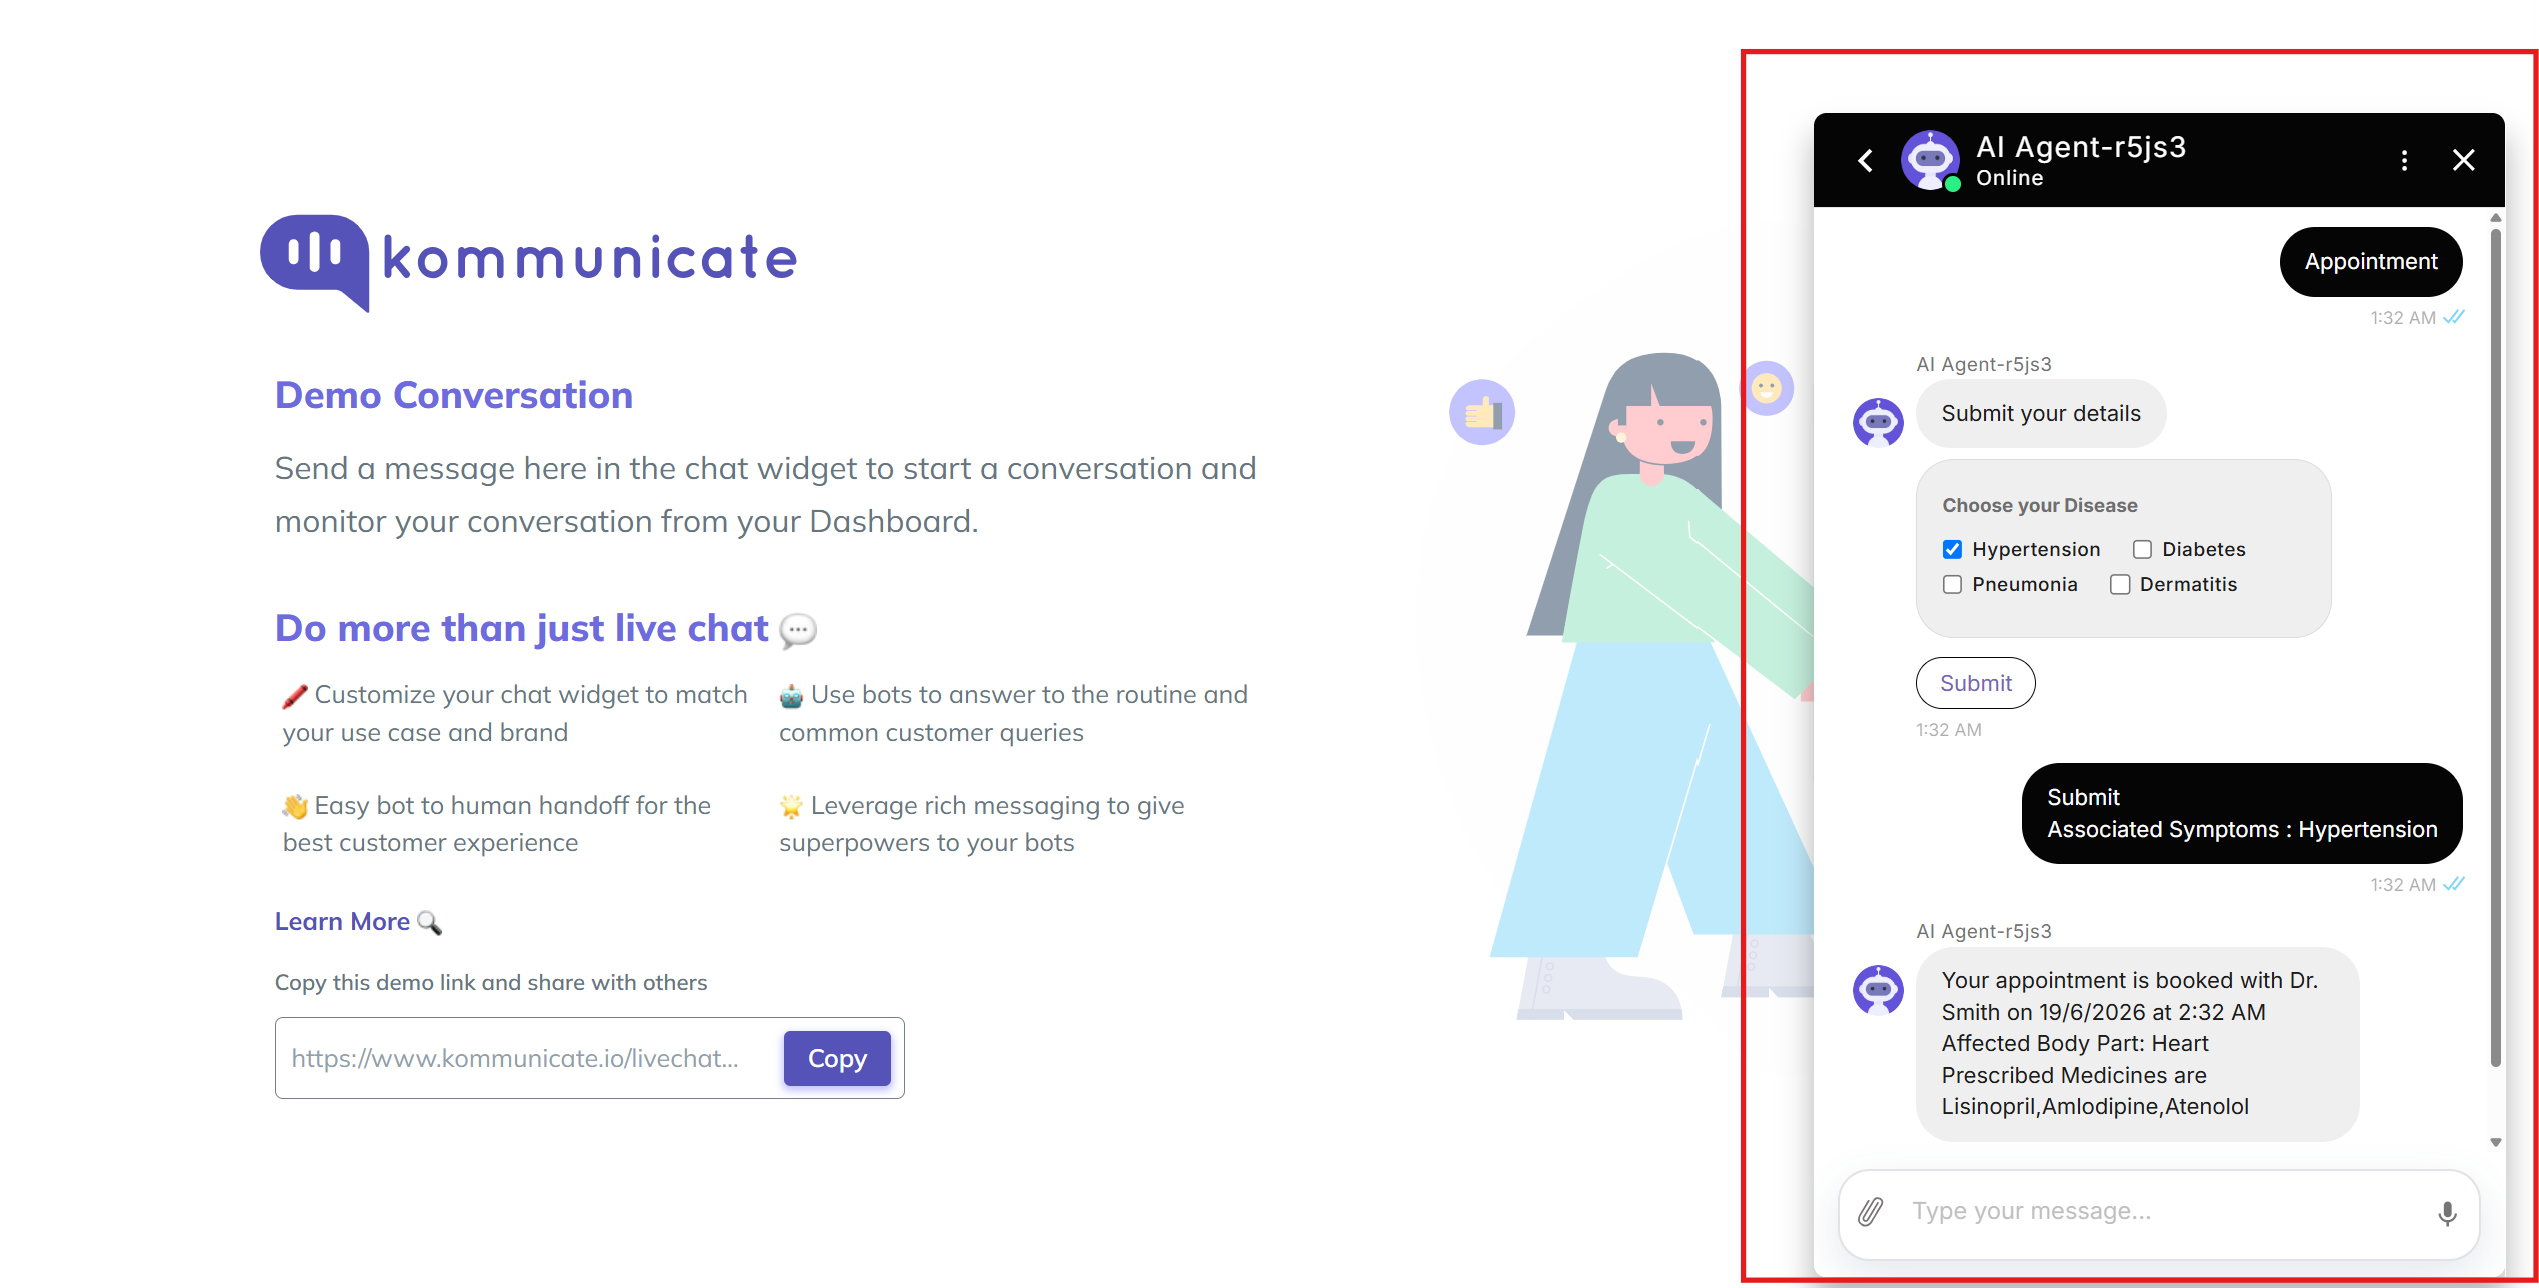
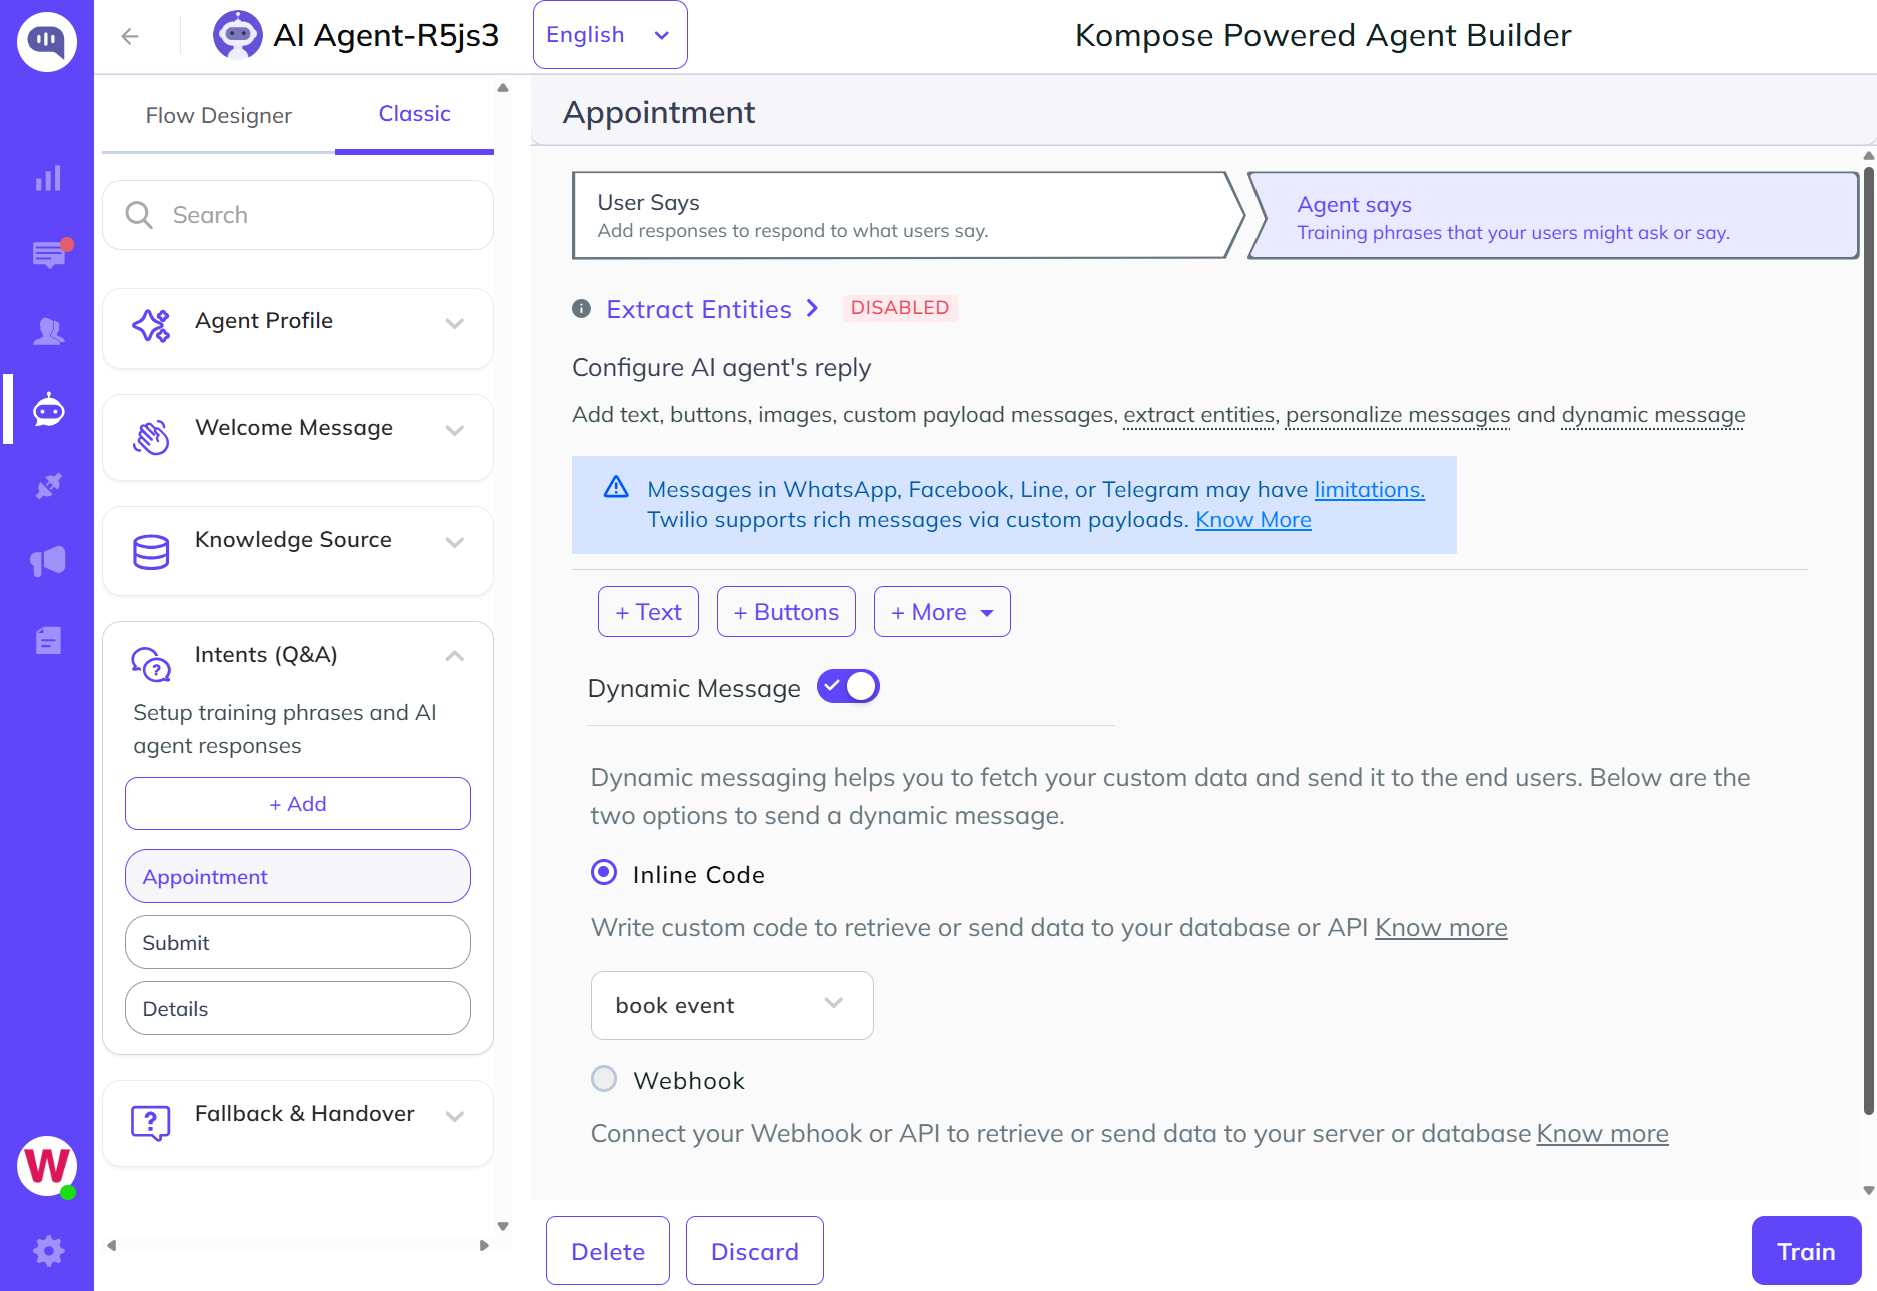
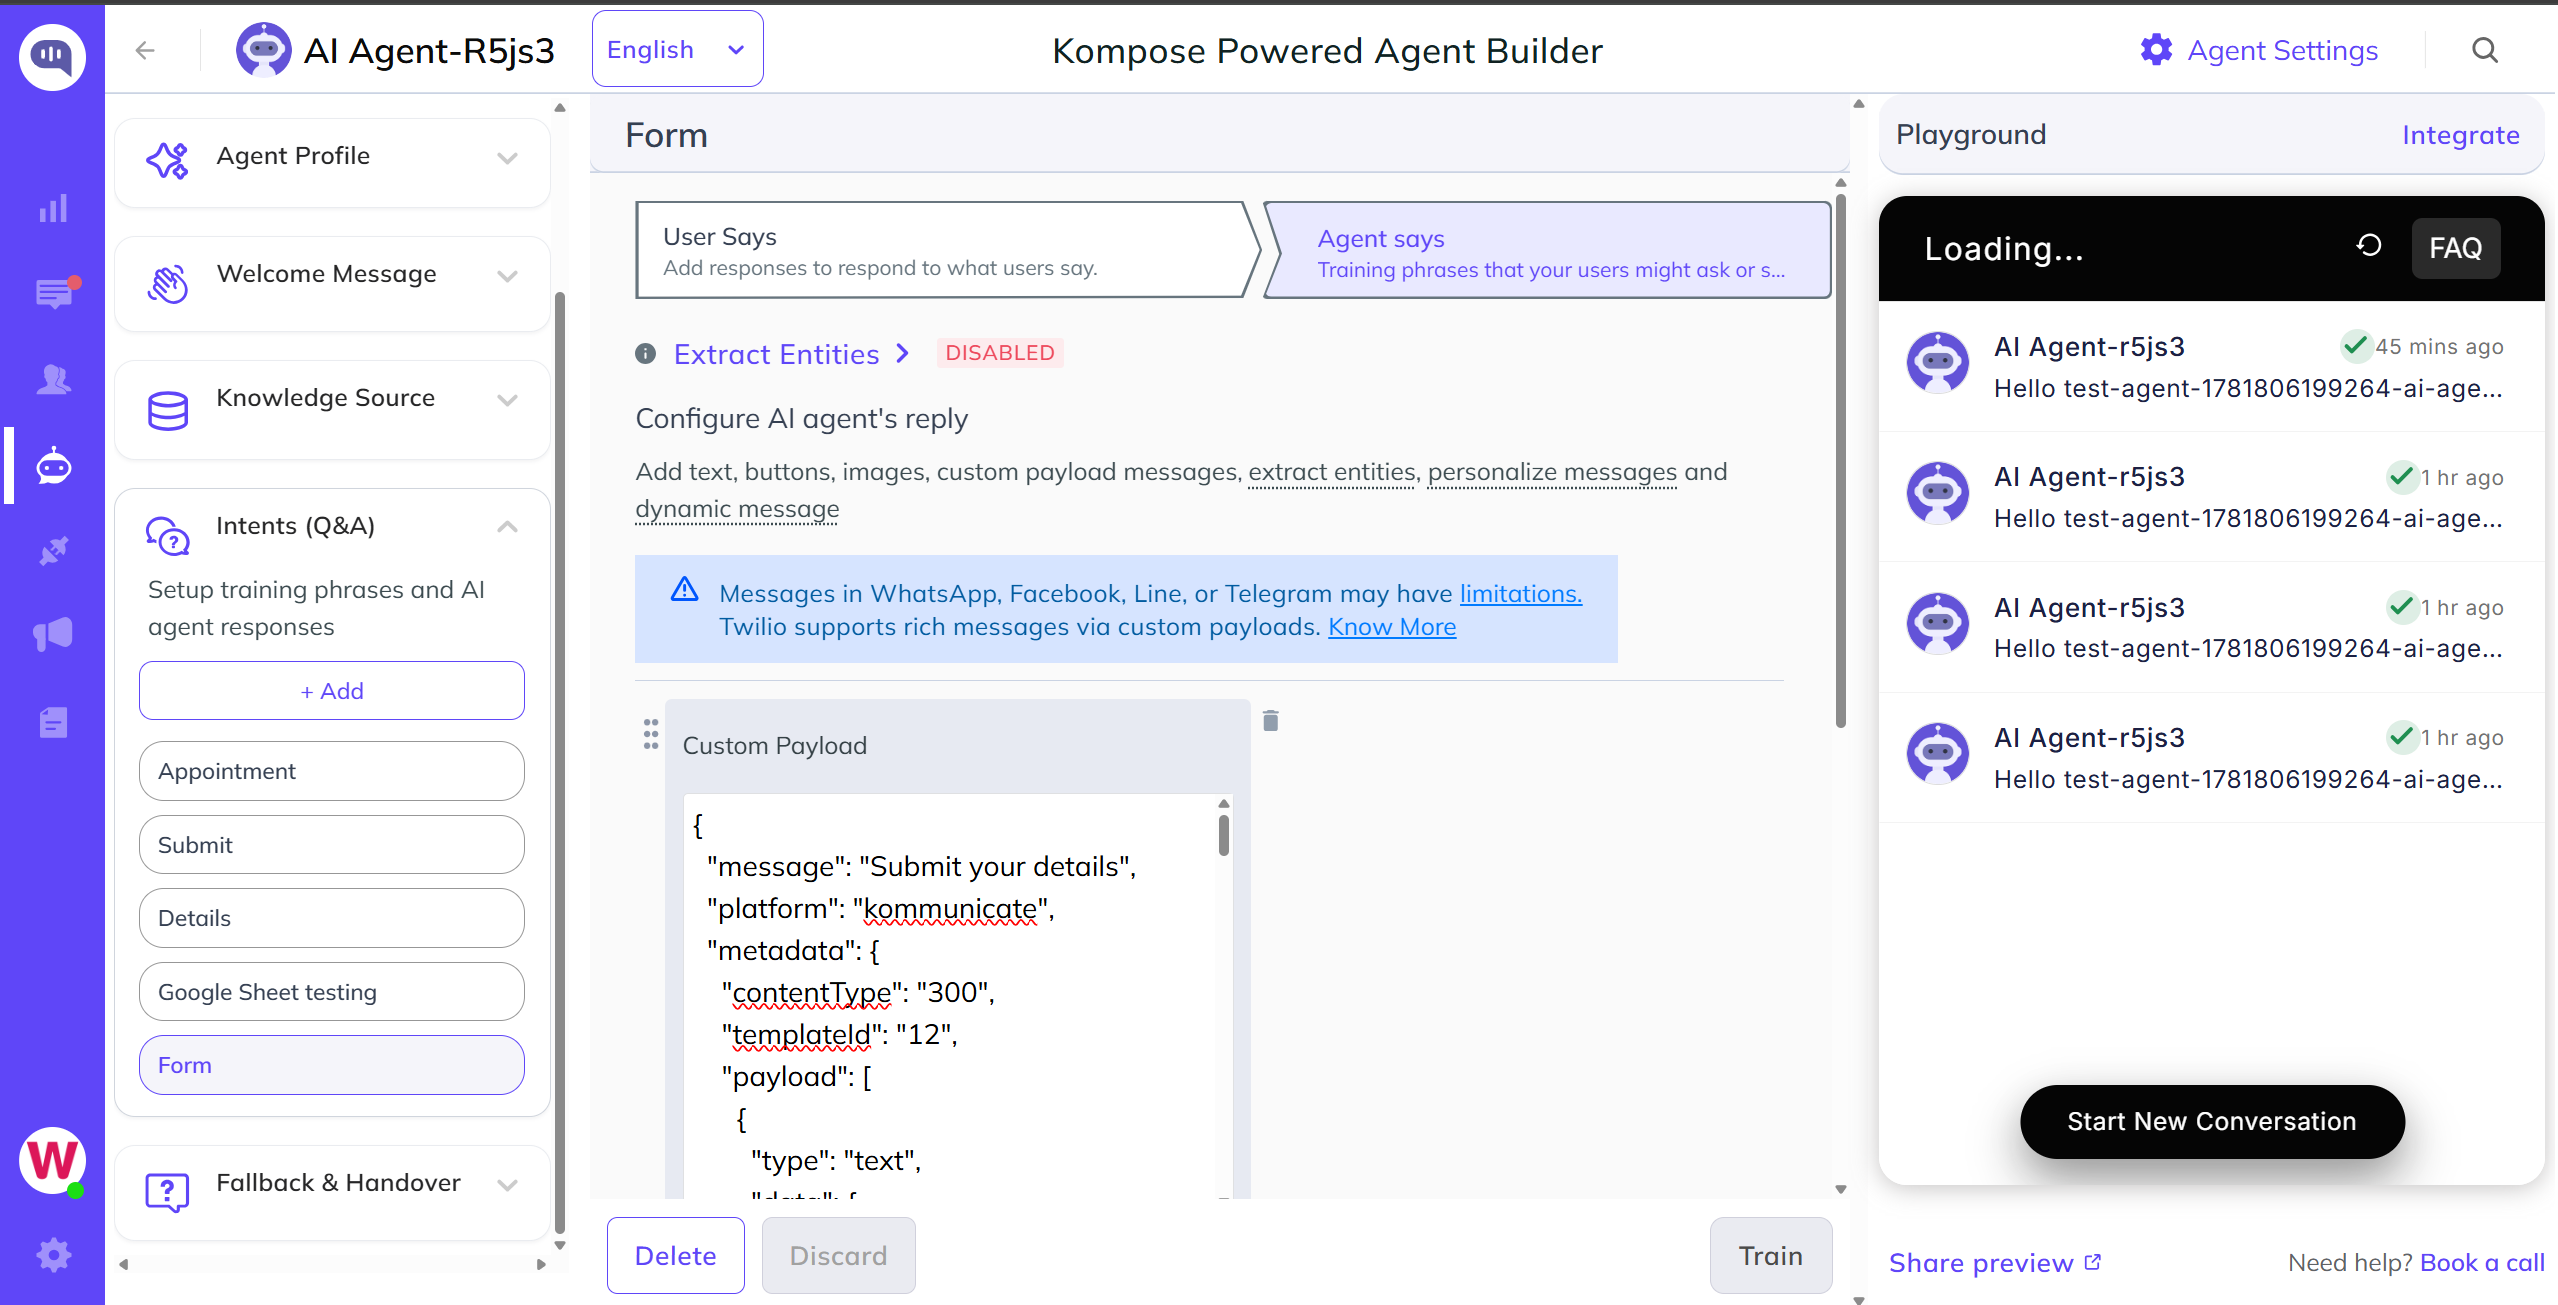
Doctor's Appointment Booking AI agent using Inline Code:
In this example, an AI agent has pre-chat lead collection enabled to collect the user's email. In the welcome message, two buttons are added: Appointment and Register. To handle the appointment button, create an intent with Appointment as a training phrase and ask the patient to select their illness. Below is the payload used for illness selection.
{
    "message": "Submit your details",
    "metadata": {
        "payload": [
            {
                "data": {
                    "title": "Choose your Disease",
                    "name": "Associated Symptoms",
                    "options": [
                        {
                            "value": "Hypertension",
                            "label": "Hypertension"
                        },
                        {
                            "value": "Diabetes",
                            "label": "Diabetes"
                        },
                        {
                            "value": "Pneumonia",
                            "label": "Pneumonia"
                        },
                        {
                            "value": "Dermatitis",
                            "label": "Dermatitis"
                        }
                    ]
                },
                "type": "checkbox"
            },
            {
                "data": {
                    "name": "Submit",
                    "action": {
                        "postFormDataAsMessage": "true",
                        "postBackToKommunicate": "false",
                        "requestType": "json",
                        "formAction": ""
                    },
                    "type": "submit"
                },
                "type": "submit"
            }
        ],
        "templateId": "12",
        "contentType": "300"
    },
    "platform": "kommunicate"
}
To handle the Submit button, create another intent named Submit and add training phrases such as Submit and associated symptoms. To schedule an appointment, create inline code by navigating to Settings in the top-right corner of the AI agent builder page, selecting Inline Code, and clicking Create Inline Code. In this example, the inline code is named Submit. Select the same inline code by enabling Dynamic Message under the AI agent Says section of the Submit intent. Below is the inline code used:
exports.responseHandler = async (input, callback) => {
  try {
    const getDateTimeOneHourLaterInIST = () => {
      let currentDate = new Date();
      currentDate.setMinutes(currentDate.getMinutes() + 330);

      currentDate.setHours(currentDate.getHours() + 1);

      let day = currentDate.getDate();
      let month = currentDate.getMonth() + 1;
      let year = currentDate.getFullYear();
      let formattedDate = `${day}/${month}/${year}`;

      let hours = currentDate.getHours();
      let minutes = currentDate.getMinutes();

      let ampm = hours >= 12 ? 'PM' : 'AM';

      hours = hours % 12;
      hours = hours ? hours : 12;

      minutes = minutes < 10 ? '0' + minutes : minutes;

      let formattedTime = `${hours}:${minutes} ${ampm}`;

      return `${formattedDate} at ${formattedTime}`;
    };

    let appointmentDateTime = getDateTimeOneHourLaterInIST();

    let resp = {
      "appointment": {
        "comment": {
          "body": "This is Body",
          "public": false
        },
        "book": "Your appointment is booked with ",
        "time": ` on ${appointmentDateTime}`
      },
      "Hypertension": {
        "bodyPart": "Heart",
        "medicines": ["Lisinopril", "Amlodipine", "Atenolol"],
        "doctor": "Dr. Smith"
      },
      "Diabetes": {
        "bodyPart": "Pancreas",
        "medicines": ["Metformin", "Glipizide", "Insulin"],
        "doctor": "Dr. Patel"
      },
      "Pneumonia": {
        "bodyPart": "Lungs",
        "medicines": ["Azithromycin", "Amoxicillin", "Oseltamivir"],
        "doctor": "Dr. Johnson"
      },
      "Dermatitis": {
        "bodyPart": "Skin",
        "medicines": ["Hydrocortisone", "Cetirizine", "Eucerin"],
        "doctor": "Dr. Williams"
      }
    };

    if (input.message.includes("Hypertension")) {
      callback([{
        "message": resp.appointment.book + resp.Hypertension.doctor + resp.appointment.time + "\n" + "Affected Body Part: " + resp.Hypertension.bodyPart + "\n" + "Prescribed Medicines are " + resp.Hypertension.medicines
      }]);
    } else if (input.message.includes("Diabetes")) {
      callback([{
        "message": resp.appointment.book + resp.Diabetes.doctor + resp.appointment.time + "\n" + "Affected Body Part: " + resp.Diabetes.bodyPart + "\n" + "Prescribed Medicines are " + resp.Diabetes.medicines
      }]);
    } else if (input.message.includes("Pneumonia")) {
      callback([{
        "message": resp.appointment.book + resp.Pneumonia.doctor + resp.appointment.time + "\n" + "Affected Body Part: " + resp.Pneumonia.bodyPart + "\n" + "Prescribed Medicines are " + resp.Pneumonia.medicines
      }]);
    } else if (input.message.includes("Dermatitis")) {
      callback([{
        "message": resp.appointment.book + resp.Dermatitis.doctor + resp.appointment.time + "\n" + "Affected Body Part: " + resp.Dermatitis.bodyPart + "\n" + "Prescribed Medicines are " + resp.Dermatitis.medicines
      }]);
    } else {
      callback([{
        "message": "No input selected"
      }]);
    }

  } catch (err) {
    console.log("Error: " + err);
    callback([{
      "message": "inline code failed"
    }]);
  }
};
input contains all information related to the triggered intent. callback is used to send the message back to your AI agent. Here, the input message is used to reply through a callback with the appropriate doctor name, scheduled according to the selected illness.
Result:
Extract Entities Through Inline Code
Before extracting entities, consider how the response handler works.
responseHandler is a function with two parameters. The first parameter is an object that contains the details of the message that triggered a particular intent. The second parameter is a function responsible for generating the response from the AI agent.
Input
The input parameter is an object. It contains all the information that may be required to generate a response.
For example, you may need data entered by the user in a form, the group ID or user ID for validation, and the messages sent by the user.
Sample JSON
{
   "botId": "prhelpt-a8ju9", // the id of the AI agent which is supposed to reply
   "key": "5-541471-1628416506417", // unique key associated with a message
   "from": "8TXpRYy1bkAZGD4SHAcSatd4uM0b5WiEcM", // userId of the customer
   "matchedIntent": "608fdf42ab34748dd5355d94a", // intent id which got triggered
   "matchedIntentName": "A sample intent",
   "parameters": null, // this will contain extracted entity data
   "nlpResponse": [],
   "message": "Hello from the end user", // the user input which triggered this intent
   "groupId": 65781456, // the group id of the conversation
   "metadata": {
// data such as form response, etc will appear in KM_CHAT_CONTEXT
       "KM_CHAT_CONTEXT": {
           "formData": {
               "Name": "John",
               "Password": "john123",
               "userDetail": "some_secret_detail",
               "Gender": "male",
               "music_type": [
                   "metal",
                   "pop"
               ]
           },
       }
   },
  }
Extracted Entities from the parameters Property
{
   "botId":"new-bot-4-xf5i8",
   "key":"5-656651-16747851667298",
   "from":"8TXpRYy1bkXZhsUyqRiqTtd4uM0b5WiEcM",
   "matchedIntent":"63abc4ac48jfy6977d2350e07",
   "matchedIntentName":"my name is somename",
   "parameters":{
      "name":"John"
   },
   "nlpResponse":[ ],
   "message":"my name is John",
   "groupId":651451,
   "metadata":{ },
}
Callback
The callback is a function that accepts an array of message objects. A message can be plain text or a rich message. Refer to the message types documentation for the rich messages supported by Kommunicate.
// example of a simple message
let message1 ={
   "message":"Hello Kommunicate"
}// example of a rich message with buttons
let message2 ={
   "message":"click on the buttons",
   "platform":"kommunicate",
   "metadata":{
      "contentType":"300",
      "templateId":"3",
      "payload":[
         {
            "type":"link",
            "url":"https://www.google.com",
            "name":"Go To Google"
         },
         {
            "type":"link",
            "url":"https://www.facebook.com",
            "name":"Go To Facebook",
            "openLinkInNewTab":false
         }
      ]
   }
}
callback([message1, message2]);;
Personalization
Customers expect personalized communication. An AI agent that addresses customers by name can provide a more human and personalized experience.
Personalizing Kompose AI agent responses makes the conversation more interactive and engaging for customers.
There are three ways to personalize Kompose AI agent responses:
User information/pre-chat form
Chat context
Conversation info
User Information/pre-chat Lead Form
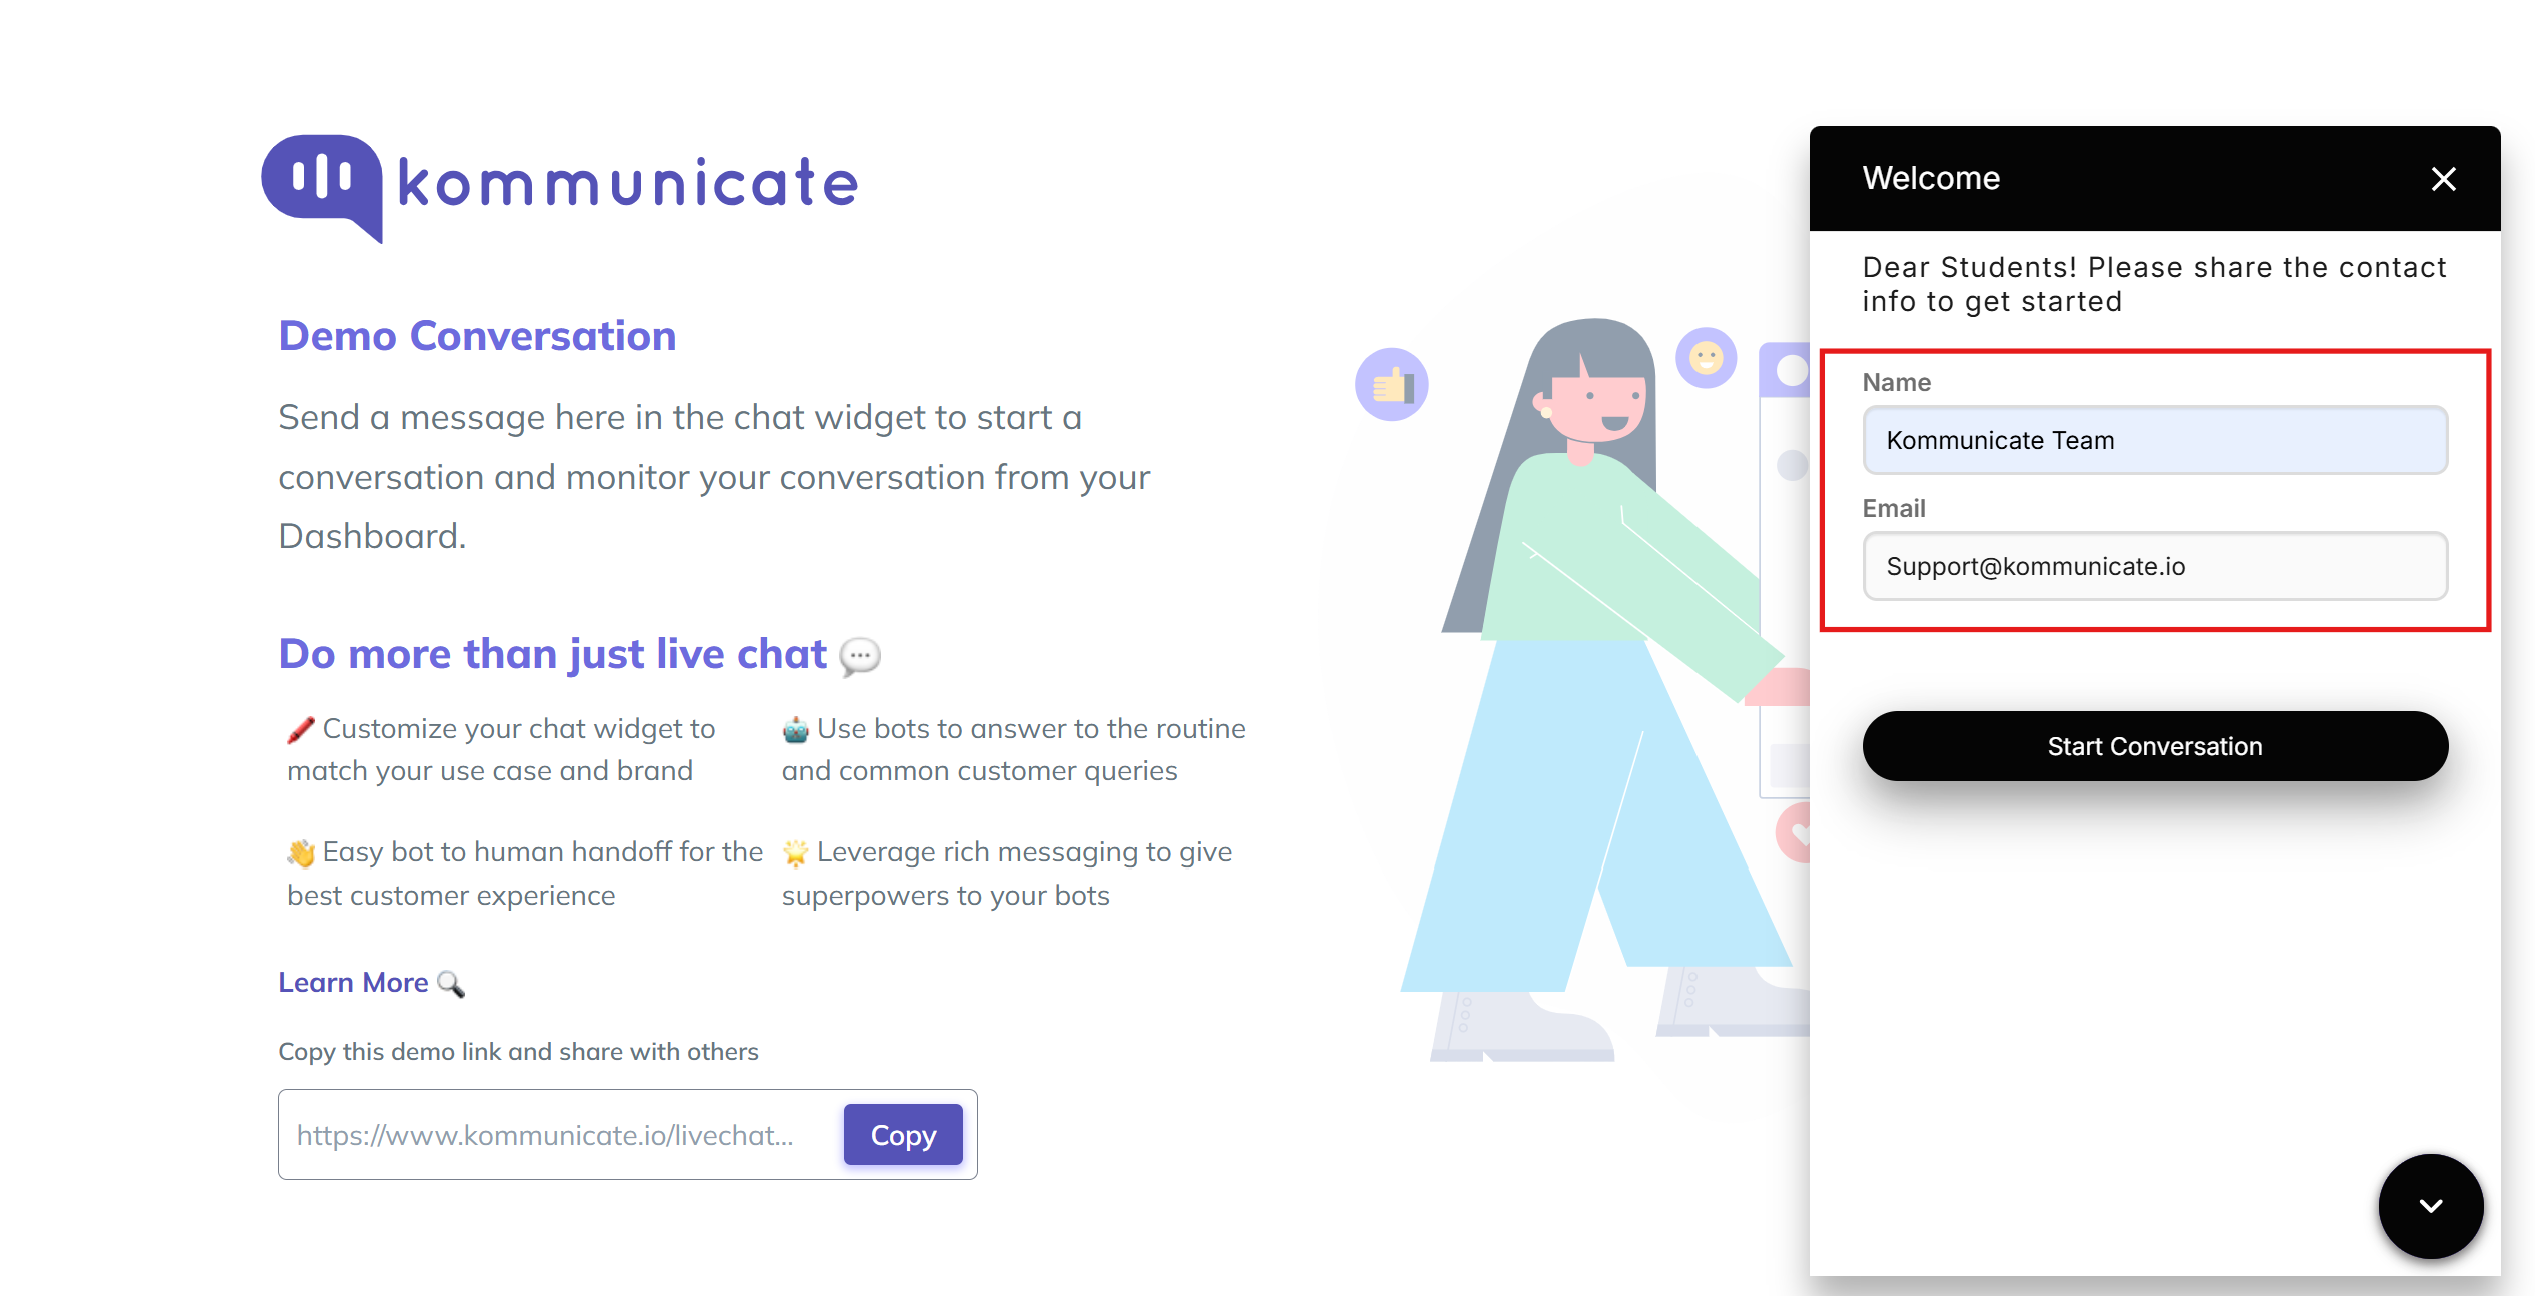
To send a personalized message to an end user, use the information shared by the user through the pre-chat form.
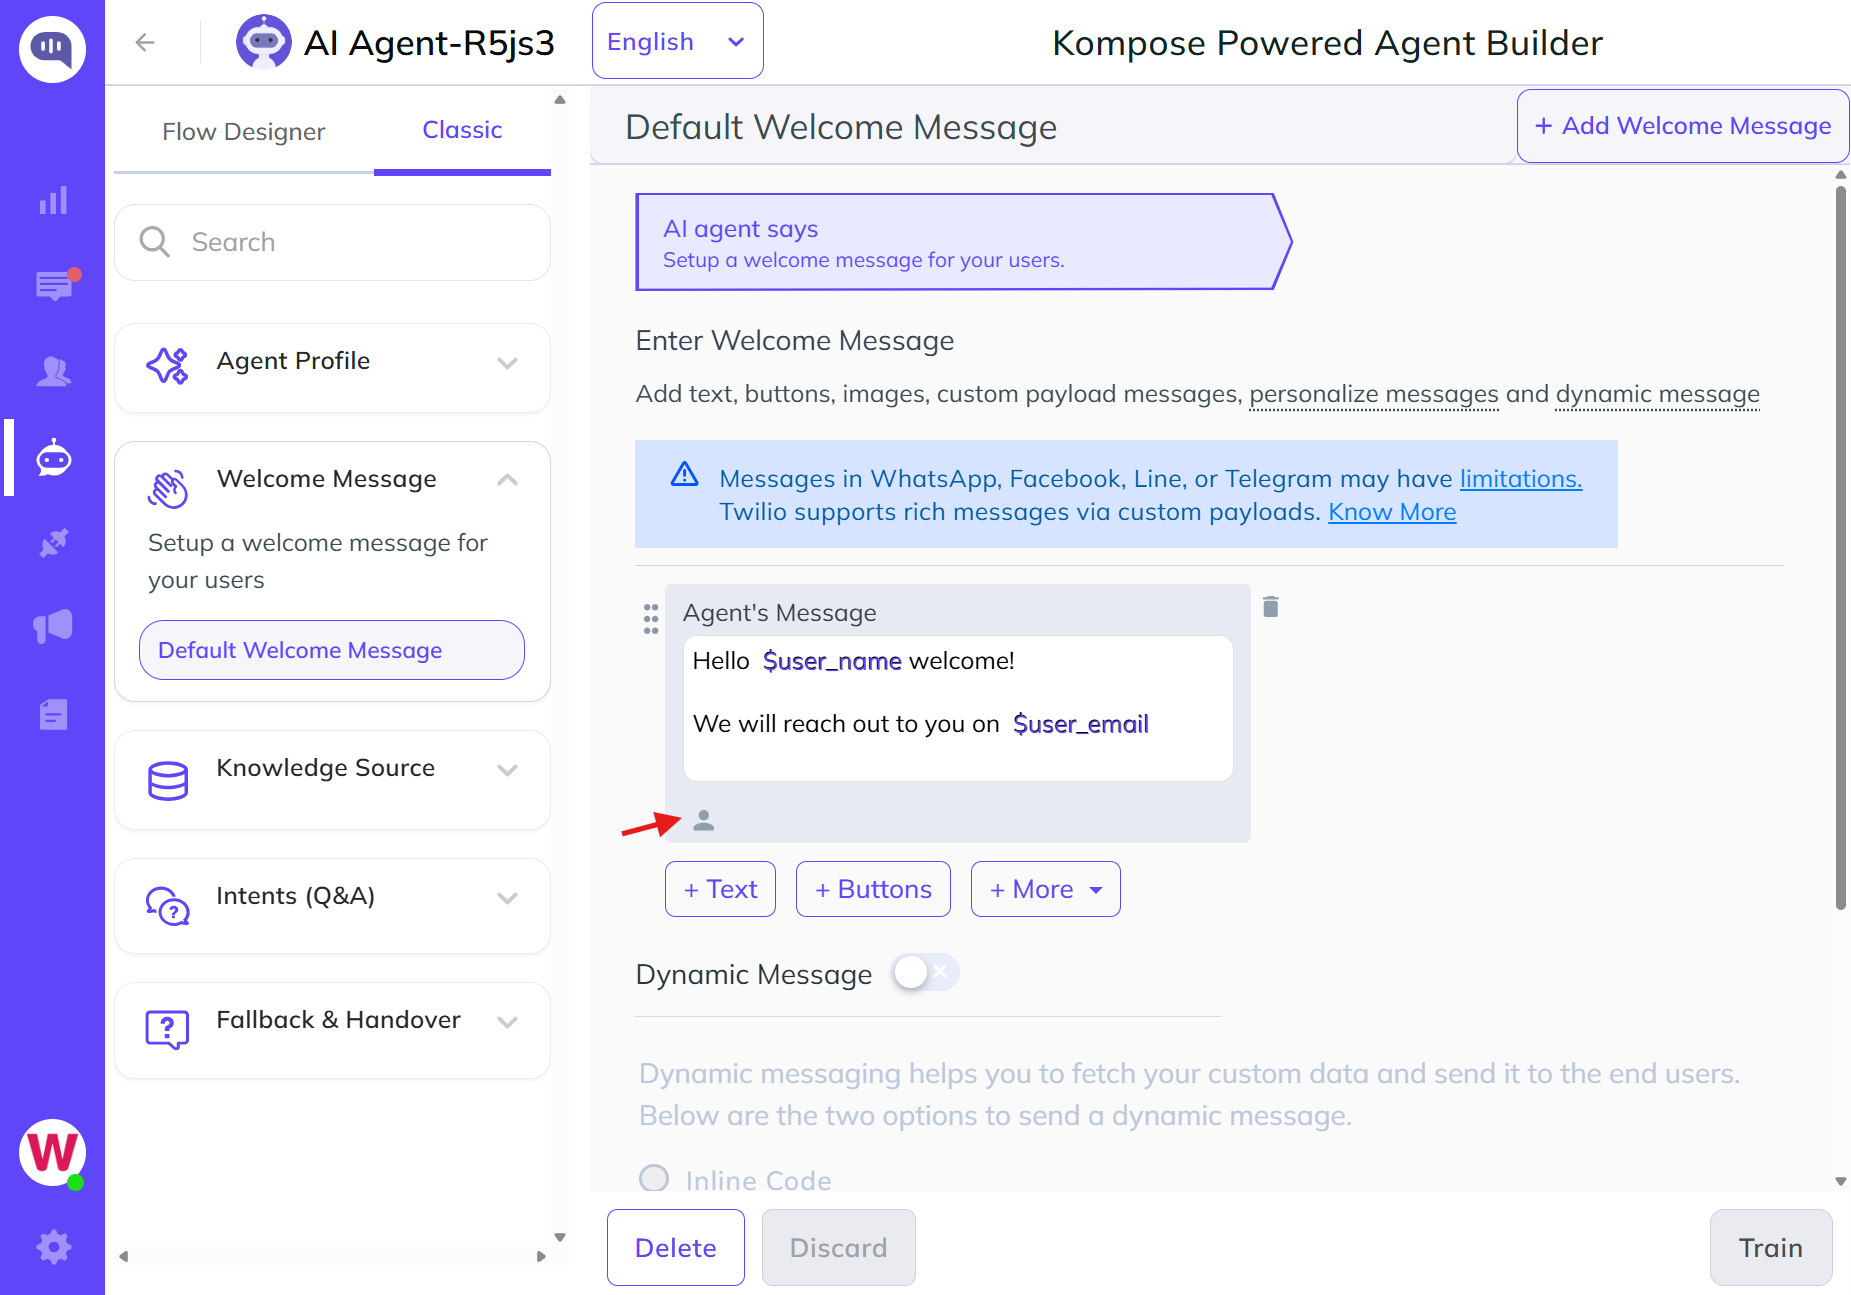
Step 1: Create a Kompose AI agent and add the following AI agent response in the Default Welcome Intent. You can use the available user fields in the intent text box UI to write a personalized welcome message.
Welcome Intent/AI agent Message
Hello $user_name,
Thanks for contacting us, your email is $user_email and contact number is $user_phone.
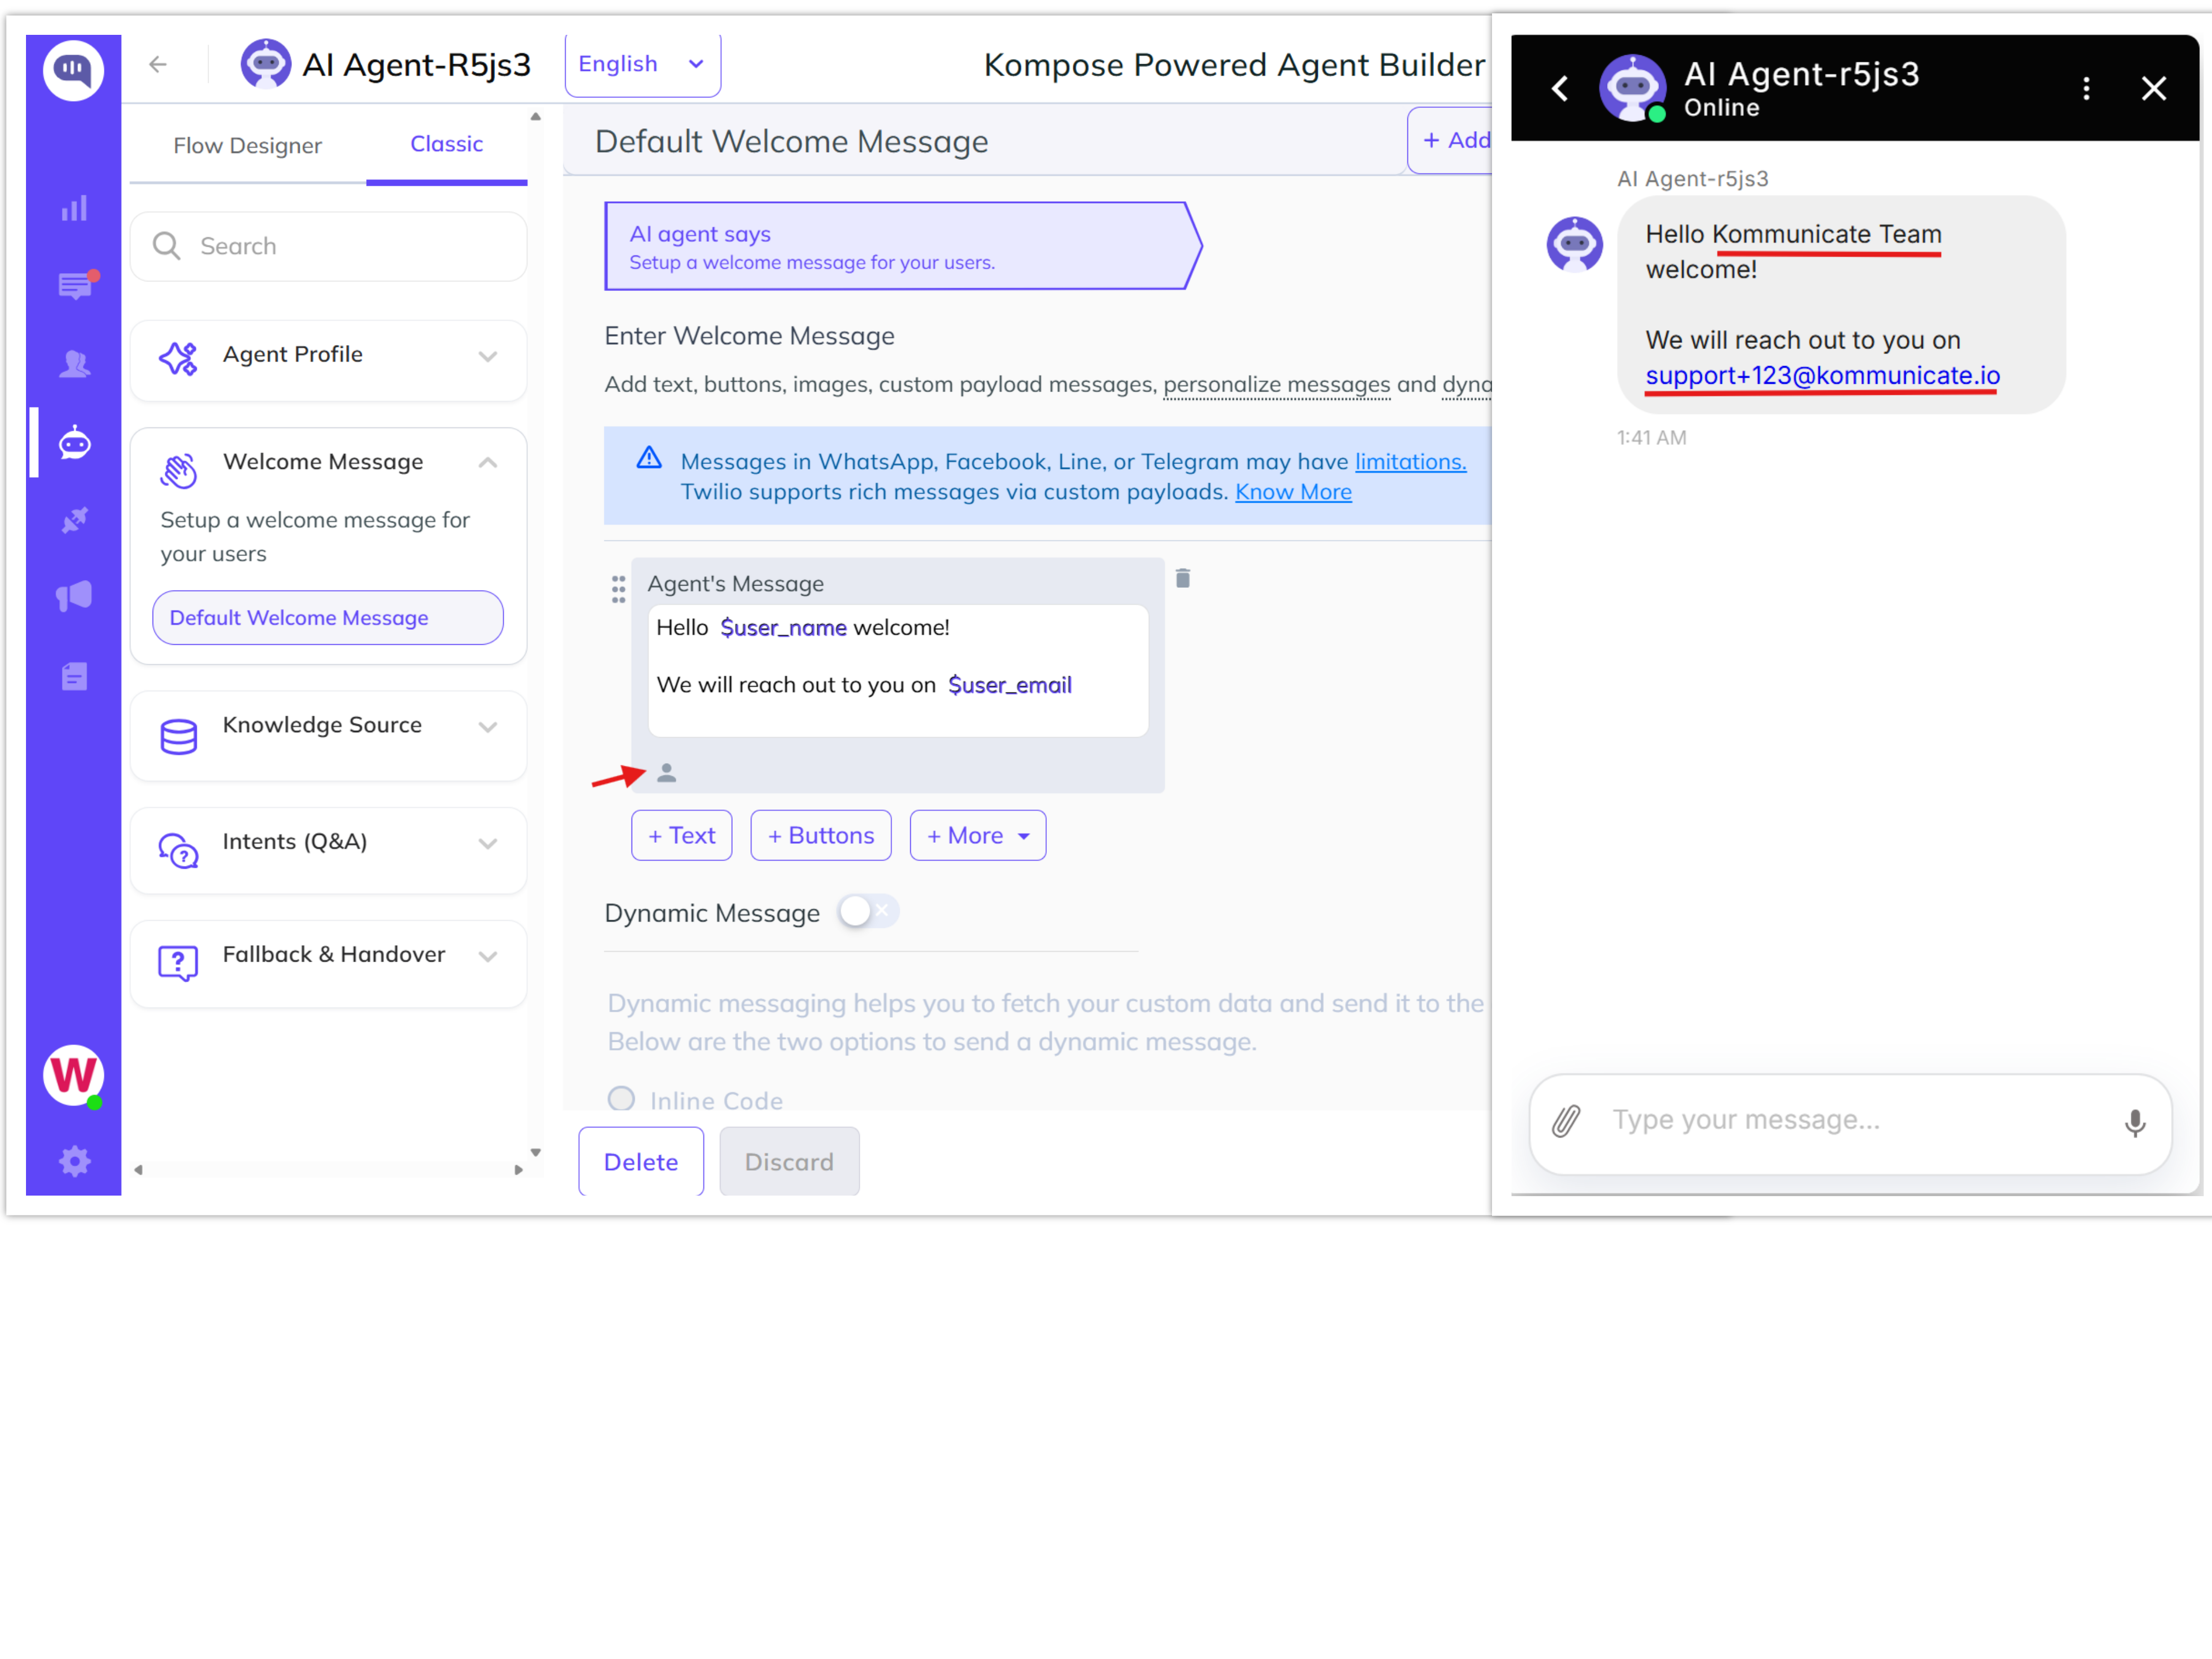
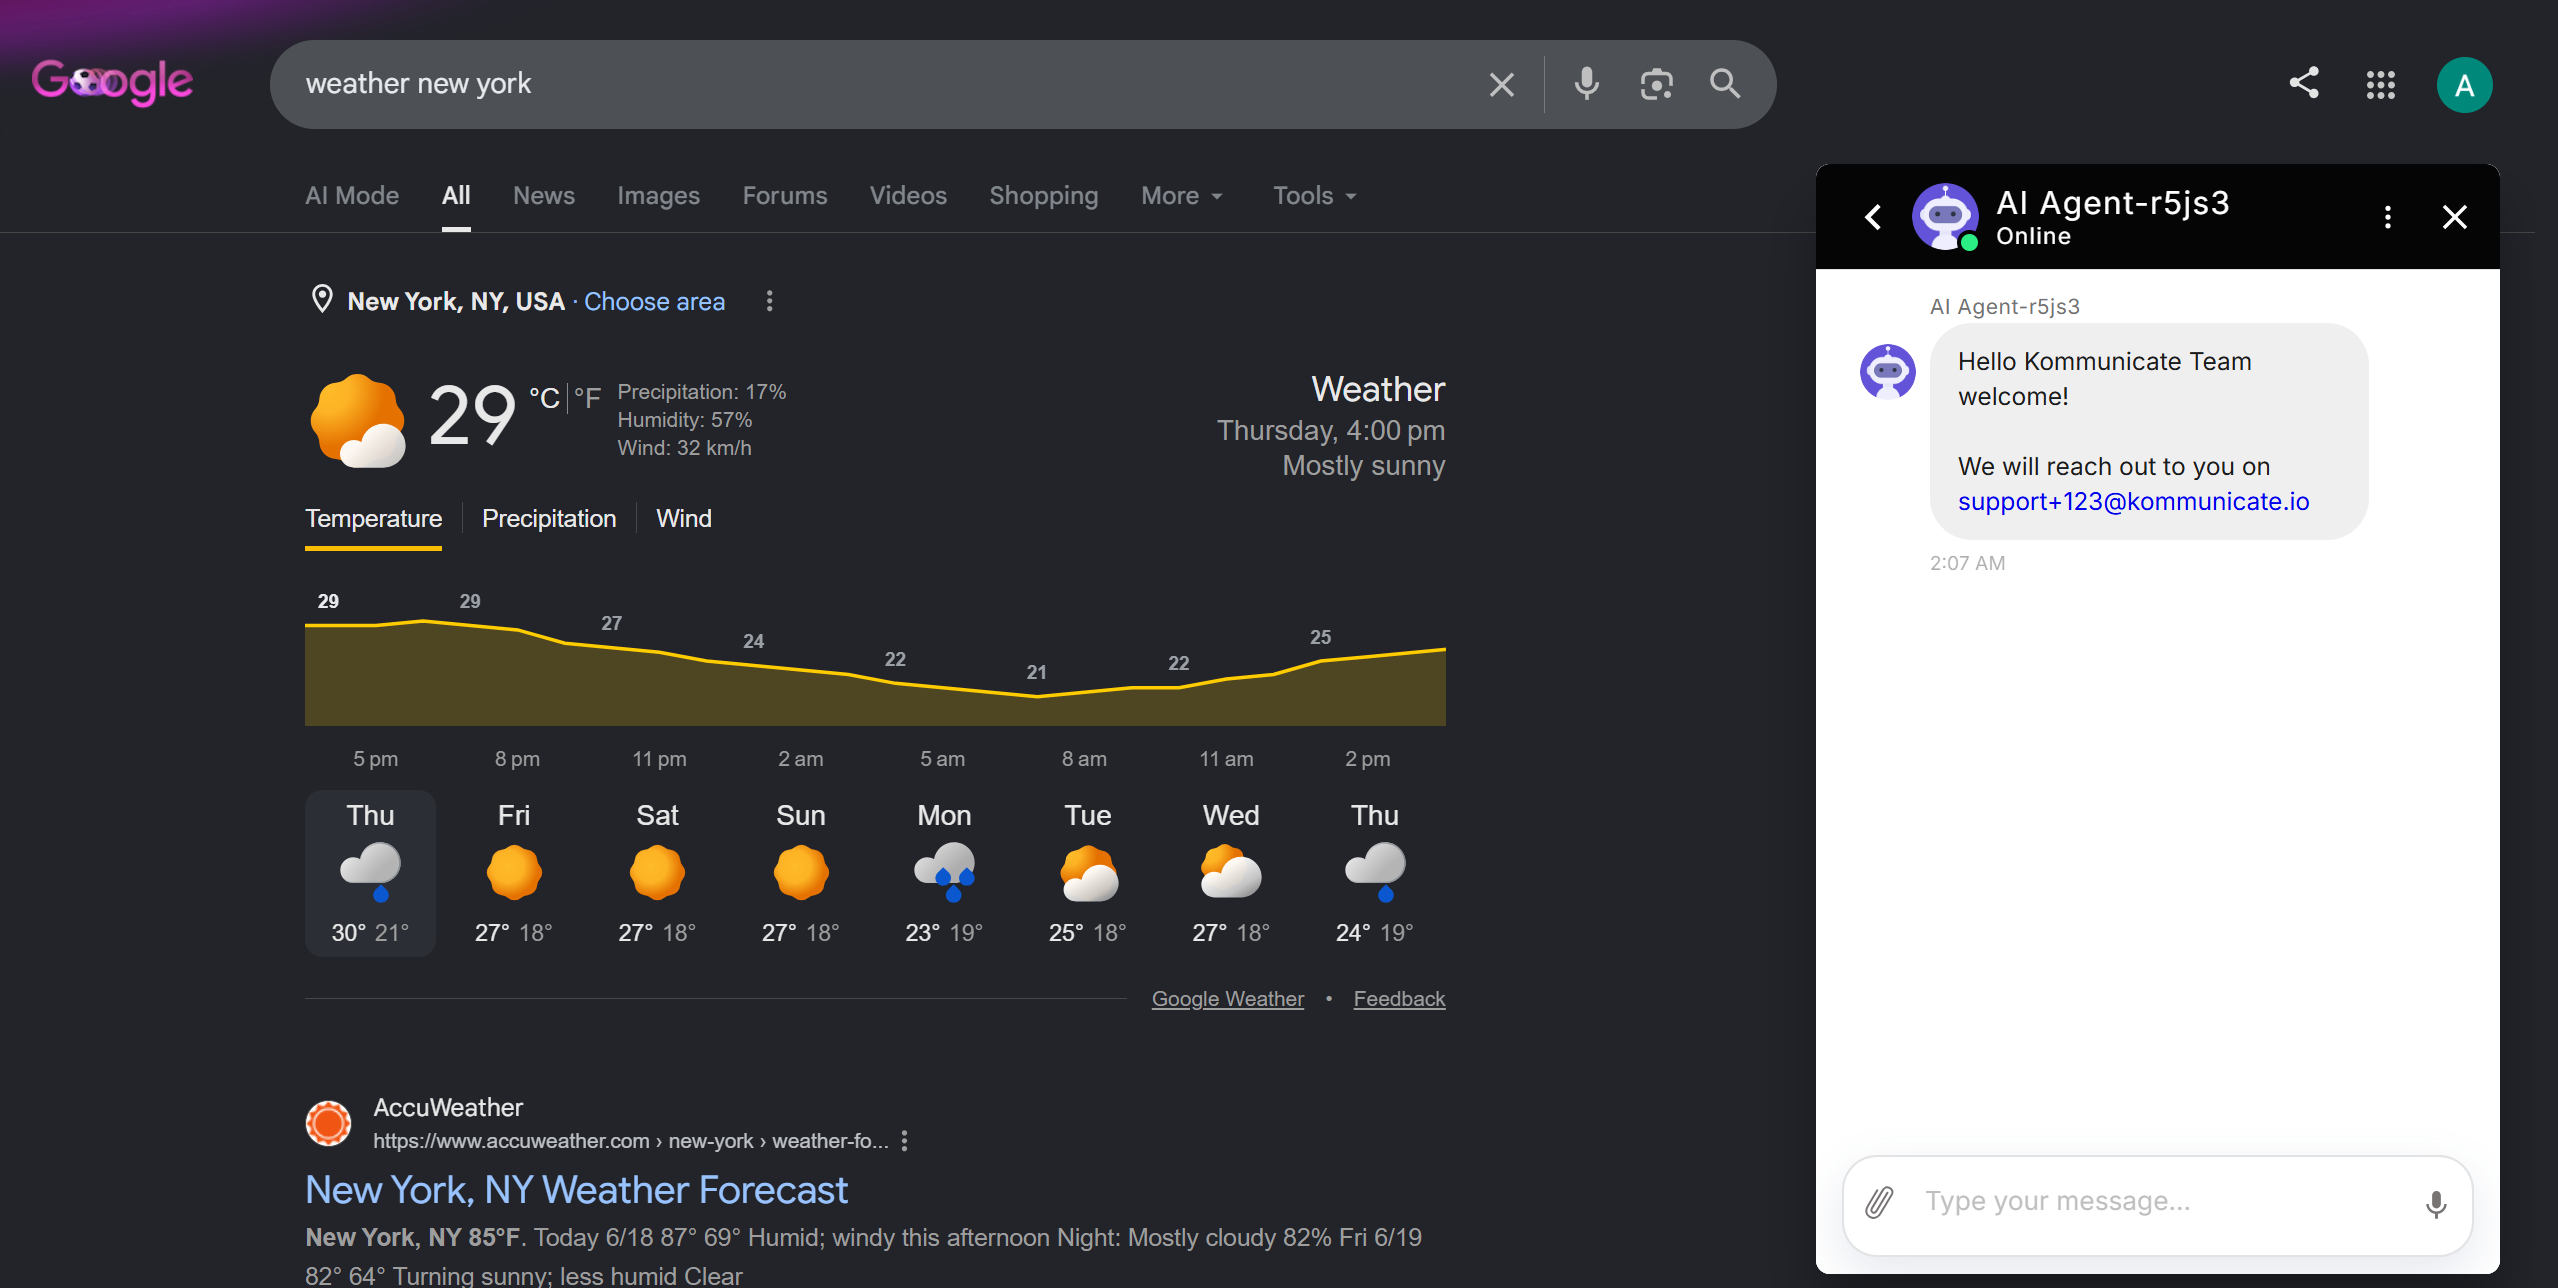
Step 2: User information such as name, email, and phone number is fetched from the pre-chat data previously provided by the customer, as shown below.
Chat Context
Chat context is used to send user information to the AI agent platform. The data passed in chat context can be fetched and used to send personalized messages to the end user. In this example, the user's name, email, and phone number are passed in the Kommunicate install script.
Note: The pre-chat form is disabled in the chat context case. If you use the pre-chat form, the data passed through chat context is overridden. The information passed through the pre-chat form is used by the AI agent to send the personalized message.
Install script with chat context user information:
(function(d, m){
        var kommunicateSettings =
            {"appId":"3d5cd4f5c269dfe504be8f28586e32747","popupWidget":true,"automaticChatOpenOnNavigation":true,"onInit": function() {
        var chatContext = {
              "name" : "PoojaGC", "mail" : "poojagc1@gmail.com", "phonenumber" : "8861921749"
            }
            Kommunicate.updateSettings({"KM_CHAT_CONTEXT":chatContext});
        }};
        var s = document.createElement("script"); s.type = "text/javascript"; s.async = true;
        s.src = "https://widget.kommunicate.io/kommunicate-widget-3.0.min.js";
        var h = document.getElementsByTagName("head")[0]; h.appendChild(s);
        window.kommunicate = m; m._globals = kommunicateSettings;
    })(document, window.kommunicate || {});
The data passed in chat context, such as name, email, and phone number, is used to send the personalized message. On the Kompose AI agent side, use fields such as $context_name, $context_mail, and $context_phonenumber in the welcome intent.
Welcome Intent/AI agent Message
Hi $context_name,
Greetings!
Your email is $context_mail and contact number is $context_phonenumber,
let me know how can I help you?
After adding the intent, initiate the chat to see the personalized welcome message sent by the AI agent:
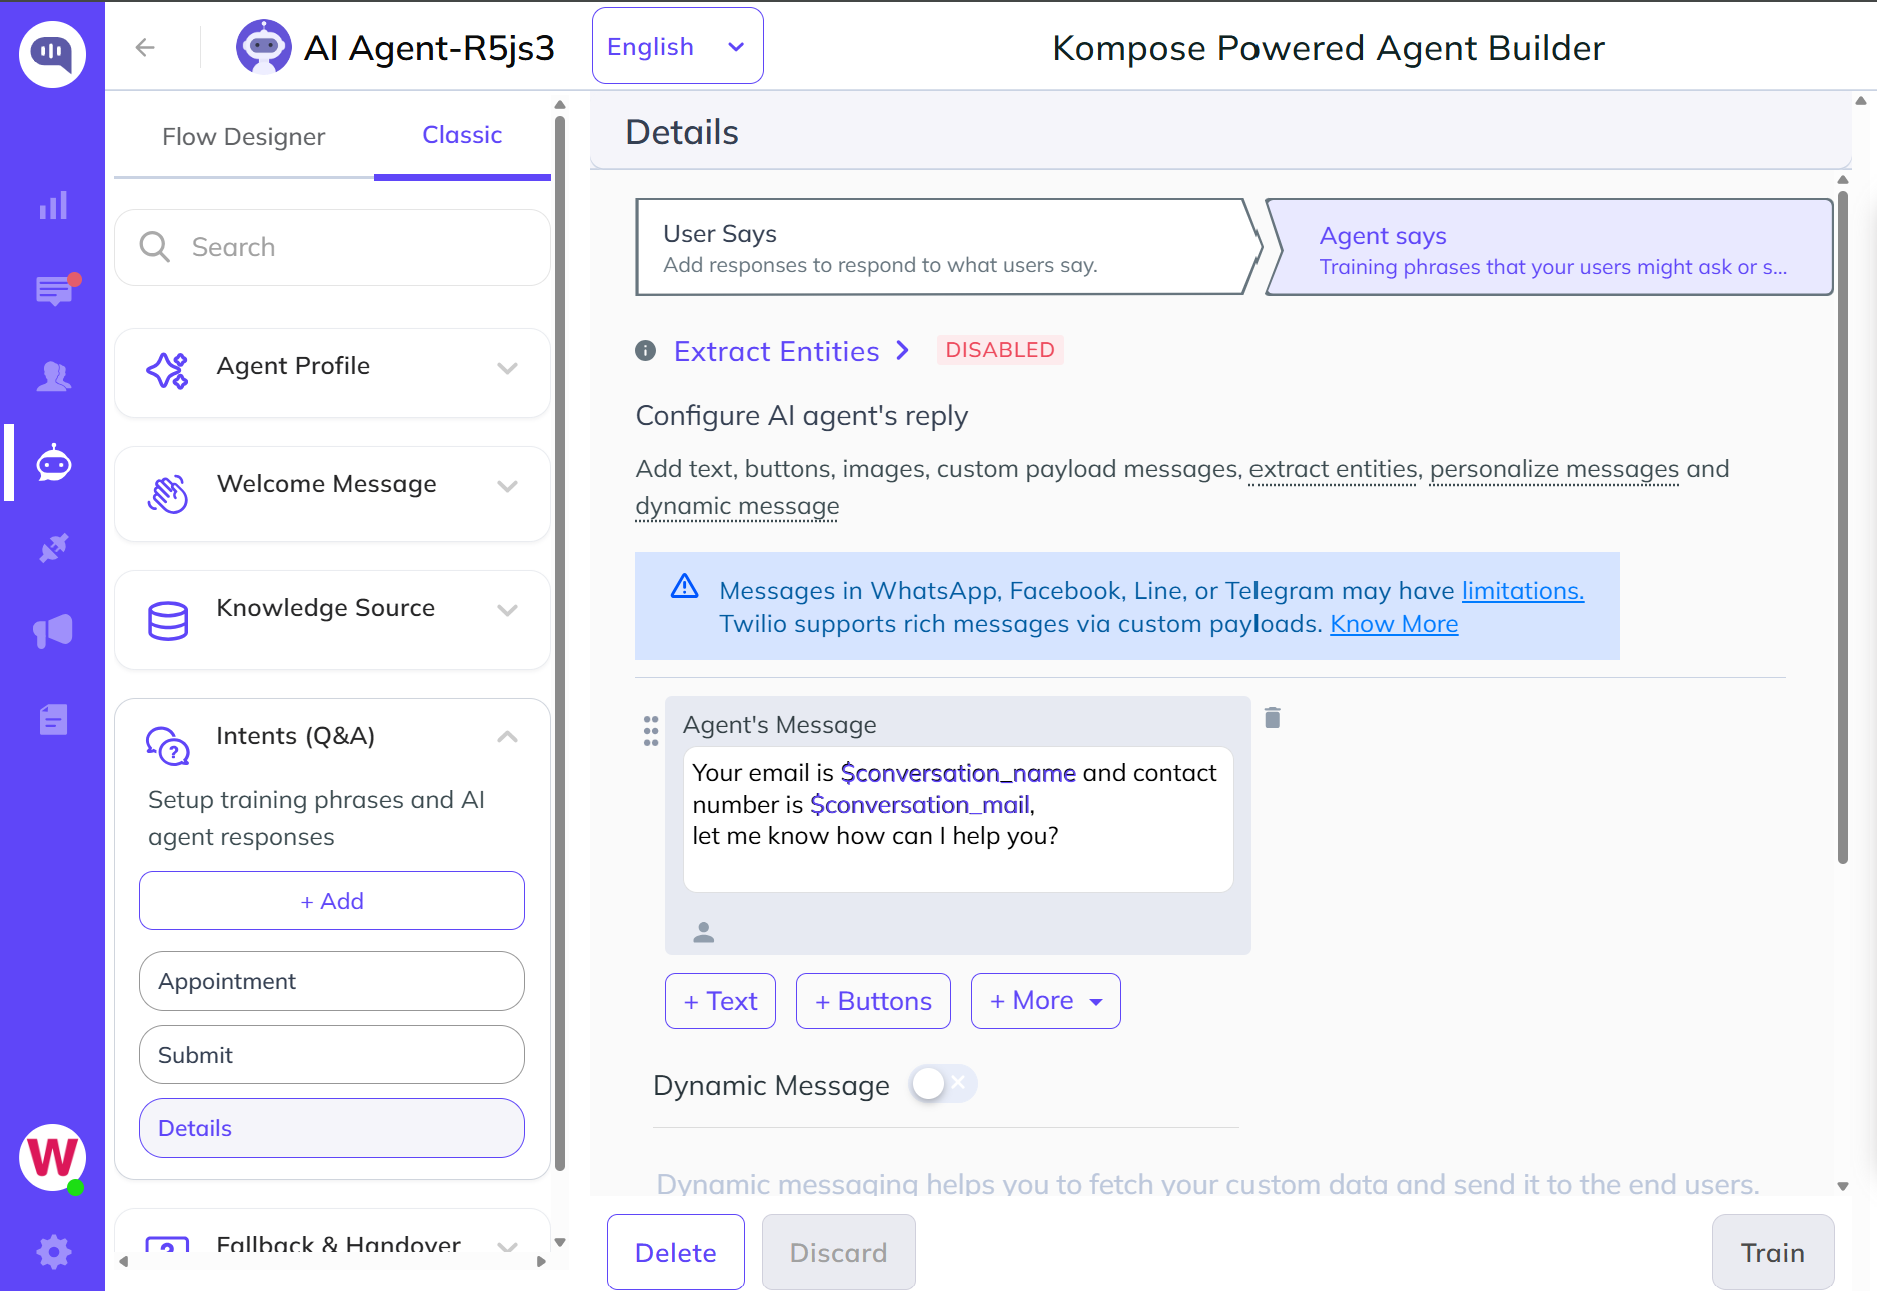
conversation info
Conversation information is used to show information on the Kommunicate dashboard. You can also use conversation information to show personalized messages to the user. Information can be fetched by passing fields such as $conversation_name, $conversation_mail, and $conversation_phonenumber.
Installation script
(function(d, m) {
    var kommunicateSettings = {
        "appId": "205054949ed1e58593e506d4d7915a80d",
        "popupWidget": true,
        "automaticChatOpenOnNavigation": true,
        "onInit": function() {
            var conversationInfo = {
                groupId: 100787930,
                metadata: {
                    "name": "Brooke",
                    "mail": "Brooke57@gmail.com",
                    "phonenumber": "9738474554",
                }
            };
            Kommunicate.updateConversationMetadata(conversationInfo);
        }
    };
    var s = document.createElement("script");
    s.type = "text/javascript";
    s.async = true;
    s.src = "https://widget.kommunicate.io/v2/kommunicate.app";
    var h = document.getElementsByTagName("head")[0];
    h.appendChild(s);
    window.kommunicate = m;
    m._globals = kommunicateSettings;
})(document, window.kommunicate || {});
Note: You will get the Group ID/Conversation ID right after the chat is initiated. Later, you can pass user information along with the conversation ID/group ID.
Note: Pass the fields
$conversation_name,$conversation_mail, and$conversation_phonenumberin follow-up intents. Do not use the welcome intent to fetch this information because the conversation ID/group ID is not present before the welcome message is sent. The group ID is created after the conversation starts by sending the welcome message.
Example: If the Welcome Intent has a normal welcome message with two buttons, Pricing and Details, add the following AI agent Message/Intent in the follow-up intent created for the Details button.
AI agent Message/follow-up Intent
Hi $conversation_name,
Greetings!
Your email is $conversation_mail and contact number is $conversation_phonenumber,
let me know how can I help you?
The end user receives the personalized message once they click the Details button in the example above.
Building a Multilingual AI agent
To copy your default agent to other languages so end users can chat with a multilingual AI agent, use the language settings inside the builder. This is especially useful for intent-based agents.
Step-by-step Configuration
Step 1: Add the New Language
Inside the Kompose Agent Builder, click the Language dropdown located at the top-left, beside the agent's name. Select the desired language and click Let's Do It to confirm.
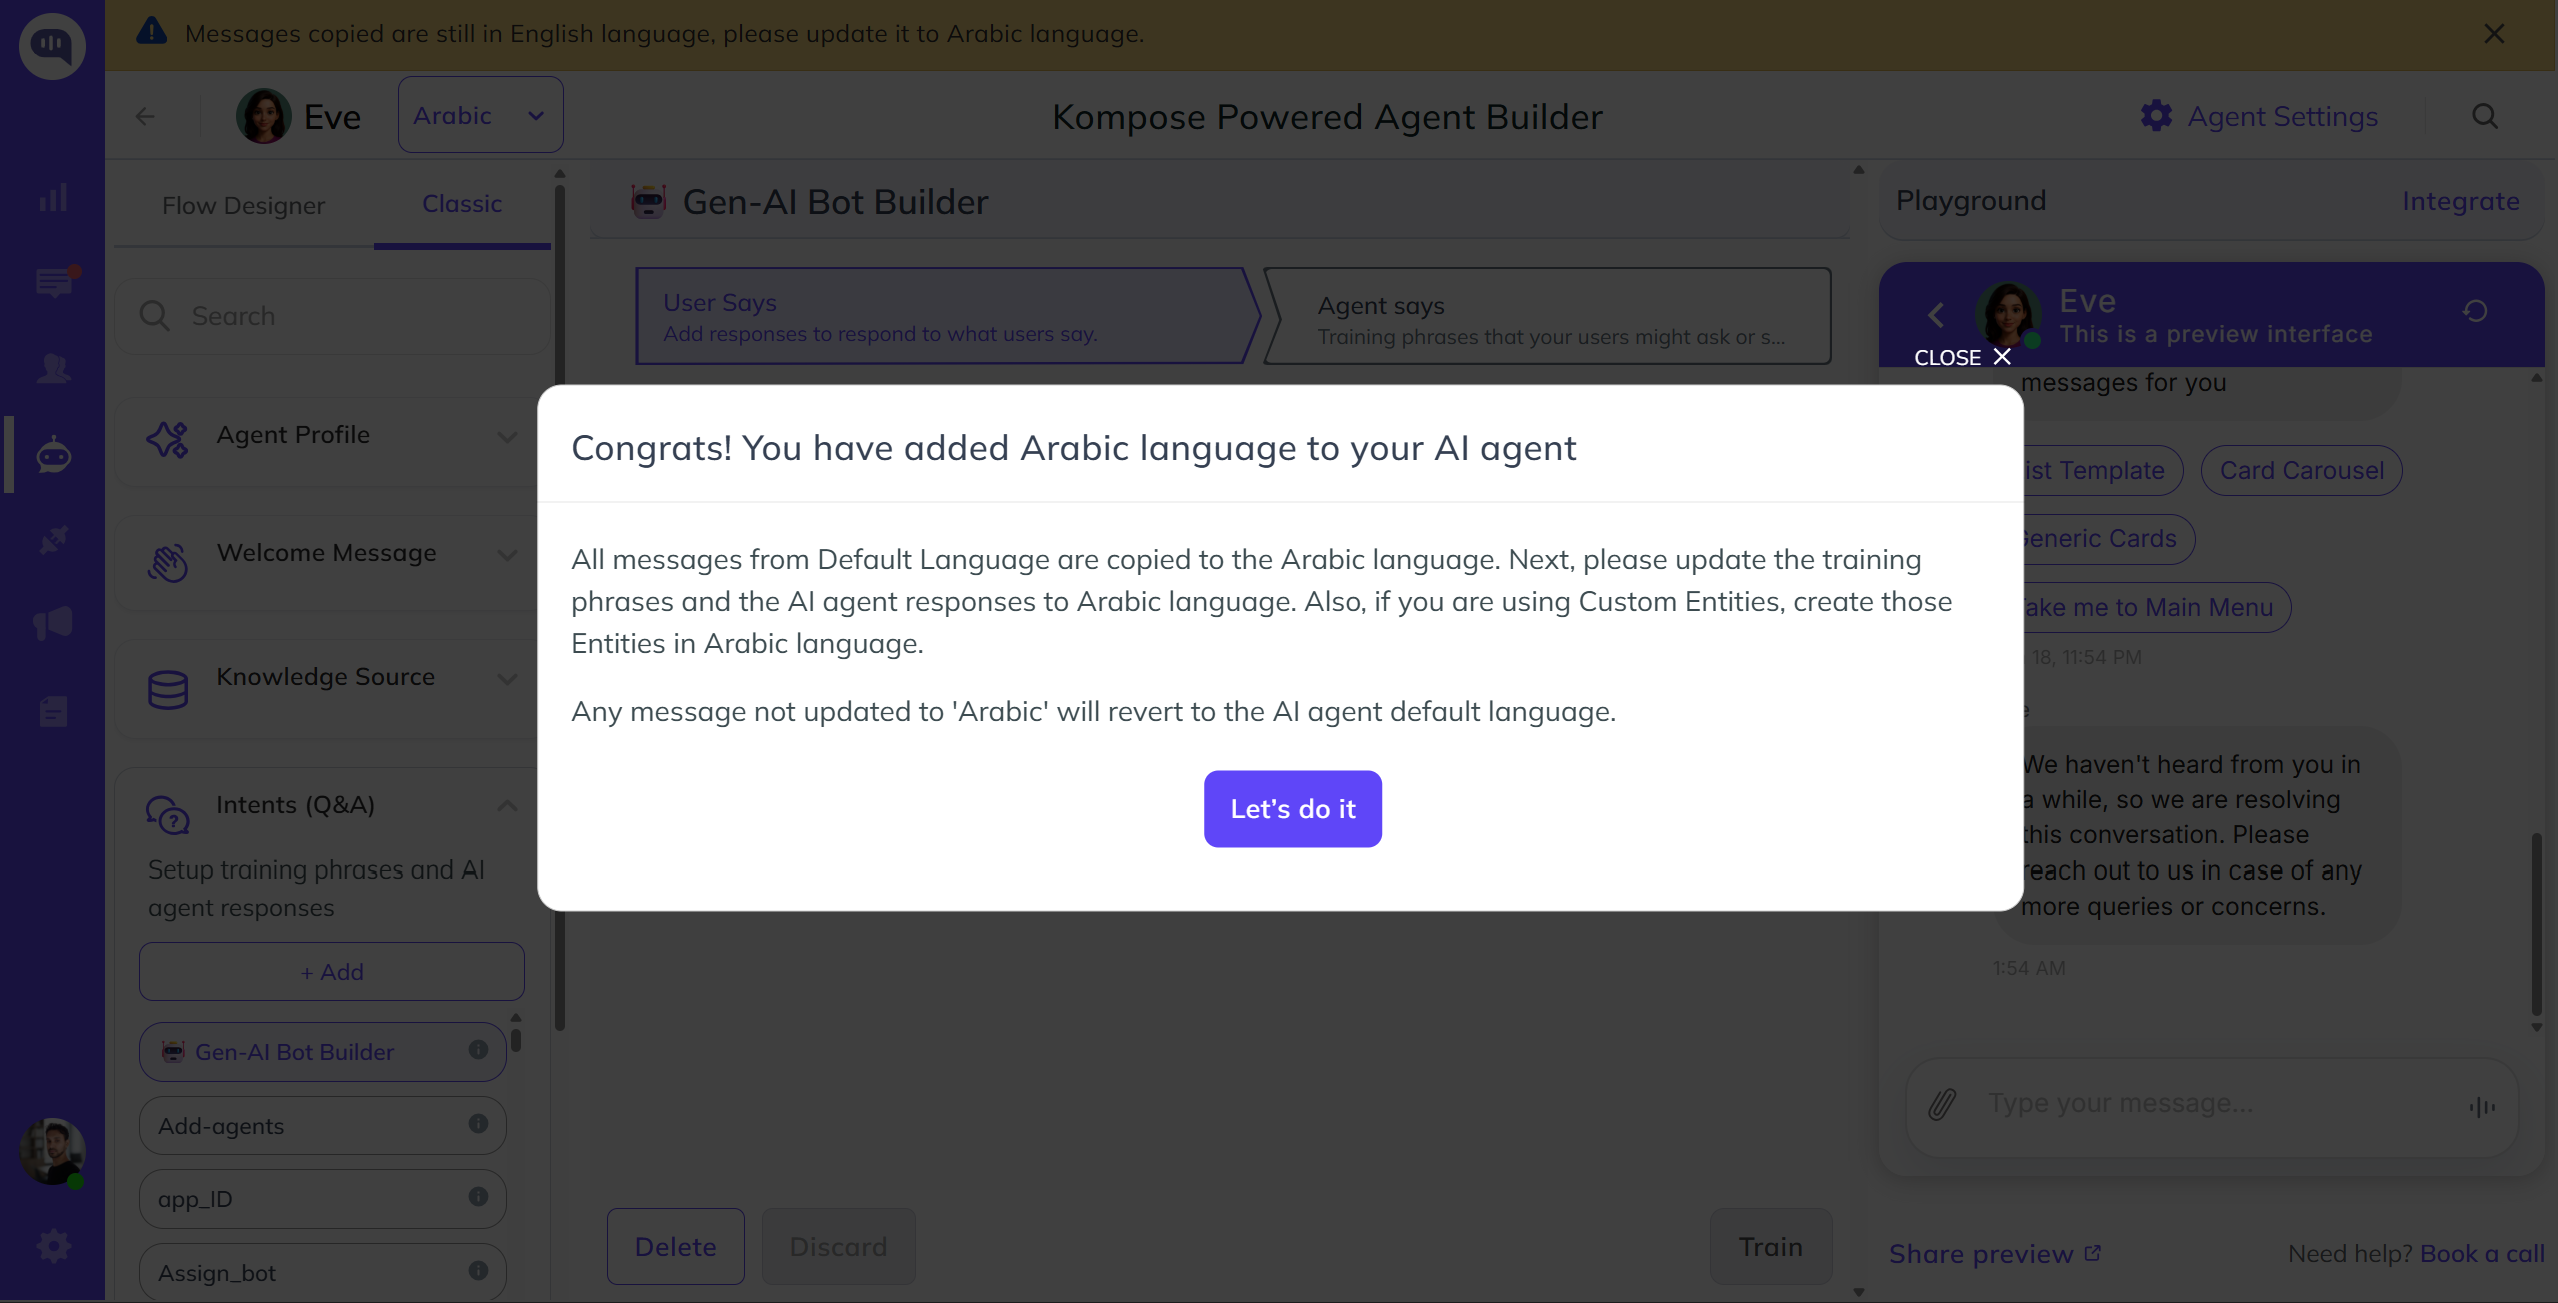
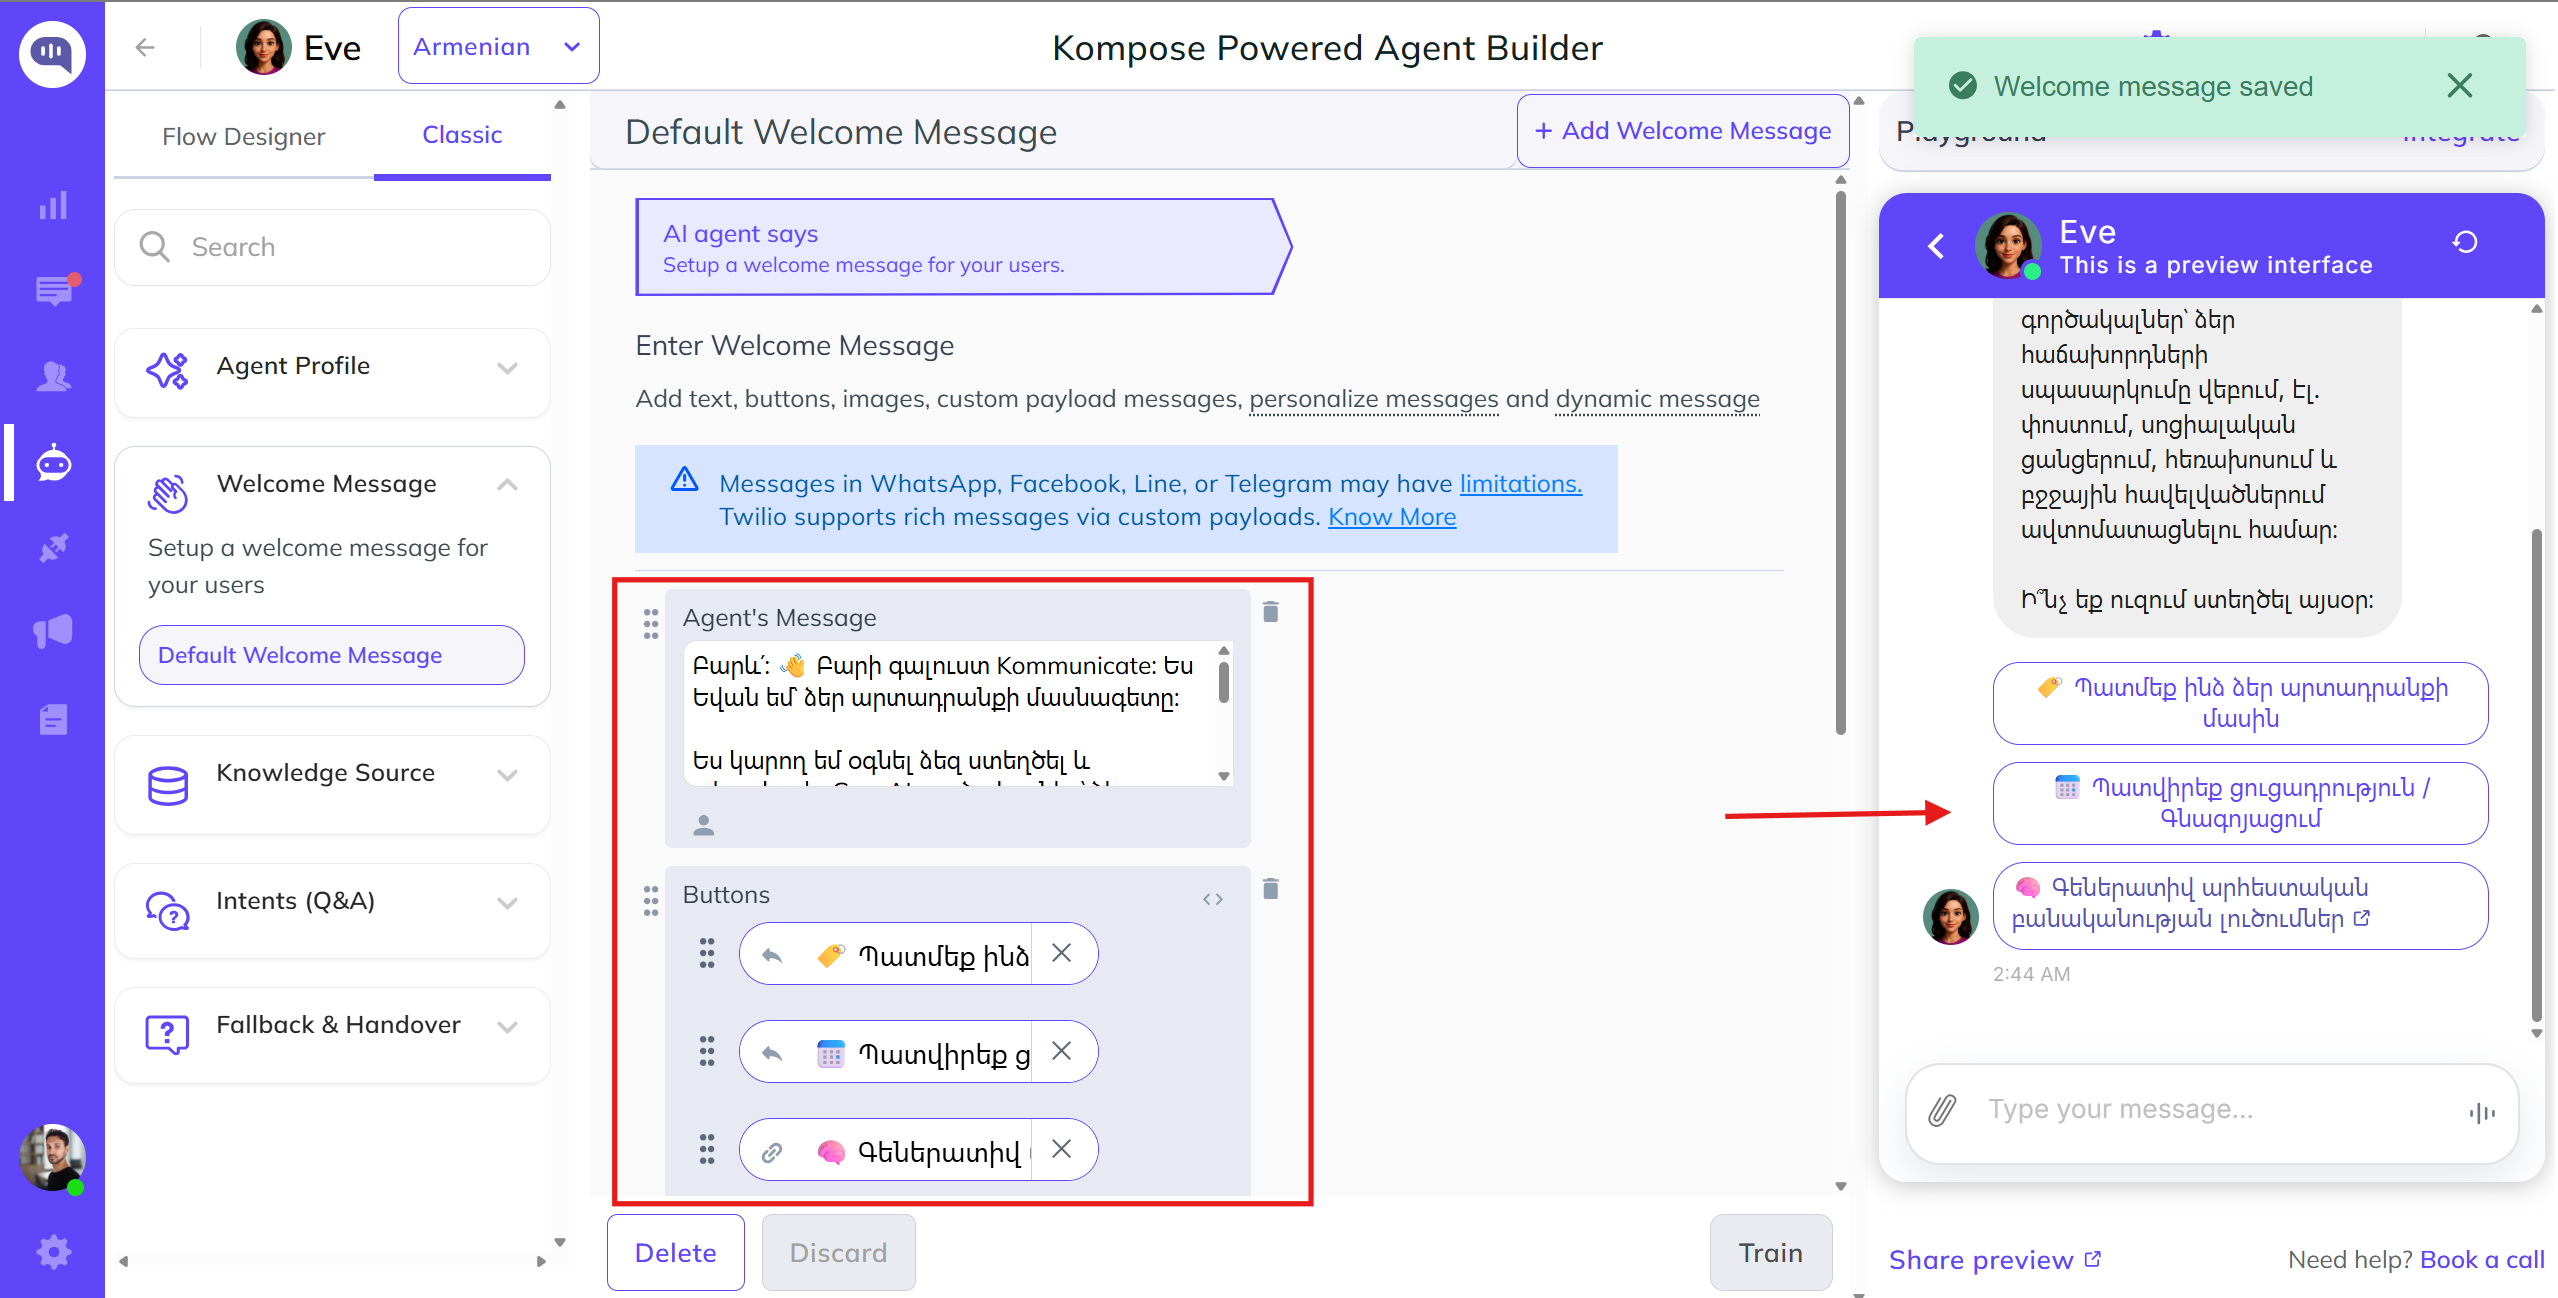
Step 2: Translate the Copied Intents
Once confirmed, all default intents are automatically copied into this new language as Drafts. Open these drafts and translate the training phrases and responses into the target language.
Step 3: Test the Multilingual Setup
- Kommunicate Dashboard: Test the new language instantly inside the test environment without changing any extra settings.
- Live Website or App: To test on a live site, change your browser language. For example, in Chrome, go to Settings -> Languages and move the target language to the top. The AI agent automatically detects the visitor's browser language and switches the conversation to match it.
Before testing on your website or app, change the browser language to the language in which you want the AI agent messages to be shown.
No need to change the browser language when testing on the Kommunicate test environment.
To change the browser language in Google Chrome, go to Settings > Languages and move the preferred language to the top of the list.
Once you have changed the browser language, the AI agent will detect it and start the conversation in the same language.
If your website supports multiple languages and you wish to display the specific AI agent based on the website's chosen language, you can this script.
const languageCode = get lang code from dropdown;
const navigatorLanguage = window.navigator.language || window.navigator.userLanguage;

(function (d, m) {
  const kommunicateSettings = {
    appId: APP_ID,
    popupWidget: true,
    automaticChatOpenOnNavigation:true
    userLocale: languageCode || navigatorLanguage,
  };
  const s = document.createElement("script");
  s.type = "text/javascript";
  s.async = true;
  s.src = widgetUrl;
  const h = document.getElementsByTagName("head")[0];
  h.appendChild(s);
  window.kommunicate = m;
  m._globals = kommunicateSettings;
})(document, window.kommunicate || {});
Training your AI agent with GenAI Models
When you train an AI agent using GenAI models with Web URLs, Documents, or External Knowledge Bases such as Zendesk or Salesforce, you do not need to translate these source resources into multiple languages.
The AI agent is designed to understand the incoming query and automatically respond to end users in the same language as the question.
Google Calendar Event Creation through Kompose Inline Editor
You can create Google Calendar events through the Kompose Inline Editor. To achieve this, use the following function that leverages the Google API for event creation.
Before using this function, you need two types of credentials:
- Client ID and client secret
- Access and refresh token
Client ID and Client Secret
To get a client ID and client secret, create an OAuth Client in Google Console. Click Create Credentials from the link above.
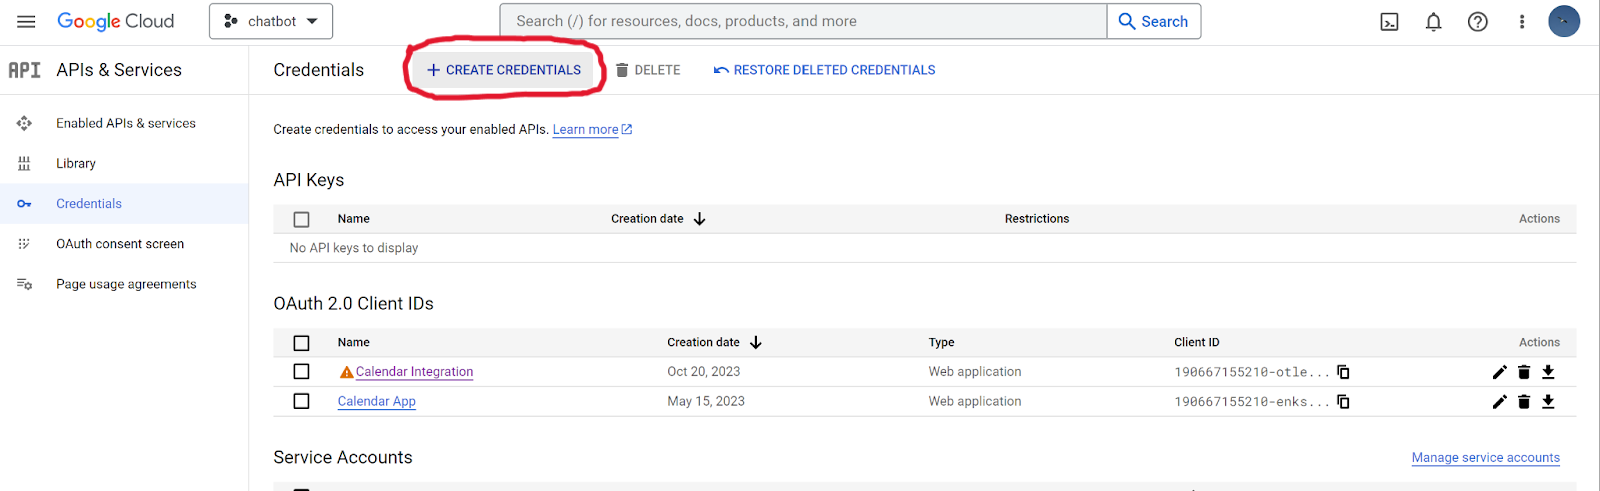
After that, select OAuth Client ID, select Web Application, and fill in the details as shown below:
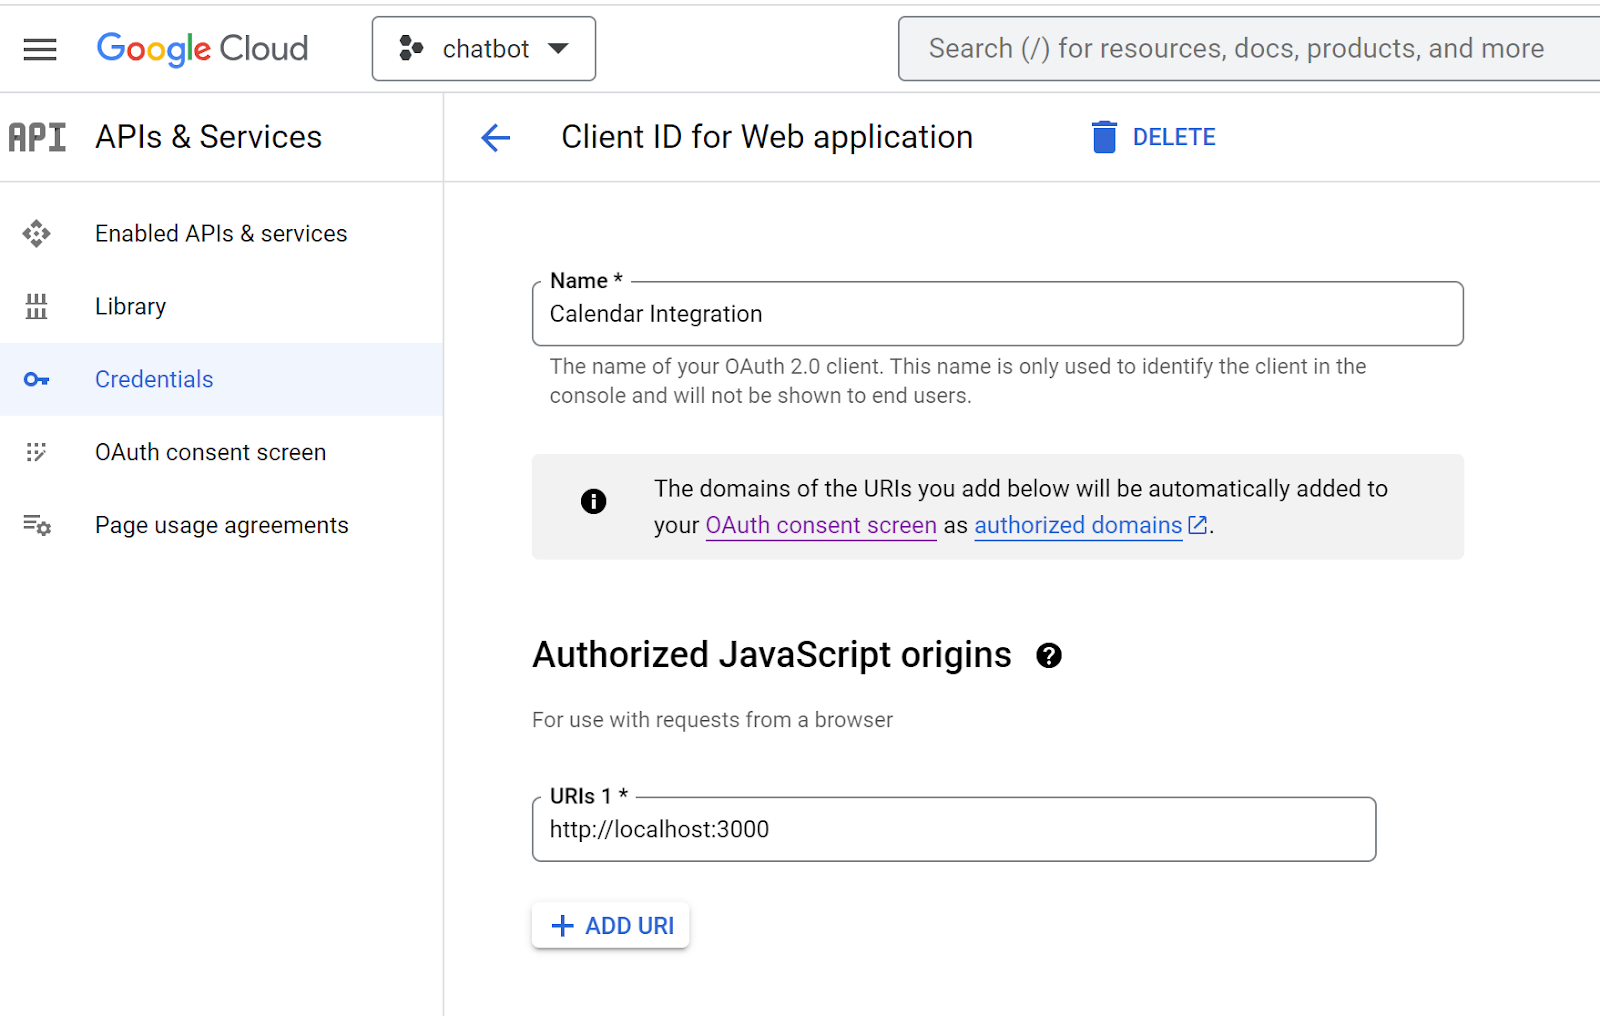
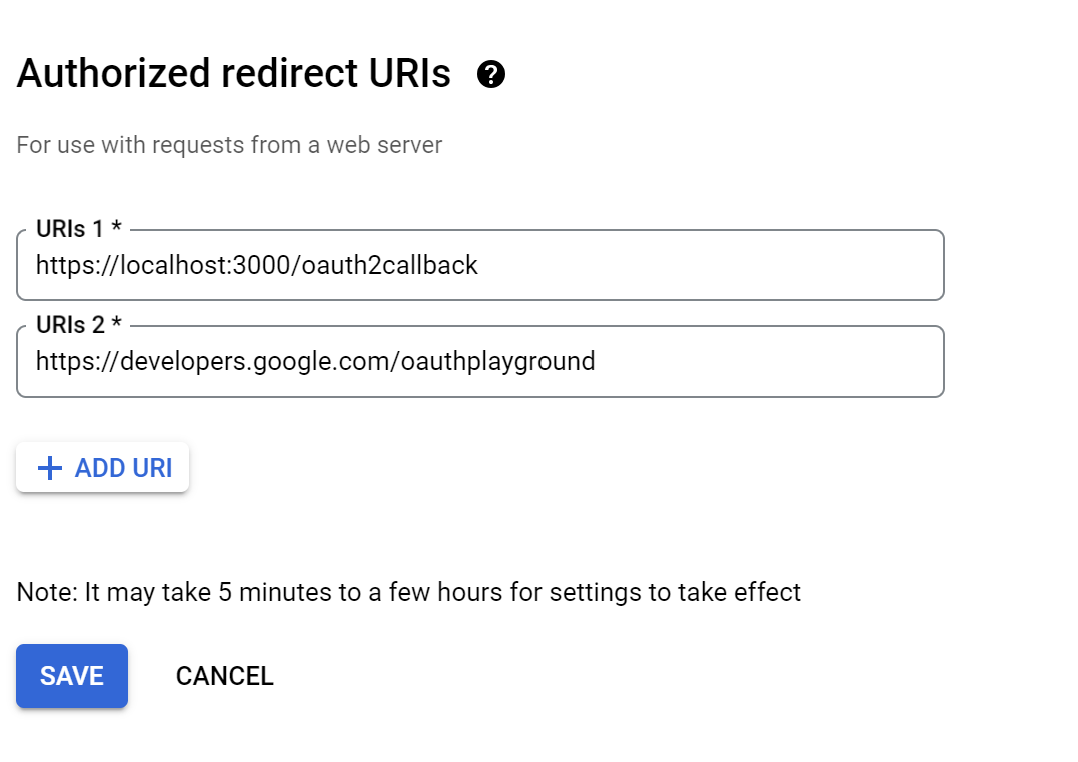
Make sure the Google Calendar API is enabled in the same project.
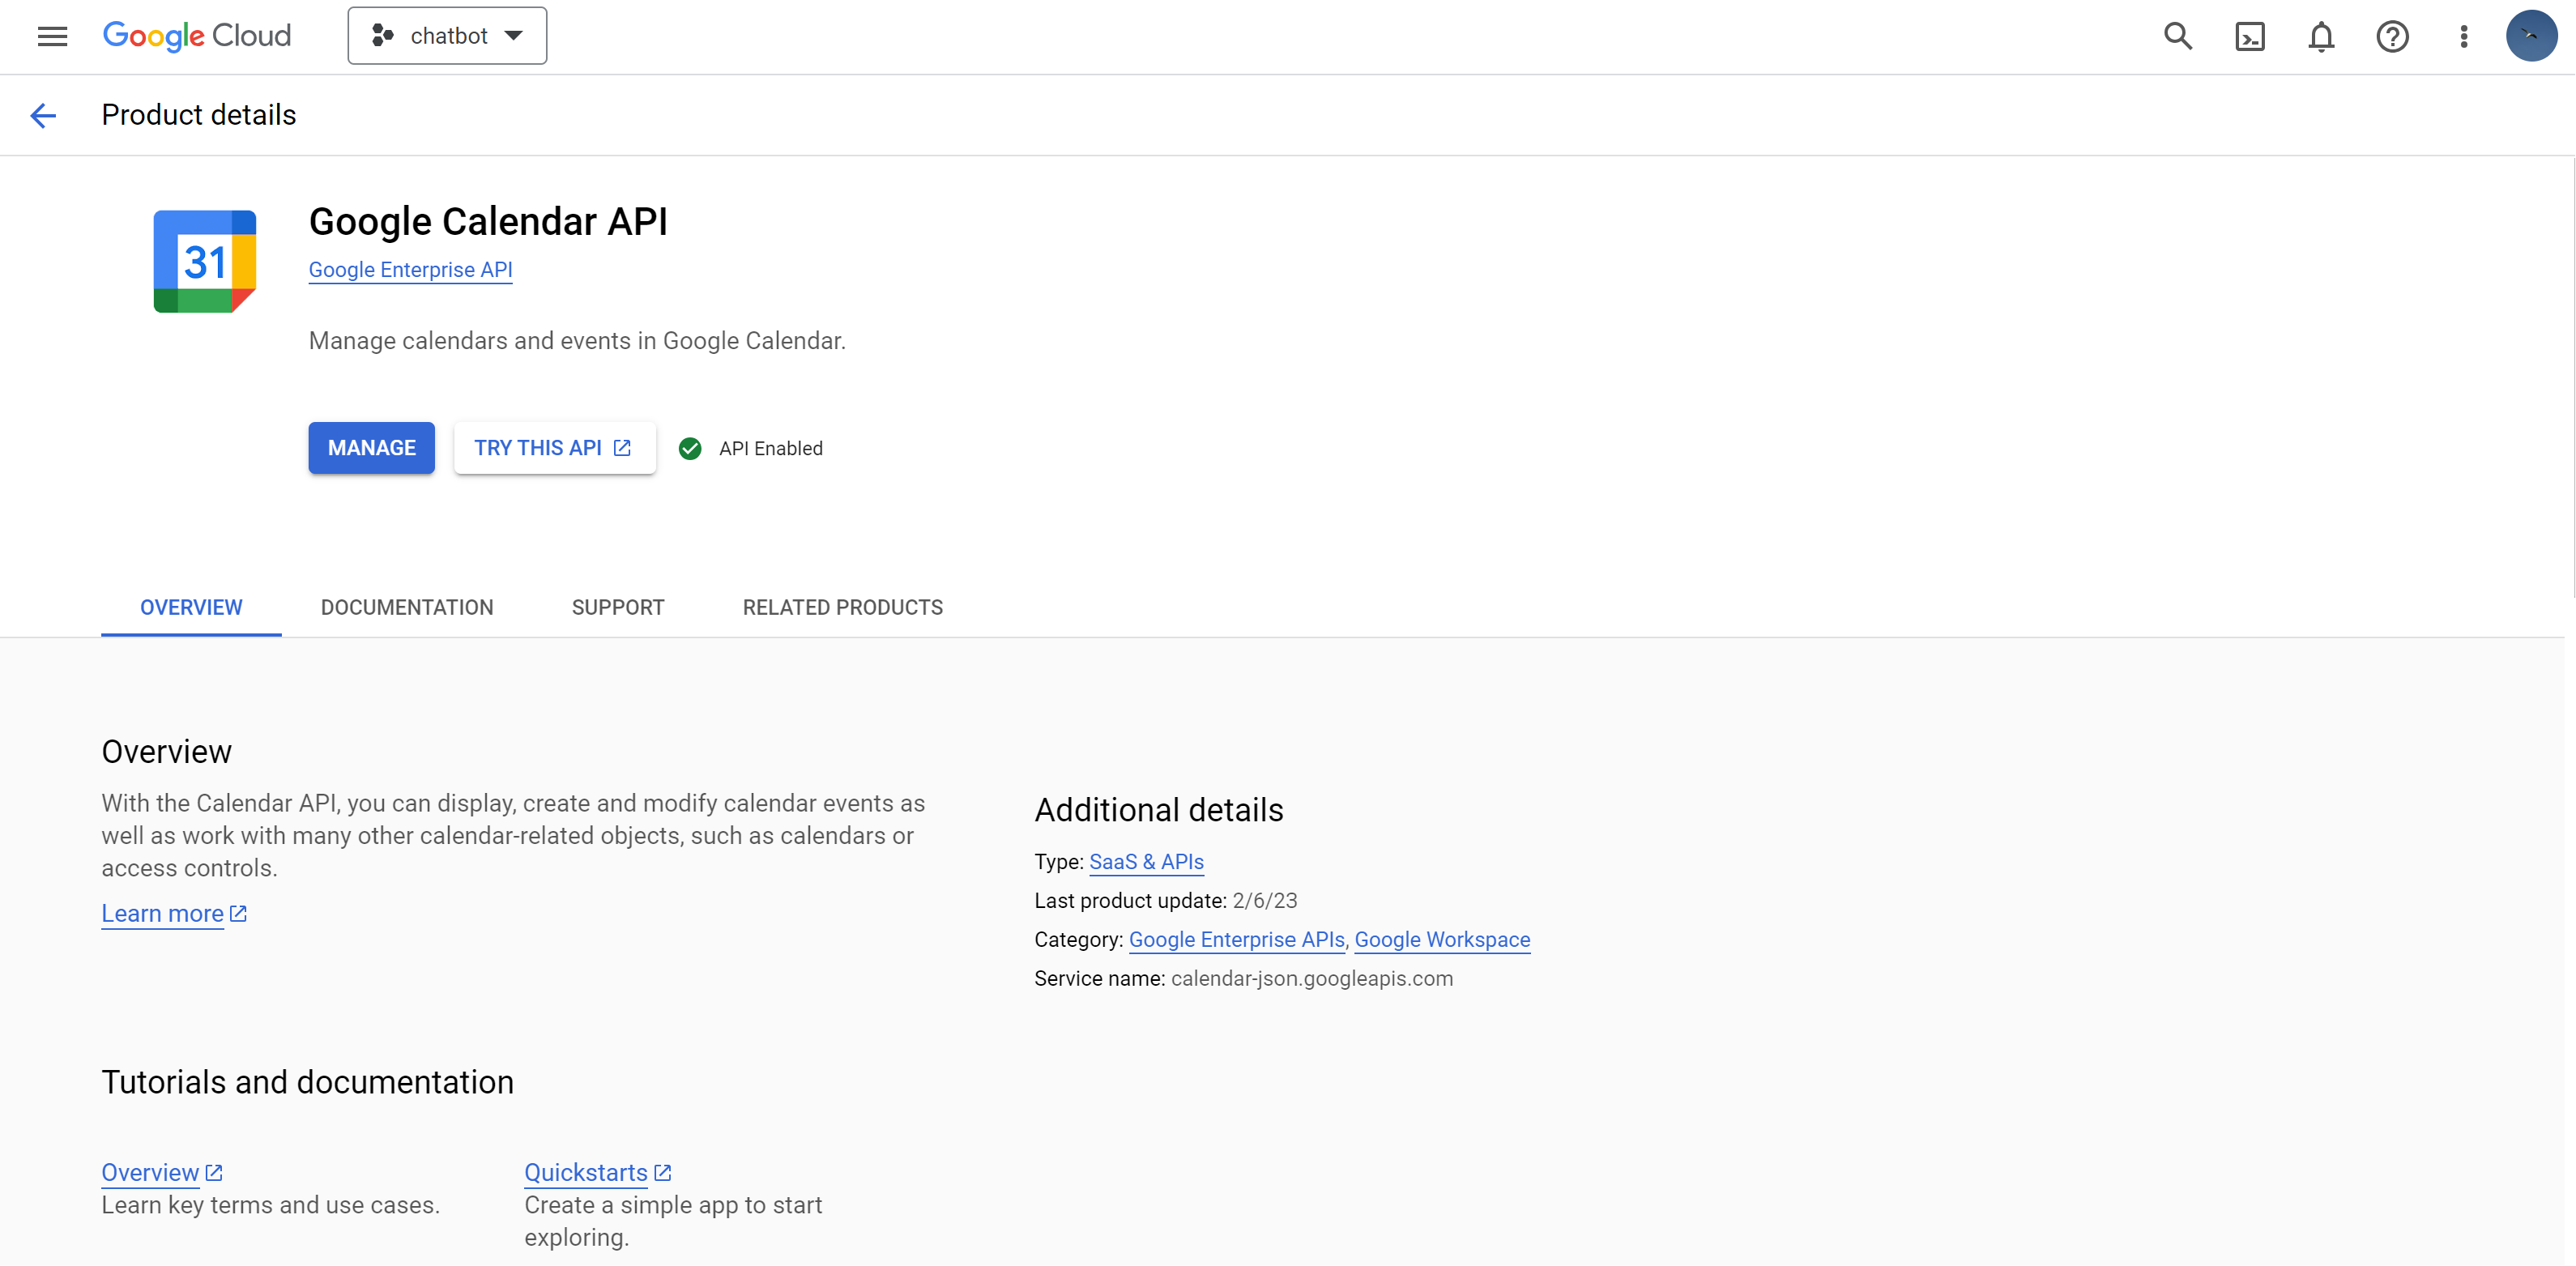
Once you complete this process, you will get the client ID and client secret. You can also access them from Credentials in APIs & Services.
Access and Refresh Token
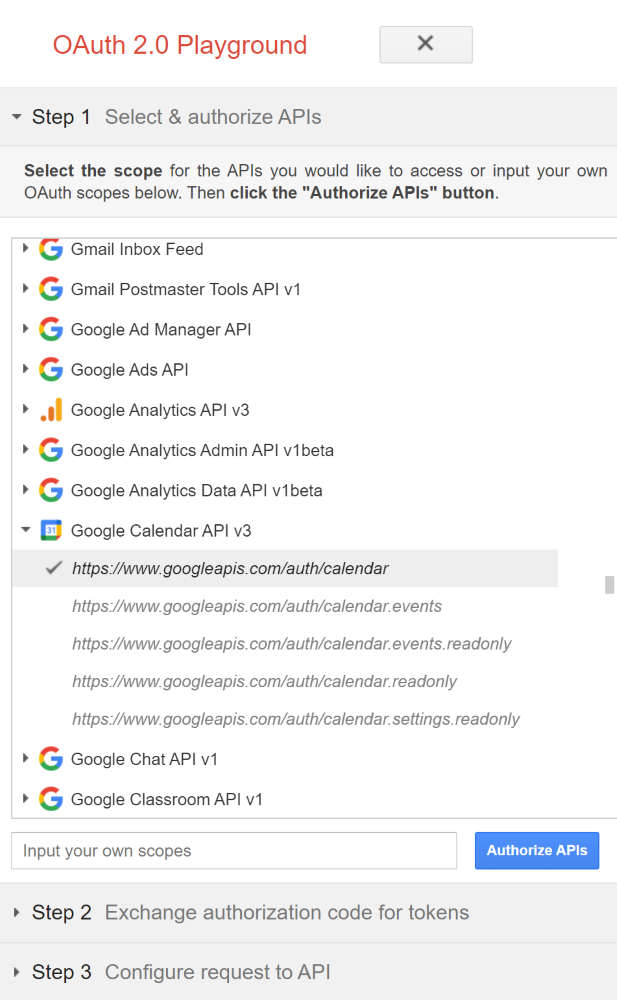
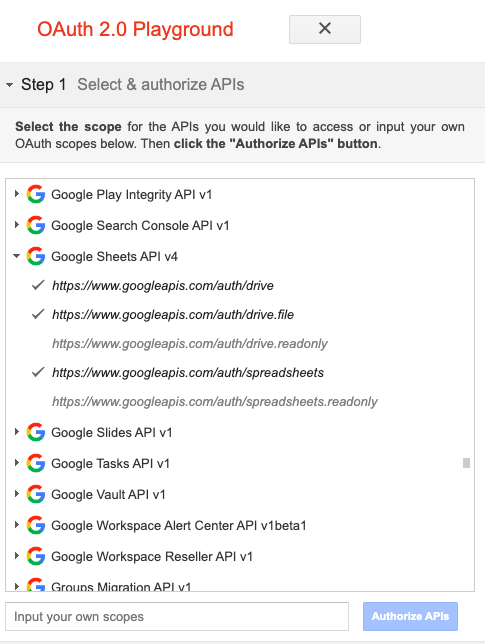
Use the above credentials in Google's OAuth playground to generate the token.
Step 1: Select and authorize APIs. Select https://www.googleapis.com/auth/calendar as shown below and click Authorize APIs.
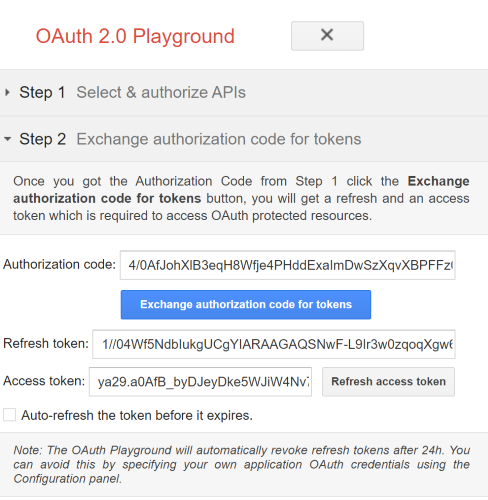
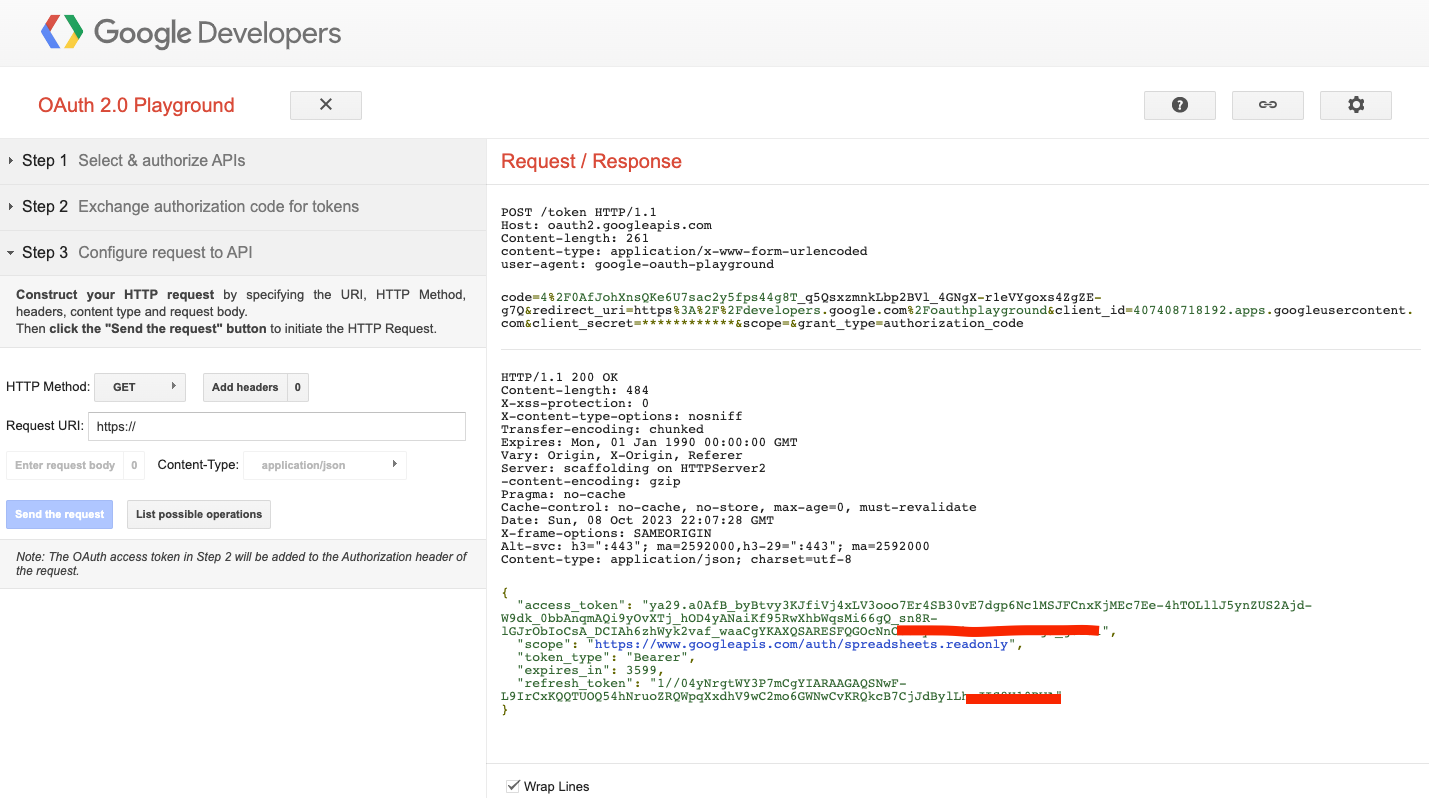
Step 2: Exchange the authorization code for tokens. Once you get the authorization code from Step 1, click Exchange authorization code for tokens. You will get the refresh token and access token required to access OAuth-protected resources.
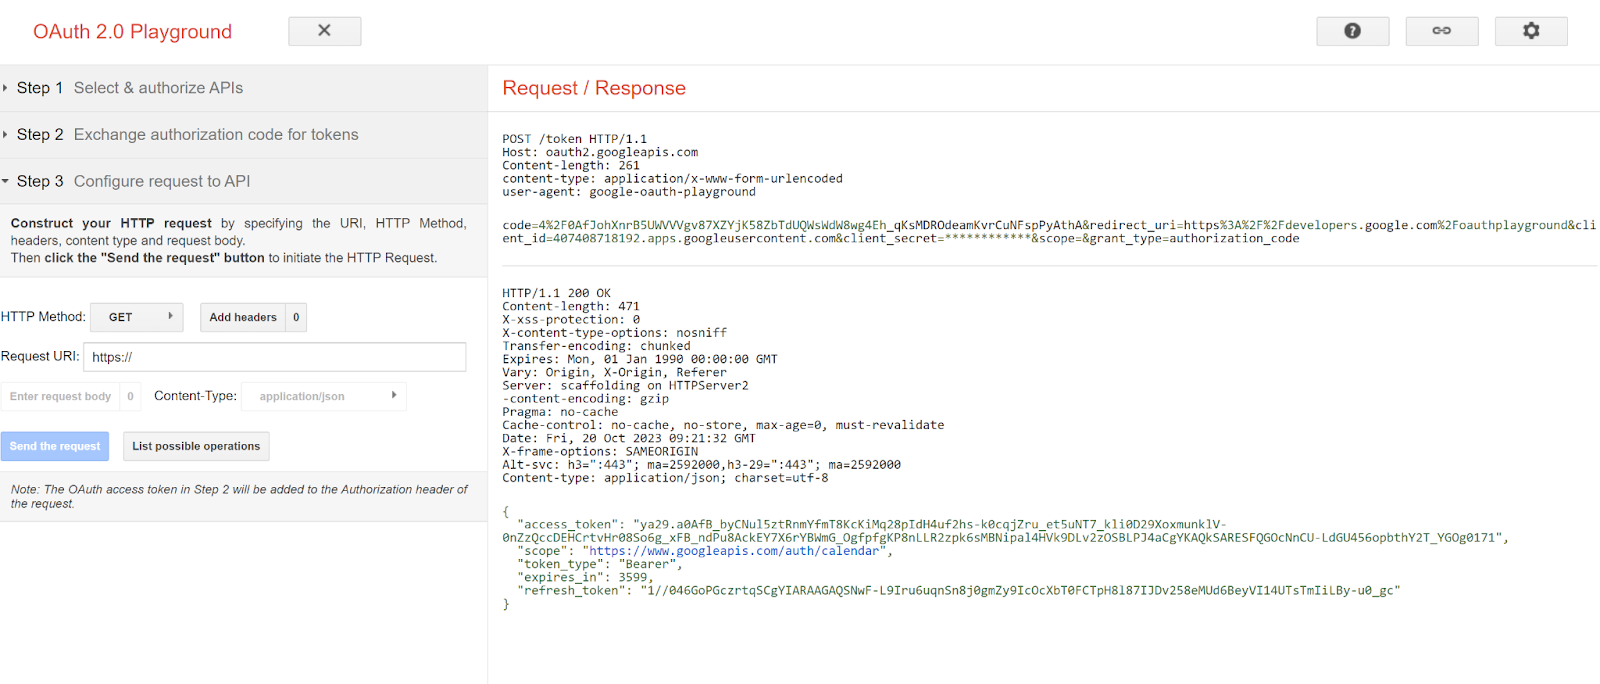
Step 3: Configure request to API
Click the Send the request button to initiate the HTTP Request. Save the generated access token and refresh token.
Steps to Create a Google Event Using Inline Code in Kompose AI agent Builder
Create an intent in Kompose AI Agent Builder. In the AI Agent says section, enable Dynamic Messages, select inline code, add the function below, and save the intent. Pass the collected details, such as client ID, client secret, access token, and refresh token, into this function. You also need to pass the event date, time, location, and attendee email.
exports.responseHandler = async (input, callback) => {
  // Get access and refresh token from this playground using your own client id and secret: https://developers.google.com/oauthplayground
  const ACCESS_TOKEN = "" //Pass Access Token
  const REFRESH_TOKEN = "" //Pass Refresh token
  const CLIENT_ID = ""; // Pass client ID
  const CLIENT_SECRET = ""; // Pass client secret
  const oauth2Client = new google.auth.OAuth2(
    CLIENT_ID,
    CLIENT_SECRET
  );

  try {
    oauth2Client.setCredentials({
      access_token: ACCESS_TOKEN,
      refresh_token: REFRESH_TOKEN,
      scope: "https://www.googleapis.com/auth/calendar",
      token_type: "Bearer"
    });

    const calendar = google.calendar({ version: "v3", auth: oauth2Client });

    const event = {
      summary: "Meeting with Kommunicate",//Give a brief summary of your event
      location: "123 Main St",//Enter location details
      description: "Discuss project proposal",//Enter brief description of your event
      start: {
        dateTime: new Date().toISOString(),
        timeZone: "America/Los_Angeles",
      },
      end: {
        dateTime: new Date(new Date().getTime() + 1000 * 60 * 60).toISOString(),
        timeZone: "America/Los_Angeles",
      },
      attendees: [{ email: "support@kommunicate.io" }],
      reminders: {
        useDefault: true,
      },
    };

    calendar.events.insert(
      { calendarId: "primary", resource: event },
      (err, res) => {
        if (err) {
          const errorMsg = err.message;
          callback([{ "message": errorMsg }]);
          return;
        }
        callback([{ "message": `Event created: ${res.data.htmlLink}` }]);
      }
    );
  } catch (error) {
    const errorMsg = error.message;
    callback([{ "message": errorMsg }]);
  }
}
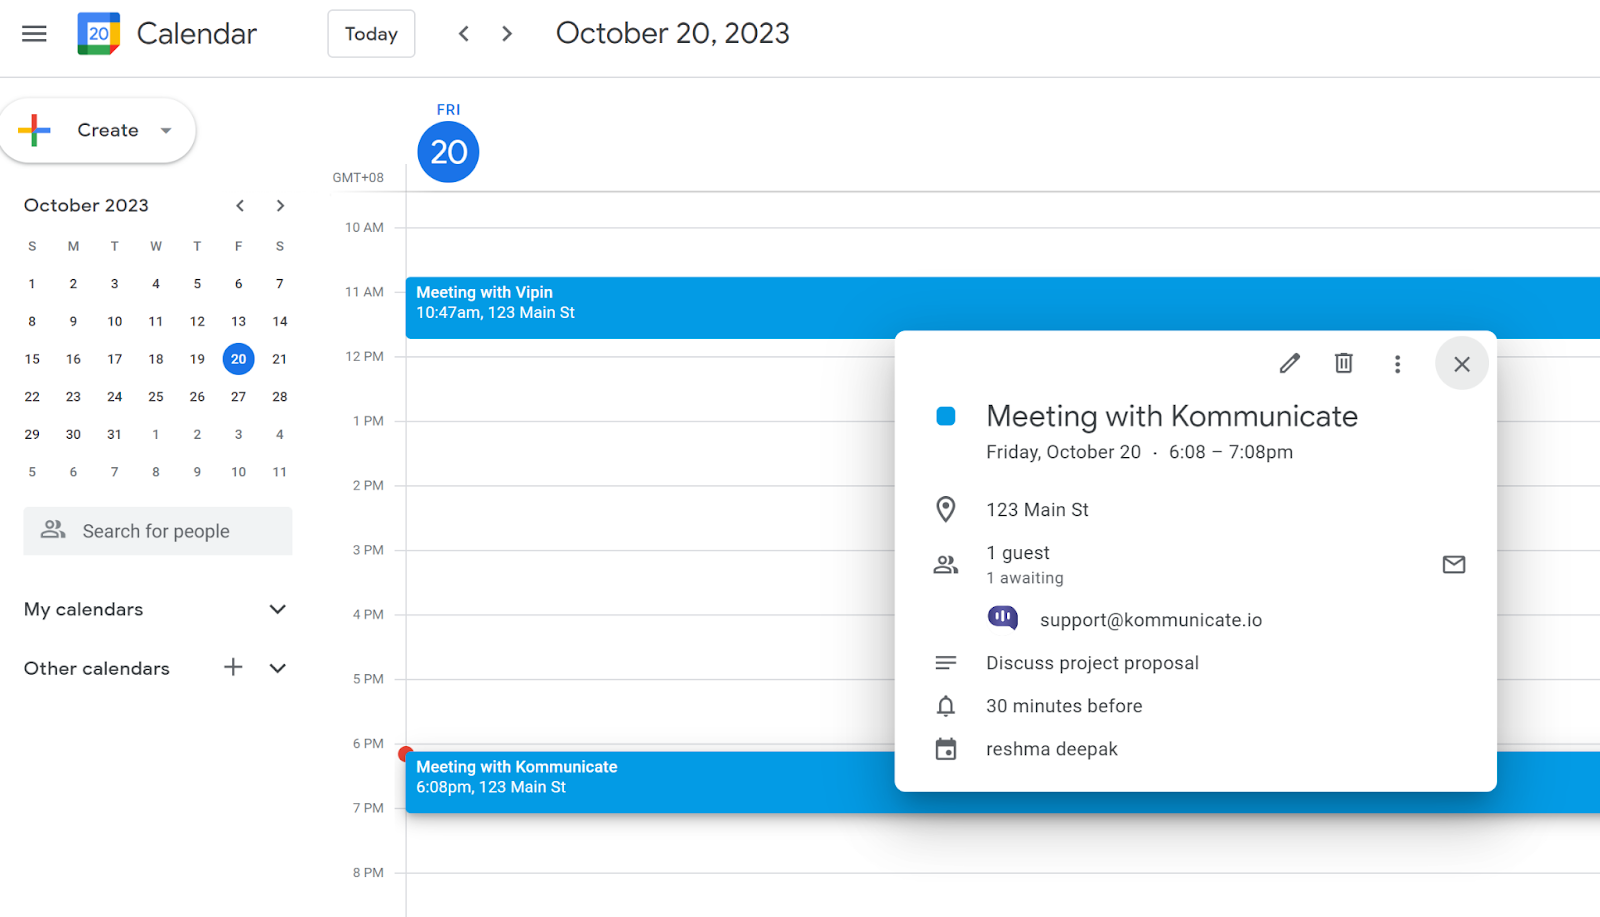
When this intent is triggered, the AI agent creates an event on Google Calendar and sends the event link in the AI agent response. The email is hardcoded in the function above, but you can customize it by using details such as name and email from chat context, for example (input.metadata.KM_CHAT_CONTEXT?.email), or personalization. The inline editor function's input parameter contains details such as the user's message and chat context.

Google Sheet Integration Through Inline Code
Kompose supports creating and retrieving Google Sheet data through the Inline Editor and Apps Script. You can use the following function, which leverages the Google API for sheet updates, creation, and data retrieval.
1. Retrieve Data from an Existing Google Sheet via Google Apps Script
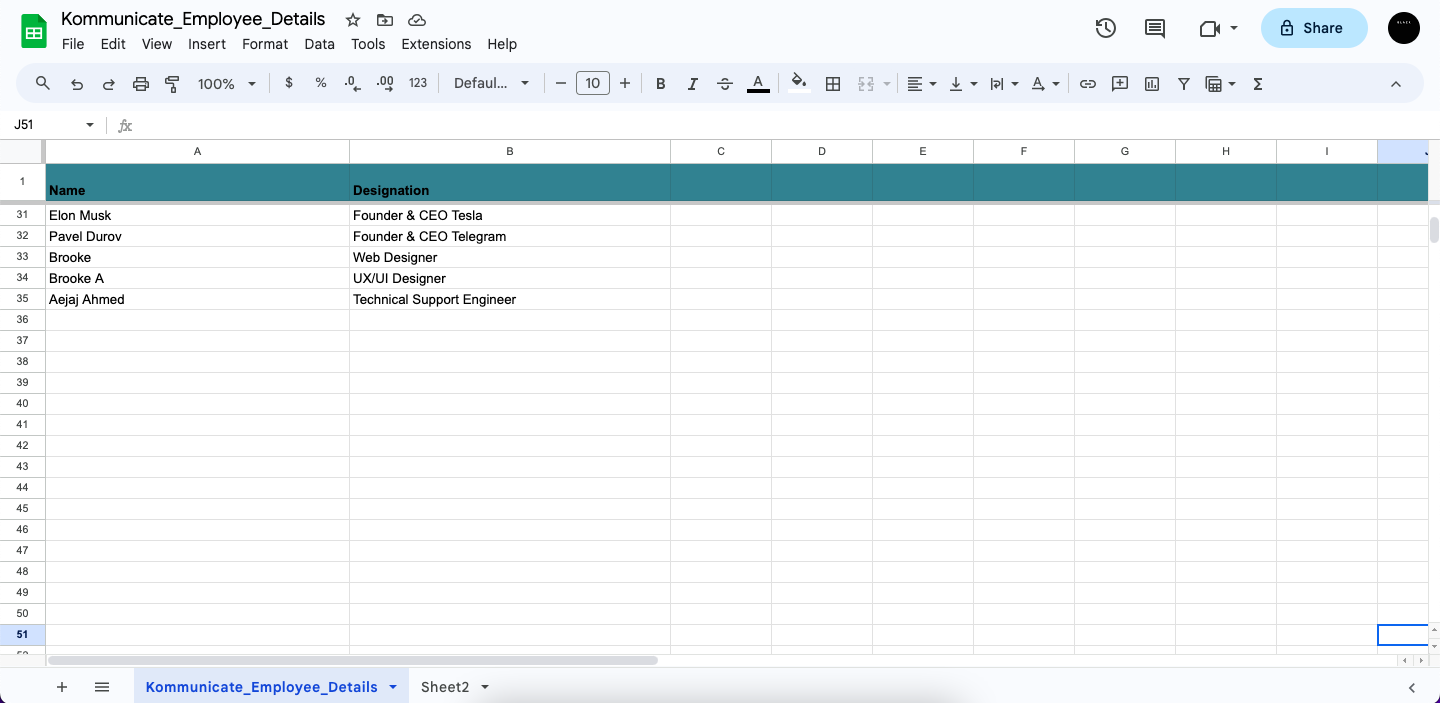
The example below fetches Kommunicate employee details from Google Sheets to the Kompose AI agent using Apps Script.
A. Create the Google Sheet with the desired data.
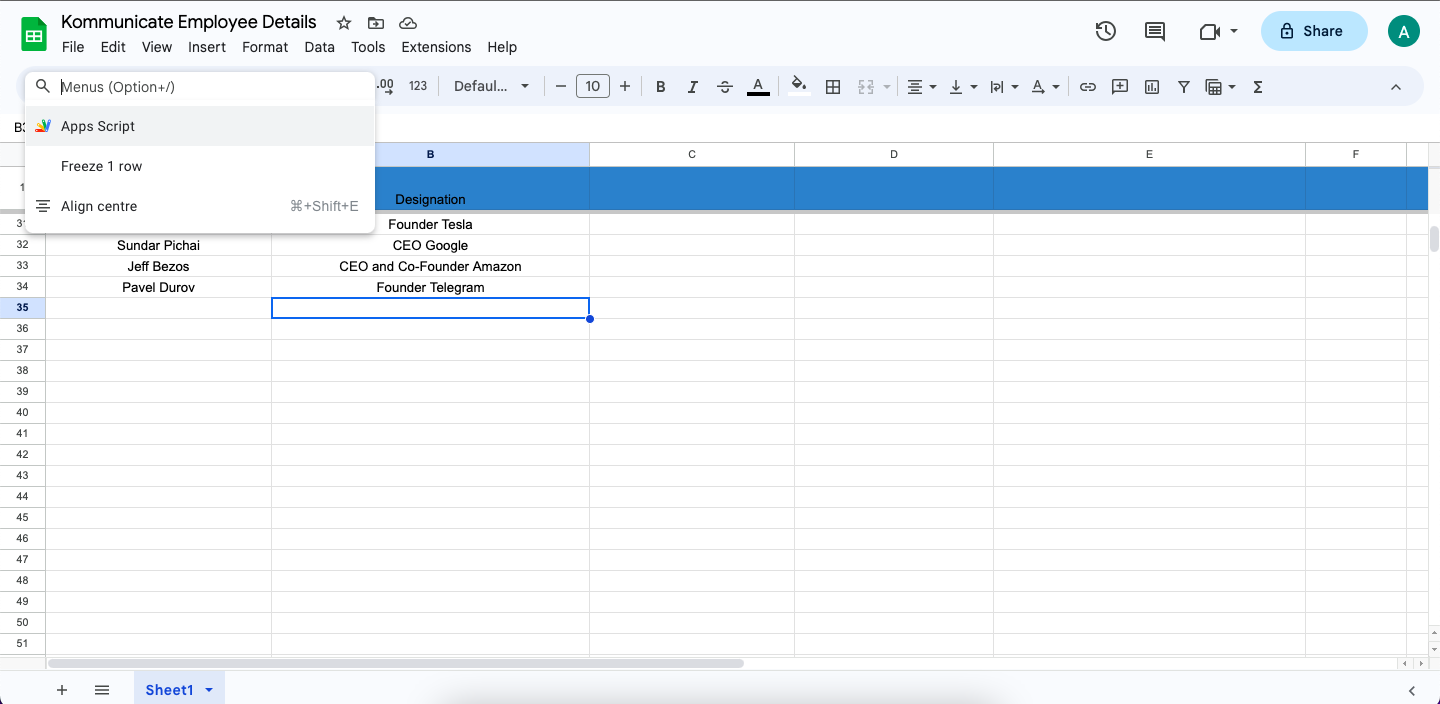
B. Go to Help and search for Apps Script.
Under Apps Script, paste this code.
This code gets data from the sheet and creates a GET request URL for the sheet:
function doGet(req) {
  const doc = SpreadsheetApp.getActiveSpreadsheet(),
    sheet = doc.getSheetByName("Employee_Details"),
    values = sheet.getDataRange().getValues();

  let data = [];

  for (let i = 0; i < values.length; i++) {
    let row = {};

    row["name"] = values[i][0];
    row["designation"] = values[i][1]

    data.push(row);
  }

  return ContentService.createTextOutput(JSON.stringify(data)).setMimeType(ContentService.MimeType.JSON);
}
Google Doc: Spreadsheet Service|Apps Script|Google for Developers
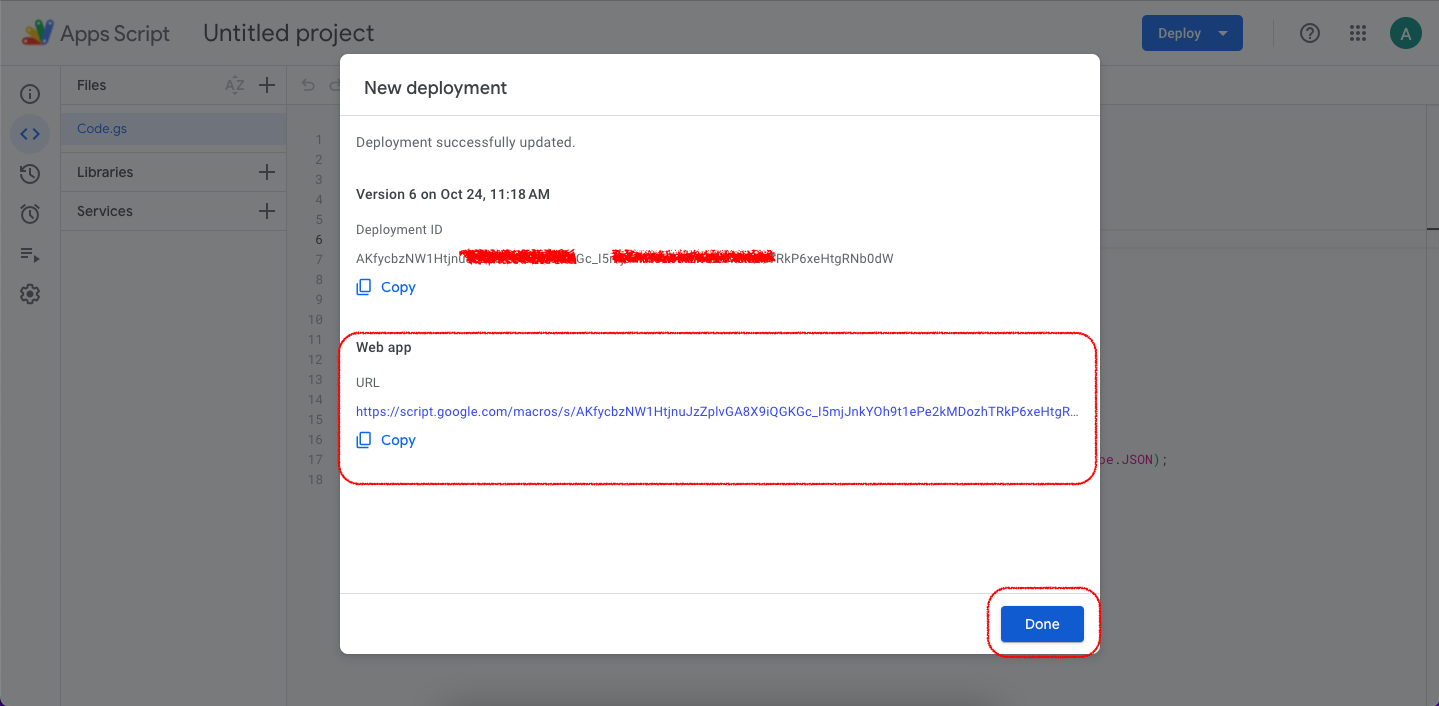
Click Deploy, select Web app as the type, give it a name, and deploy. This will generate the Web App URL.
As the last step, create a Kompose inline code function to retrieve data from the sheet and display the information as an AI agent reply when prompted.
Create an intent, add training phrases that match the Google Sheet data, and use the inline code below.
exports.responseHandler = async (input, callback) => {
  try {
    const { message } = input;
    const splitMessage = message?.replace(/[?]/g, "")?.toLowerCase()?.trim()?.split(" ");
    const fallbackResponse = "Data not found for your query, please contact the developer";

    //user can pass their get url here
    const EMPLOYEE_DETAILS_RESPONSE =
      "https://script.googleusercontent.com/macros/echo?user_content_key=fTuL2HMwBwolBVGu49-Yz4AWNsKpbM6SdVGXF7QVk-ayNDYB7OLzOfgSCIB1b0cV4B4fXb4tlo2oDemN9CCS2h10ox_1xSncGQajx_ryfhECjZEnMtozHXDidNnjzme0rp7o1qi1rs4i0ZnnMpVEkAK_oJQW3sUKfehdBL4IuHOucwFv5VFYOfASKKRqeQEOwijqrnp_QtL293EStz9Jw9Md8uu&lib=M3imb7ly2NVxyO5kkvUDY_pAJLmWRozmf";

    const resp = await axios.get(EMPLOYEE_DETAILS_RESPONSE);

    if (!resp?.data || !splitMessage) {
      callback([{ message: fallbackResponse }]);
      return;
    }

    const response = resp.data;
    let responseForBot = "not found";
    let empName = "";

    for (const { name, designation } of response) {
      const lowerCaseName = name.toLowerCase().split(" ");

      if (splitMessage.some(msg => lowerCaseName.includes(msg))) {
        empName = name;
        responseForBot = designation;
      }
    }

    callback([
      {
        message: `${empName ? empName : "Employee"} is ${responseForBot} in kommunicate`,
        platform: "kommunicate",
      },
    ]);
  } catch (error) {
    callback([{ message: error.message }]);
  }
};
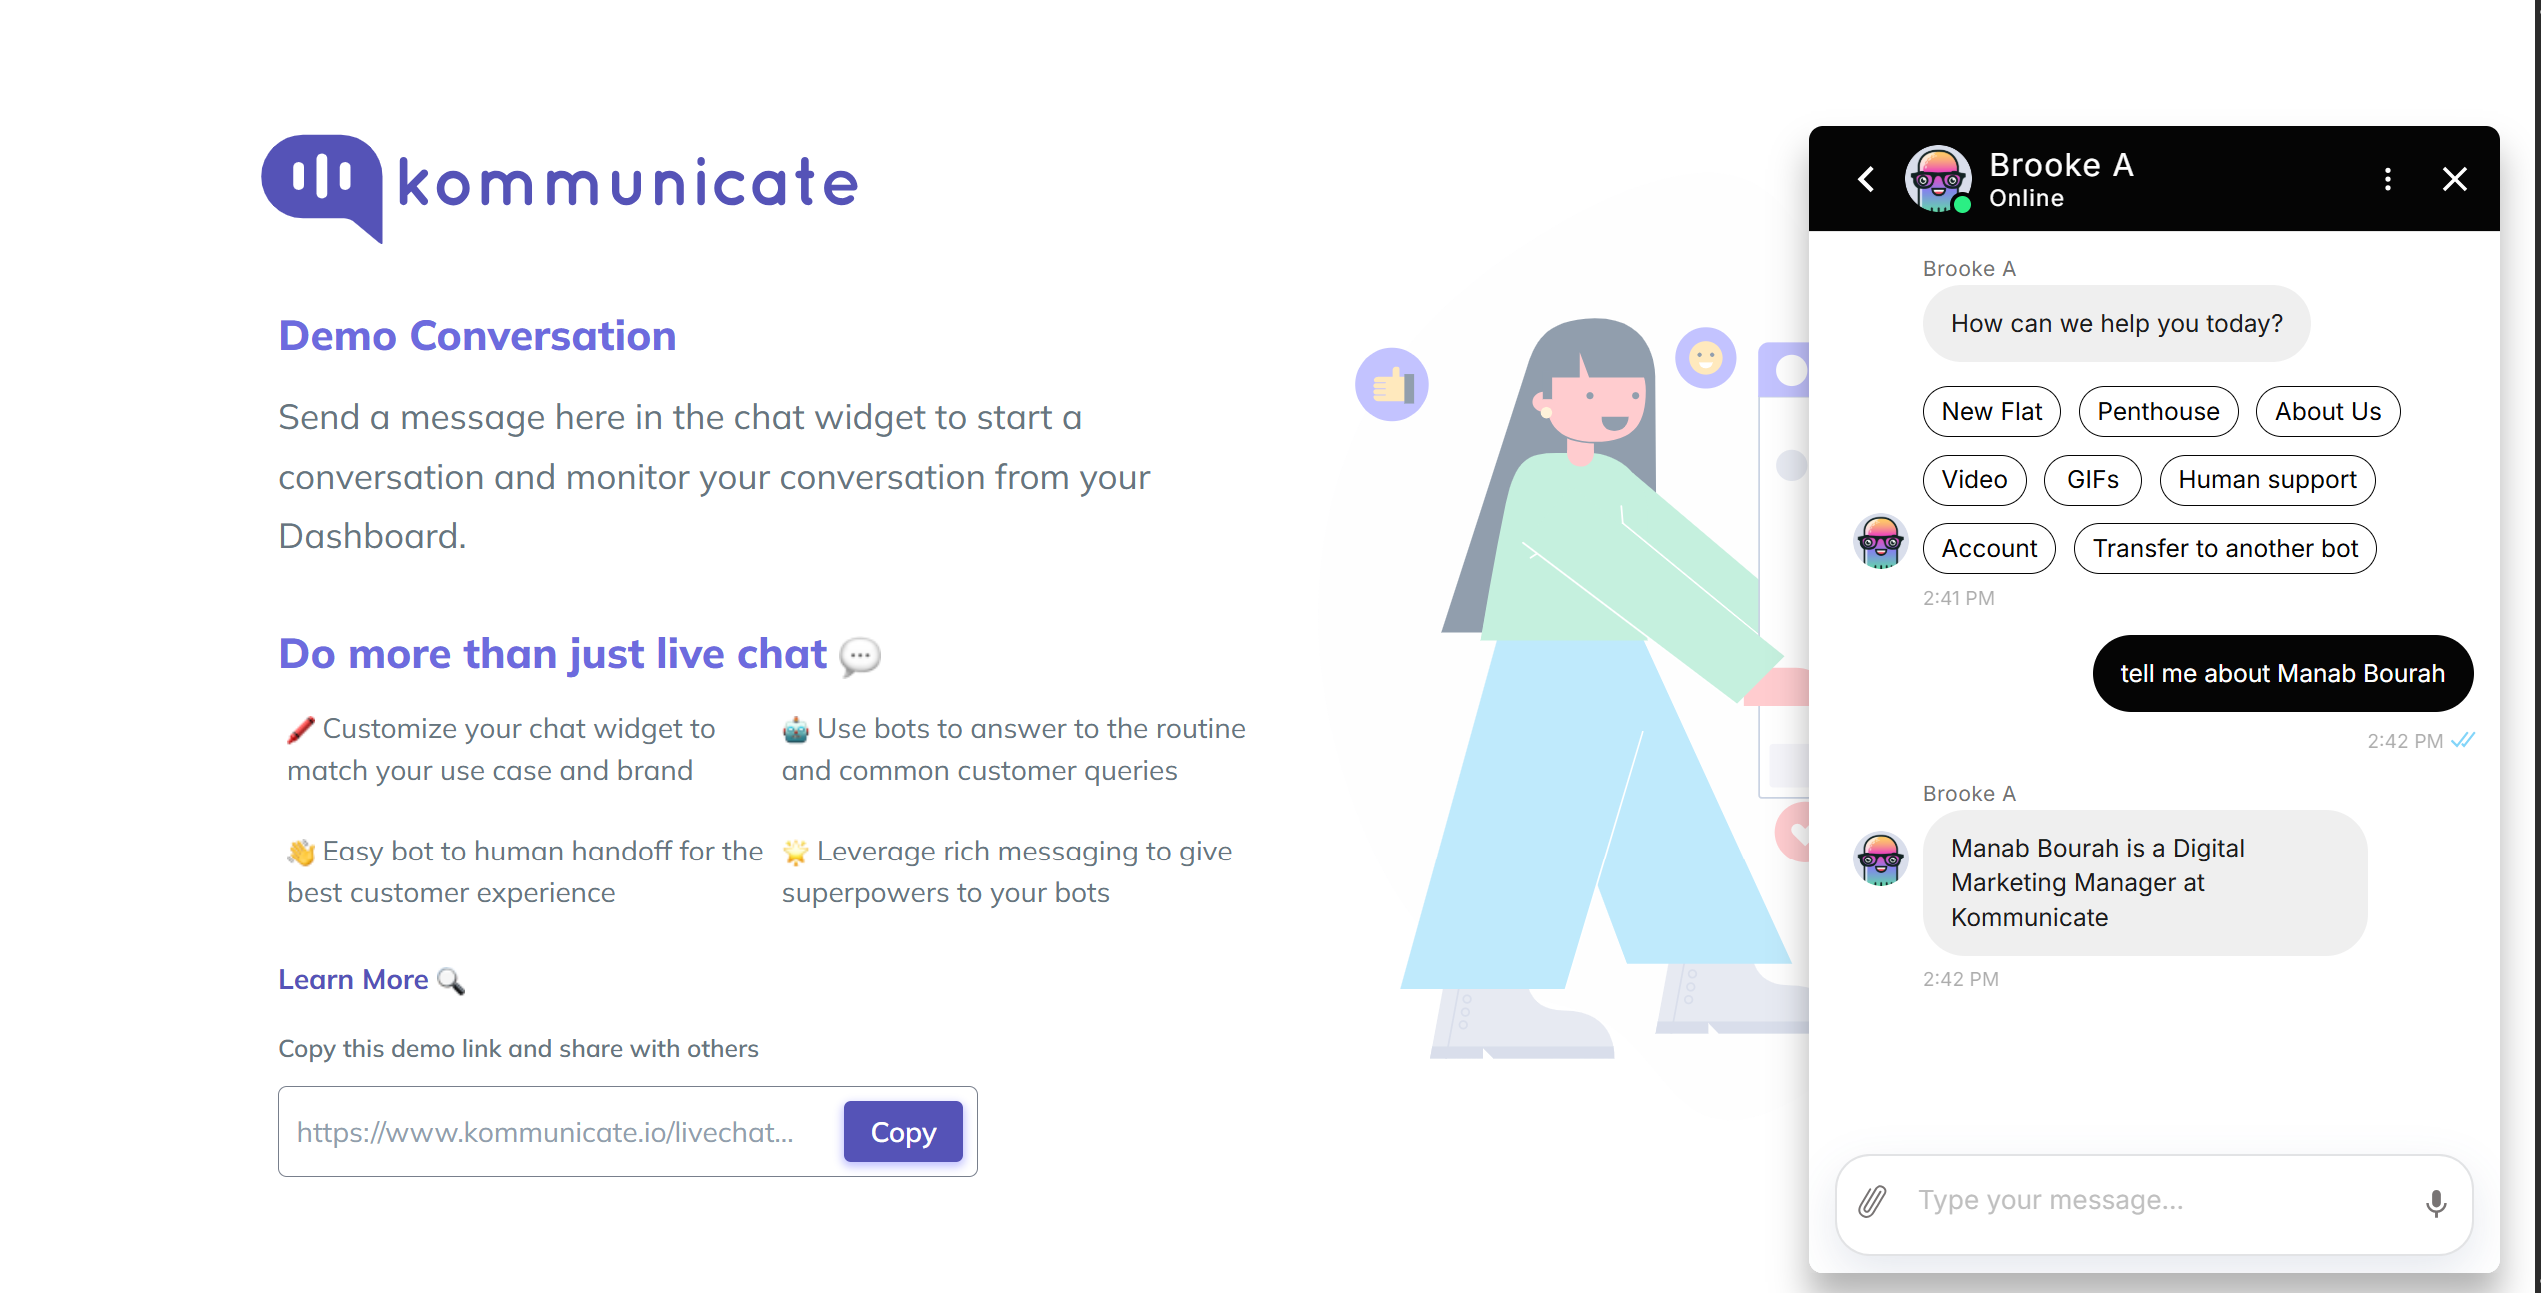
When the intent is matched, the AI agent will fetch the employee details and respond accordingly.
2. Retrieve Data from an Existing Google Sheet via Inline Code
A. Create the Google Sheet with the desired data as outlined in the first step of the previous method.
B. Enable the Google Sheet API and add the client ID and client secret in OAuth Settings.
C. Generate the access and refresh token:

Use the above credentials in Google's OAuth playground to generate the token. Pass the client ID and client secret created above in the Playground settings option, then select https://www.googleapis.com/auth/spreadsheets.readonly as shown below and proceed with Authorize APIs.

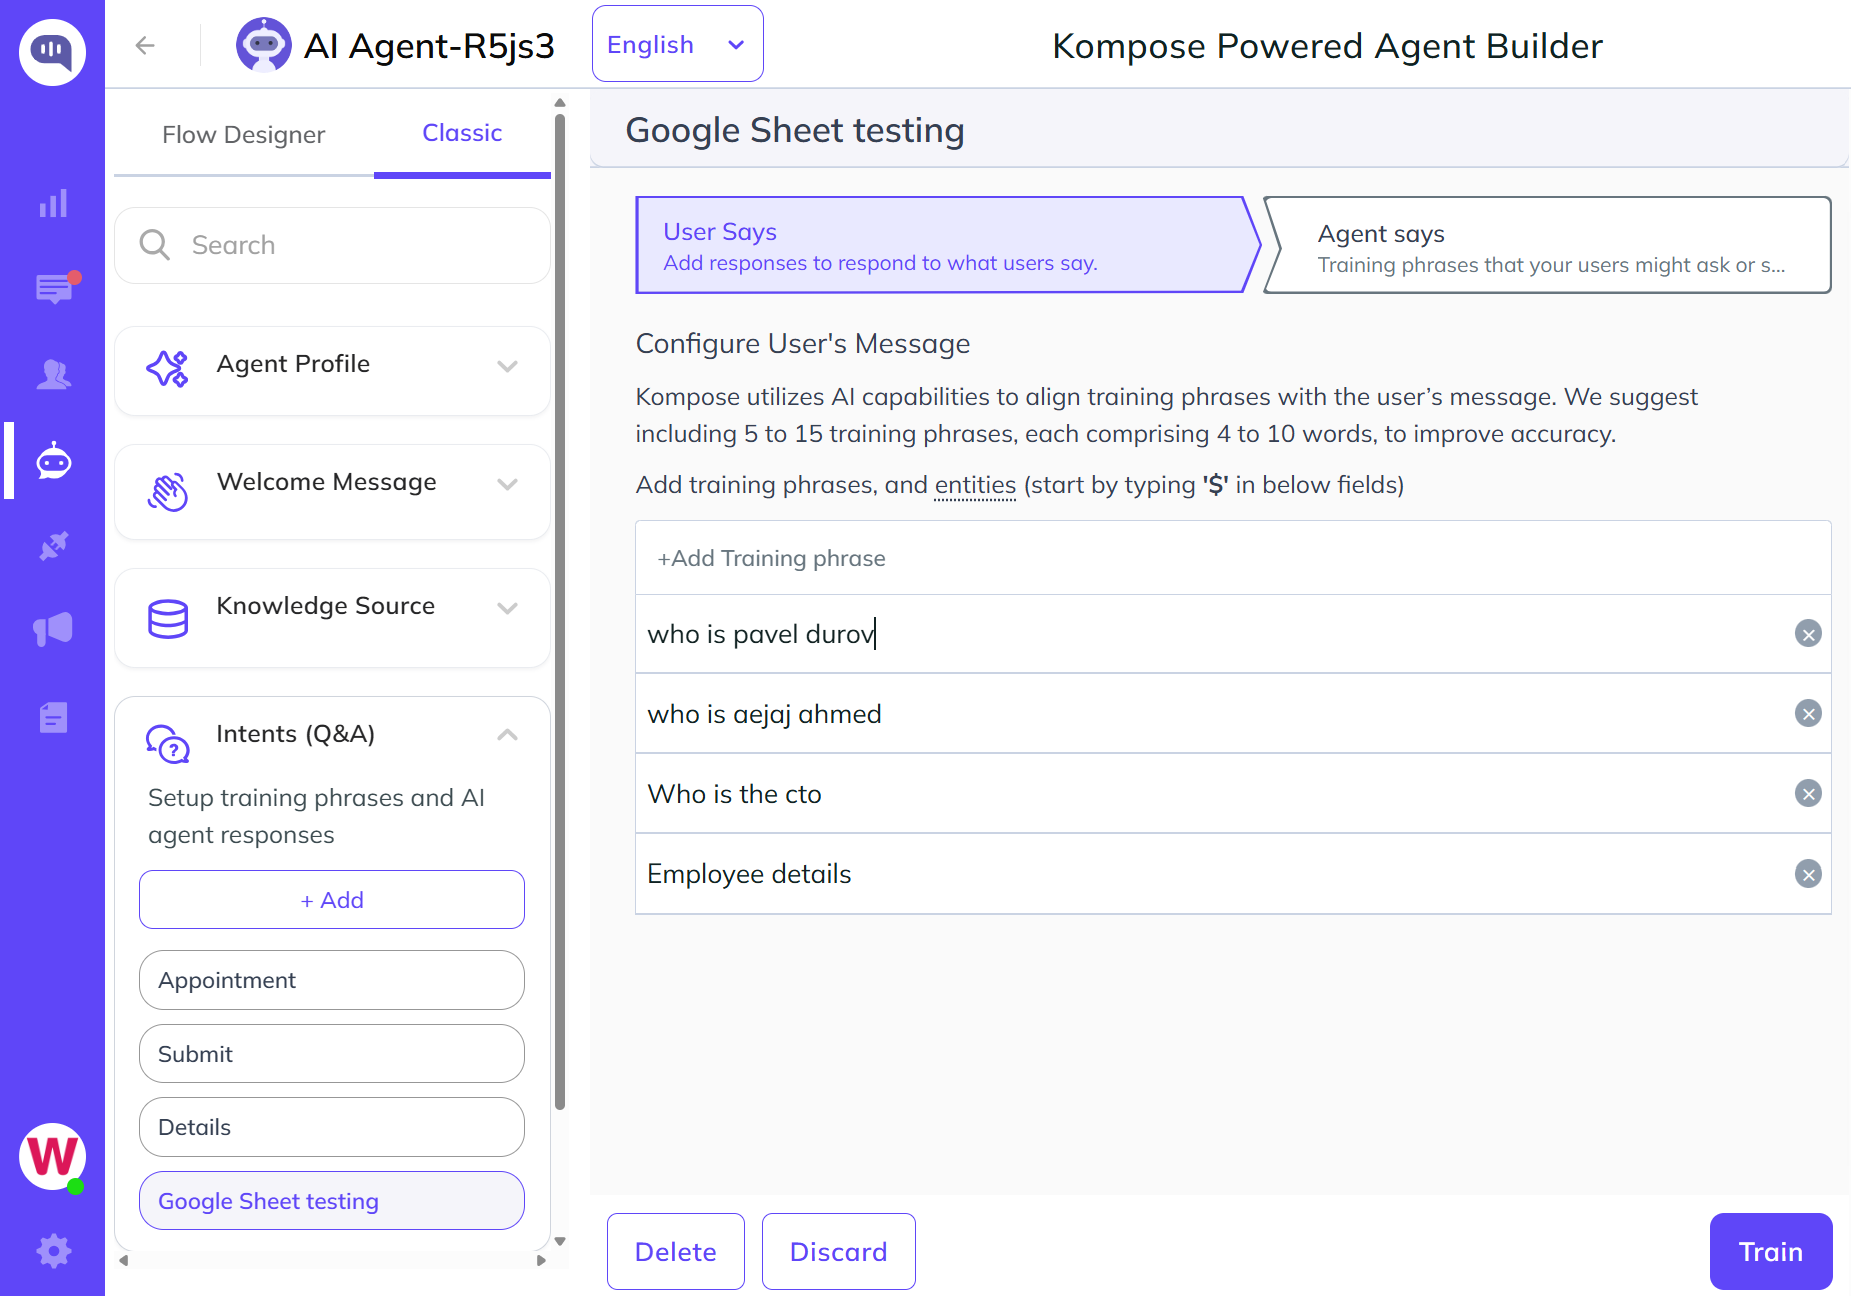
D. Once tokens are generated, create an intent that uses this inline code function to retrieve the data and show it as an AI agent response. Add a few AI agent training phrases that match user questions and sheet data.
exports.responseHandler = async (input, callback) => {
  // Get access and refresh token from auth playground page
  // client ID and secret: https://developers.google.com/oauthplayground

  const ACCESS_TOKEN = "Your_Access_Token";
  const REFRESH_TOKEN = "Your_Refresh_Token";

  const CLIENT_ID = "Your_Client_ID";

  const CLIENT_SECRET = "Your_Client_Secret_Key";

  const oauth2Client = new google.auth.OAuth2(CLIENT_ID, CLIENT_SECRET);
  const SCOPES = ['https://www.googleapis.com/auth/spreadsheets.readonly'];

  try {
    const { message } = input;
    const splitMessage = message?.replace(/[?]/g, "")?.toLowerCase()?.trim()?.split(" ");
    const fallbackResponse = "Data not found for your query, please try again";

    oauth2Client.setCredentials({
      access_token: ACCESS_TOKEN,
      refresh_token: REFRESH_TOKEN,
      scope: SCOPES,
      token_type: "Bearer",
    });

    const sheets = google.sheets({ version: "v4", auth: oauth2Client });
    const spreadsheetId = "Your_Spreadsheet_ID"; //ID of the spreadsheet found in URL
    const range = "Employee_Details!A1:B32"; //Name and range of the spreadsheet within Spreadsheet. For example, Sheet1.

    sheets.spreadsheets.values.get(
      {
        spreadsheetId,
        range,
      },
      (err, res) => {
        if (err) {
          callback([{ message: `The API returned an error: ${err}` }]);
          return;
        }

        const rows = res?.data?.values;

        if (rows.length) {
          const keys = rows[0];
          const convertedData = [];

          for (let i = 1; i < rows.length; i++) {
            const obj = {};
            for (let j = 0; j < keys.length; j++) {
              obj[keys[j].toLowerCase()] = rows[i][j];
            }
            convertedData.push(obj);
          }

          let responseForBot = "not found";
          let empName = "";

          for (const { name, designation } of convertedData) {
            const lowerCaseName = name.toLowerCase().split(" ");

            if (splitMessage.some(msg => lowerCaseName.includes(msg))) {
              empName = name;
              responseForBot = designation;
            }
          }
          callback([
            {
              message: `${empName ? empName : "Employee"} is ${responseForBot} in kommunicate`,
              platform: "kommunicate",
            },
          ]);

          return;
        }

        callback([{ message: fallbackResponse }]);
      }
    );
  } catch (error) {
    const errorMsg = error.message;
    callback([{ message: errorMsg }]);
  }
};
3. Update Data in an Existing Google Sheet via Inline Code
With this approach, you can update the Google Sheet by retrieving information provided by the user through the chat widget.
A. Several of the steps outlined in the previous method are the same here (A, B, C). The key change is that this process uses the Google Sheet API V4.
- https://www.googleapis.com/auth/spreadsheets
- https://www.googleapis.com/auth/drive
- https://www.googleapis.com/auth/drive.file
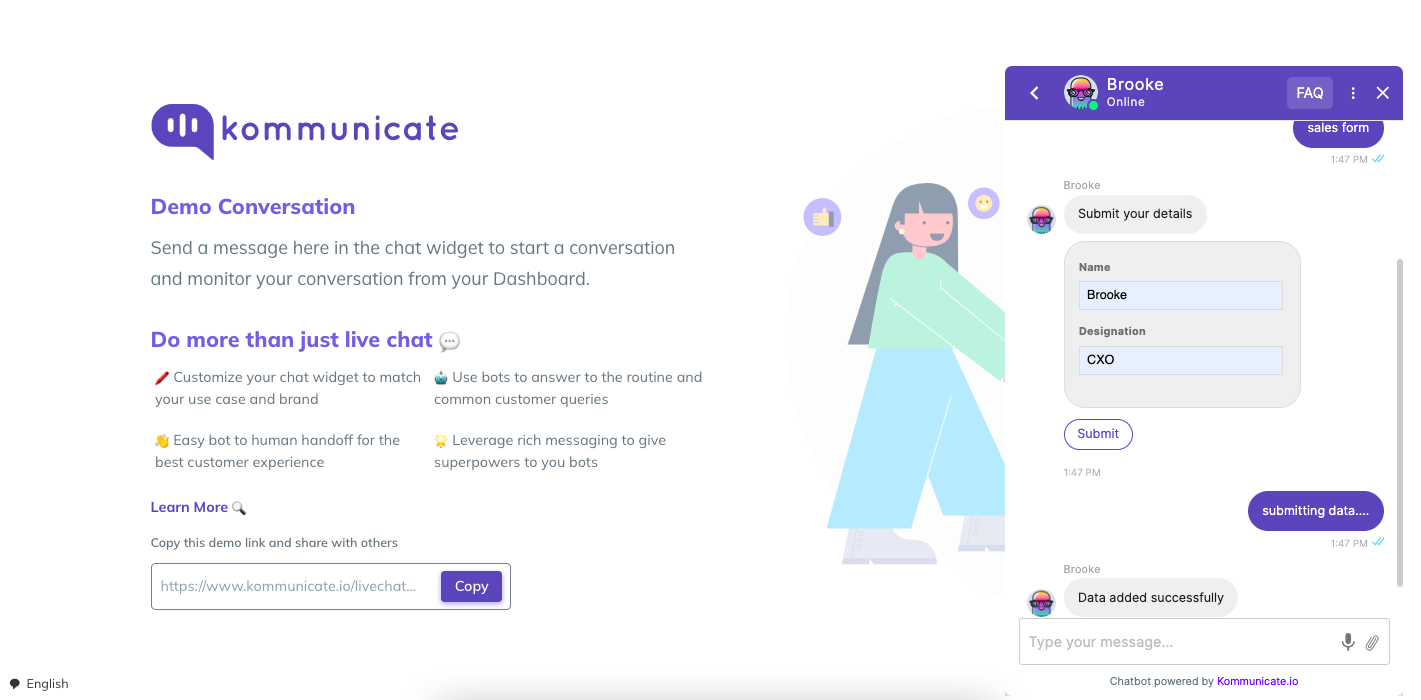
B. Next, create an intent and a form to collect information from users, such as the sales form in the example shown below.
Payload to use inside the form intent:
{
    "message": "Submit your details",
    "platform": "kommunicate",
    "metadata": {
        "contentType": "300",
        "templateId": "12",
        "payload": [
            {
                "type": "text",
                "data": {
                    "label": "Name",
                    "placeholder": "Enter your name"
                }
            },
            {
                "type": "text",
                "data": {
                    "label": "Designation",
                    "placeholder": "Enter your designation"
                }
            },
            {
                "type": "hidden",
                "data": {
                    "name": "userDetail",
                    "value": "some_secret_detail"
                }
            },
            {
                "type": "submit",
                "data": {
                    "action": {
                        "requestType": "postBackToBotPlatform",
                        "message": "submitting data...."
                    },
                    "type": "submit",
                    "name": "Submit"
                }
            }
        ]
    }
}
C. The final step is to create an intent that includes inline code and triggers the form intent. Fill in the information and submit it to update the Google Sheet.
exports.responseHandler = async (input, callback) => {
const ACCESS_TOKEN = "Add your access token here";
const REFRESH_TOKEN = "Add your refresh token here";
const CLIENT_ID = "Add your client id here";
const CLIENT_SECRET = "Add your client secret key here";
const oauth2Client = new google.auth.OAuth2(CLIENT_ID, CLIENT_SECRET);
const SCOPES = ["https://www.googleapis.com/auth/spreadsheets", "https://www.googleapis.com/auth/drive", "https://www.googleapis.com/auth/drive.file"];
try {
const { "KM_CHAT_CONTEXT": { formData } } = input.metadata;
if(!formData) {
callback([{ message: `No data to process` }]);
return;
}
const fallbackResponse = "Unable to Update data in sheet, please try after some time or contact developer";
oauth2Client.setCredentials({
access_token: ACCESS_TOKEN,
refresh_token: REFRESH_TOKEN,
scope: SCOPES,
token_type: "Bearer",
});
const sheets = google.sheets({ version: "v4", auth: oauth2Client });
const spreadsheetId = "Add your spreadsheet id here";
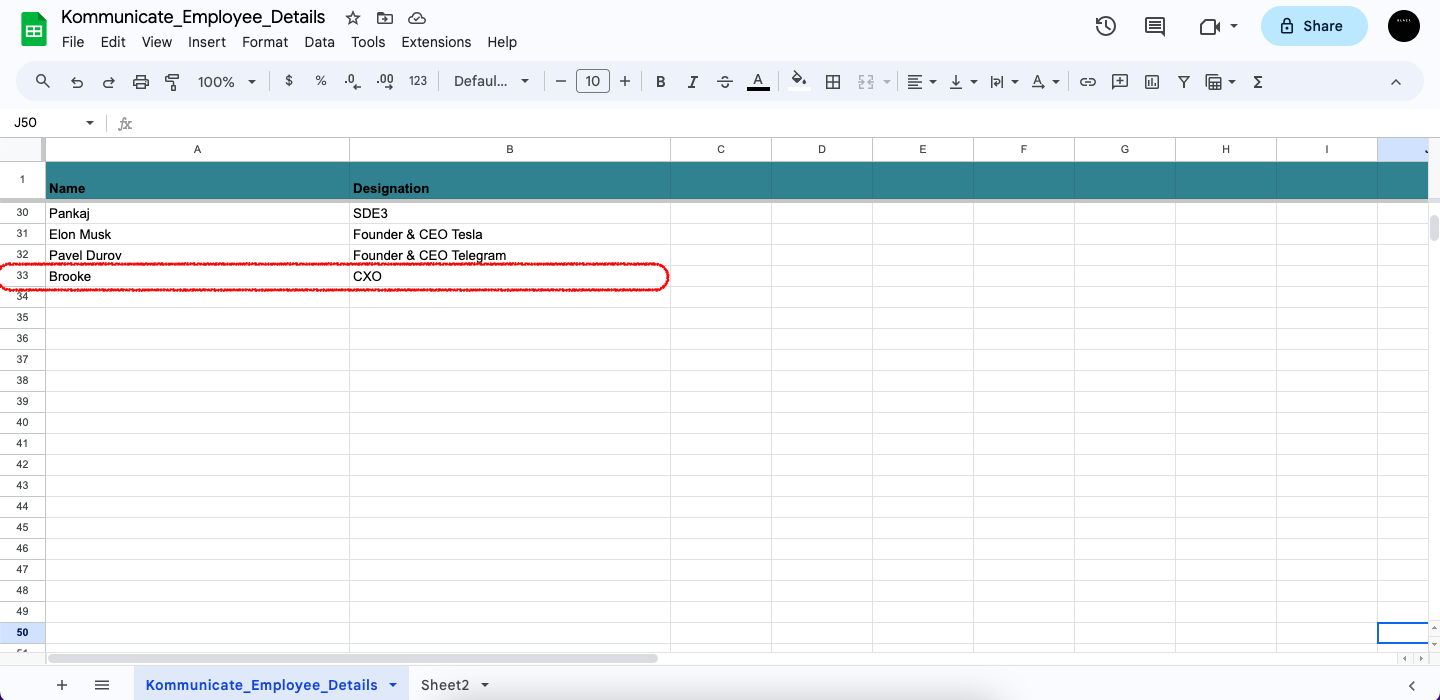
const range = "Kommunicate_Employee_Details!A:B";
const values = [[ formData.Name, formData.Designation ]];
sheets.spreadsheets.values.append(
{
spreadsheetId,
range,
resource: { values },
valueInputOption: "RAW",
includeValuesInResponse: true,
insertDataOption: "INSERT_ROWS"
},
(err, res) => {
if (err) {
callback([{ message: `The API returned an error: ${err}` }]);
return;
}
if (res.status === 200) {
const response = res?.data?.updates;
if (response) {
callback([{ message: `Lead saved successfully` }]);
return;
}
callback([{ message: fallbackResponse }]);
}
}
);
} catch (error) {
const errorMsg = error.message;
callback([{ message: errorMsg }]);
}
};
This example demonstrates the AI agent collecting information from the user and updating it instantly in the Google Sheet.
Knowledge Source
Inside the Knowledge Source section, you can train the AI agent by connecting it to various data sources. These include uploading internal documents (such as PDF, CSV, DOCX, XLS, XLSX, and TXT), adding Web URLs, and integrating external knowledge bases from platforms like Zendesk and Salesforce. Once connected, the AI agent uses this information to generate accurate and contextual responses to user queries.
Additionally, AI agents trained using documents, Web URLs, or Zendesk Knowledge Base can automatically respond in the user's language. There is no need to upload translated documents or multilingual web pages.
URLs
Simply enter the URL of the website you want the AI agent to learn from. The system will scan and display the total number of pages it can scrape. After selecting the relevant pages, click Train to initiate the process. The AI agent will typically be trained within a few seconds.
Once the status shows Active, you can begin testing the AI agent with queries related to the content it was trained on.
Pages that are behind login screens or require authentication will not be accessible and therefore cannot be scraped or used for training.
Documents
You can upload files to train the AI agent on your organization's specific content. Supported formats include PDF, CSV, DOCX, XLS, XLSX, and TXT. To get started, upload the documents that contain the information you want the AI agent to learn. Once the files are uploaded, click Upload to initiate the process.
The AI agent will analyze the content and complete training within a few seconds. When the training status changes to Active, you can begin testing the AI agent with relevant queries based on the uploaded material.
Ensure the documents are well-structured and readable. Scanned or image-based PDFs without selectable text may not be processed correctly.
If you prefer not to show the source of the answer in the AI agent's response, disable the Display source of the answer in AI agent's message option when training the AI agent using uploaded documents or URLs.
Zendesk Knowledge Base Integration
Once you have integrated Zendesk Ticket or Messaging in the Integration section, the Knowledge Base section automatically populates with the necessary credentials. The AI agent is then trained on your Zendesk articles automatically, with no manual action required.
Salesforce FAQ Integration
Integrating with Salesforce FAQ can be a transformative step for your organization, streamlining processes, enhancing customer relationships, and improving overall business efficiency. By addressing common FAQs and ensuring a smooth integration process, you can harness the full potential of Salesforce FAQ to drive your business forward.
Follow the steps below to create FAQs in Salesforce and integrate them into the Kommunicate dashboard.
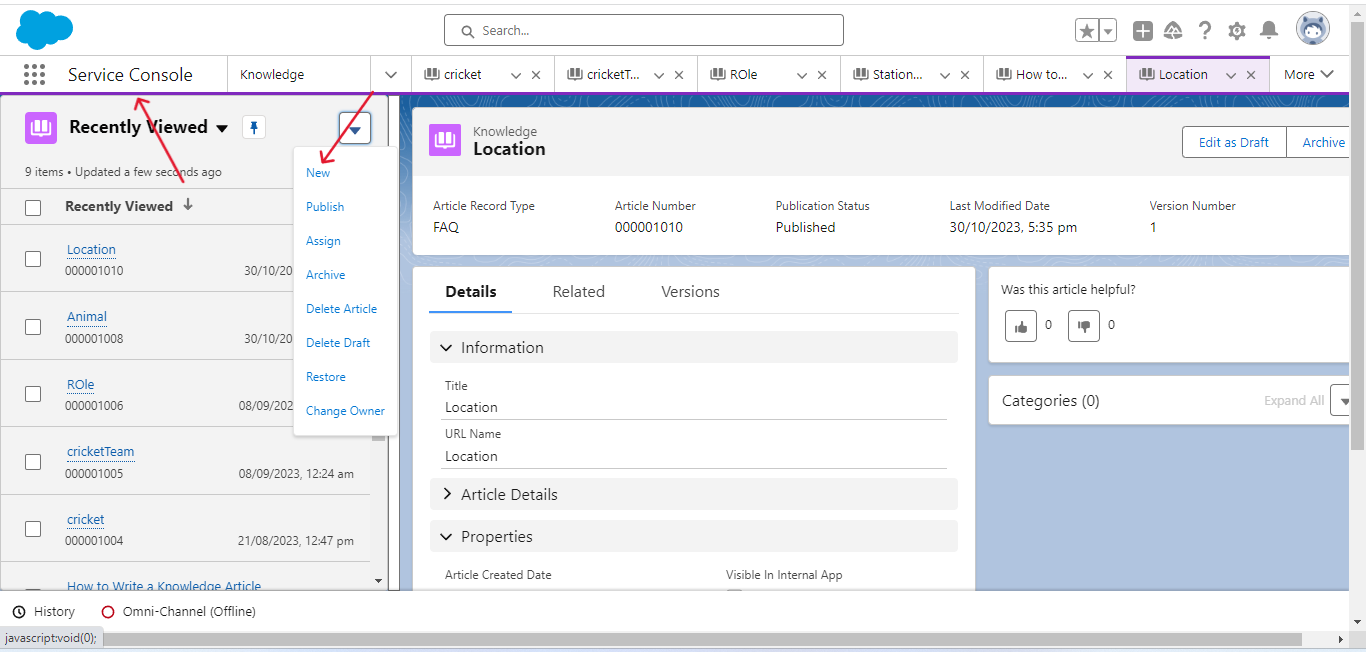
- Log in to your Salesforce account and navigate to
Service Console. To create the Salesforce FAQ article, clickNew.
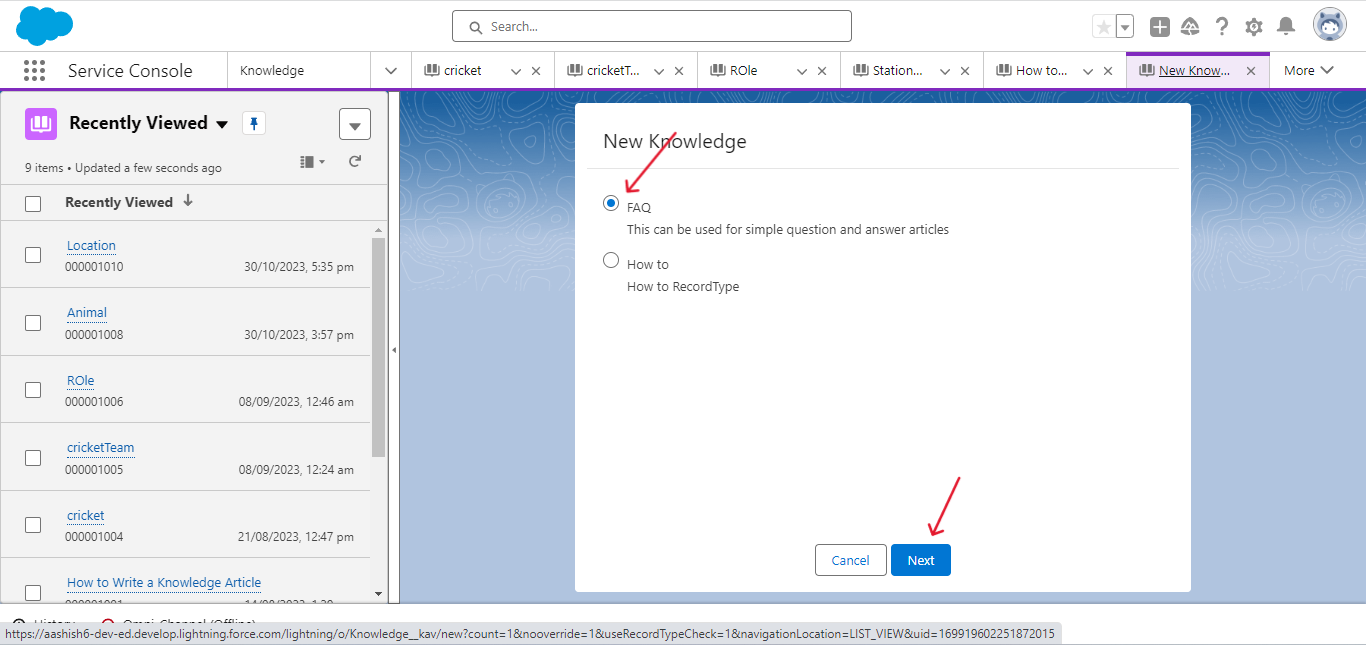
- Choose the Knowledge type as
FAQand clickNext.
- Give your FAQ article a
Titleon the next page; theURLis chosen automatically. On the same page, add the question and the relevant answer. Once done, clickSave.

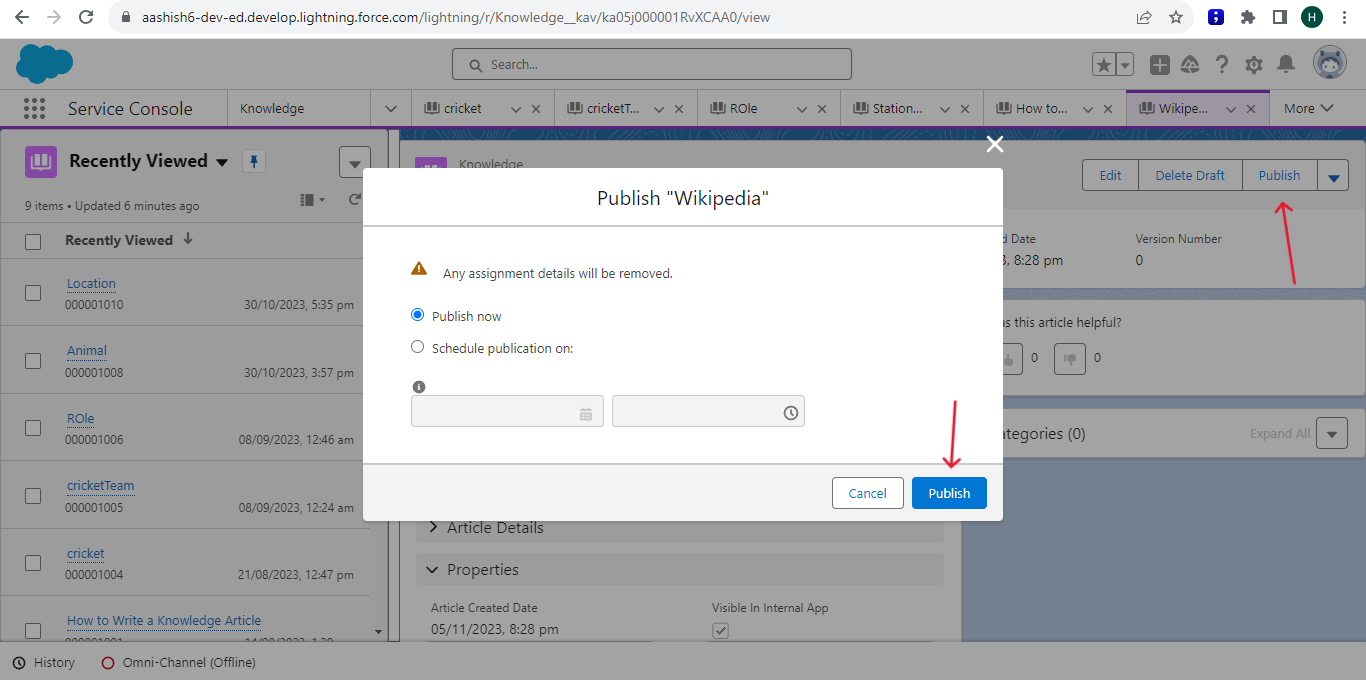
- The final step in creating the Salesforce FAQ article is to publish it. Click the Publish button in the top-right corner, as shown below.
You have now successfully created a Salesforce FAQ article. The final step is to integrate the Salesforce FAQ with Kommunicate.
- Click
Go to AI agent builderfor the AI agent you want to integrate with Salesforce FAQ, then clickKnowledge SourceandKnowledge Base.
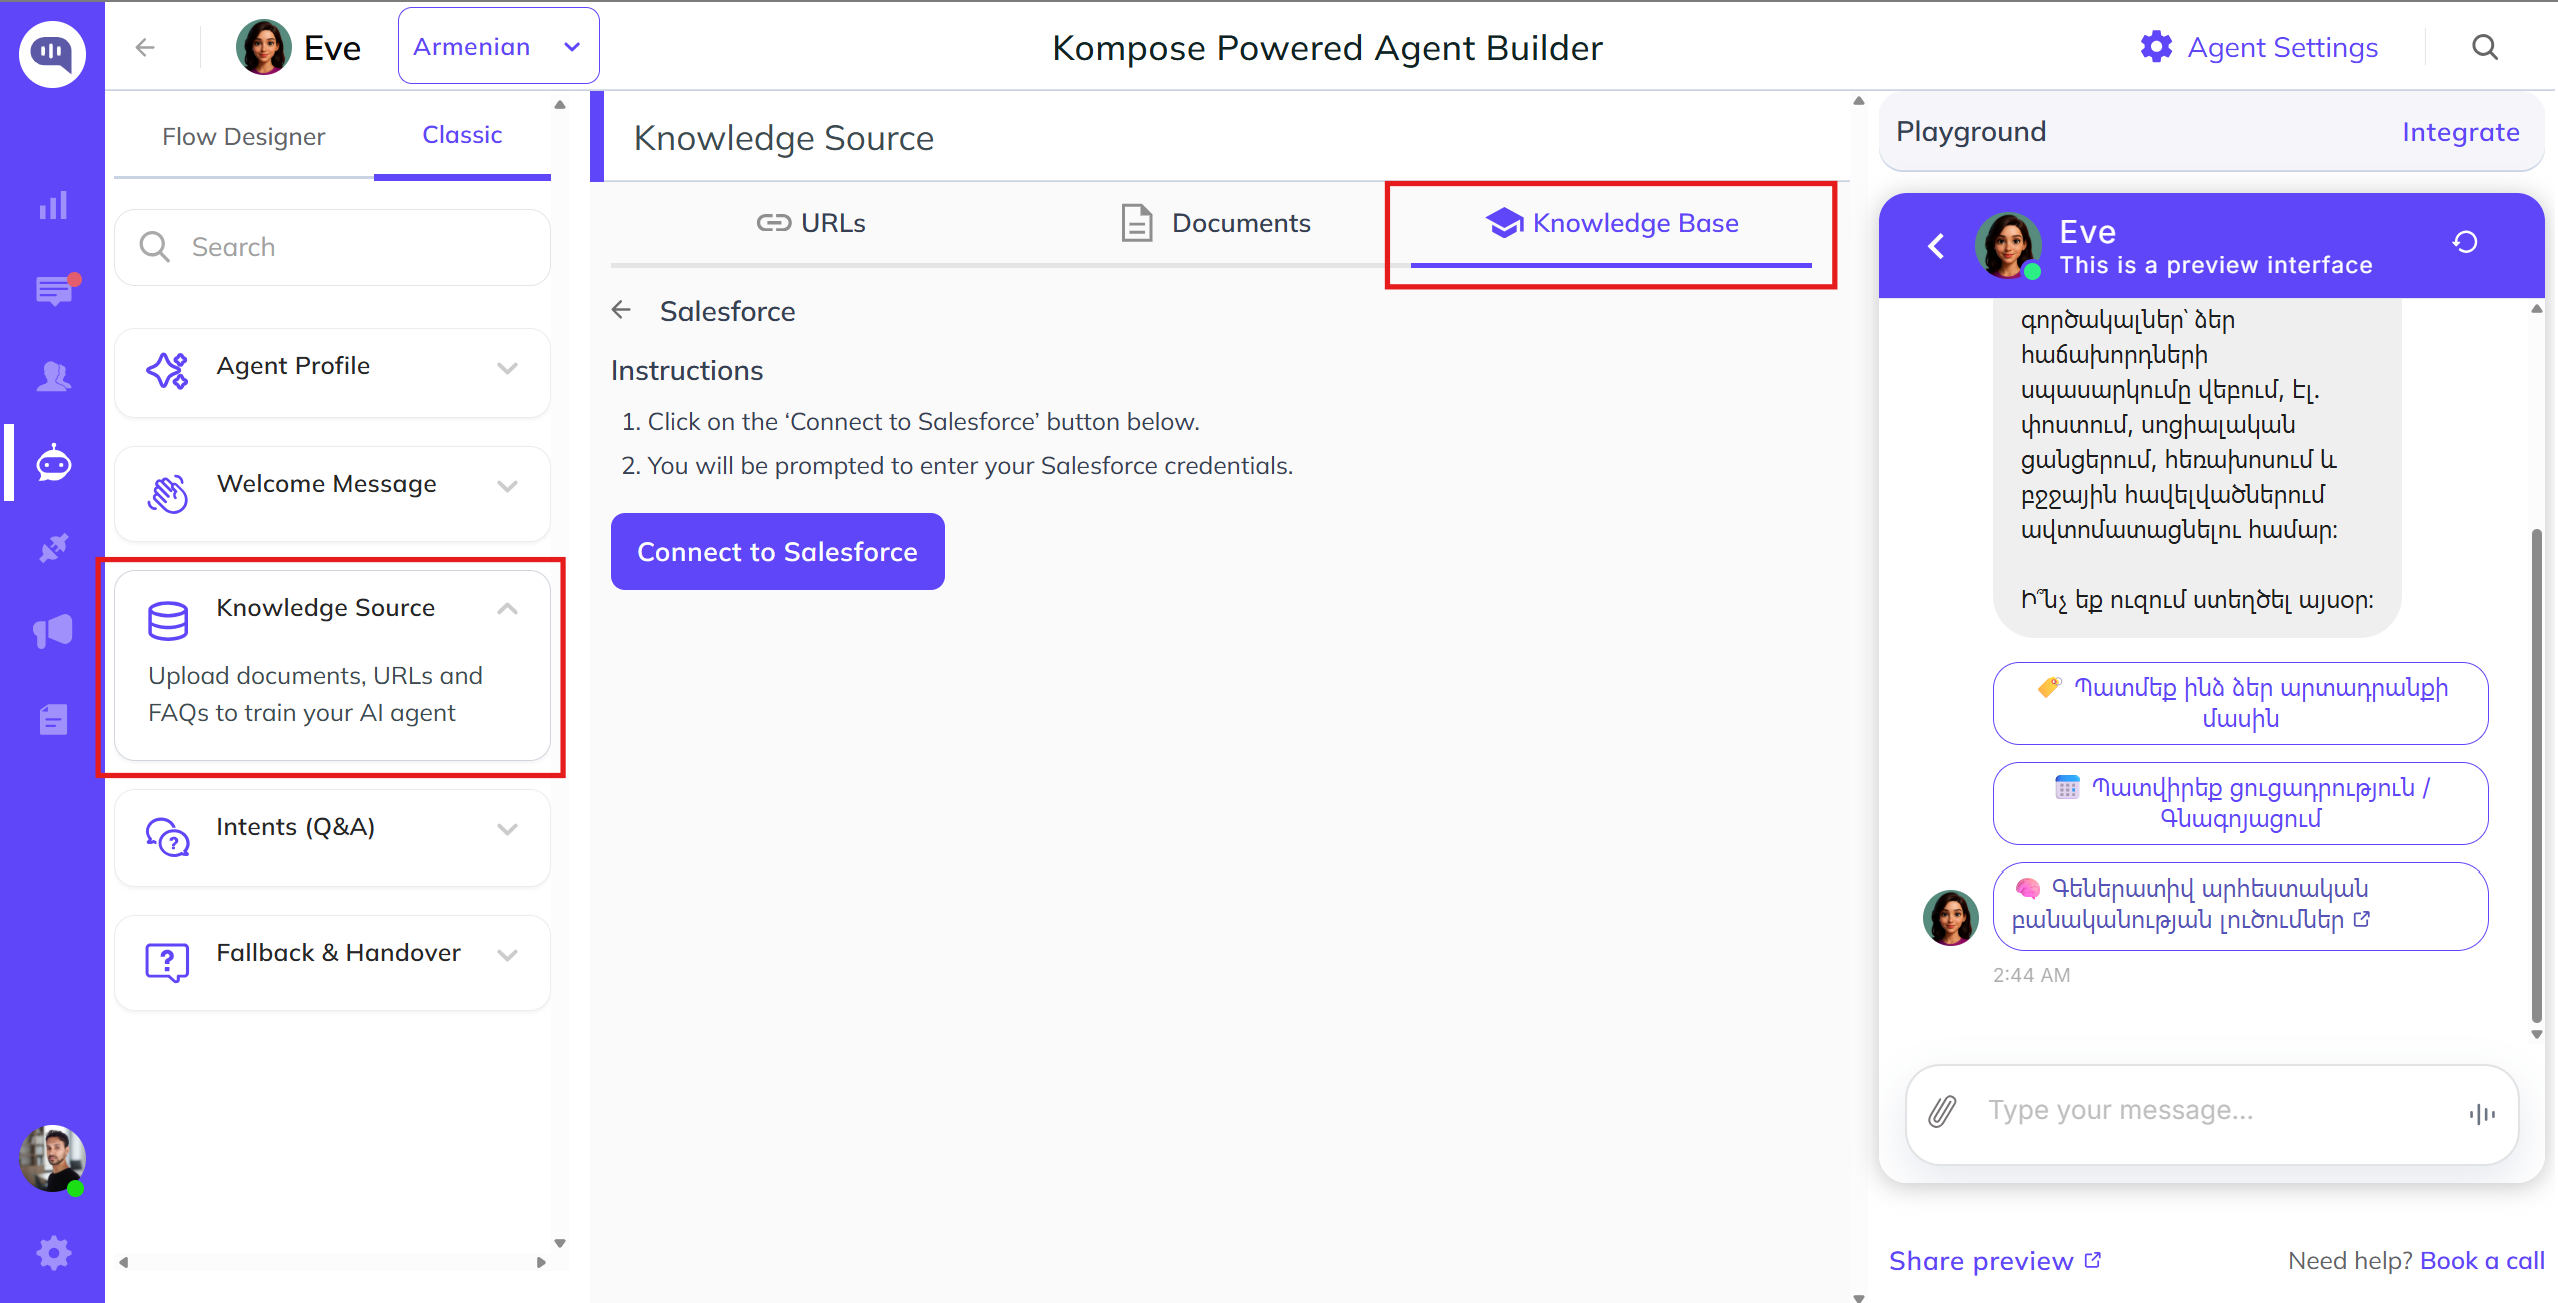
- Click Connect to Salesforce, enter your Salesforce credentials, and log in.
To test your AI agent, click Share preview. Ask your AI agent any questions from your Salesforce FAQ article.

AI agent Settings
The AI agent Settings section, accessible from the top-right corner of the AI agent builder page, allows you to fine-tune your AI agent's performance, tone, and behavior to suit your business needs. Below is a breakdown of all available settings:
1. AI Model
Choose from a variety of powerful Large Language Models (LLMs):
- Kompose (Kommunicate's native model)
- OpenAI
- Google Gemini
- Anthropic
These models differ in capabilities and response styles. You can test each to determine which suits your use case best.
2. Custom Instructions
Provide specific instructions to define how your AI agent should interact with users:
- Tone of Voice: Friendly, professional, casual, etc.
- Response Length: Short or long detailed answers.
- Other Instructions: Add any additional constraints or guidance (e.g., avoid giving legal advice, use simple language, etc.)
The more descriptive your instructions, the more accurate and aligned your AI agent's replies will be.
3. Contextual Understanding
Enable this feature to allow the AI agent to remember previous user messages within a session:
- Retain chat history contextually
- Provide follow-up answers with improved relevance
- Support multi-turn conversations
Context is stored only for the duration of a single session.
4. Collect AI agent Feedback
Let users give feedback on AI agent responses:
- Like / Dislike
- Helps assess response quality
- Useful for training and improving AI agent accuracy
5. Connect Helpcenter
Link your Kompose AI agent with your Kommunicate Helpcenter:
- Fetch answers directly from your Kommunicate knowledge base
- Keep support information consistent across channels
6. Small Talk
Enable predefined replies for casual or generic user inputs such as:
- "Hi there"
- "How are you?"
- "What's up?"
This adds a conversational tone and improves user experience.
7. Get Answers from Web
Enable this option if you want the AI agent to search the internet in addition to your existing trained content. This is especially useful when:
- You want the AI agent to provide users with the latest or trending information beyond your business data.
- You aim to enhance the AI agent's ability to respond to queries that are not covered in your uploaded documents or knowledge base.
Once enabled, the AI agent will attempt to answer every question, even those outside your trained sources, by searching online. This may result in responses that are not specific to your business context. Use with caution if strict content control is required.