
WhatsApp Cloud API Integration
What is WhatsApp Cloud API?
WhatsApp Cloud API lets you send and receive messages using Meta's cloud-hosted Business API by offering low-cost, secure, and cloud-based hosting.
WhatsApp Cloud API feature
- Allows businesses & developers to build on top of WhatsApp to customize their experiences and respond to customers quickly & easily, reducing the onboarding time.
- Low hosting cost.
- New WhatsApp features will be available as soon as they are released.
What is Sandbox?
Sandbox is a test integration where you can use a Meta phone number to send and receive messages. This will be in a test environment, so you won’t be able to use it to send messages to your customers.
What is Go-live?
Go-live is the integration, where you integrate Kommunicate with your WhatsApp number. Here, you can send and receive messages from your customers. To integrate, you can visit the “Go-live” section on the Kommunicate dashboard.
To integrate and test Sandbox, follow the steps in the below sequence only.
- Create an app on Meta.
- Add WhatsApp to the app
- Set up Sandbox on the Kommunicate dashboard.
- Configure webhook
- Test Sandbox or Go-live
To integrate and test Go-live, follow the steps in the below sequence only.
- Create an app on Meta. (skip if it's already done in Sandbox)
- Add WhatsApp to the app. (skip if it's already done in Sandbox)
- Set up Go-live on the Kommunicate dashboard.
- Configure webhook (skip if it's already done in Sandbox)
- Add payment method
- Verify Business
- Test Sandbox or Go-live
I. Create an app on Meta:
You can use an app created on Meta on both Sandbox and Go-live.
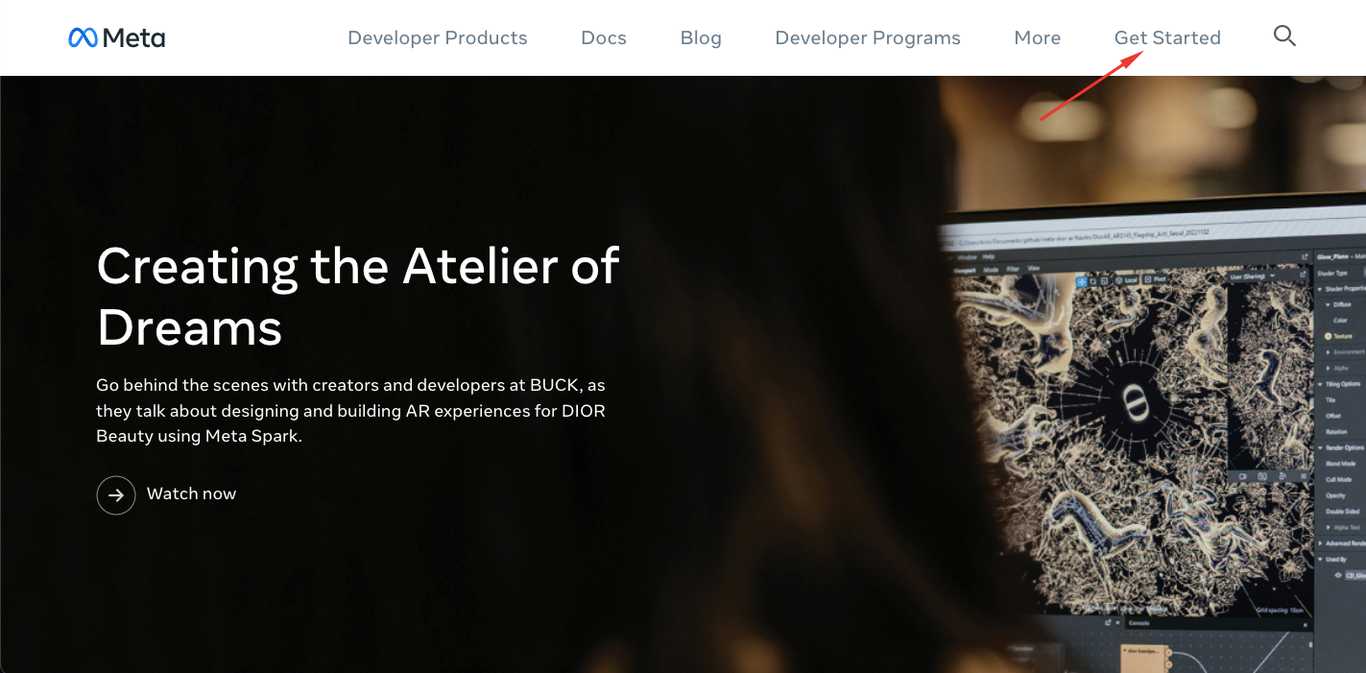
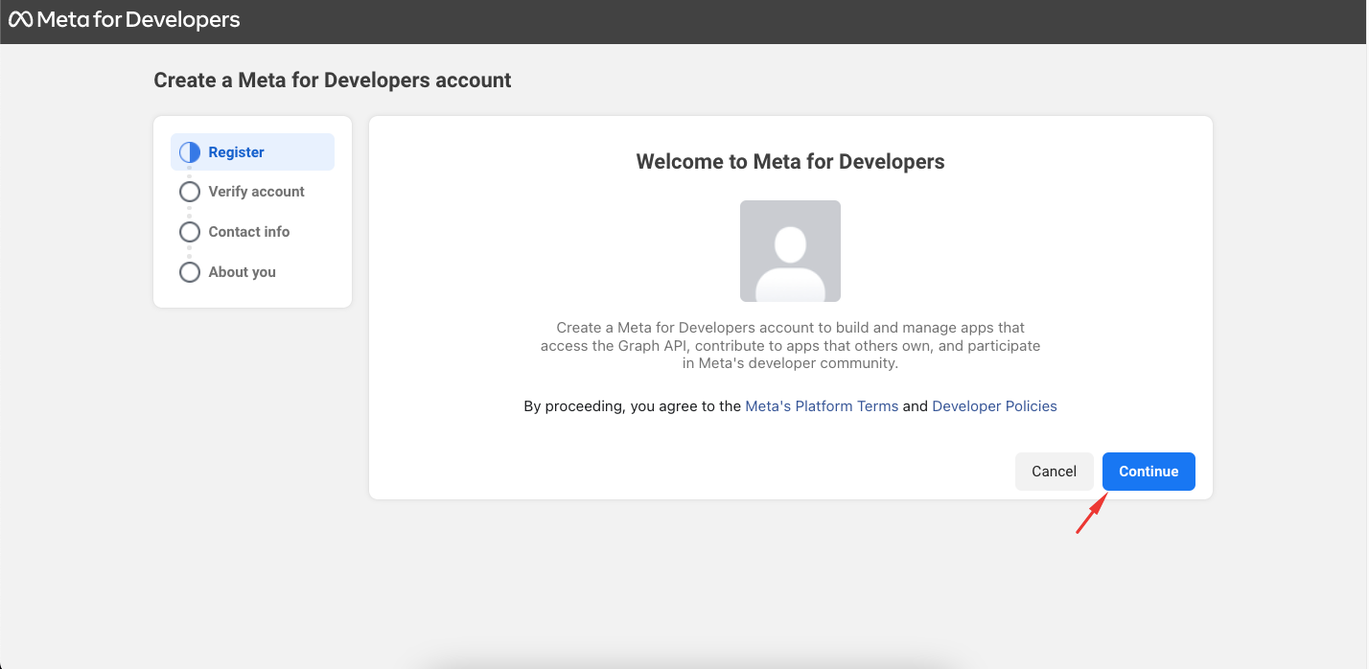
- Go to Meta for Developers. You will see the Get Started link if you still need to create a Meta for Developers account. Click that button to finish the account creation. Else, go to step 2.
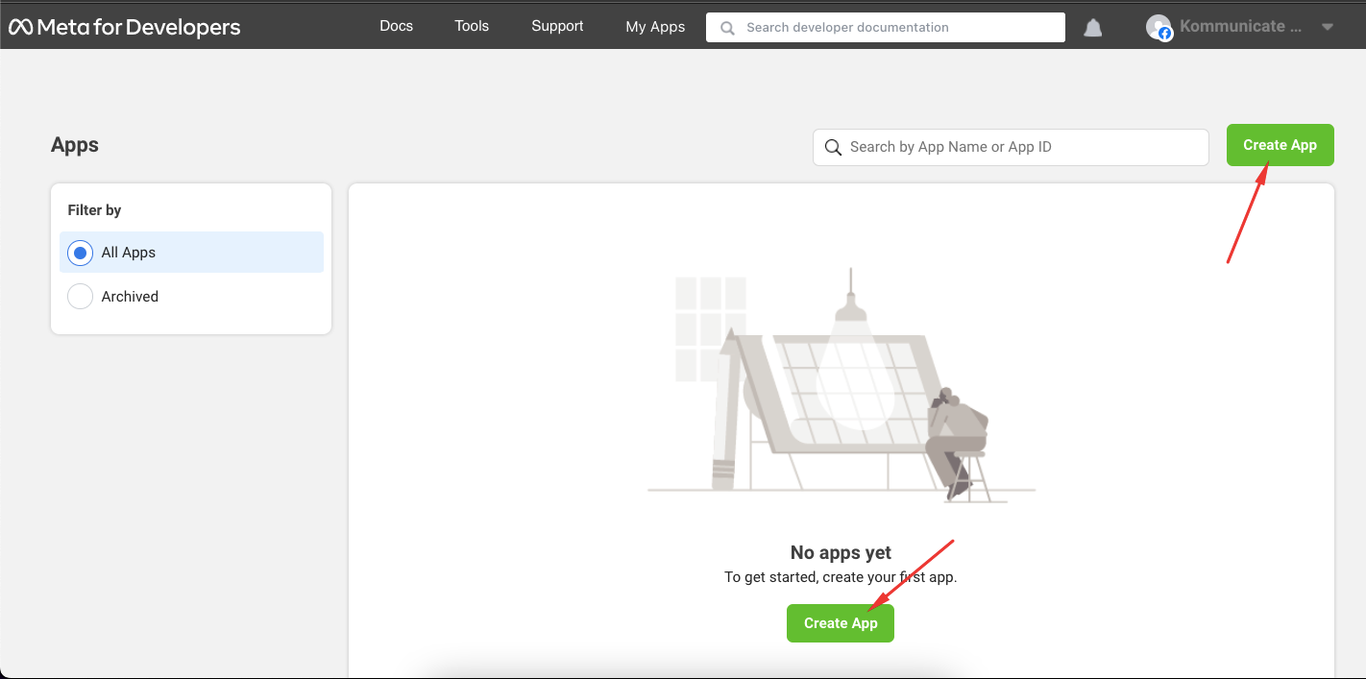
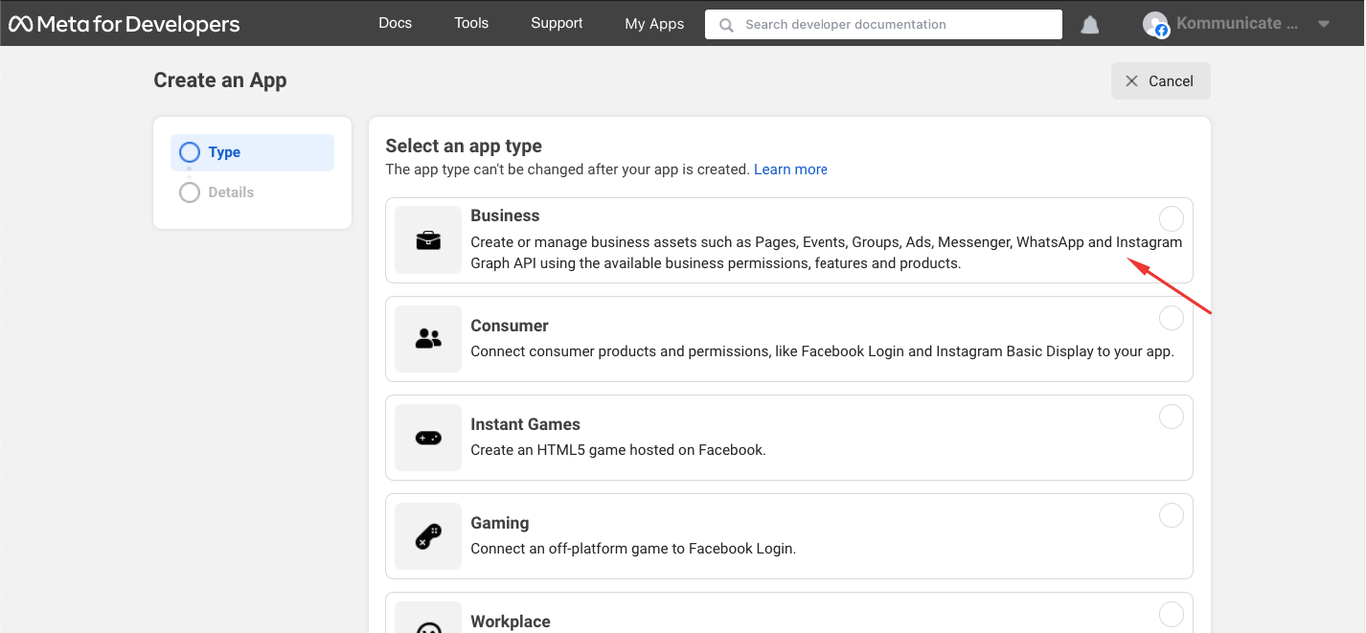
- Navigate to the My Apps link on the top right corner, and now click on Create App. Select an app type as "Business" and click the Next button at the bottom.
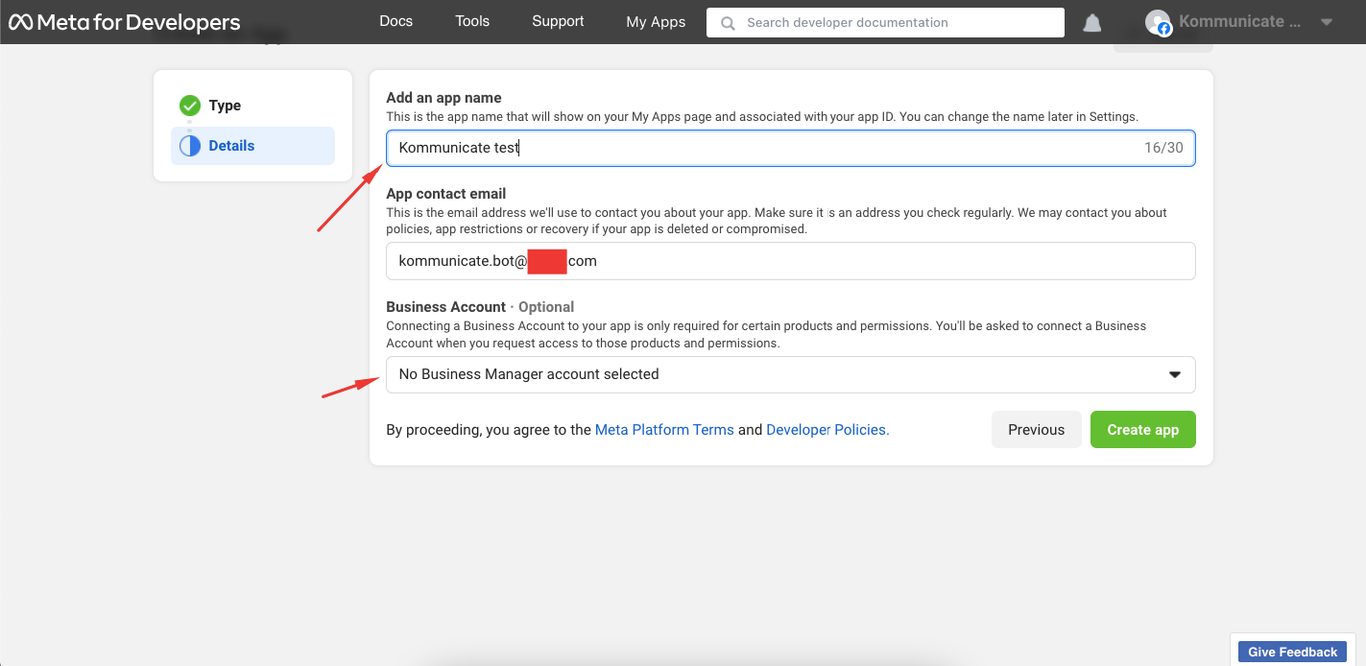
- Add an app name. If you have a business account, select or leave it as it is and click the Create app button.
II. Add WhatsApp to your app
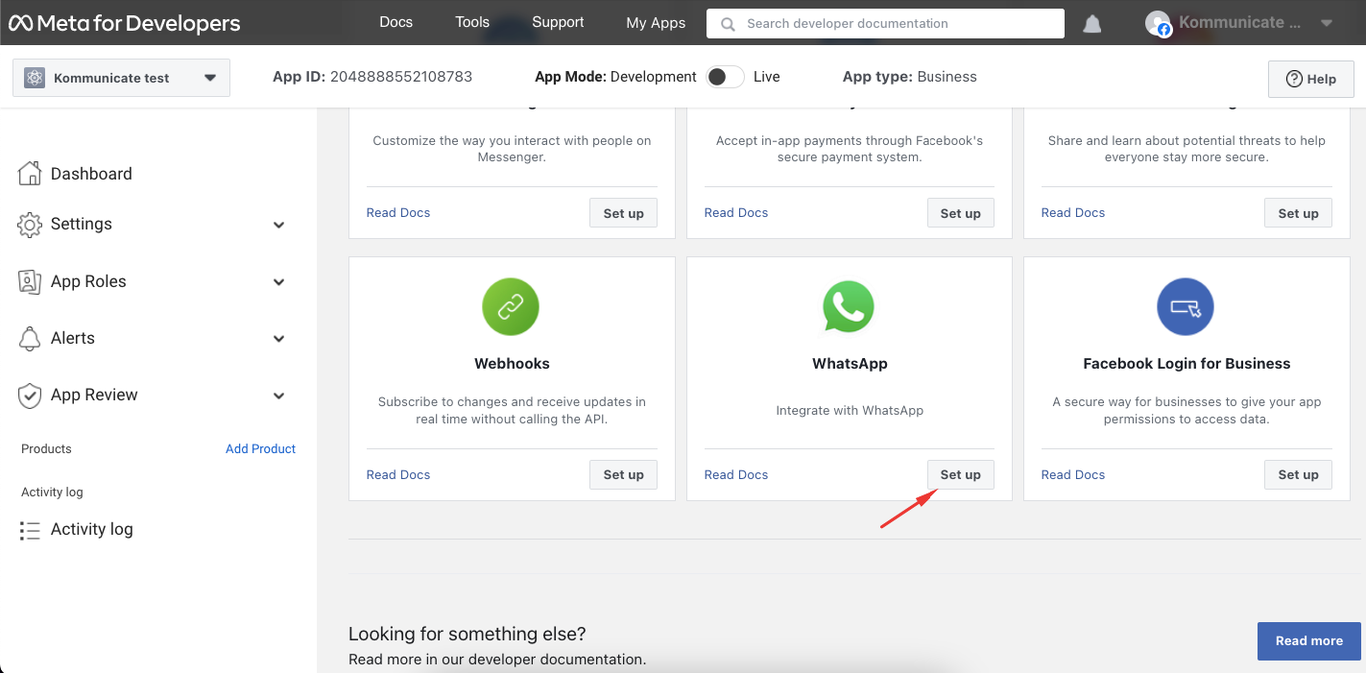
- In Meta for Developers, you will be on the Add Products to your app page, scroll down to WhatsApp, and click on the Set up button.
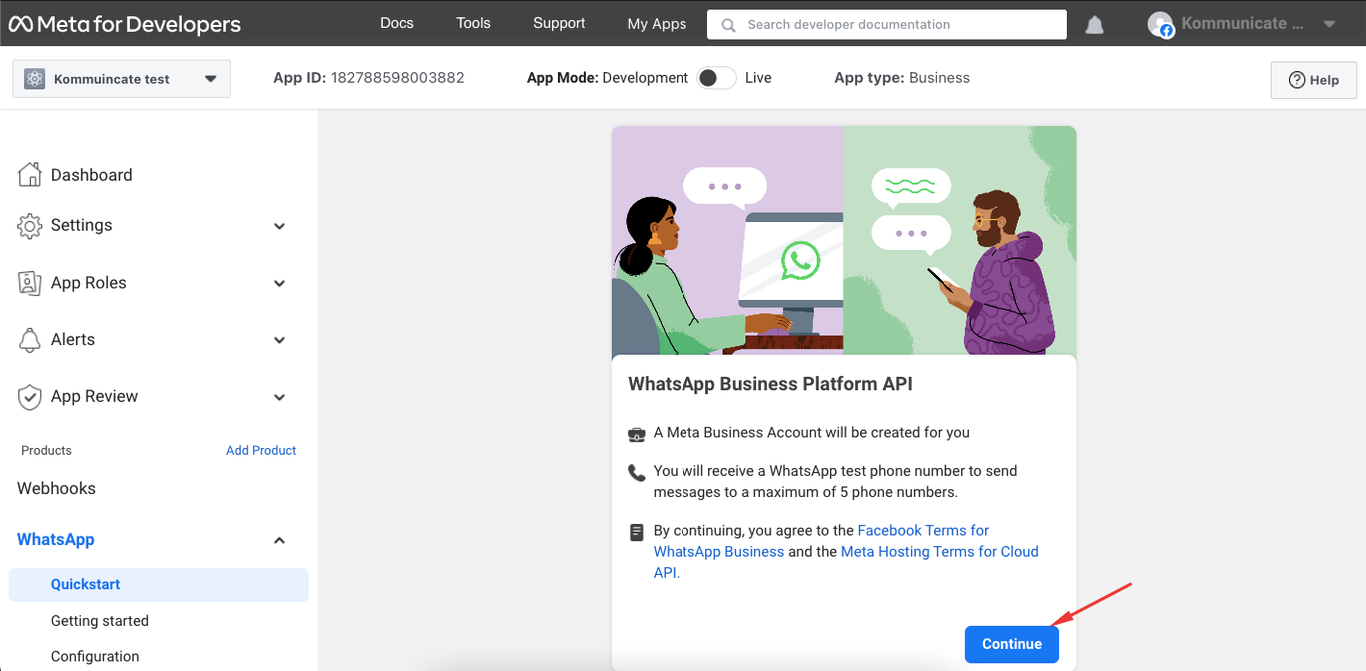
- Create or select a Meta Business Account by selecting Create a business account and clicking the Continue button.
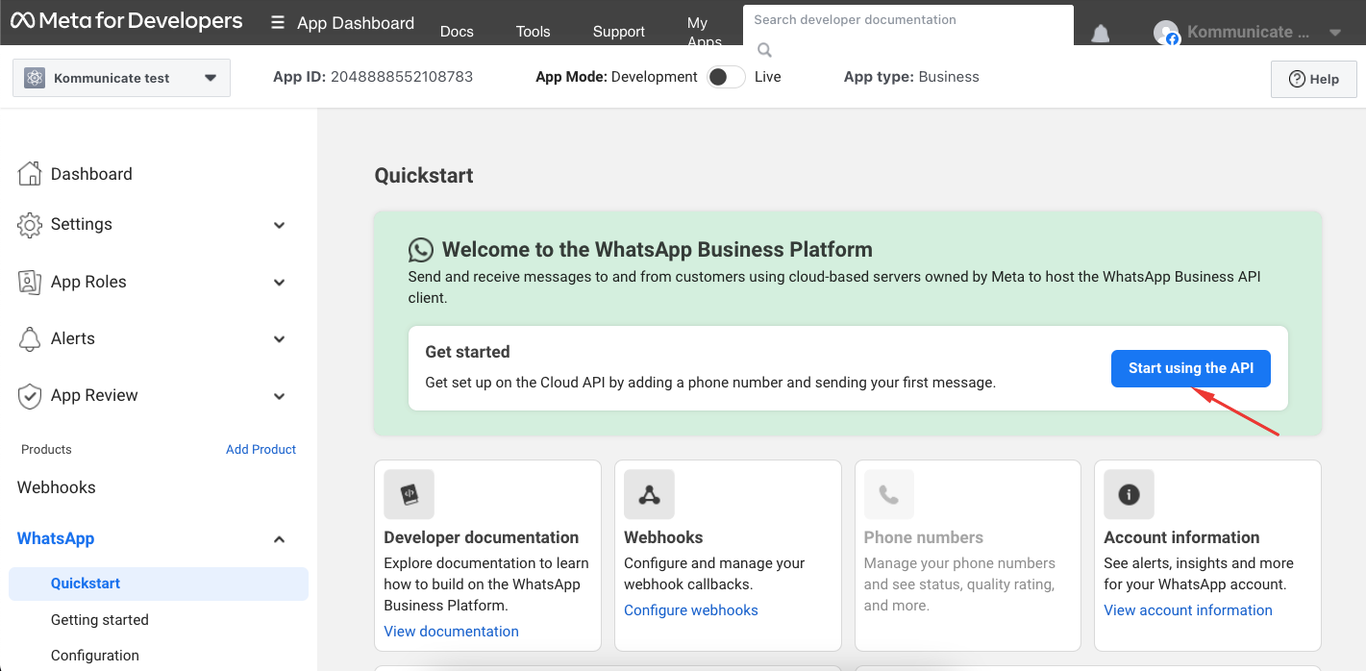
- You will land on the Quickstart page. Click on the Start using the API button.
III. Setup Sandbox on the Kommunicate dashboard
To test the Meta Cloud API, you can use Sandbox.
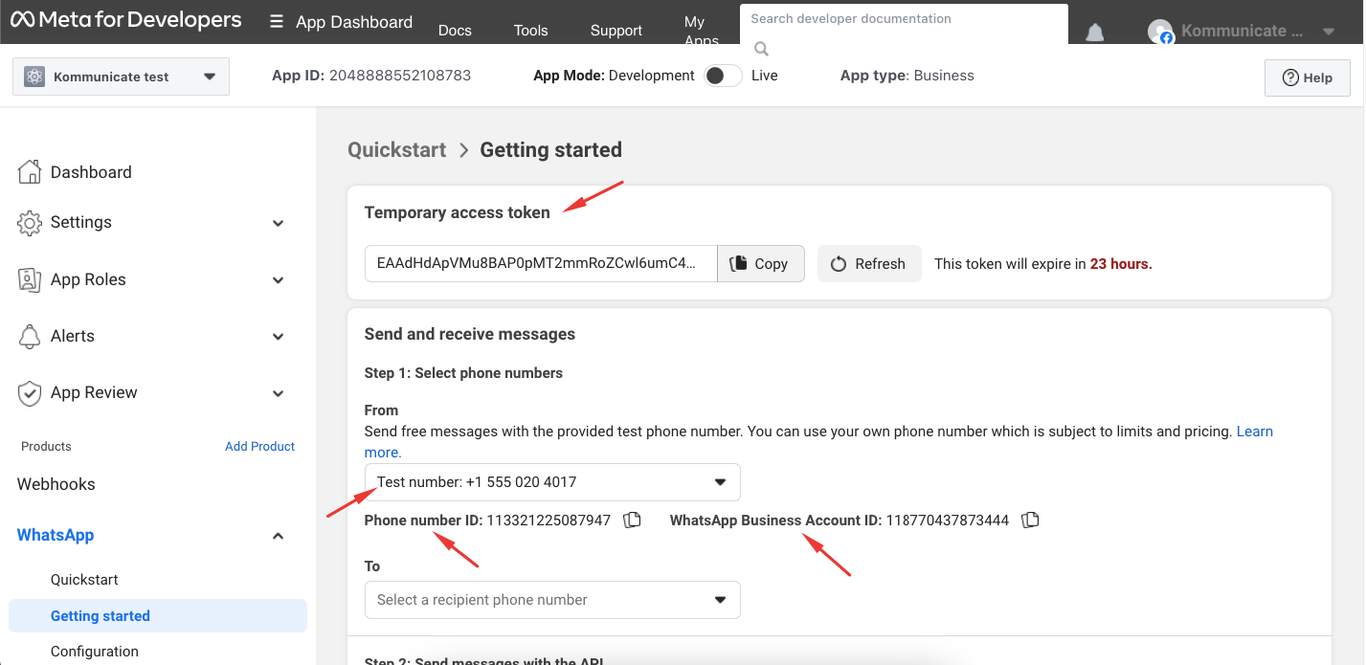
- On the Getting started page, copy and paste “Temporary access token”, “Test number(From)”, “Phone number ID” and “WhatsApp Business Account ID” to the respective fields on the Kommunicate dashboard.
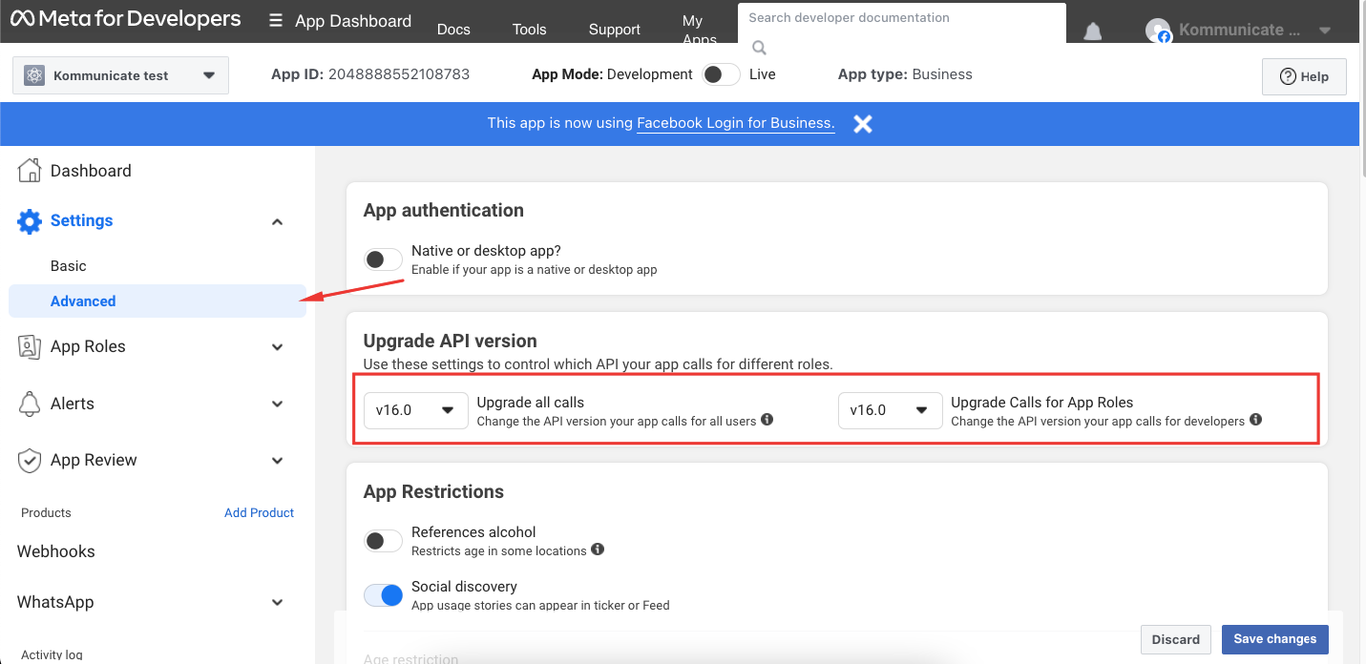
- To add the API version on the Kommunicate dashboard. Go to the Meta for Developers, and navigate to Settings > Advanced from the left panel. Under the Upgrade API version title, you can find the version number(for example, v16.0). Add that to the API version field on the Kommunicate dashboard.
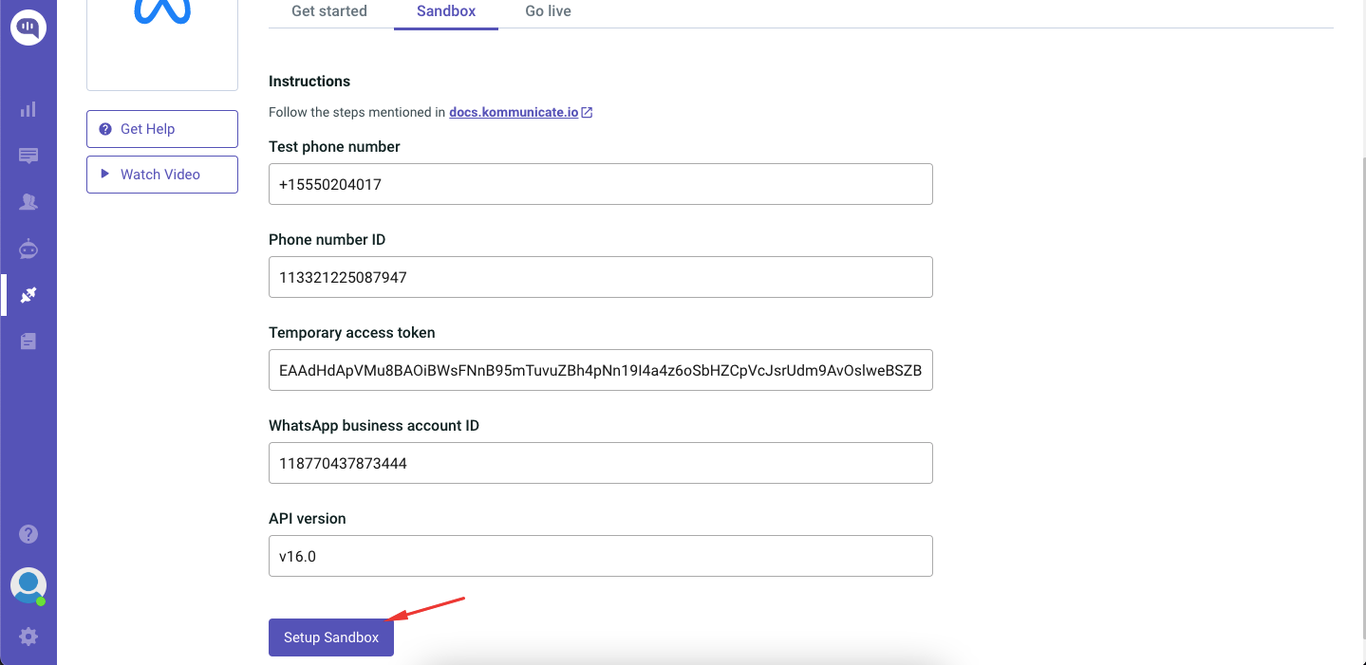
- Click the Setup Sandbox button on the Kommunicate dashboard after adding data to all five fields.
IV. Configure Webhook
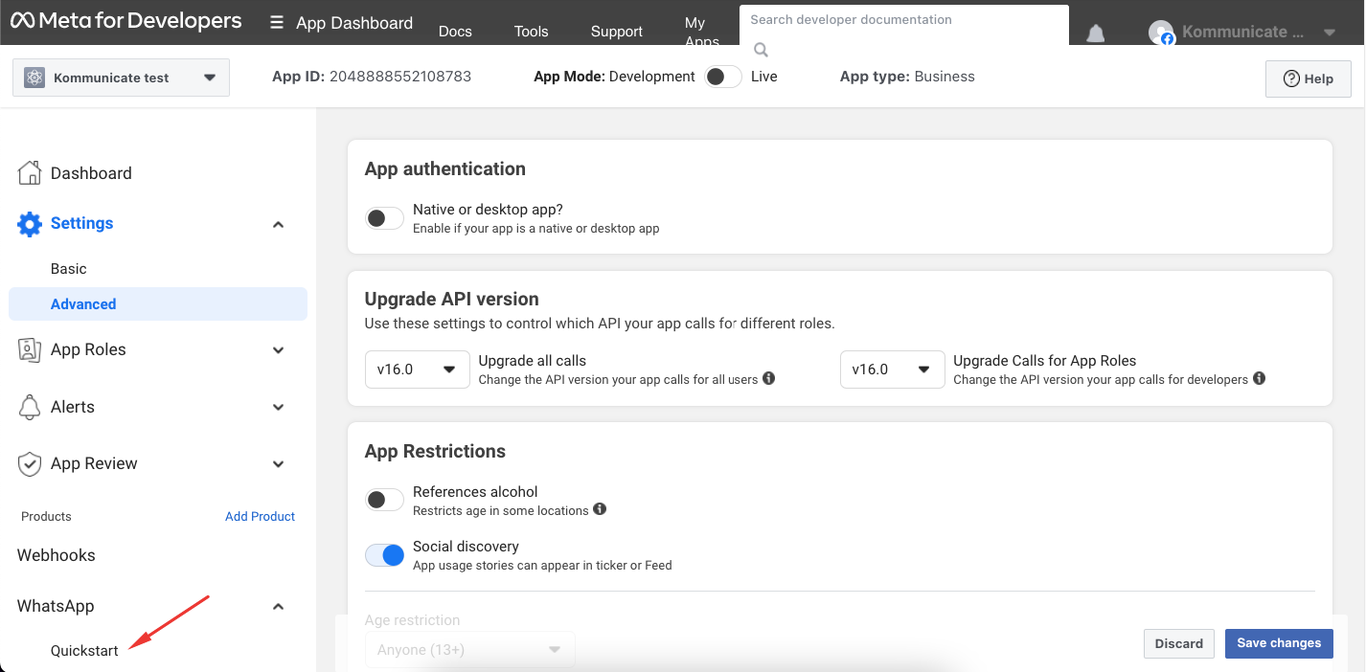
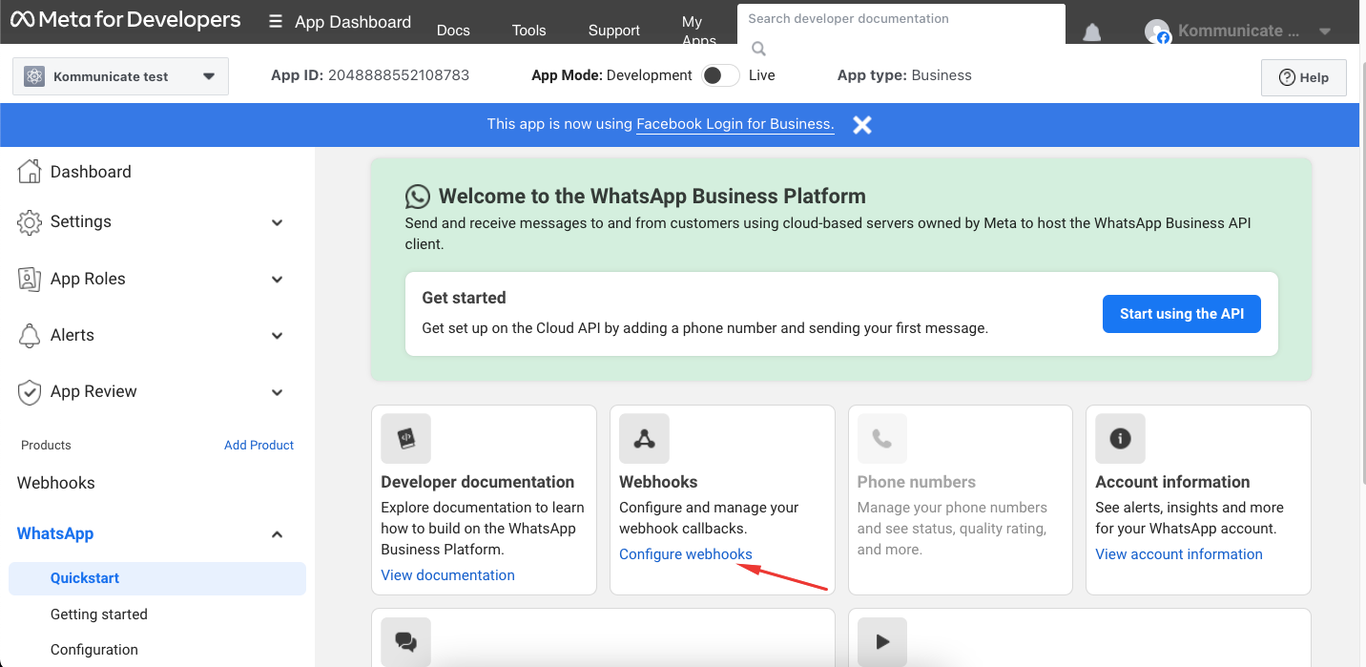
- To test the configuration, you must set up Webhook. Return to the WhatsApp > Quickstart page on Meta for Developers. Click the “Configure webhooks” link.
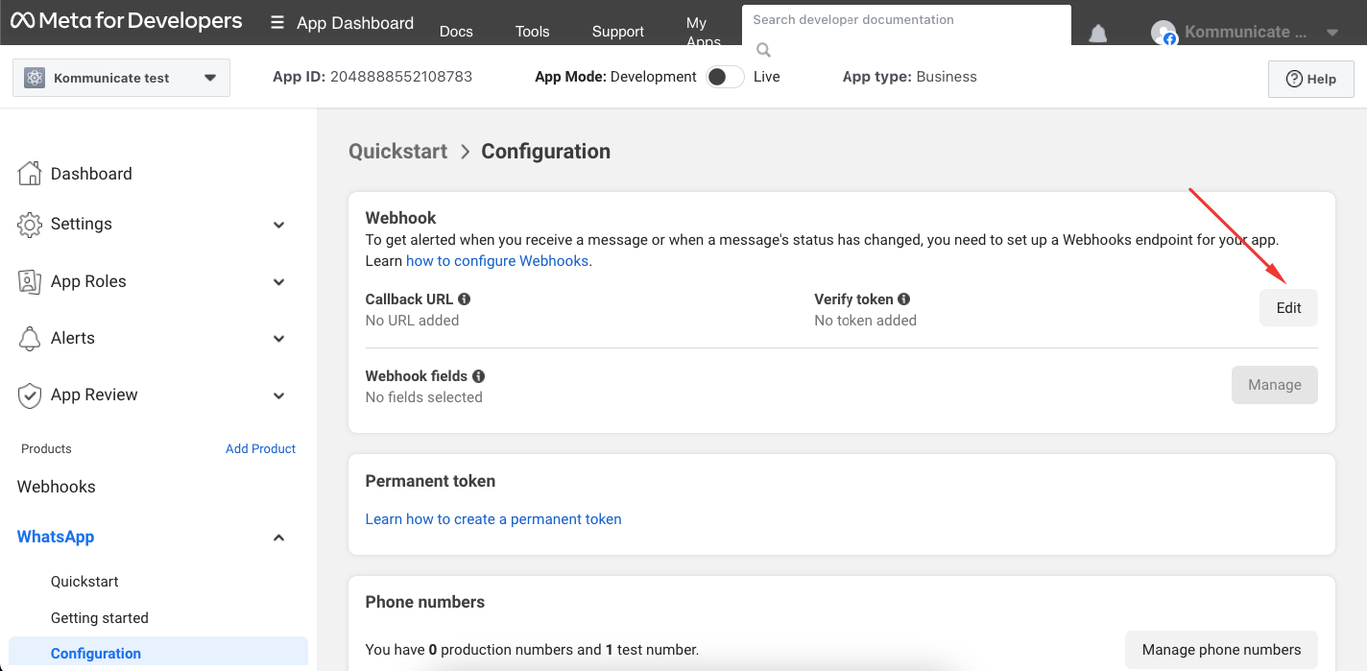
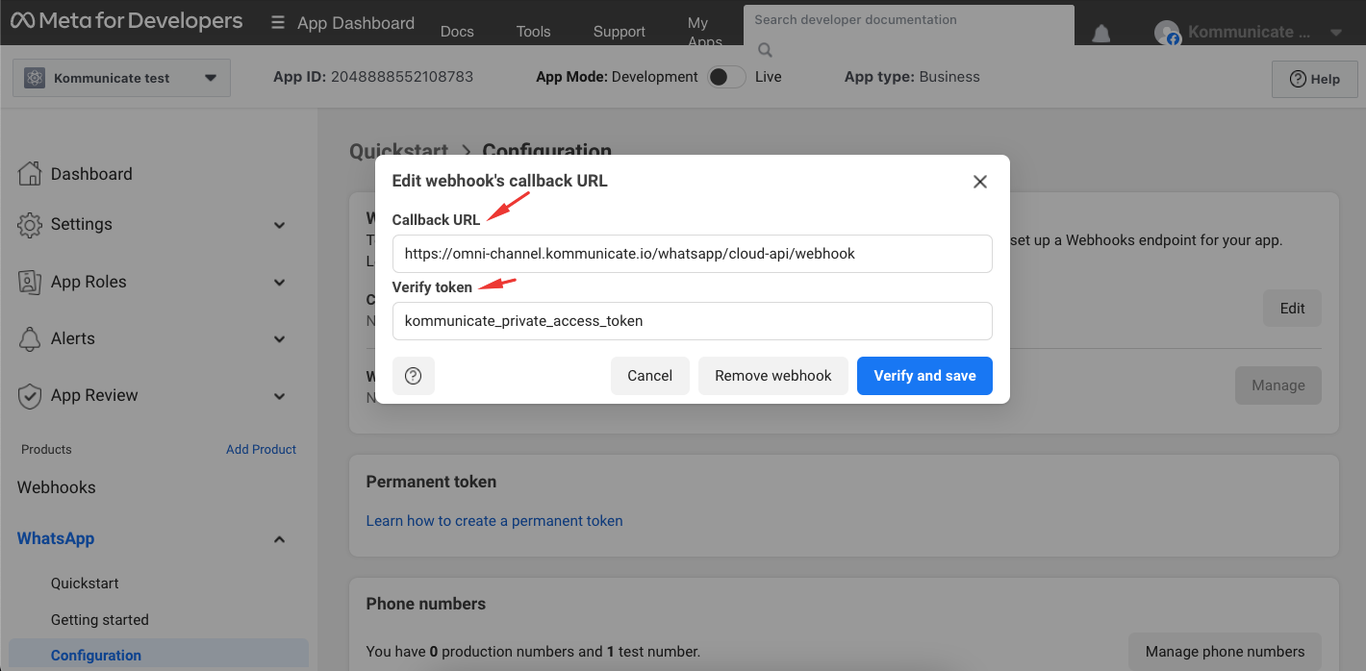
- Under Webhook (Meta for Developers), click the “Edit” button, copy and paste the Callback URL and Access Token.
Callback URL: https://omni-channel.kommunicate.io/whatsapp/cloud-api/webhook
Access Token: kommunicate_private_access_token
Click on Verify and Save button.
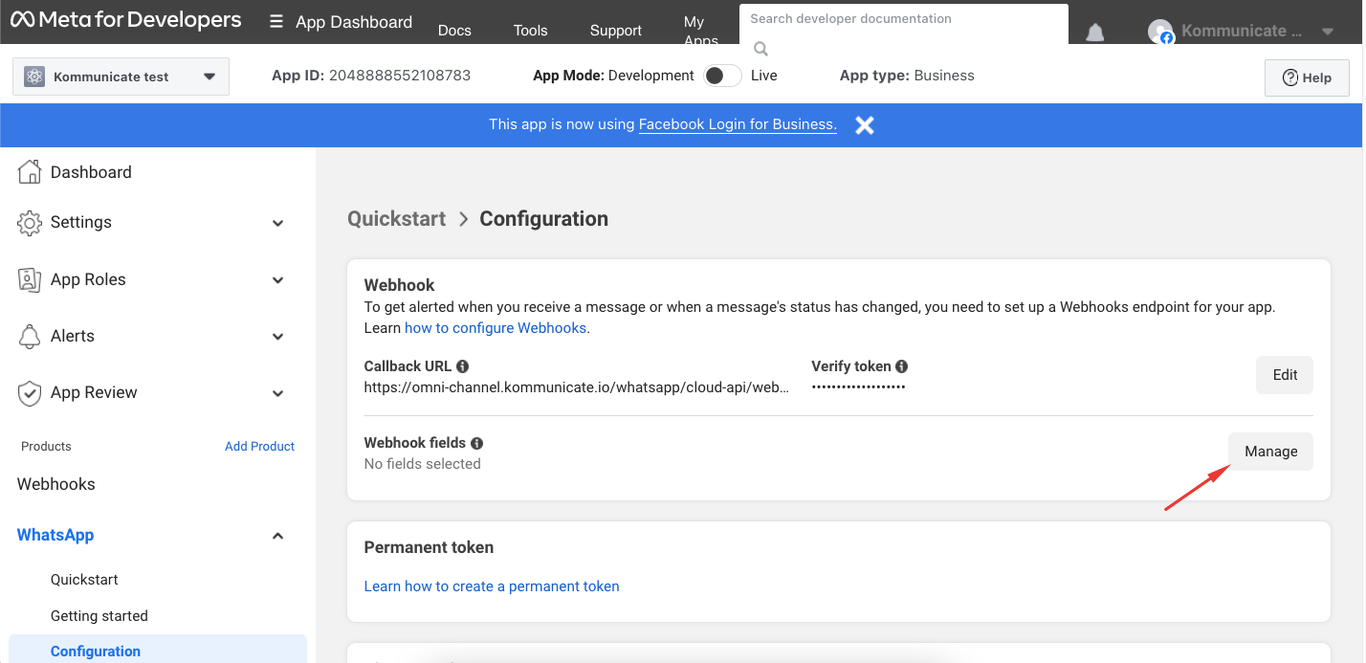
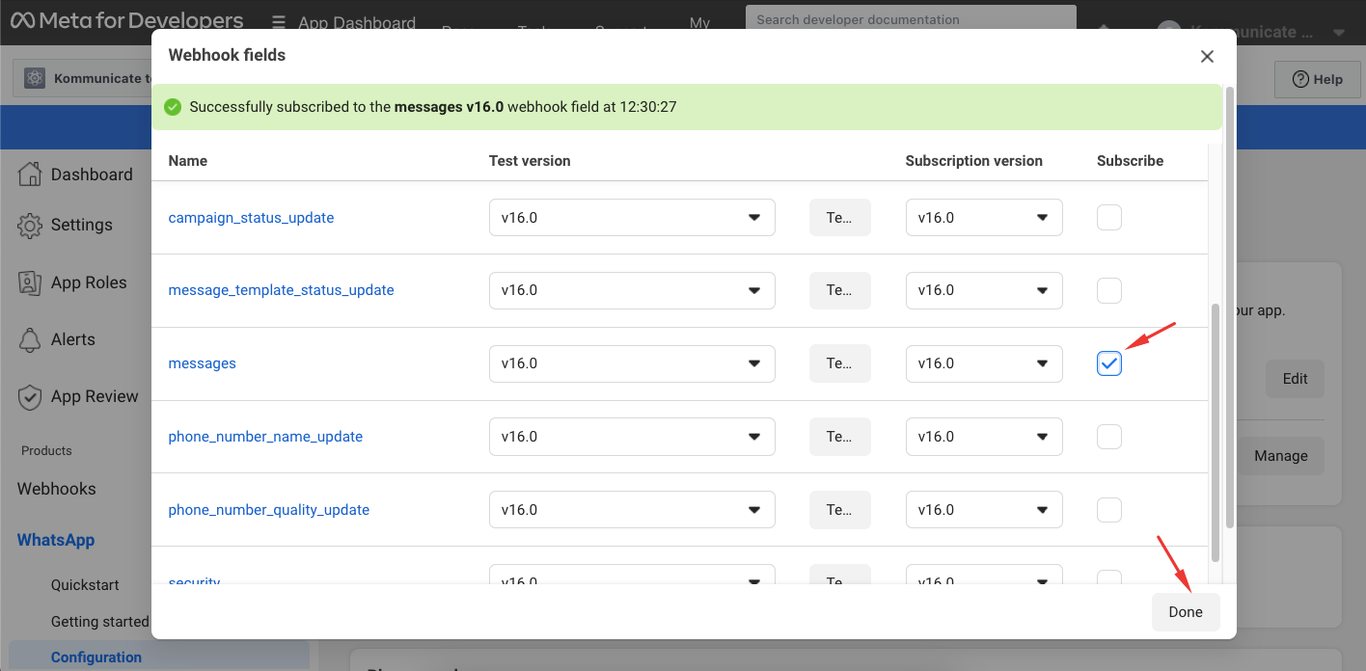
- On the same page, under “Webhook fields” click the Manage button, and select “messages” on the modal. Click the Done button.
V. Test the Sandbox or Go-live
To try sending and receiving messages on the Kommunicate dashboard using Sandbox or Go-live, follow these steps.
Please note that to test the Go-live configuration, you must integrate your number into the Go-live section on the Kommunicate dashboard. Follow the steps mentioned in Setup Go-live.
- Go to WhatsApp > Getting started page
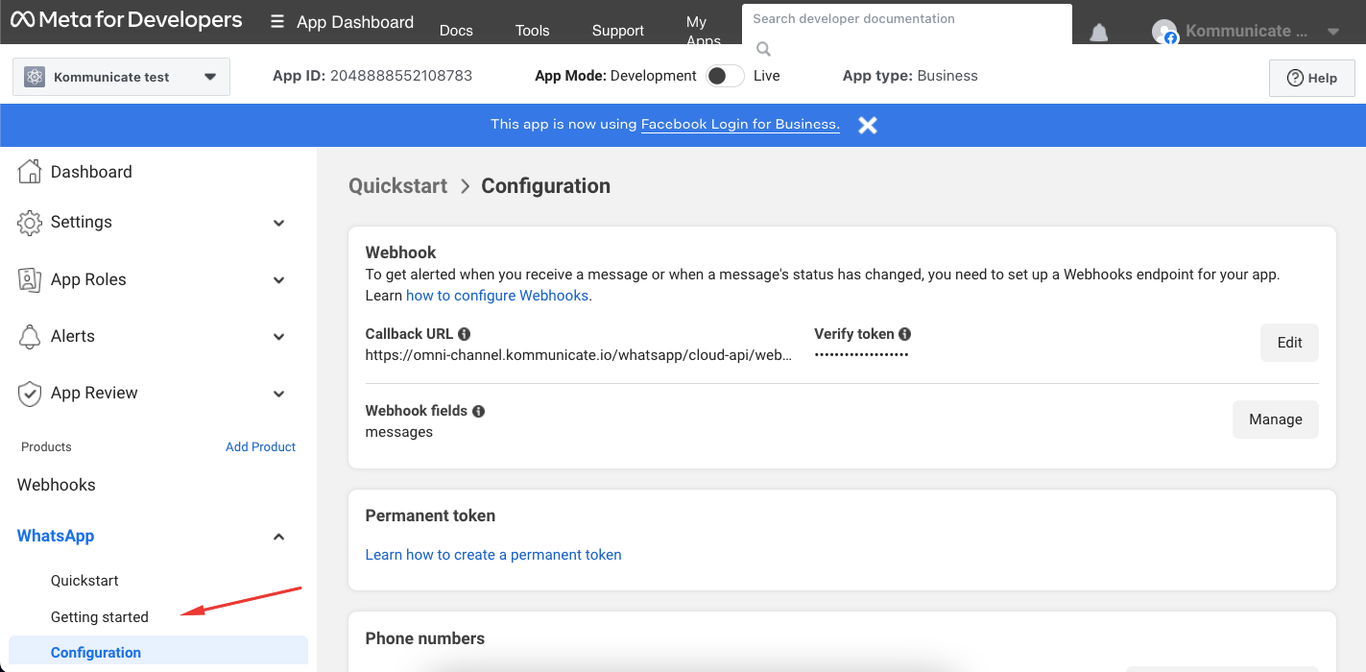
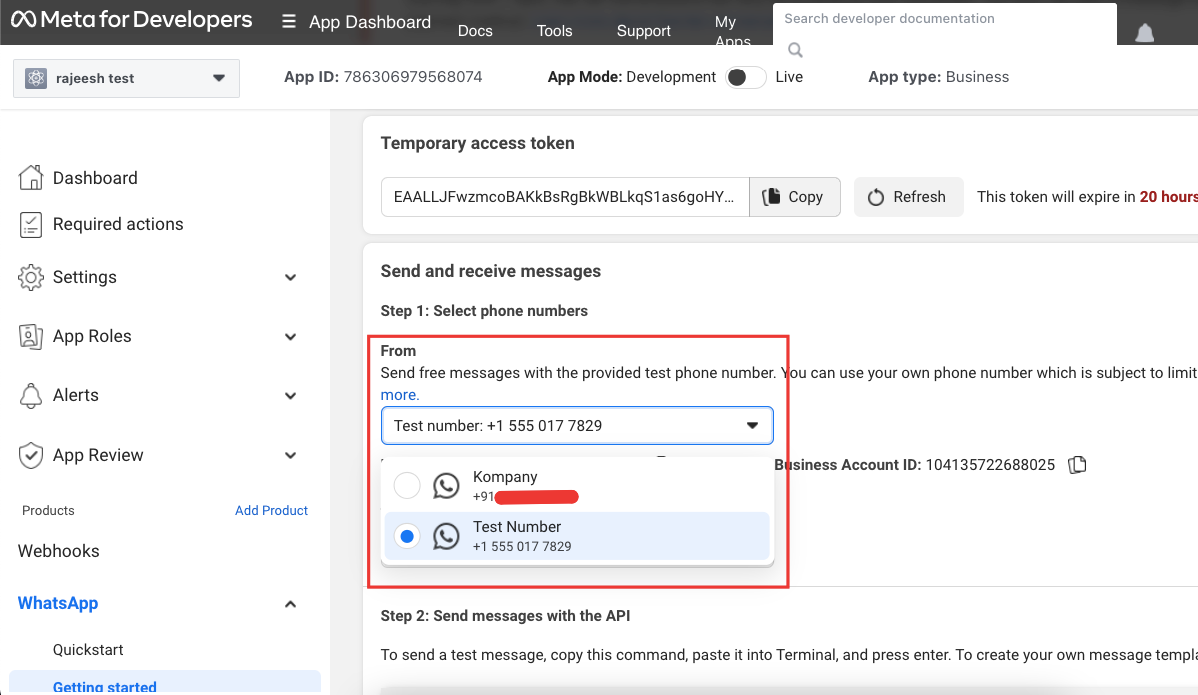
- Under “Step 1: Select phone numbers”, select any number from the dropdown you want to test. In the case of Sandbox, select the Test Number or else other.
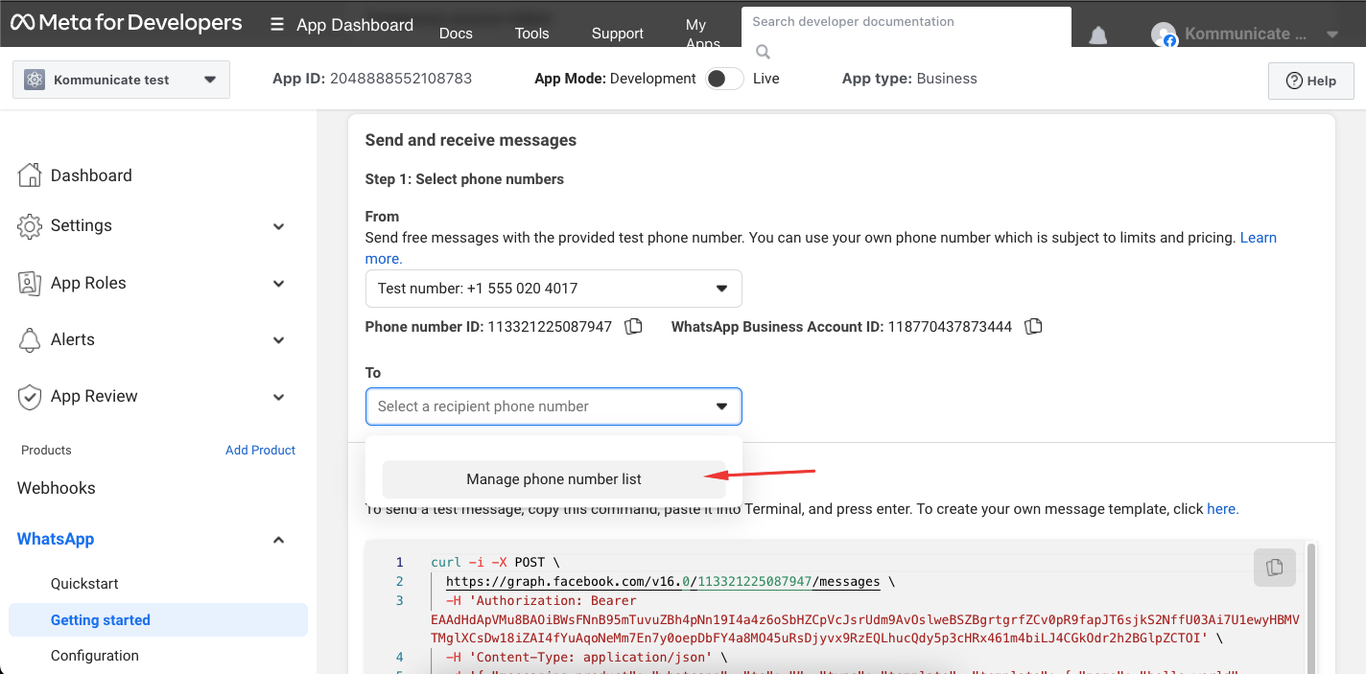
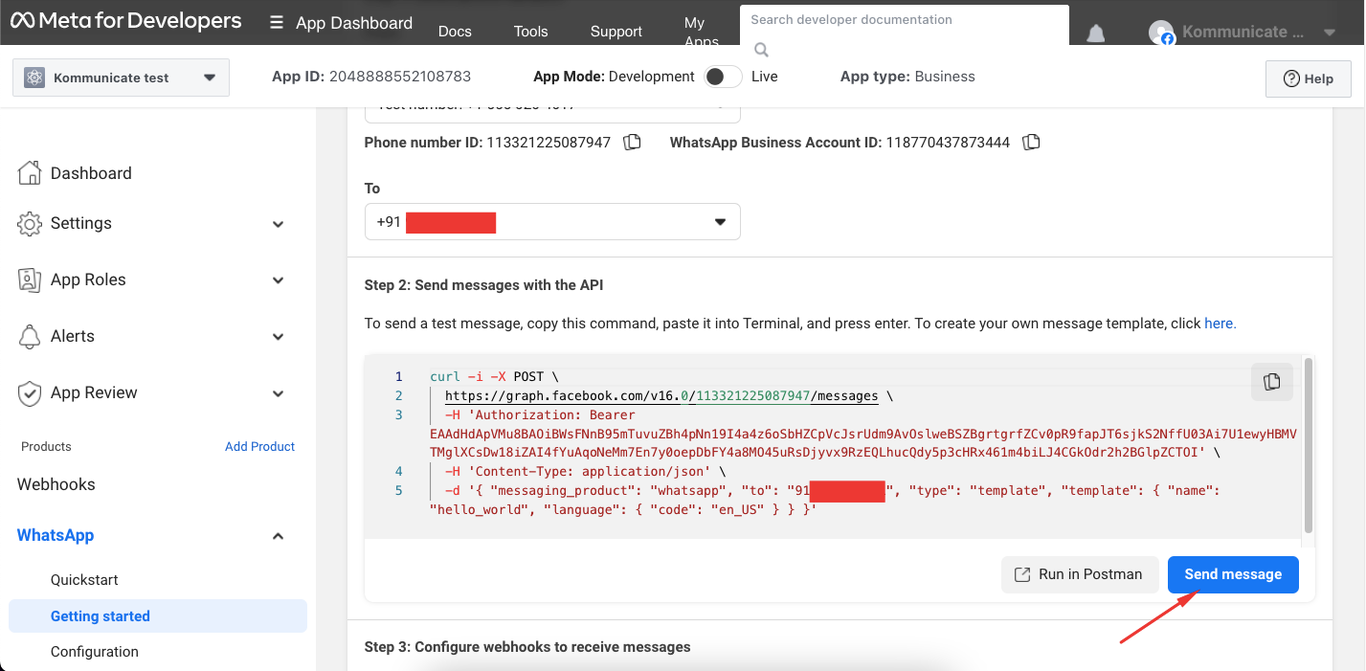
In Meta for Developers dashboard, “Step 1: Select phone numbers” section, add your phone number as the recipient phone number (To). Click on “Manage phone number list” and verify it with the code which WhatsApp will send to the number.
Now scroll down to “Step 2: Send messages with the API” on the same Meta dashboard and click on Send message button.
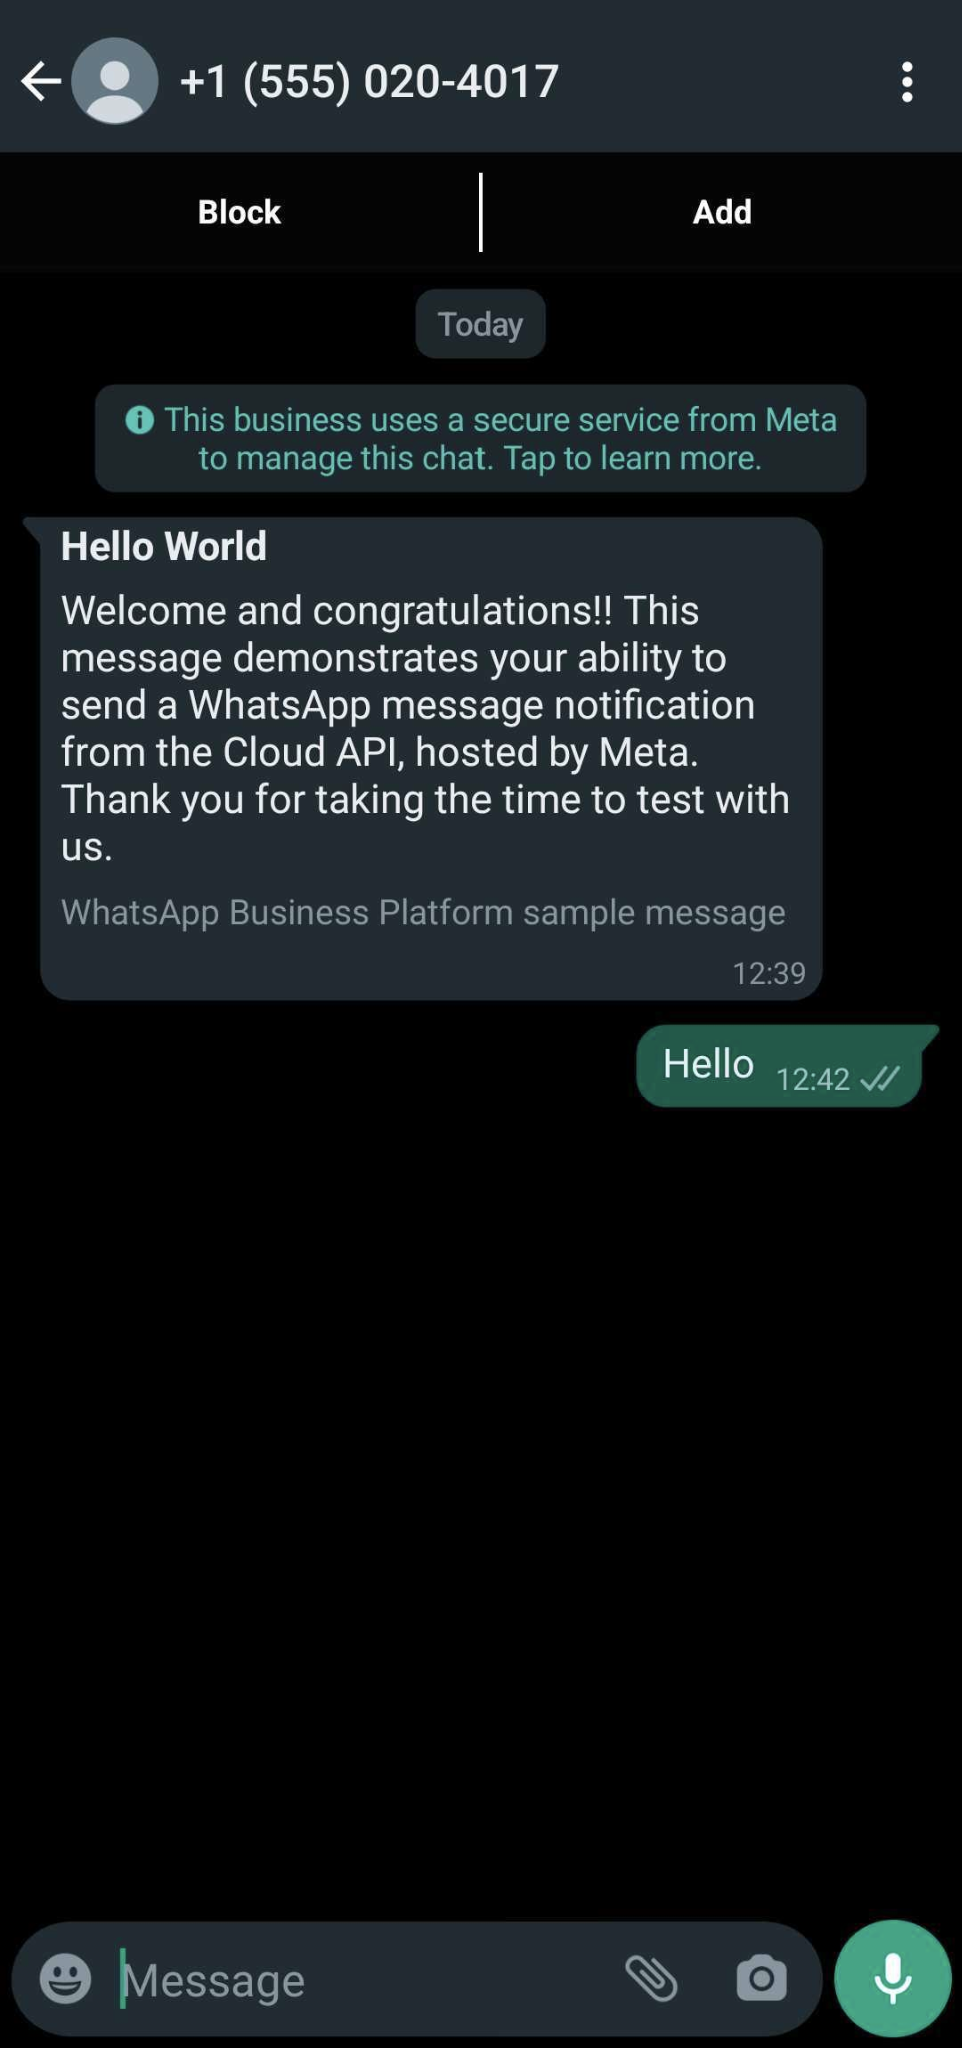
- You will receive a message from the test or business phone number. Reply to the same number with any news, for example, “Hello” like the below screen. You will see that message on the Conversation page in the Kommunicate dashboard and WhatsApp.
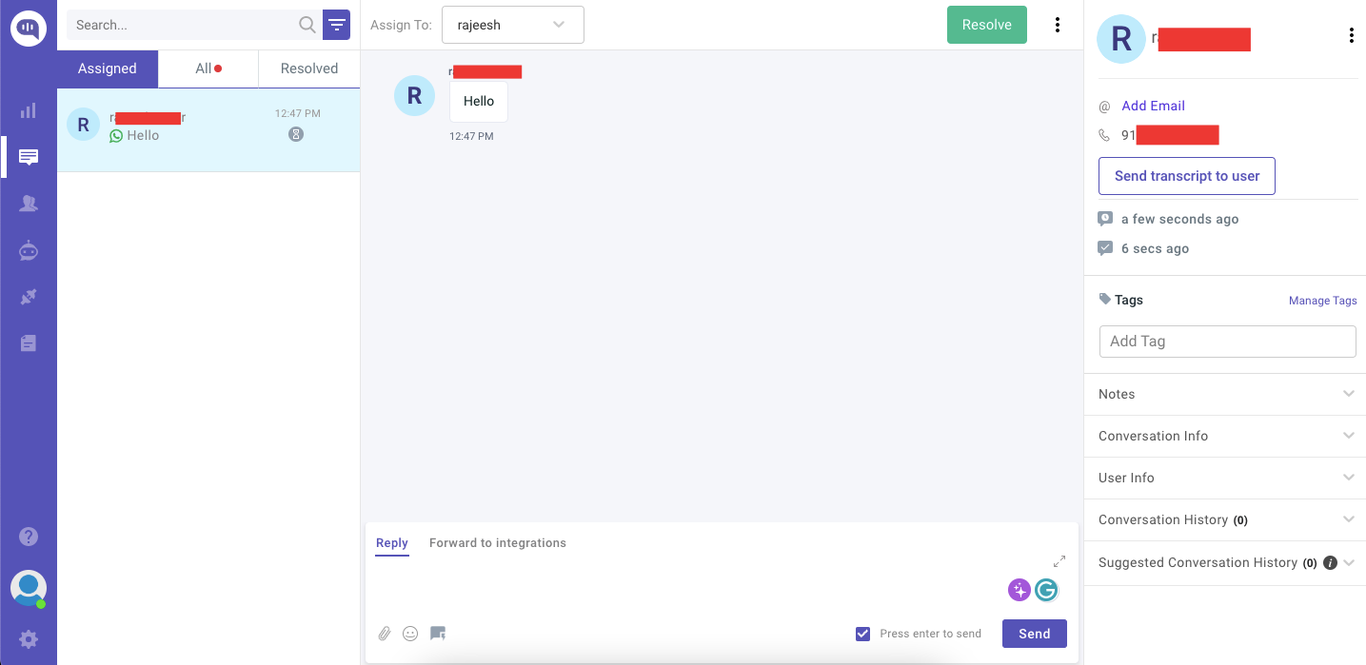
Now, testing was completed successfully!
VI. Setup Go-live
Follow the below instructions to integrate your business phone number with Kommunicate.
NOTE: If you have already created an app and added WhatsApp as a product to the app on Meta for Developers. Follow the next steps, or else go to Create an app on Meta, and Added WhatsApp to your app and follows the steps, and come back here.
- To integrate your phone number into Kommuincate via Whatsapp. Click on + Integrate a new number button.
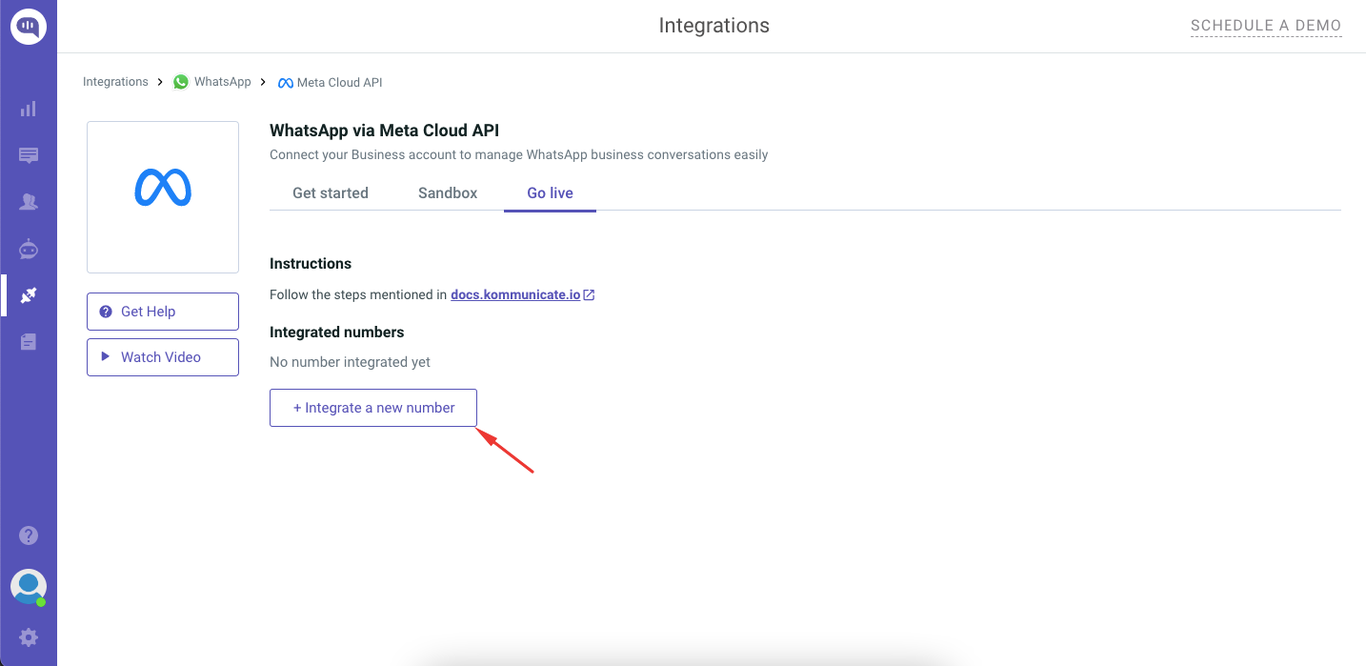
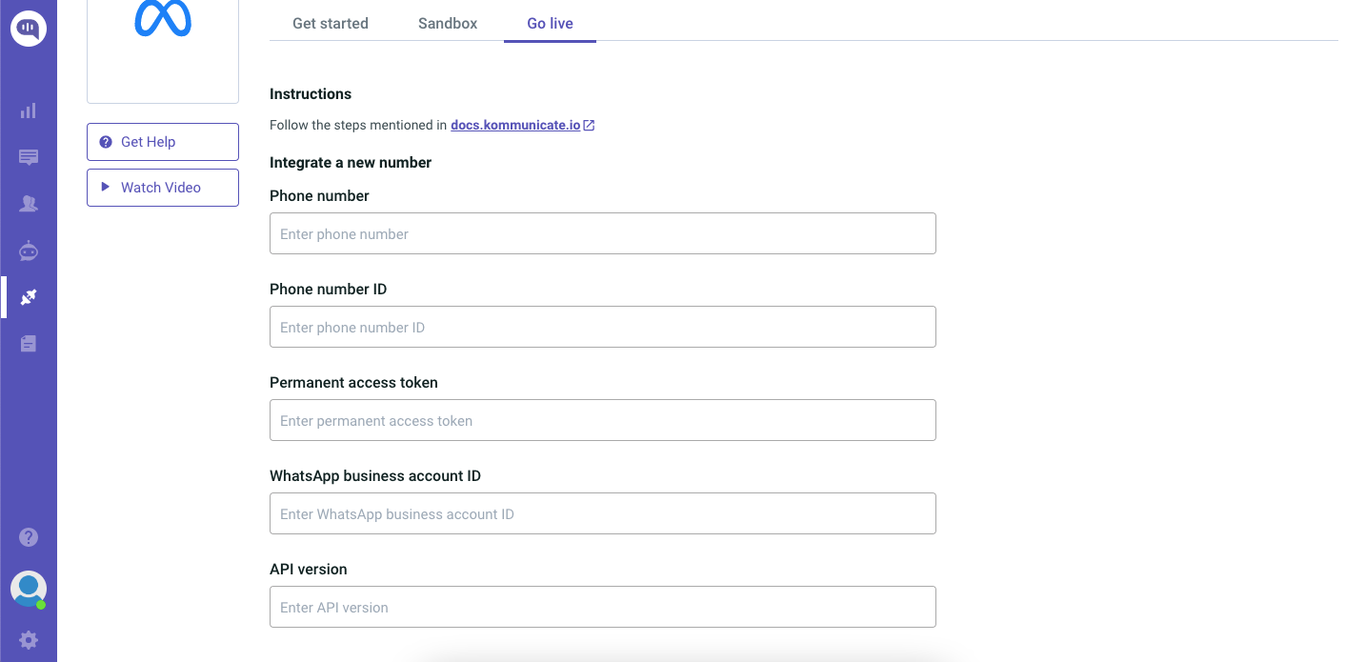
Please note that the “Phone number” on the Go-live section on Kommunicate dashboard is the same number you desire to use for your business. This number should not have a WhatsApp account linked to it, add the same number to the Phone number field on the Kommunicate dashboard. Please add the country code followed by the Phone number.
You need to add the same Phone number to the Meta account as well, to add go to Meta for Developers Meta for Developers, click the My Apps link on the top right corner, and click on the App name.
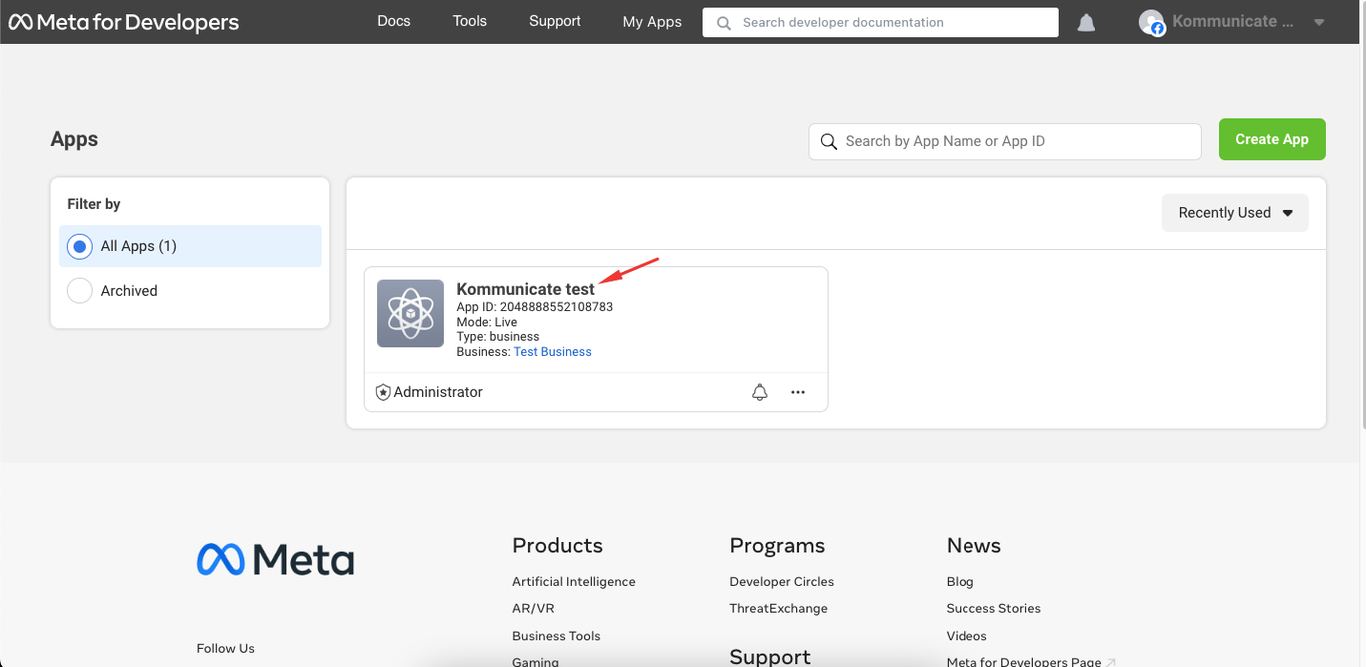
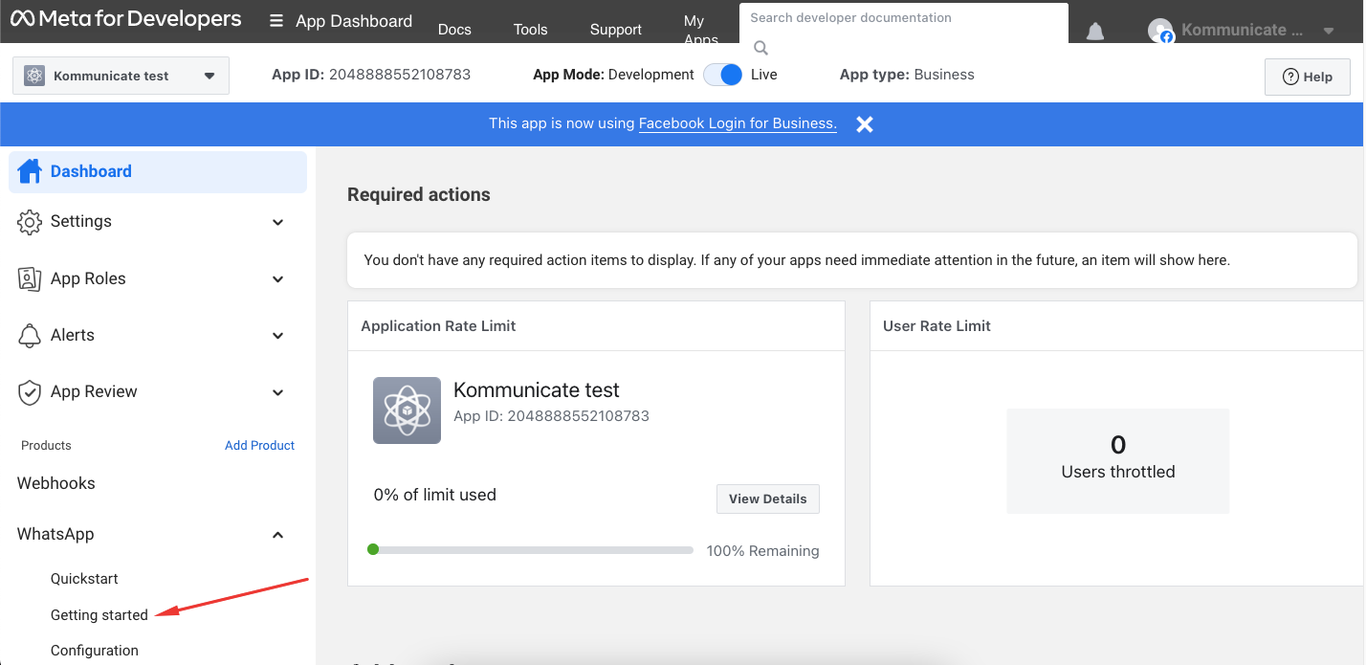
- Go to WhatsApp > Getting started, like the below image.
- On the same page, scroll down to “Add a phone number” and click on the Add phone number button
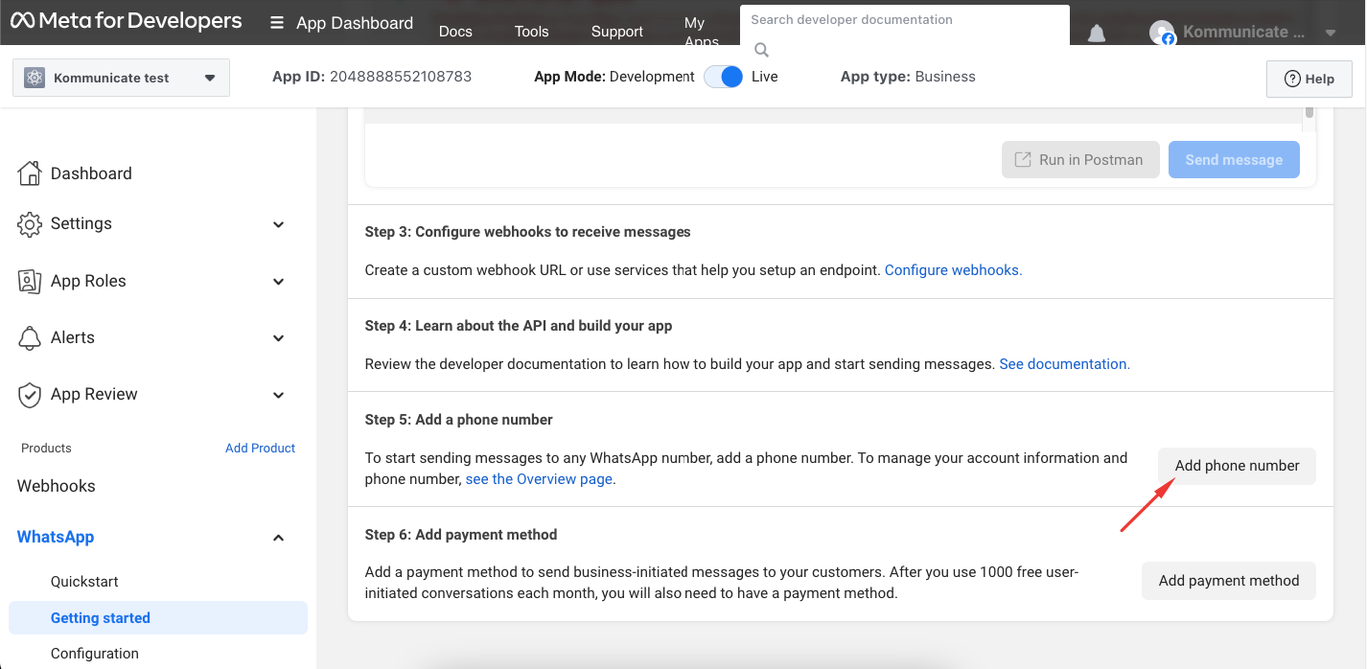
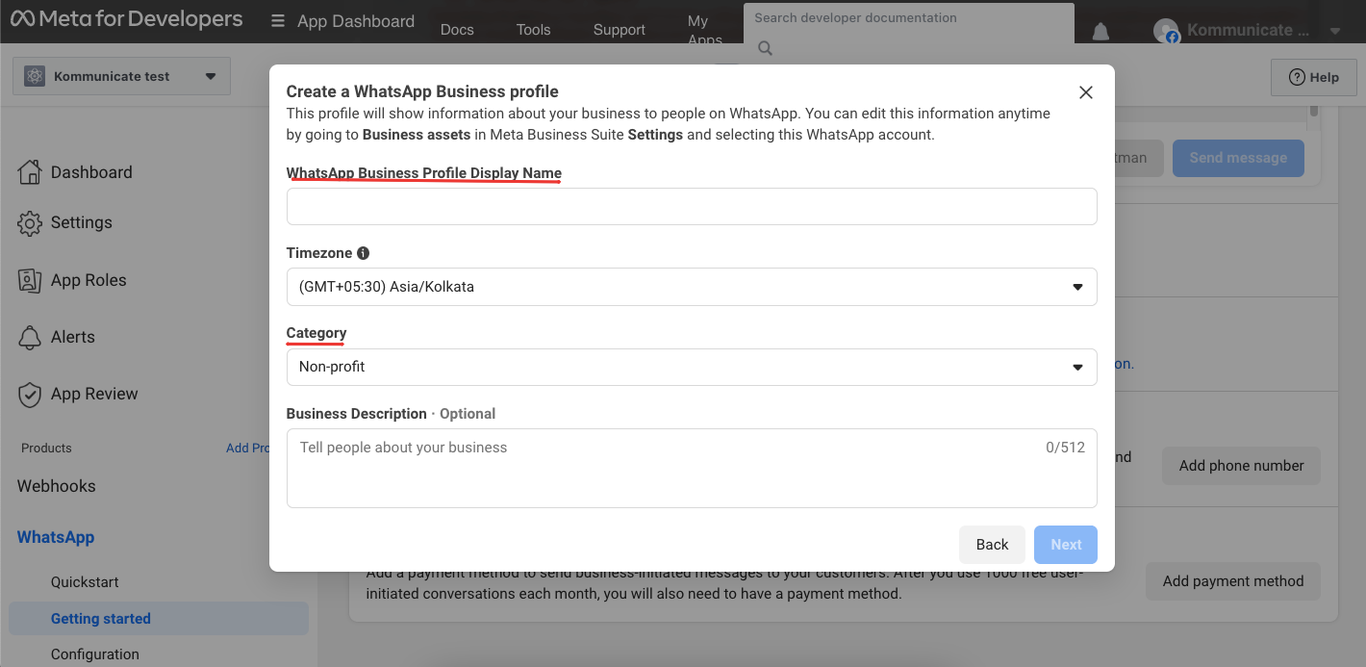
- Enter all the details into the modal, WhatsApp Business Profile Display Name, Category
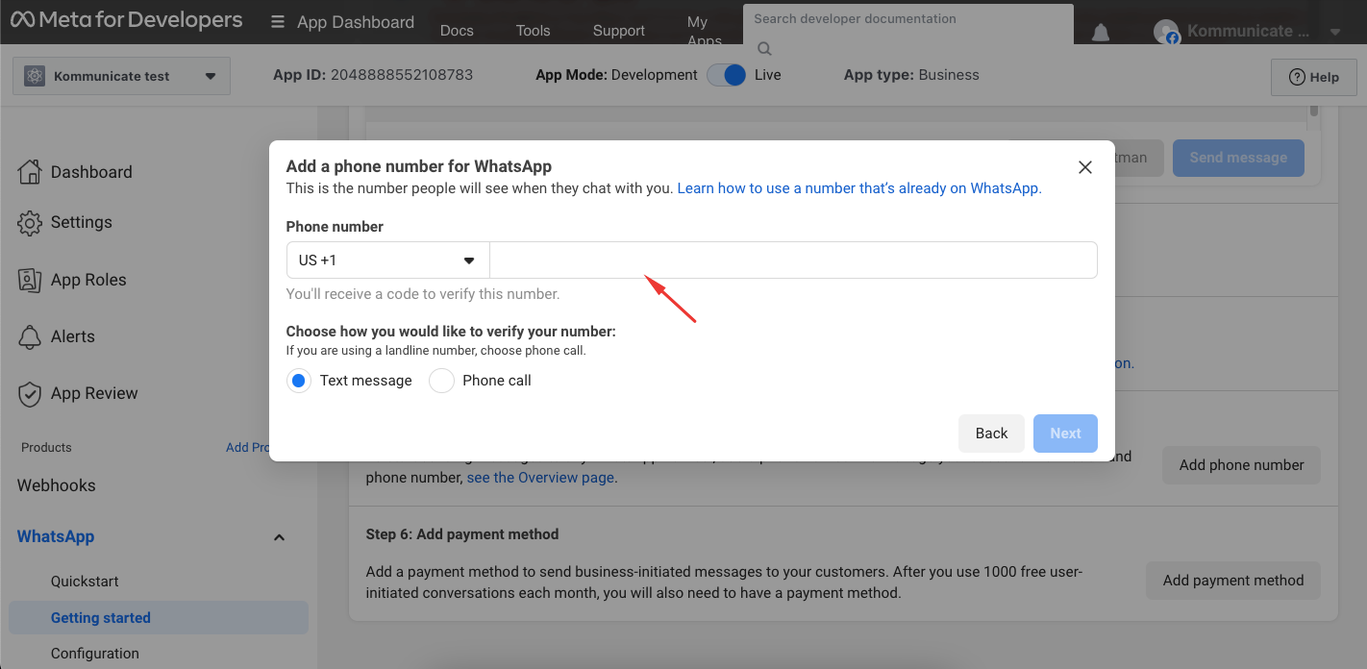
- Add a phone number and verify with a 6-digit code.
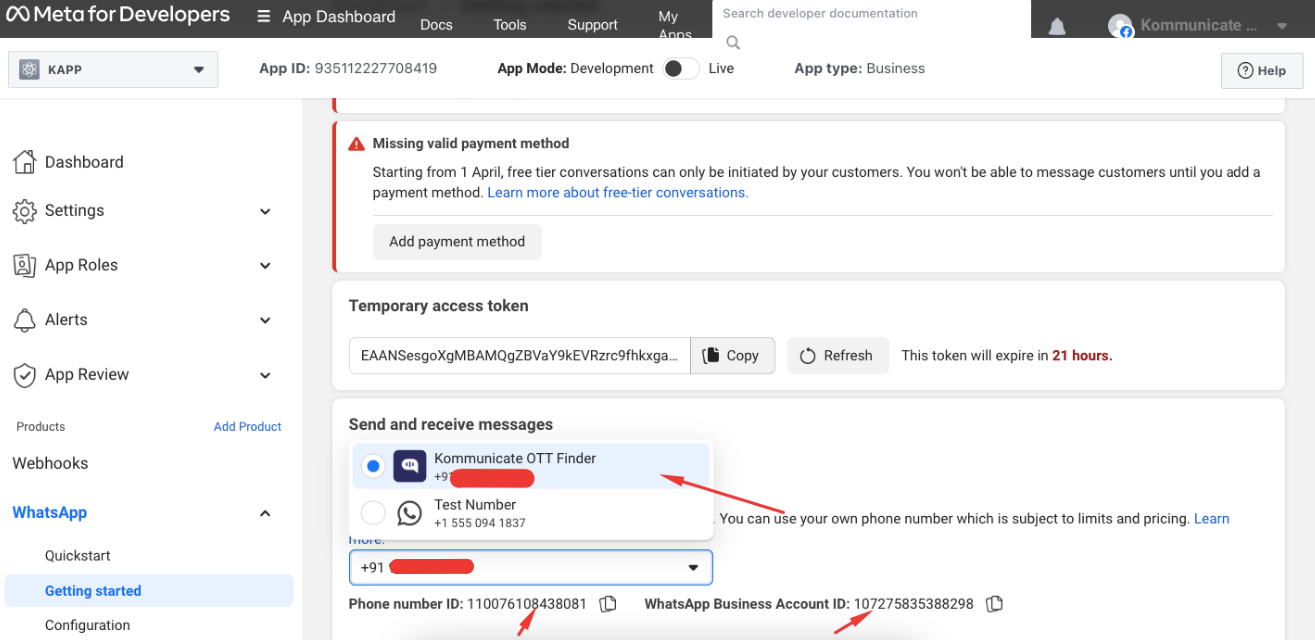
- To get the Phone number ID and WhatsApp business account ID. Select the added Phone number. Copy and paste (Phone number ID and WhatsApp business account ID) the respective fields on the Kommunicate dashboard Go-live section. To get the API version and Permanent access token follow the steps below.
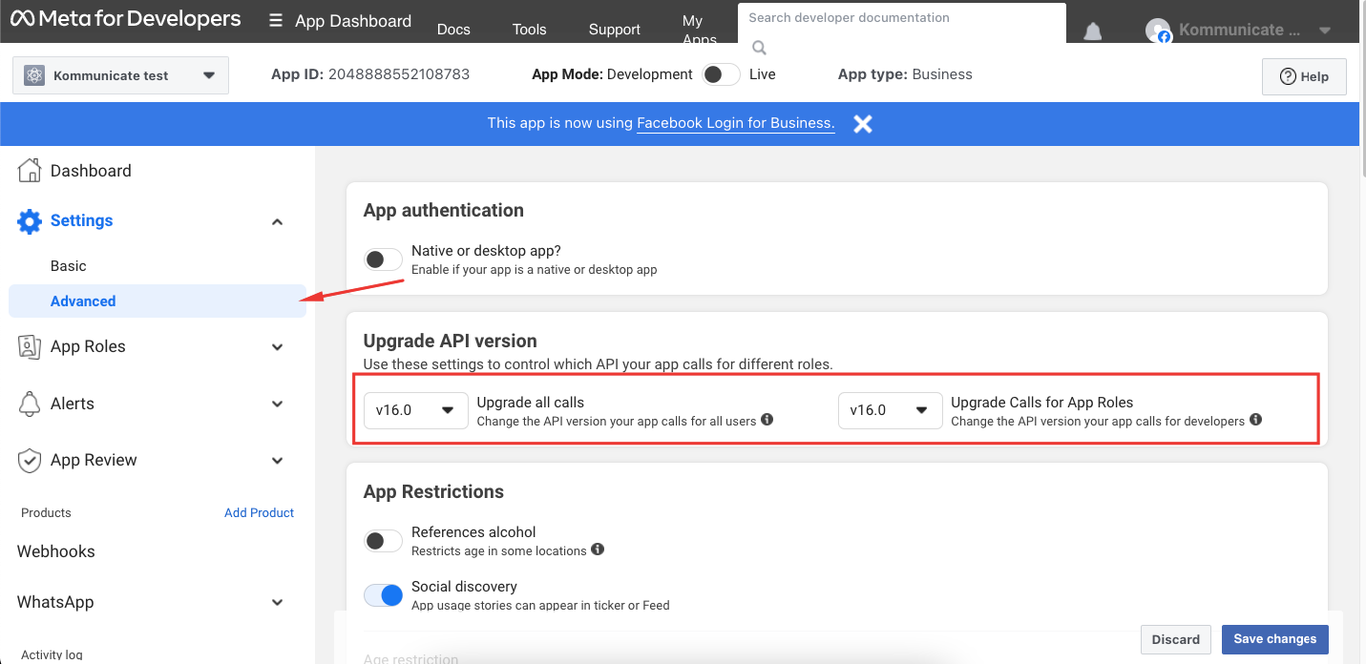
- To add the API version on the Kommunicate dashboard. Go to the Meta for Developers, and navigate to Settings > Advanced from the left panel. Under the Upgrade API version title, you can find the version number(for example, v16.0). Add that to the API version field on the Kommunicate dashboard.
To get a Permanent access token, follow the below steps.
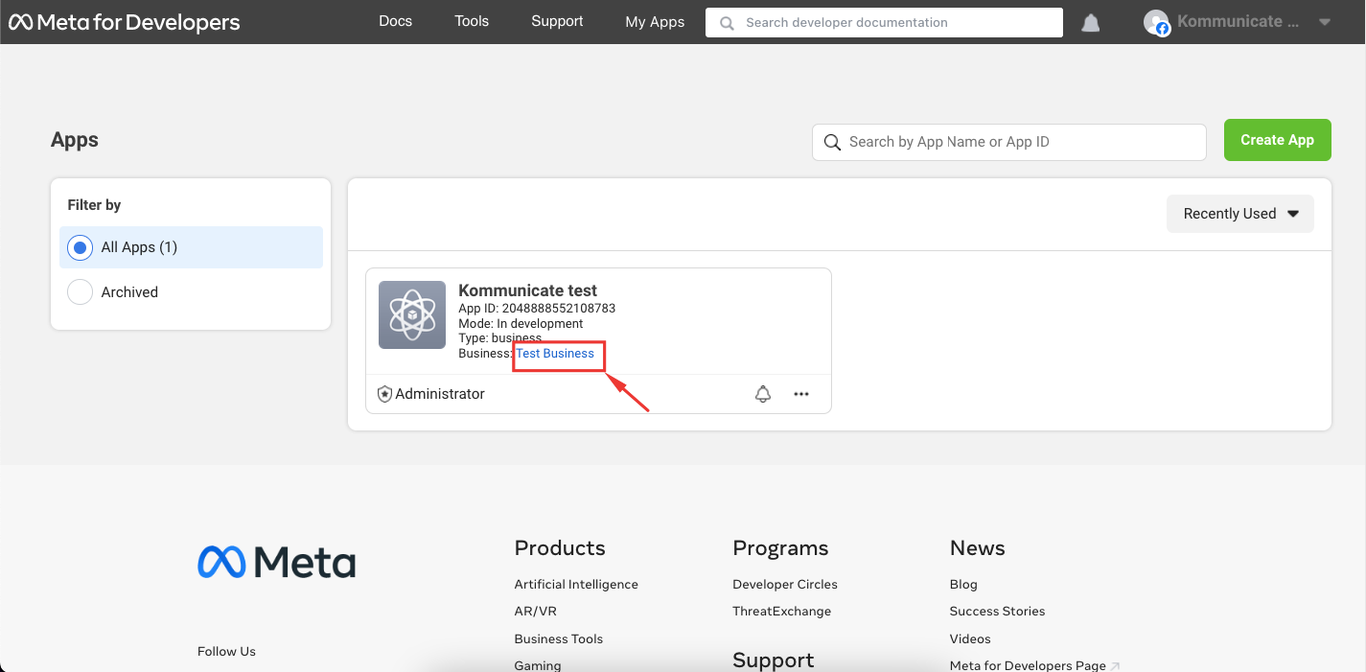
Now, go to Meta for Developers, and click the My Apps link on the top right corner.
- You will land on the Apps list page. Click on the business name of the desired app. You will now be on the Business Settings page.
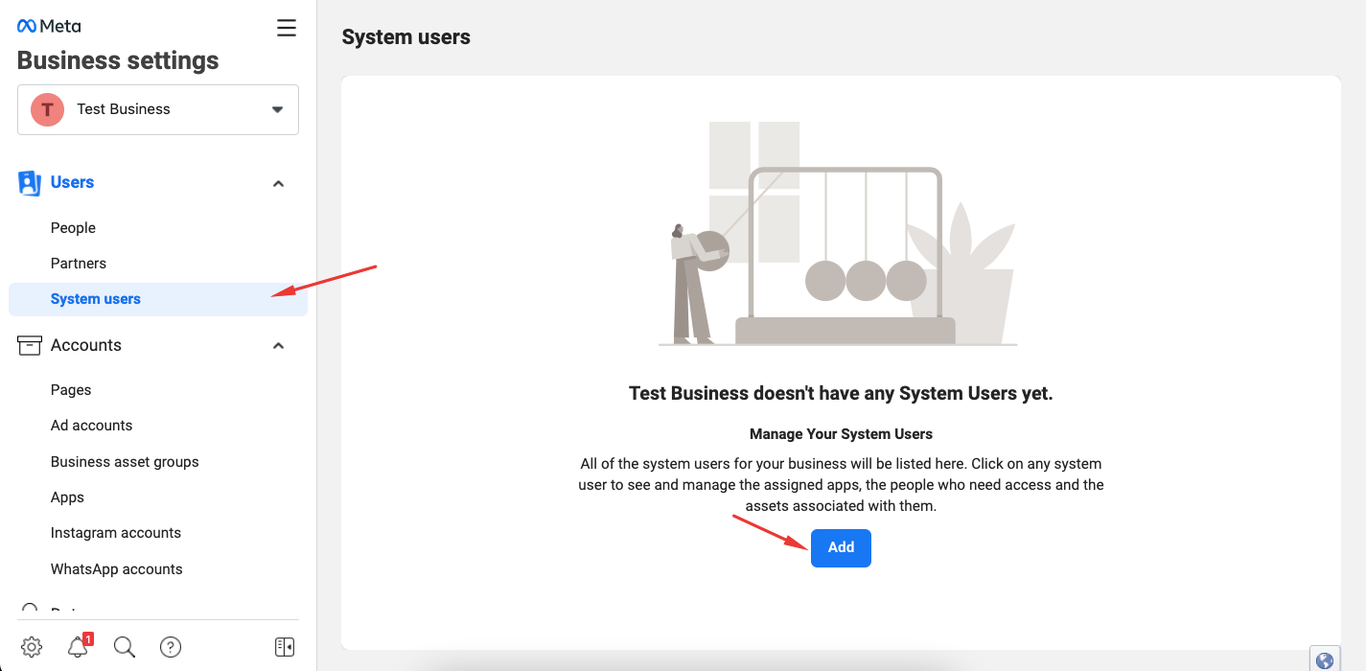
- Navigate to the Users > System users menu from the left panel.
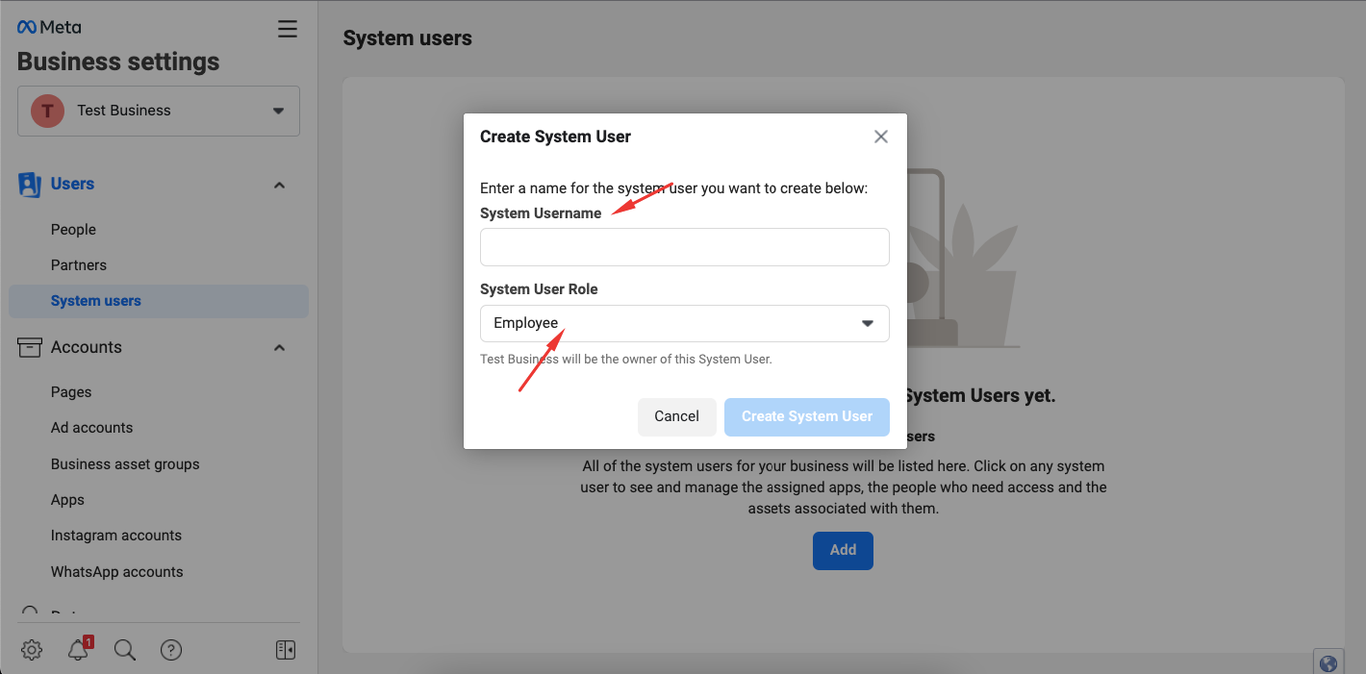
Click on Add button and accept it.
Create a System User. Give a name to “System Username”, Select User Role as "Admin", and click on Create System User button. This step is valid when the admin user is not already created. If it is already created, then you should be logged in as admin.
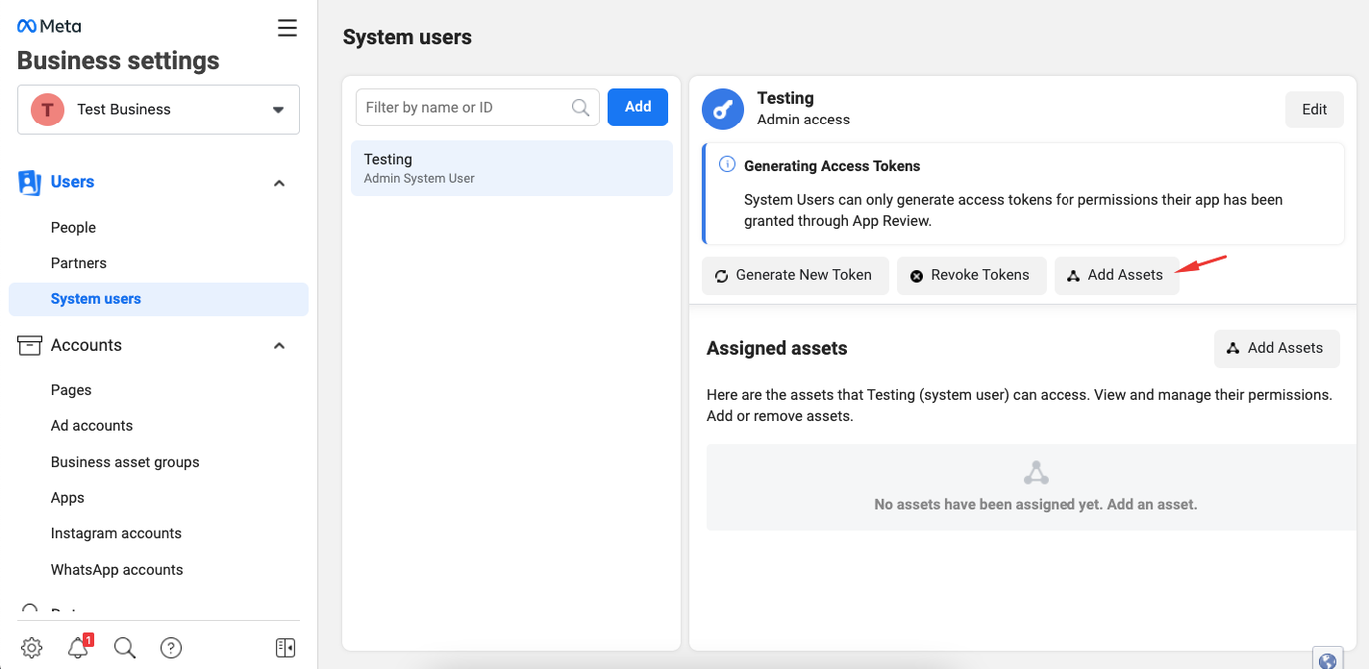
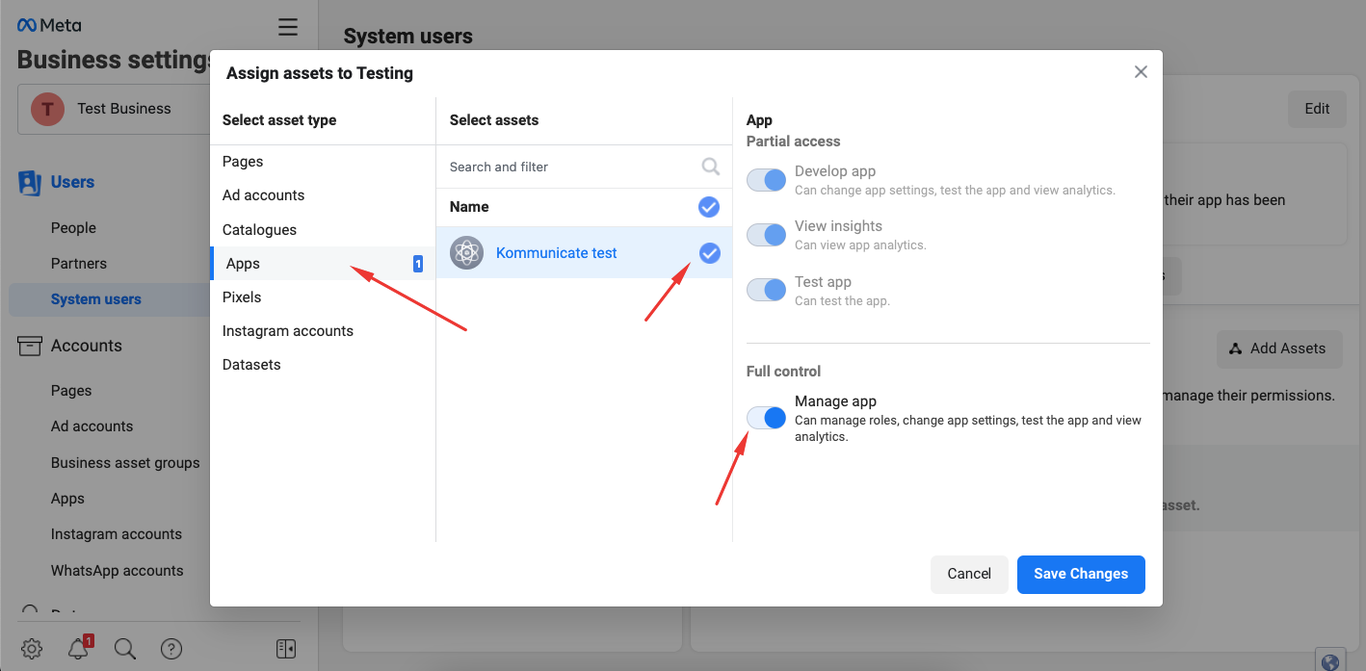
- On the same page, click on Add Assets button.
- In the modal, Select asset type as "Apps" from the left and Select asset from the list of available apps. Now enable “Full control” for managing your app by clicking on the slider button next to "full control", manage app and click on the Save Changes button.
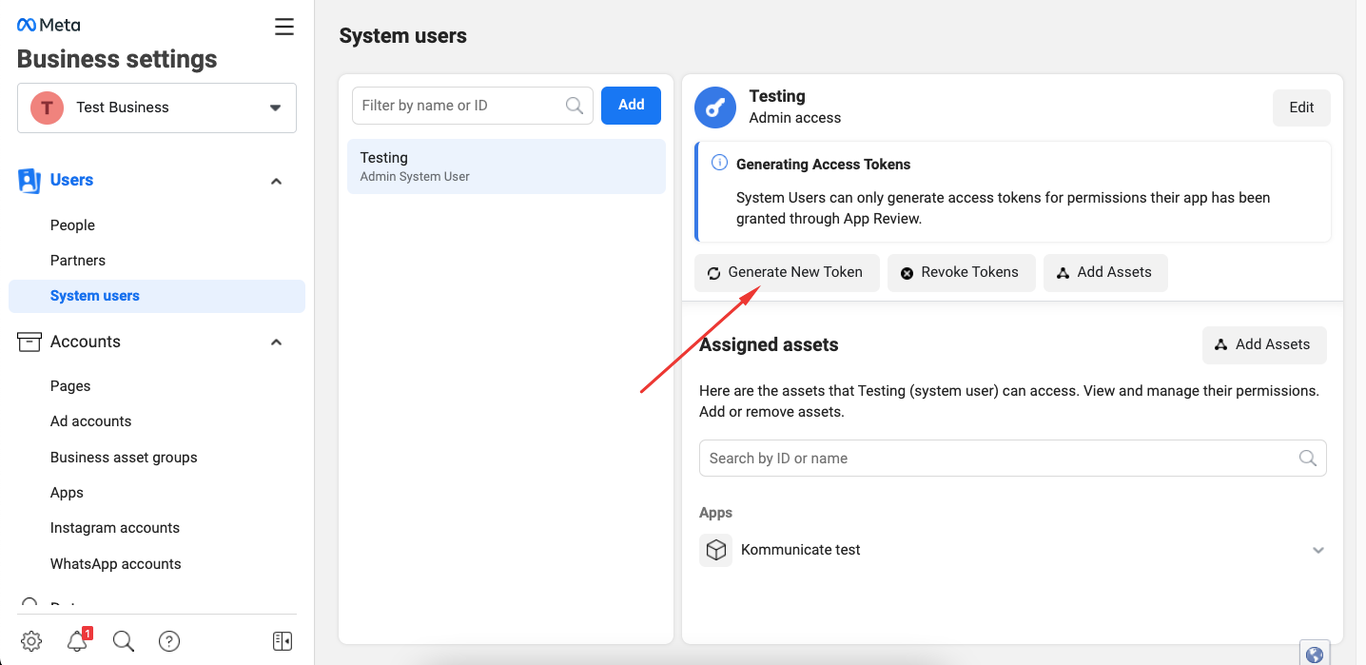
- Click on Generate New Token button.
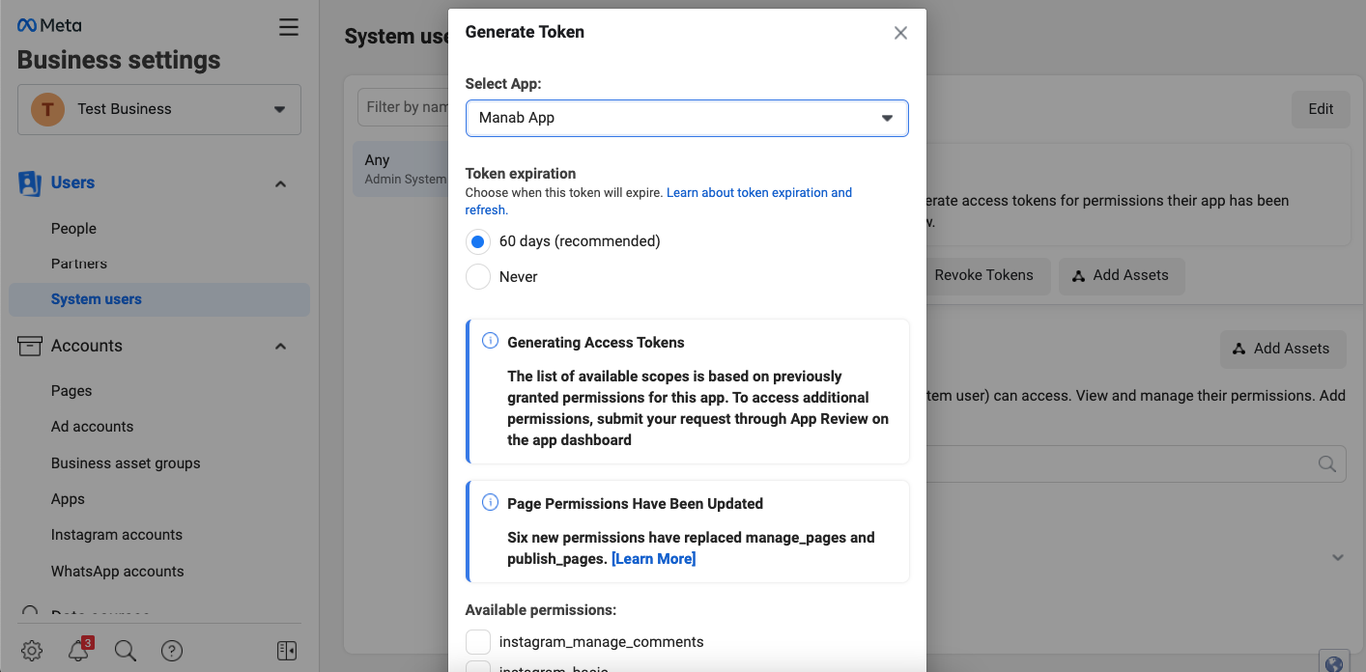
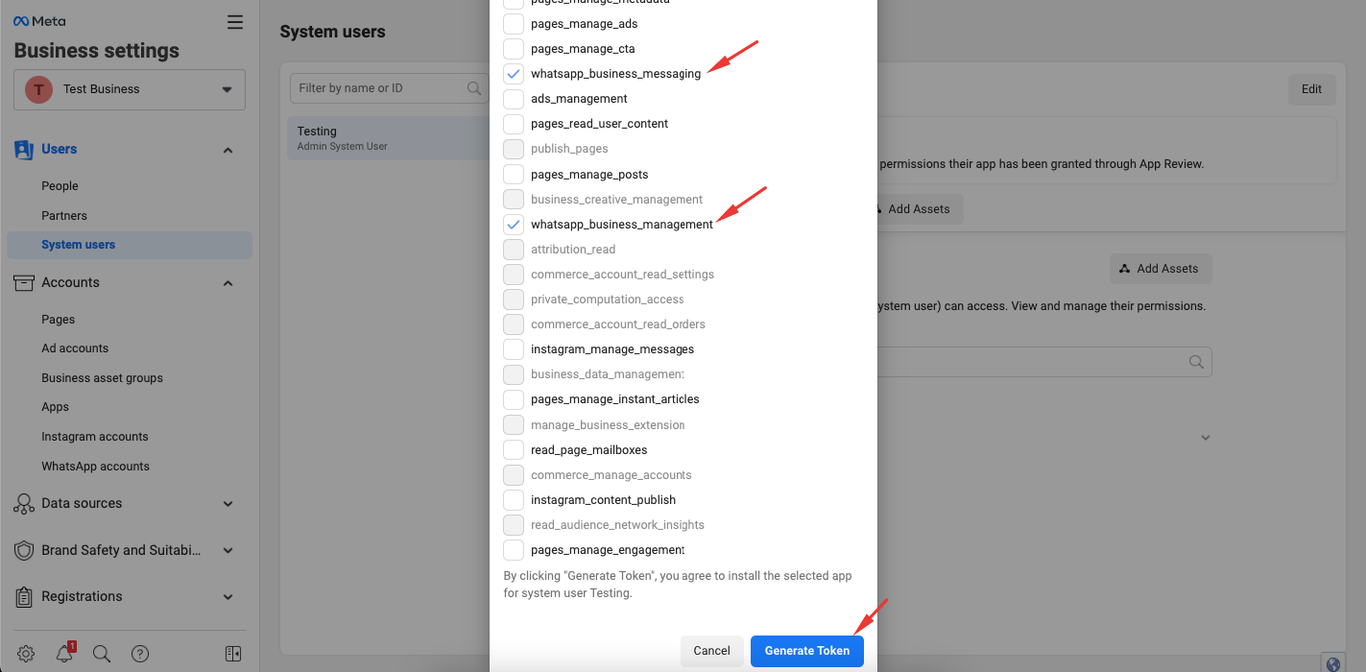
- Select the desired App from the dropdown(Select App). Scroll to “Available permissions:” select "whatsapp_business_messaging" and "whatsapp_business_management" from the list. Click the Generate Token button to the bottom.
- Copy the “Access token” and paste it to the “Permanent access token” field in Go-live section in the Kommunicate dashboard.
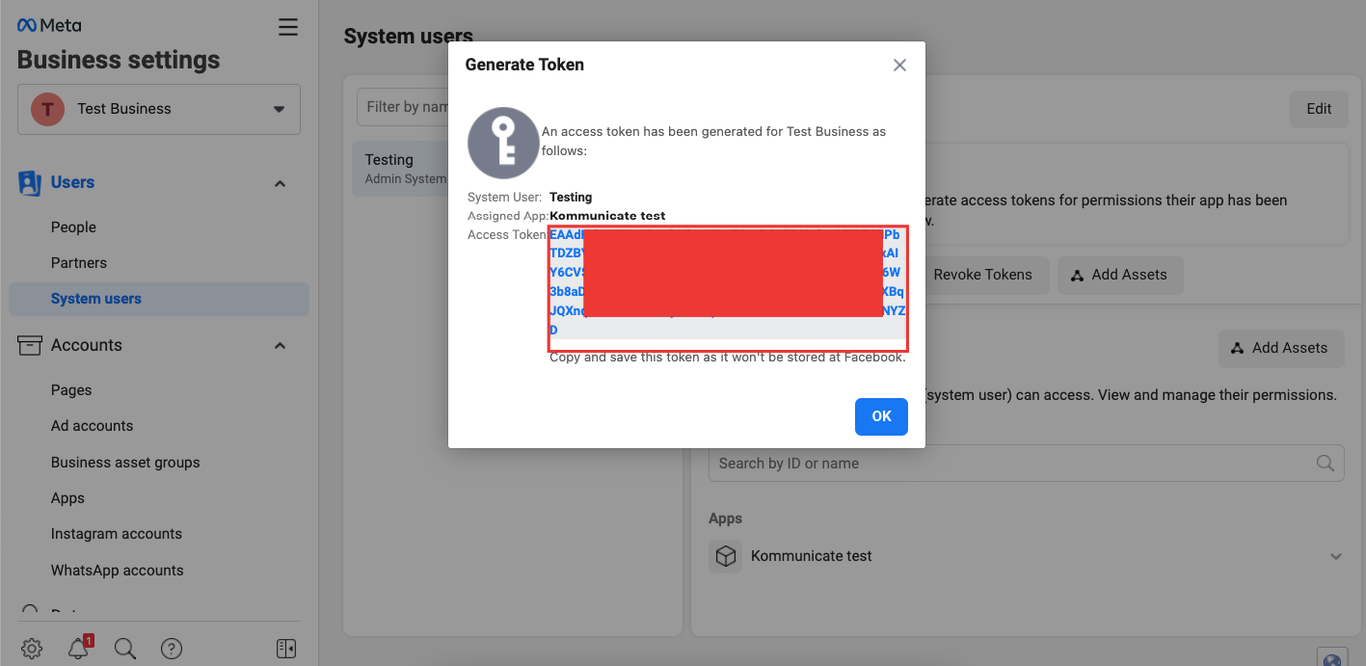
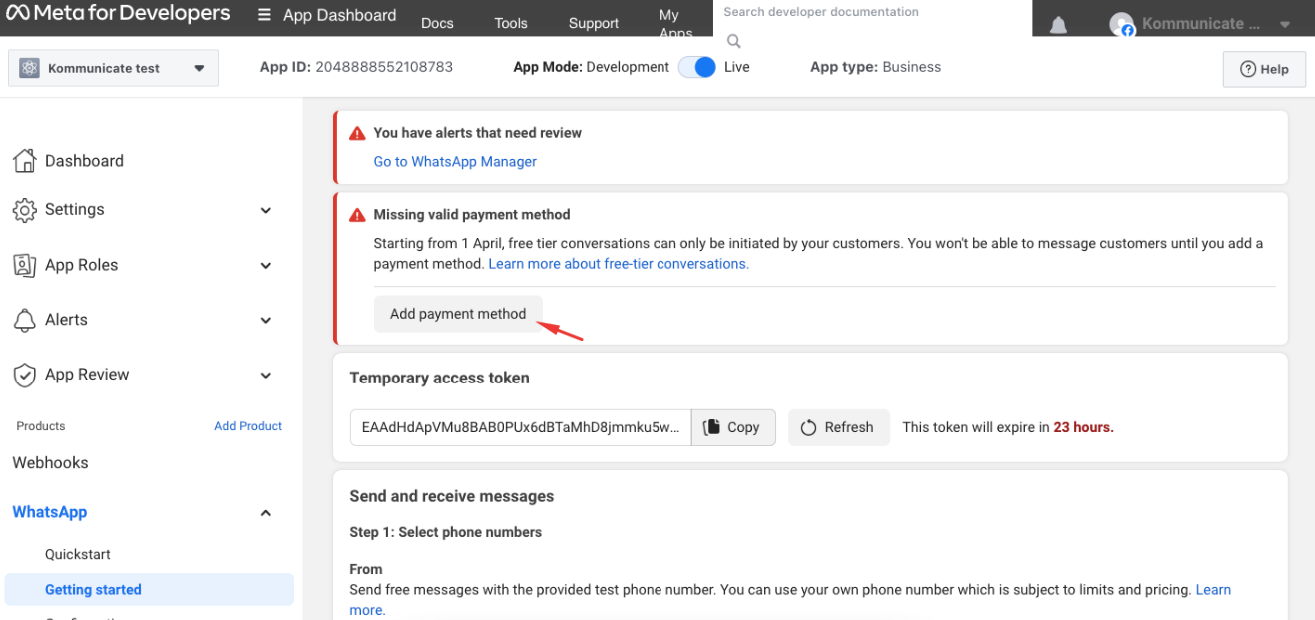
Now you need to add a Configure Webhook, Payment method, and Verify business to be able to send a message to your customer. Click on Add payment method to send and receive messages.
NOTE: If you have already configured webhook during Sandbox configuration, skip it or else go to Configure Webhook.
VII. Add payment method
- Click the Add payment method button on the Meta for Developers page.
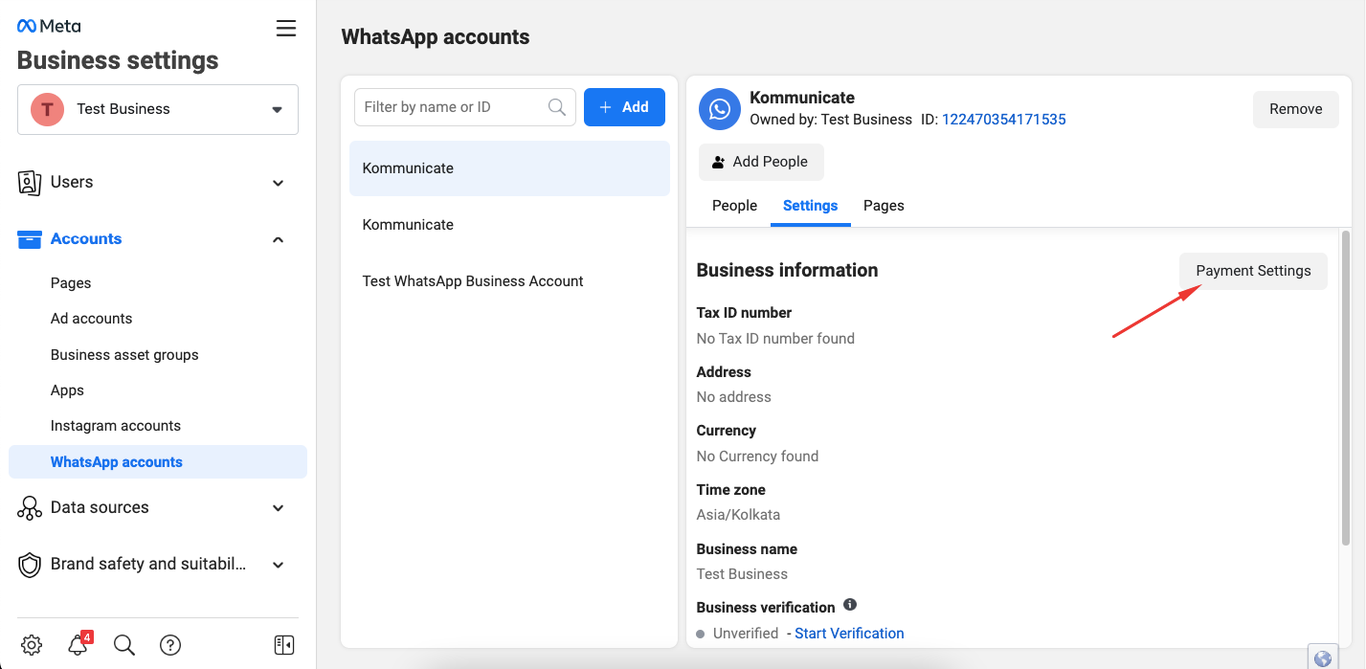
- On the Meta Business settings page. Click on the Payment Settings button to the right.
- Click on Add payment method button on the billing page.
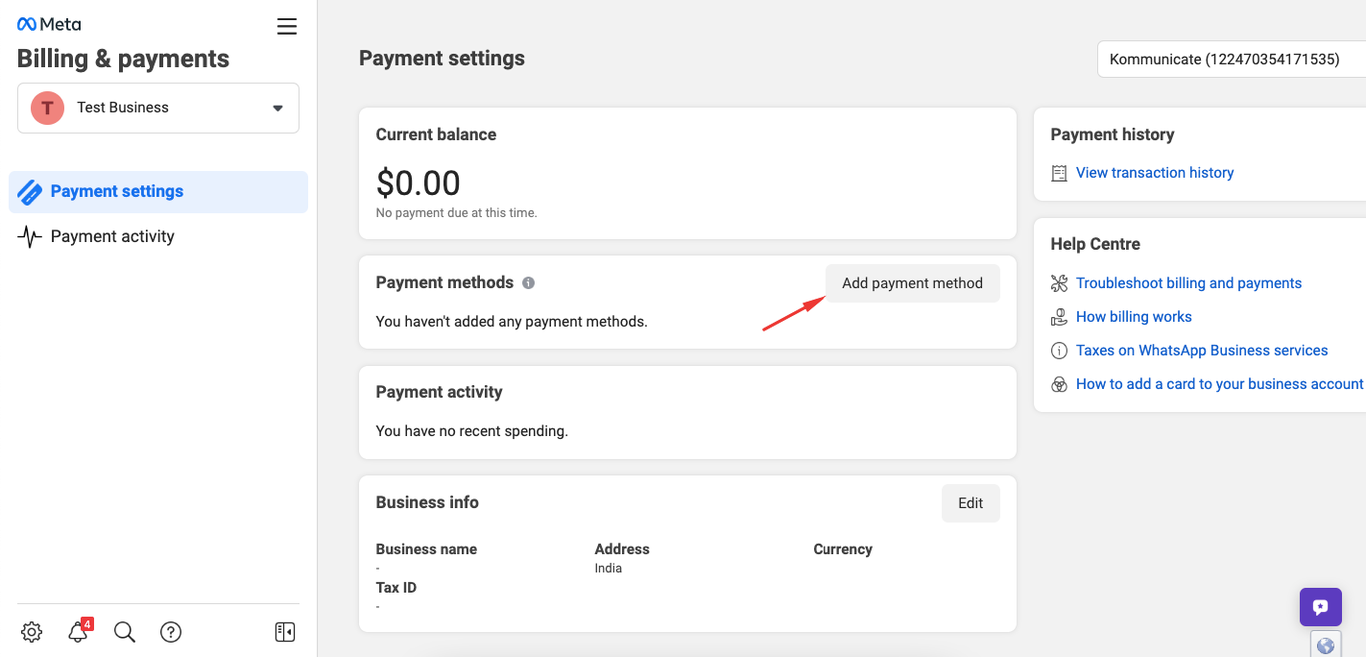
- Choose region, currency, and time zone.
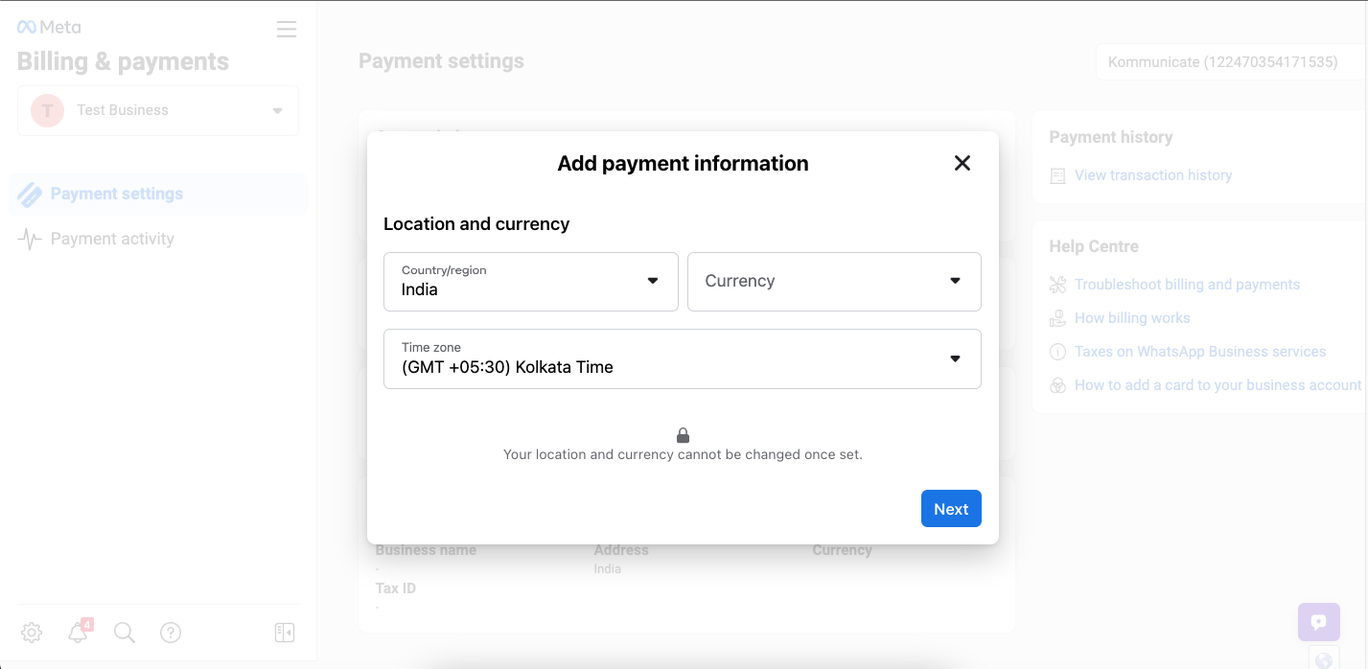
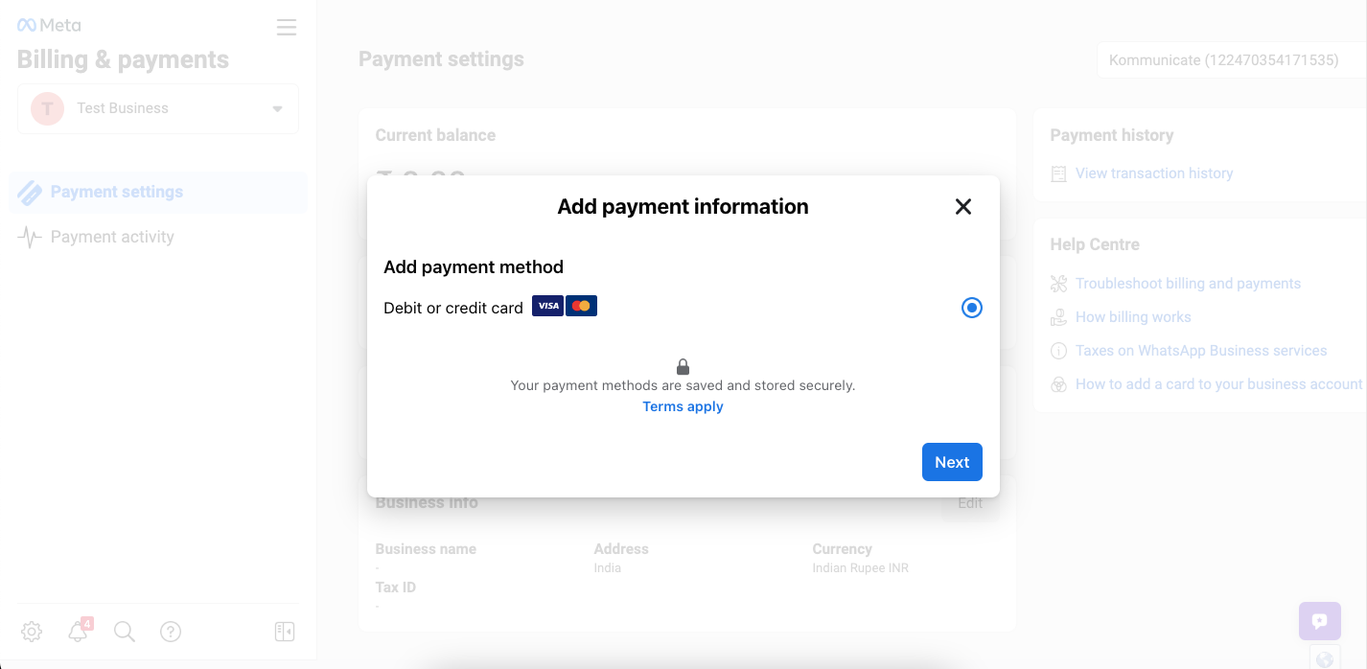
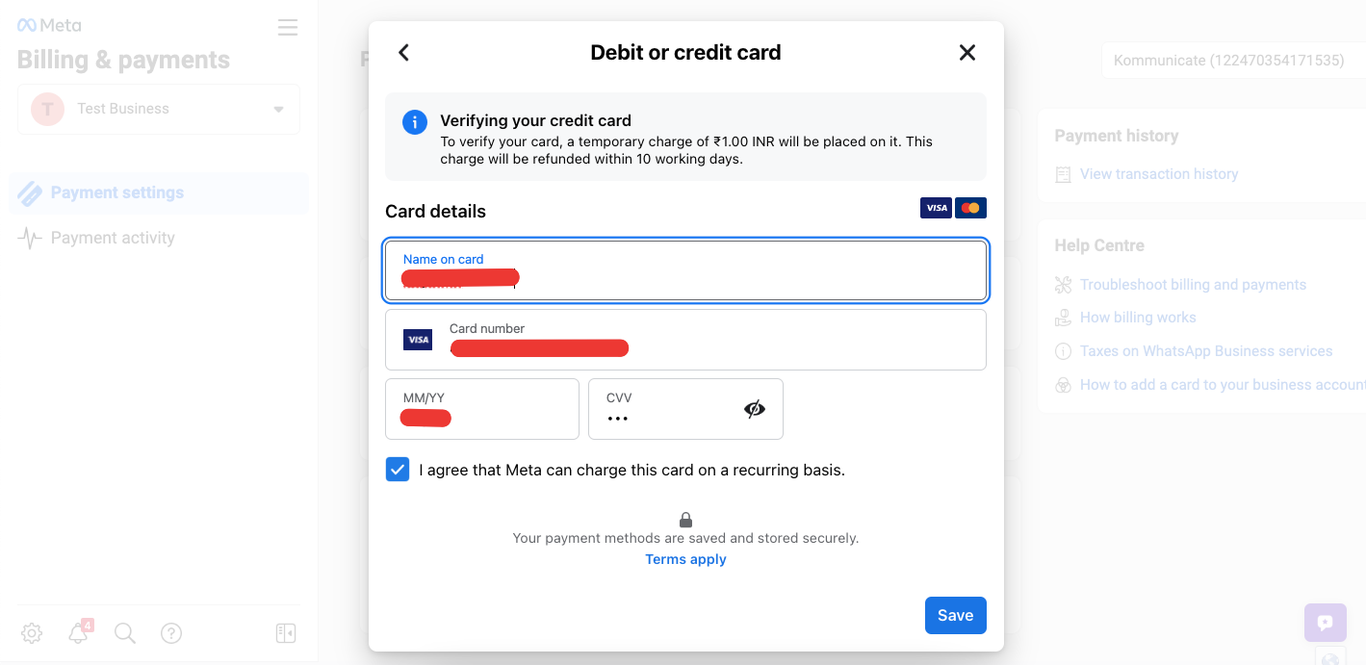
- Card verification may take up to 5 minutes. Keep this screen open to verify your card. Once the card is verified, add Business info and Save it.
VIII. Verify Business
To send and receive messages, you need to verify the Business details.
Note: Once verification is done, you would be able to send and receive the messages. Go to Test the Sandbox or Go-live and follow the steps below.
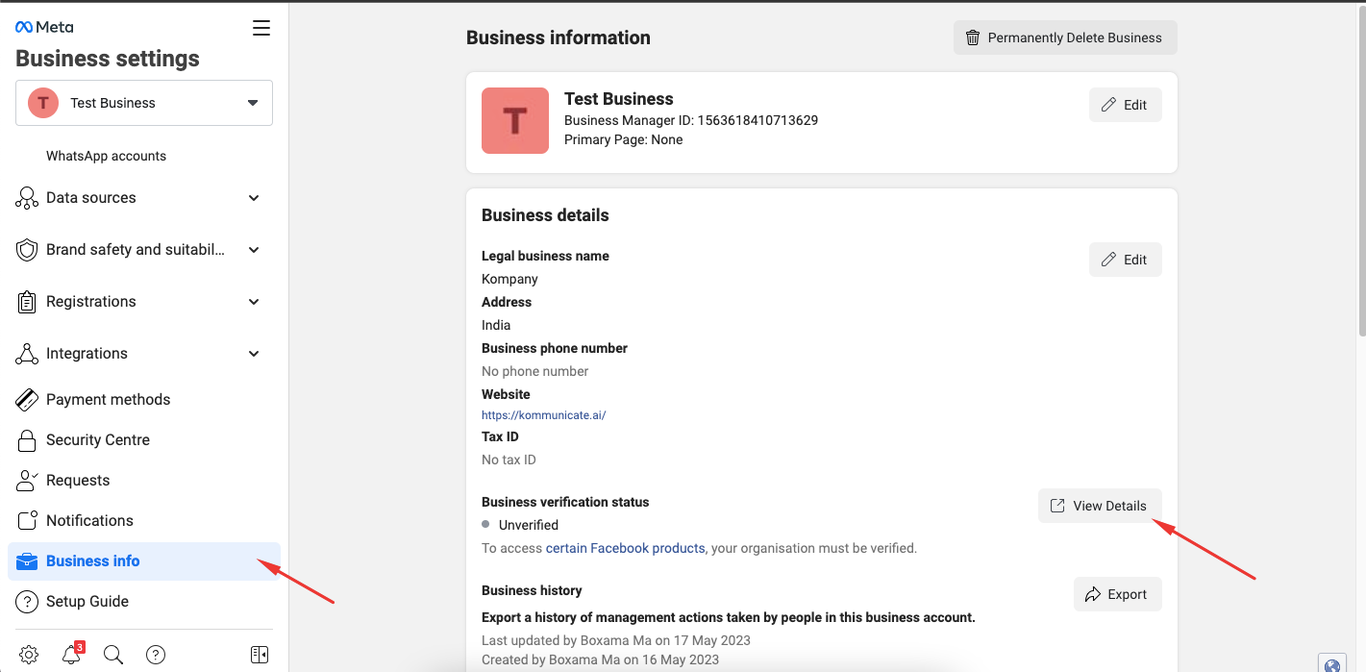
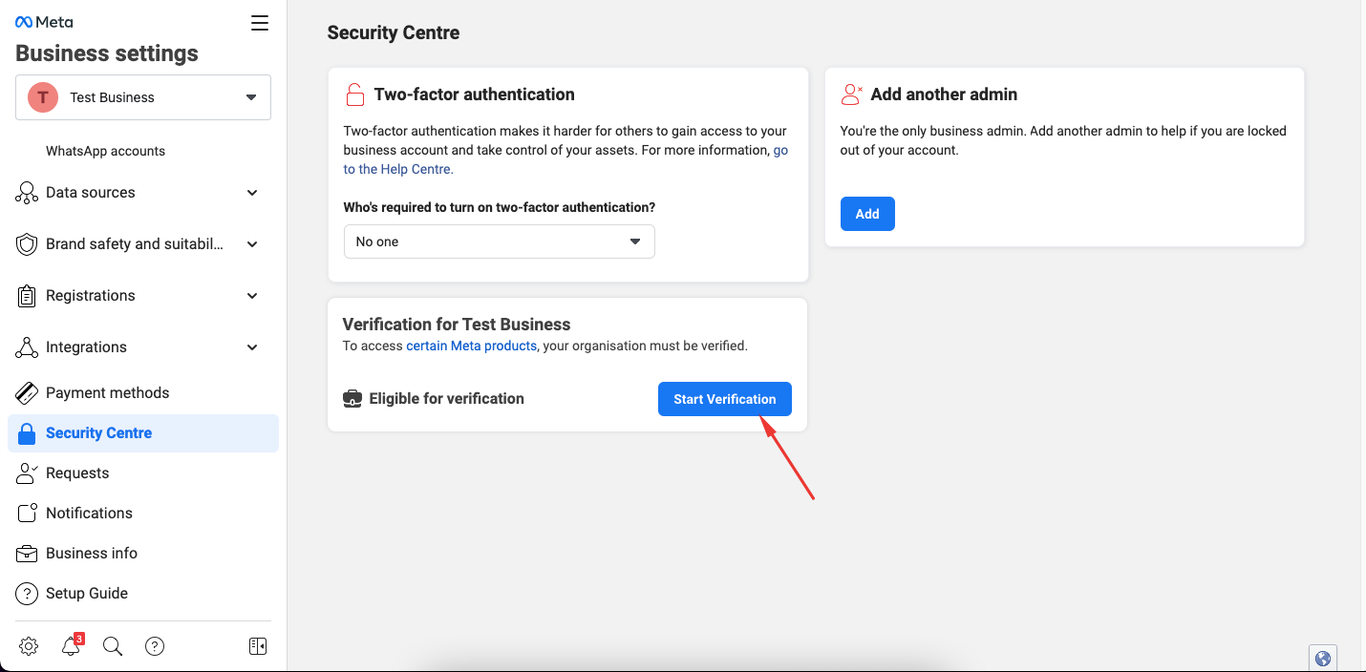
- To begin with verification. Go to “Business info” click on “View Detials” under Business verification status.
- Click on Start Verification button.
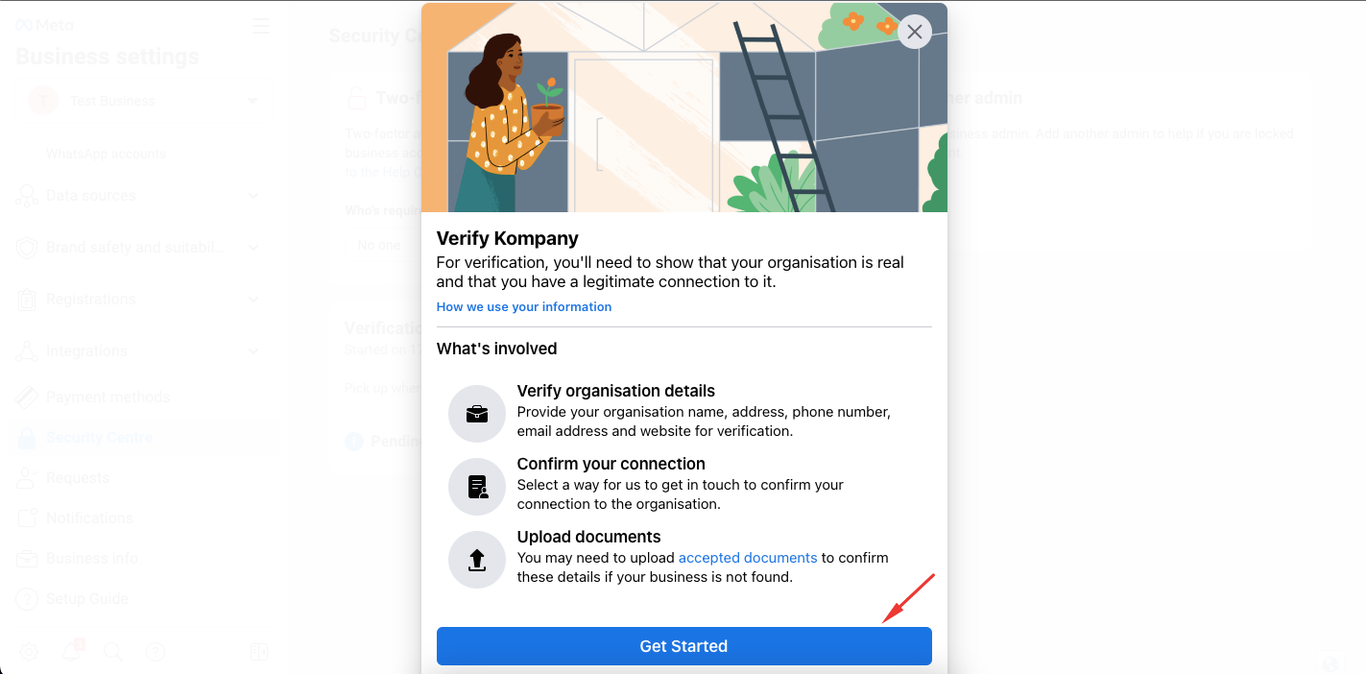
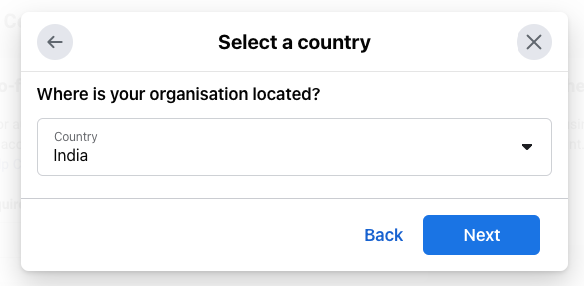
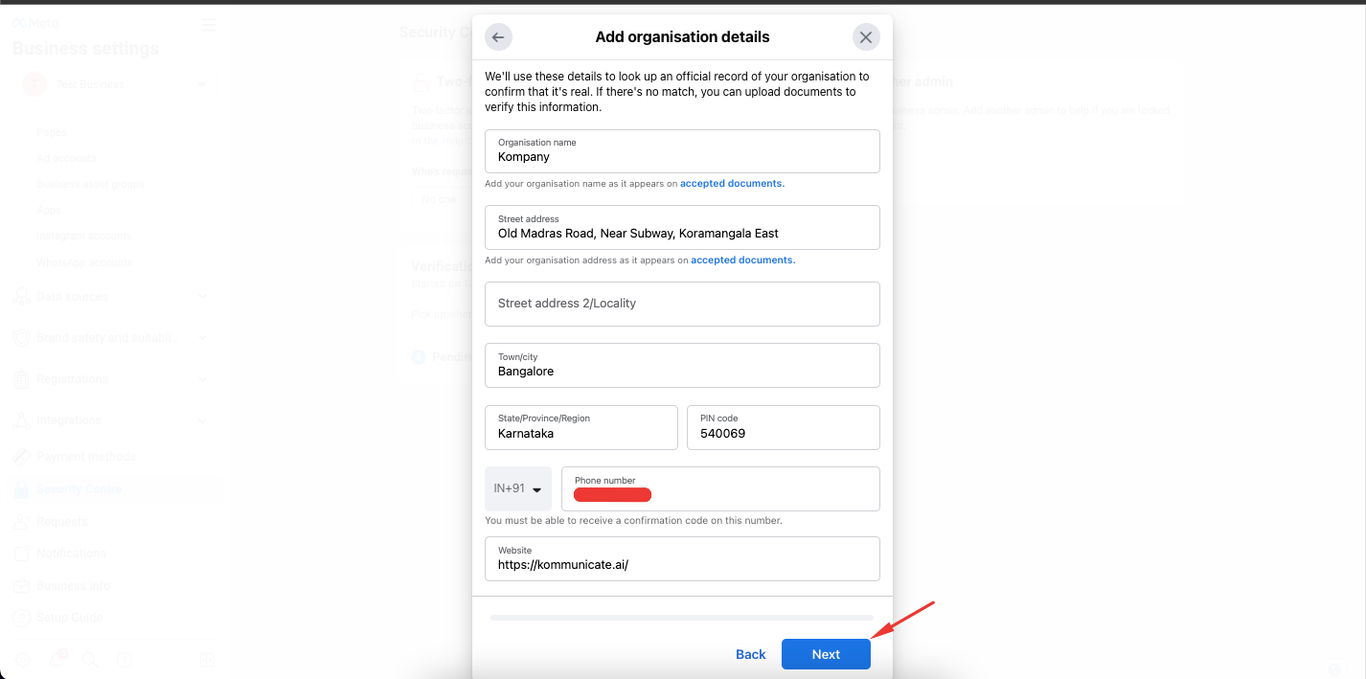
- Click on Get Started button and choose the country where your company is located. After that add Organization details and click on Next button.
- Add supporting documents

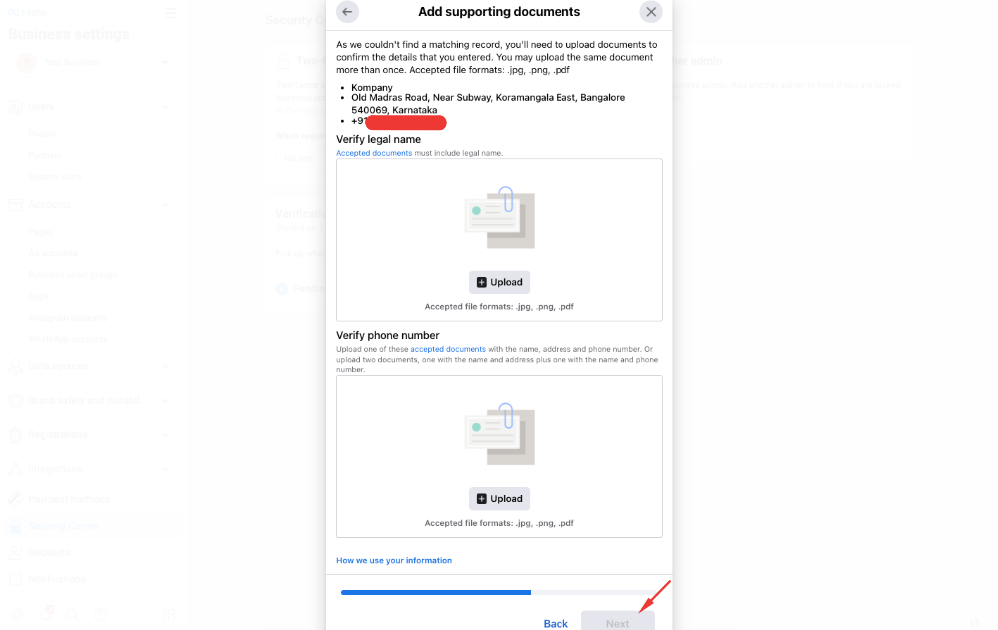
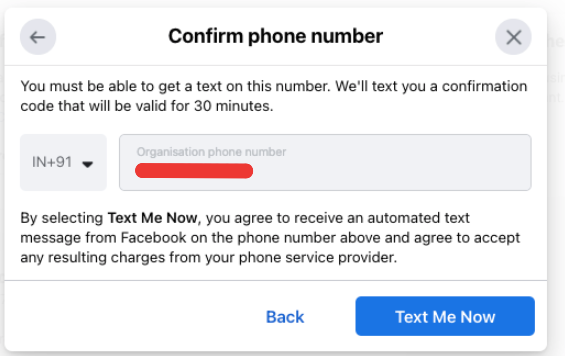
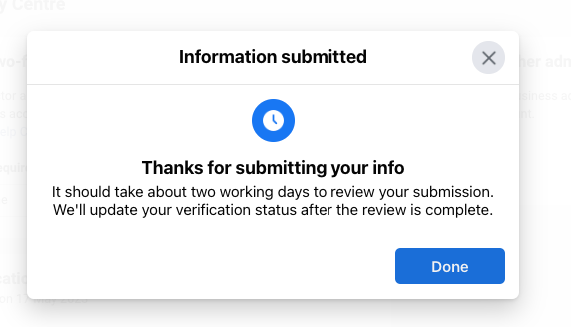
Note: Once verification is done, you can send and receive the messages. Go to Test the Sandbox or Go-live and follow the steps.
Pricing
WhatsApp is included in our Grow and Business Plan. For the first 1,000 user-initiated (service) conversations per month, are not charged. However, conversation fees will be applied subsequently based on Meta's rate cards. We at Kommunicate do not handle the payment aspects of the WhatsApp Cloud API.
For more information regarding pricing and Meta's rate cards, kindly refer to the link provided below: