
Kompose GUI Bot Builder
Overview
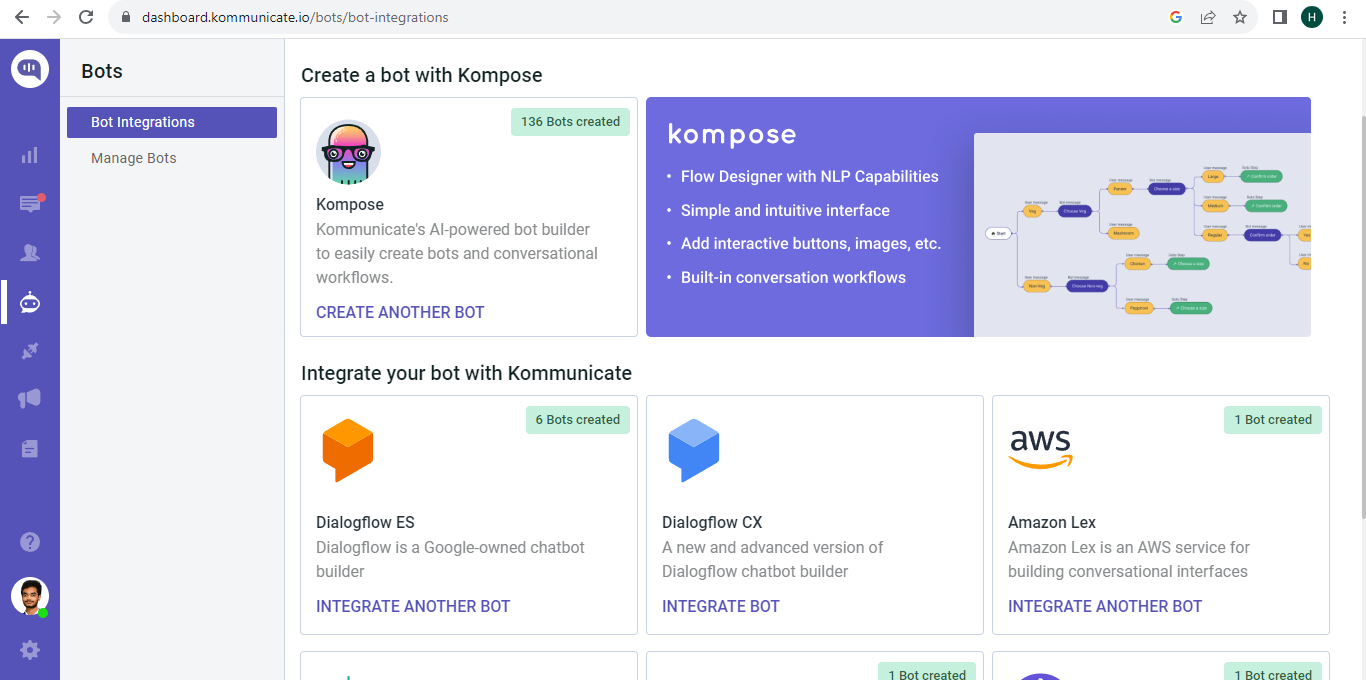
Kompose is a GUI bot builder based on natural language conversations for Human-Computer interaction. You don’t need any coding skills to master Kompose. It has a simple, intuitive, and easy-to-use interface.
Bot Integration with the Kompose
- Login to your Kommunicate dashboard.
- Navigate to the
Bot Integrationsection >> SelectKompose - Bot Builder
Tutorial Blog: Create a chatbot using Kompose bot builder
Video tutorial: Create a chatbot using Kompose bot builder in 5 minutes
Configure Intents in Kompose
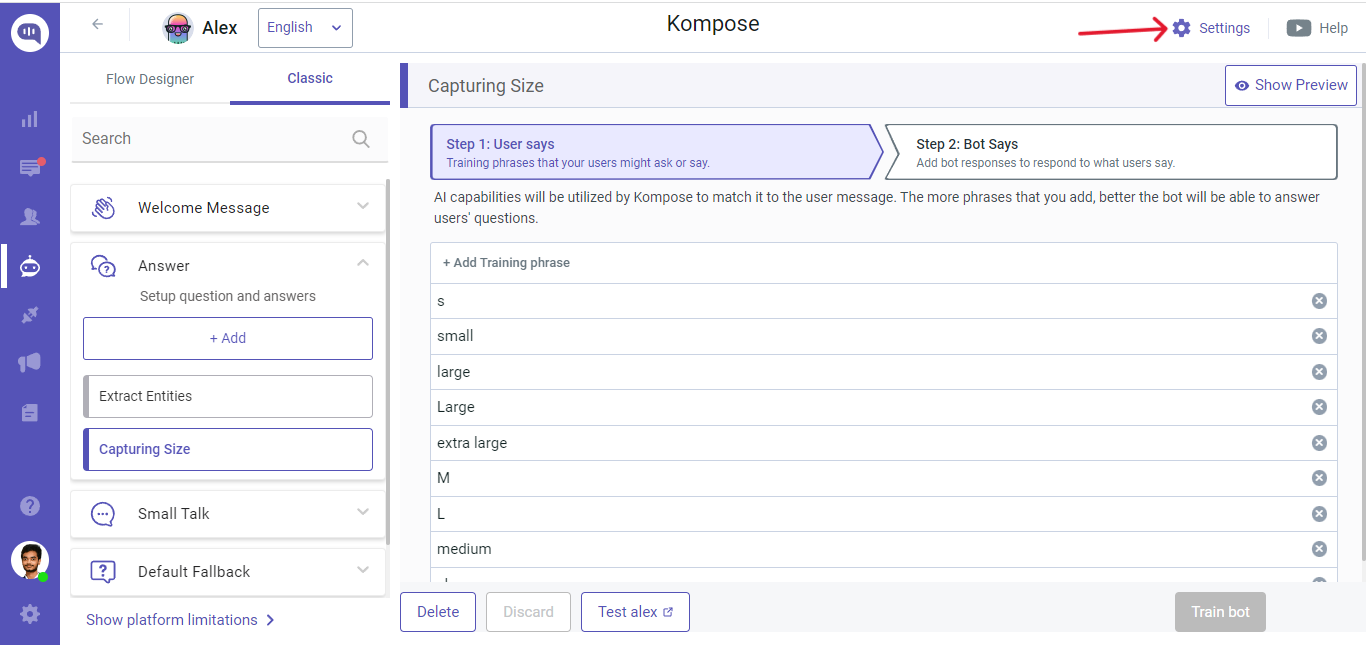
- Enter the 'Answer' section in Kompose-bot builder.
- Setup questions and answers for your bot in this section..
- Add training phrases for your intent like this:
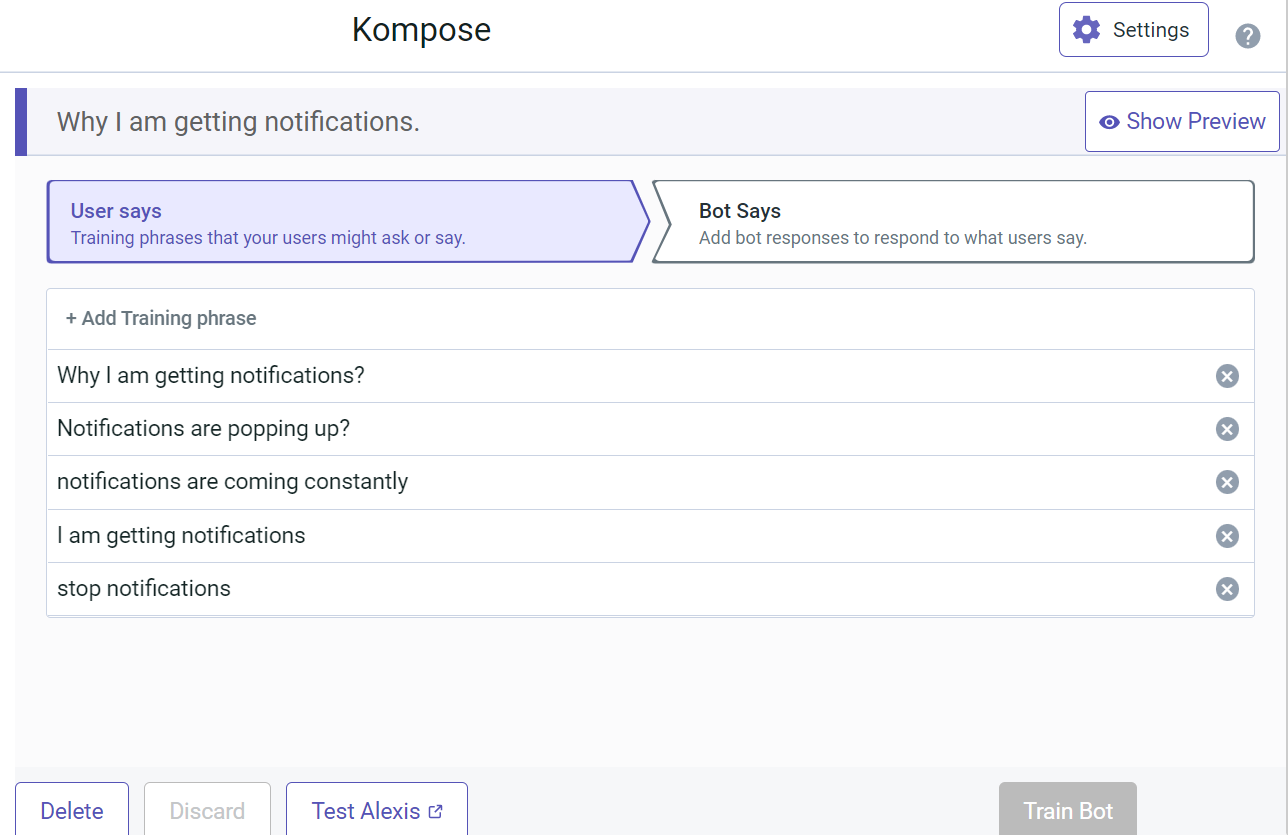
To achieve good results, make sure that insignificant(non-contextual) words are not repeated in every training phrase. Also, try to have at least 3 to 4 training phrases for each intent. For example, 'Why', 'I', 'constantly' etc. are insignificant words in the above shown example and therefore should not be repeated in every training phrase for good accuracy. This is to make sure that the correct intent only gets triggered with the right context.
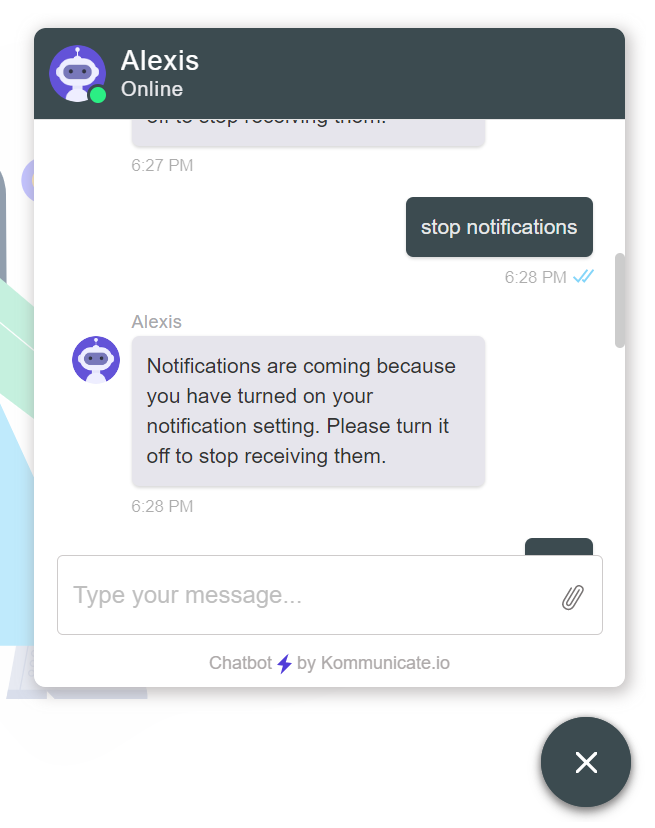
Case 1. Correct intent gets triggered.
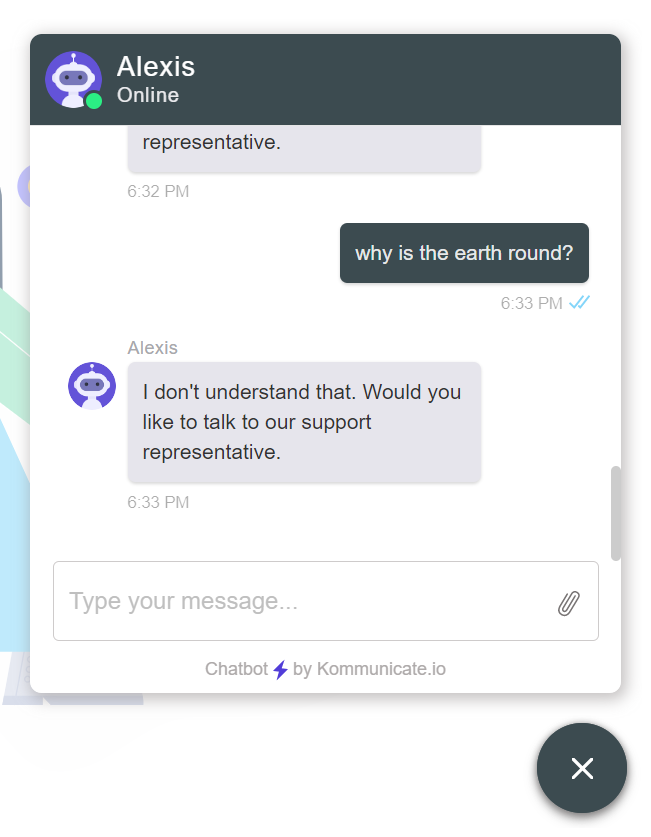
Case 2. Response for unknown user input gets triggered.
Bot to Human handoff in Kompose
Bot to human handoff is useful when the bot is unable to answer the customer question or is unable to understand what the customer is saying and if the user needs to talk to a human agent directly.
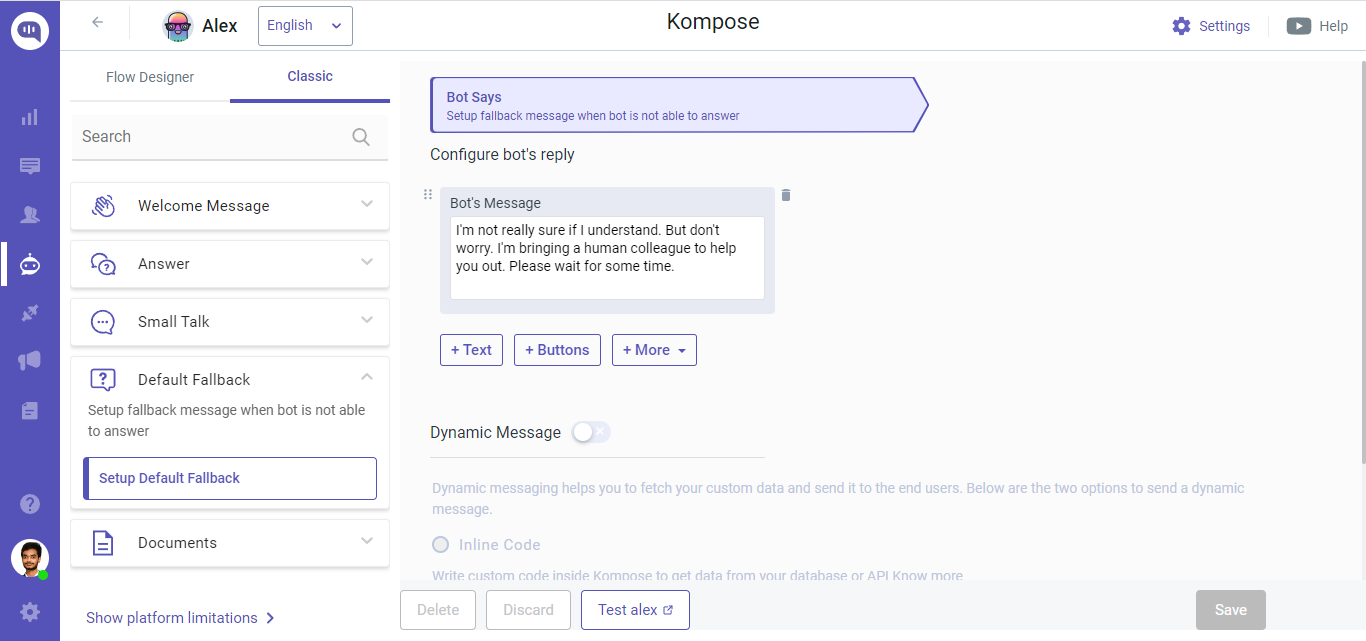
1. Fallback Intent
- In Kompose, there's an intent "Default Fallback". In this intent, you have to setup fallback message when bot is not able to answer. You have to set the bot message that should be shown to user, if it's unable to answer. When none of the intents are matched, the fallback intent is triggered, the bot response associated with it is shown to the user. Go to Bot Says Section then Click on More and then select Handover
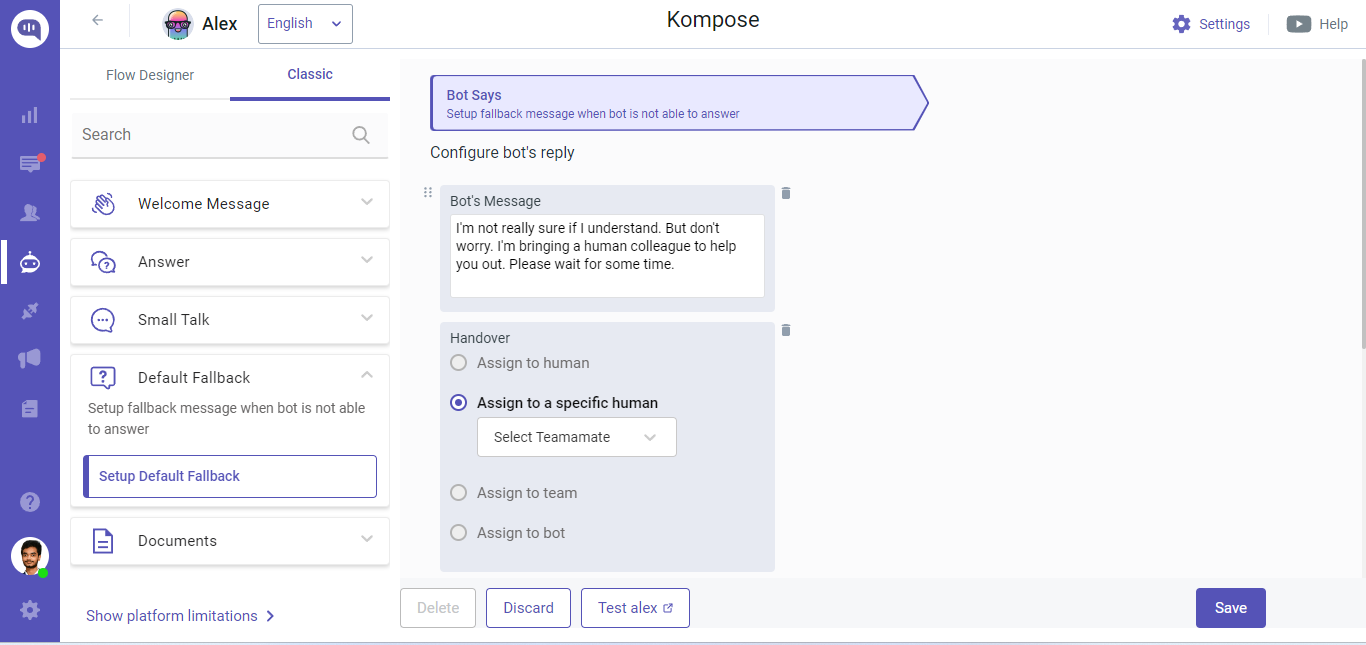
2. To Assign a conversation to a specific support agent
- Go to Bot Says Section then Click on more and then select Handover and then click on "Assign to specific human"
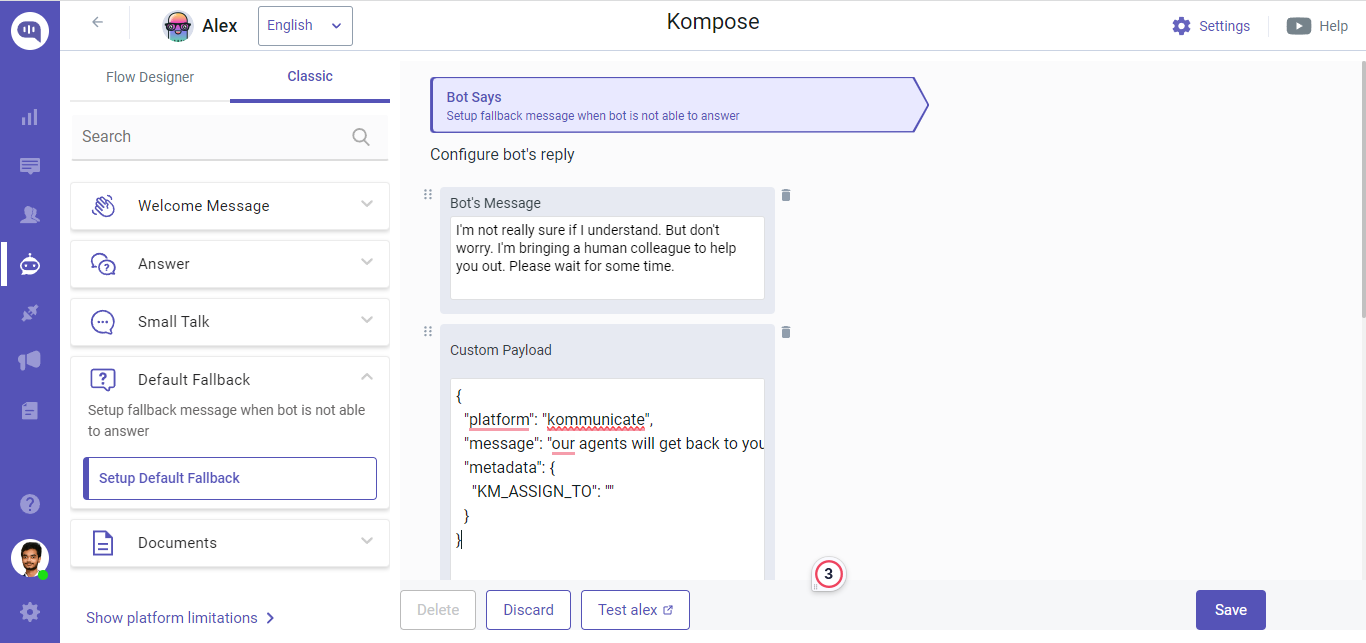
- If you do not want to use the Handover method then you can also add the JSON code below (as a custom payload) to the bot response of the Intent. Specify the agent's email ID (same email ID which an agent uses to log into the Kommunicate dashboard) in
KM_ASSIGN_TOparameter. IfKM_ASSIGN_TOparameter is left empty, the conversation routing rules will be applied and the conversation will be assigned to a human agent based on the routing rules.
{
  "platform": "kommunicate",
  "message": "our agents will get back to you",
  "metadata": {
    "KM_ASSIGN_TO": ""
  }
}
Set
"KM_ASSIGN_TO": "<AGENT'S USER_ID>"if you want to assign the conversation to specific agent.
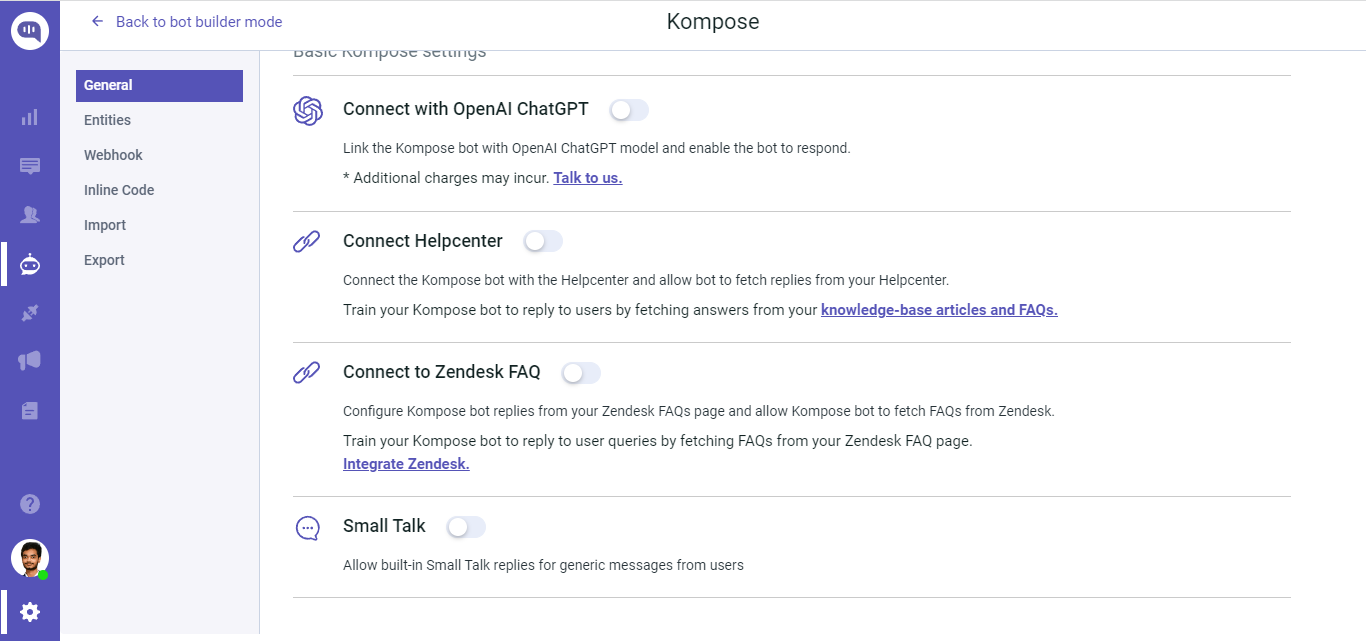
Disable Small Talk option in Kompose
- Login to your Kommunicate dashboard.
- Navigate to the
Bot Integrationsection >> SelectKompose - Bot Builder>> Select your Bot >> Click on Small Talk >>Click Setting ⚙️ >> Disable Small Talk
Rich Messages
You can use different rich messages such as Buttons, Lists, Cards, Images and Forms.
To use the rich messages with Kompose, follow the steps below:
- Create an Intent and provide a Training phrase for which you want to use the rich message and click on Bot Says.
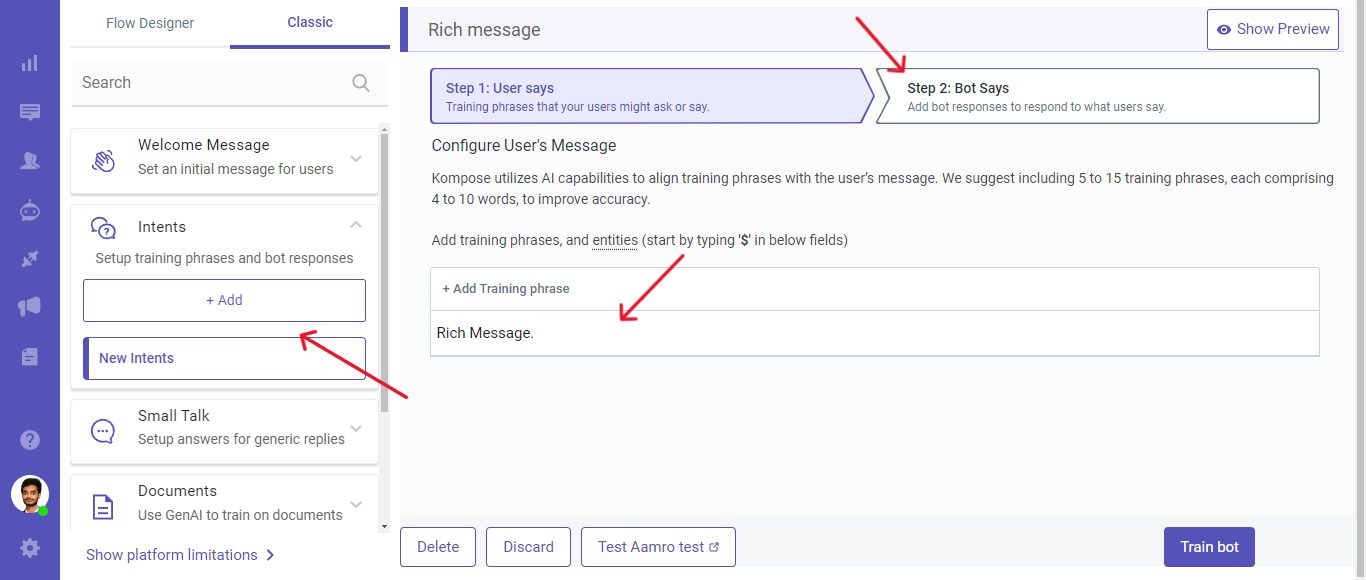
- Click on More and select the Custom Payload option.
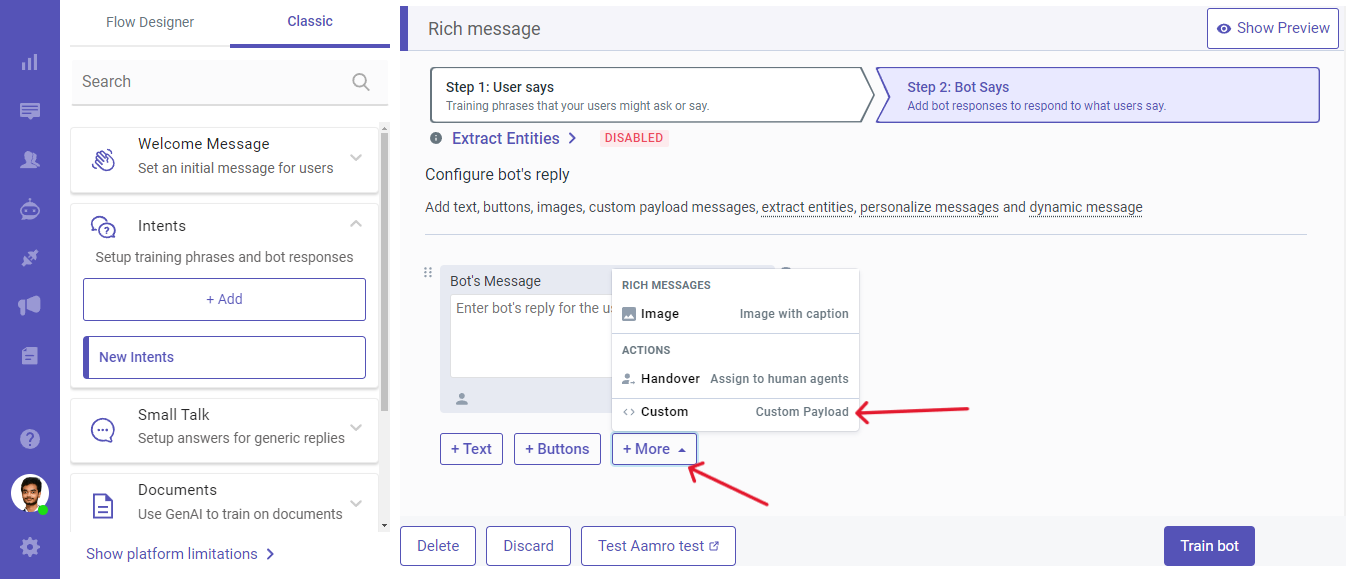
- Add your payload in the space provided and click on Train bot.
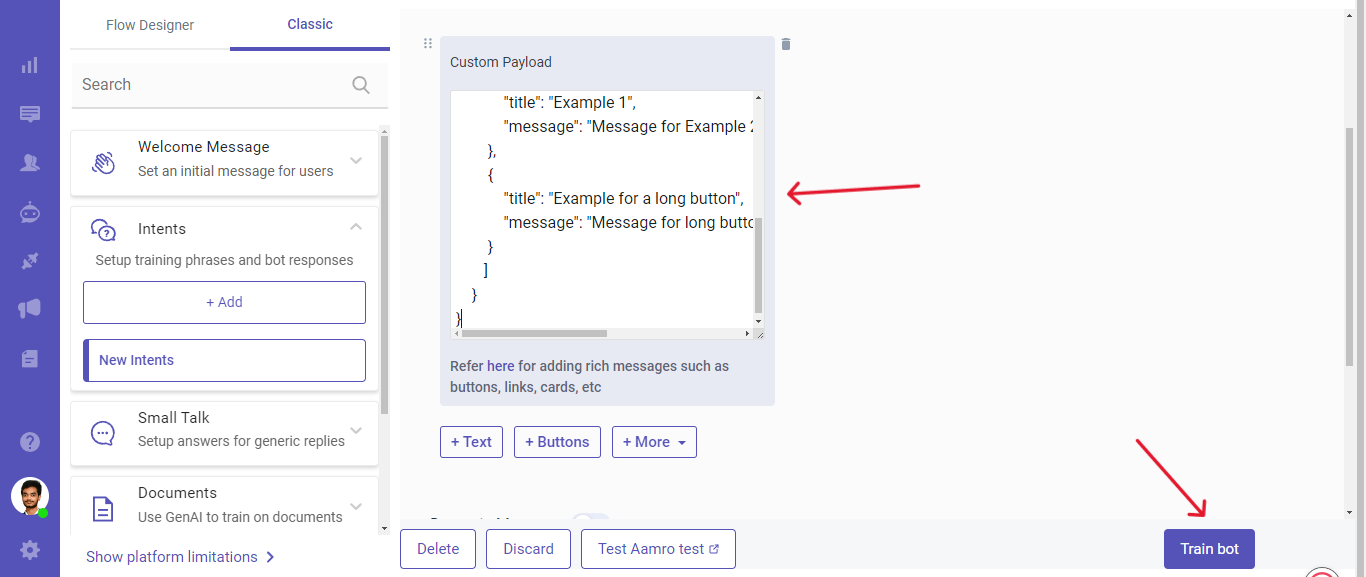
You can access the Rich message payloads from here.
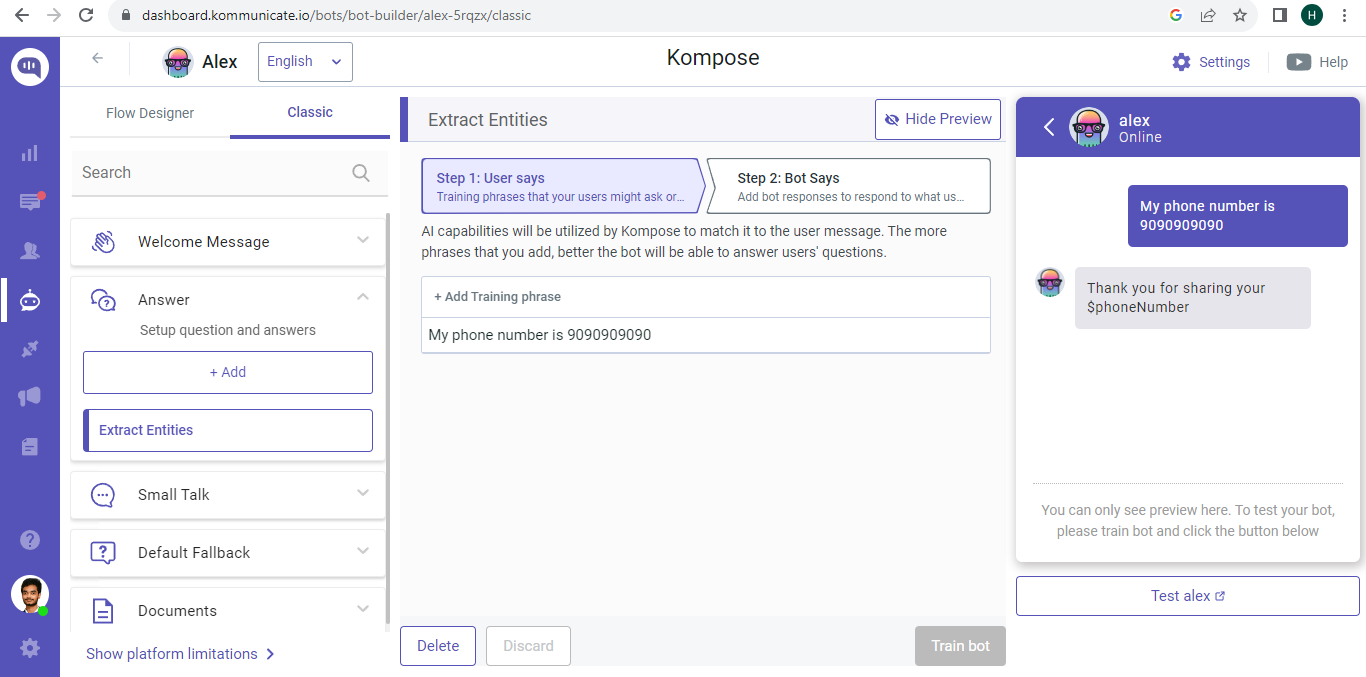
Extract Entities
Entities are used to identify and extract useful data from user inputs. Kompose supports extracting the user's entities like email, phone number etc.
To add the entities
- Login to your Kommunicate dashboard.
- Navigate to the
Bot Integrationsection >> SelectKompose - Bot Builder>> Select the bot >> Select Answer >> Type your training messages >> navigate to Bot Says section >> click to extract entity and choose the entity you want to extract.


Custom Entity
Custom entities help us to identify and extract the useful data from the inputs given by the end user.
There are 2 ways to create the custom entity in the Kompose bot builder
- via the Extract entities dropdown that is available on the Bot Says section of the Answers page.
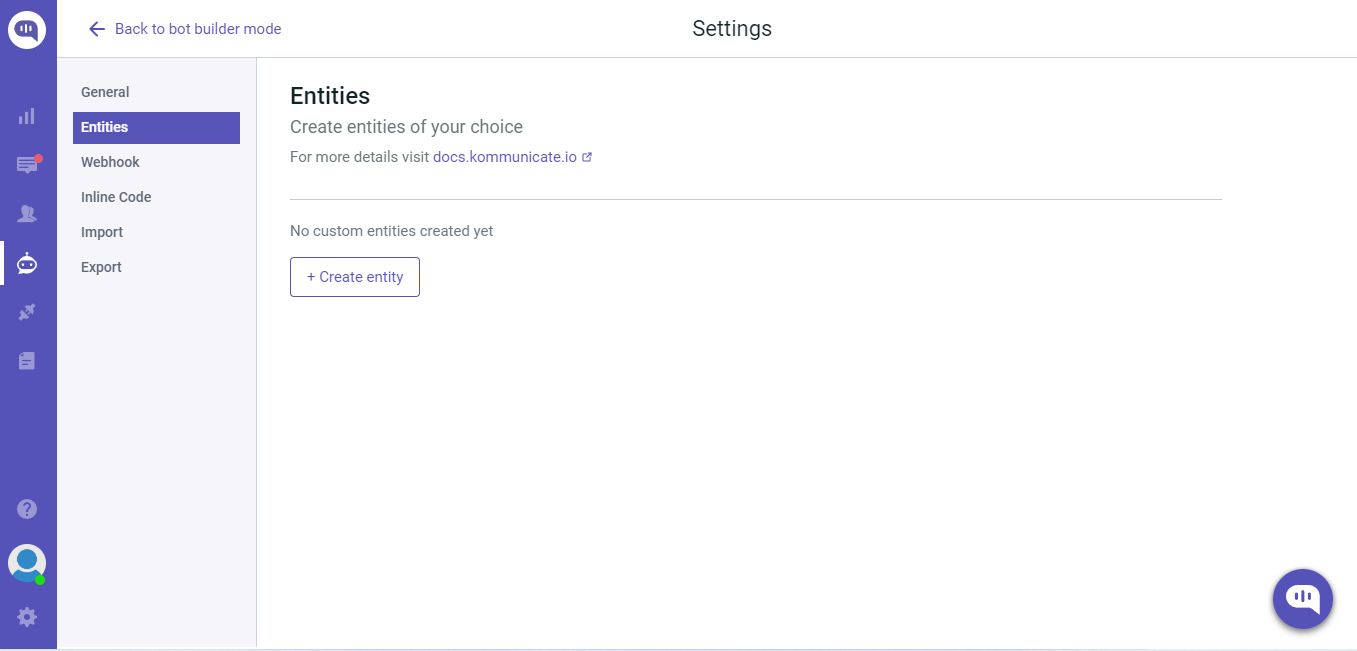
- via the Entities tab on the Kompose Settings page.
1. Create entities from the Kompose Answer page
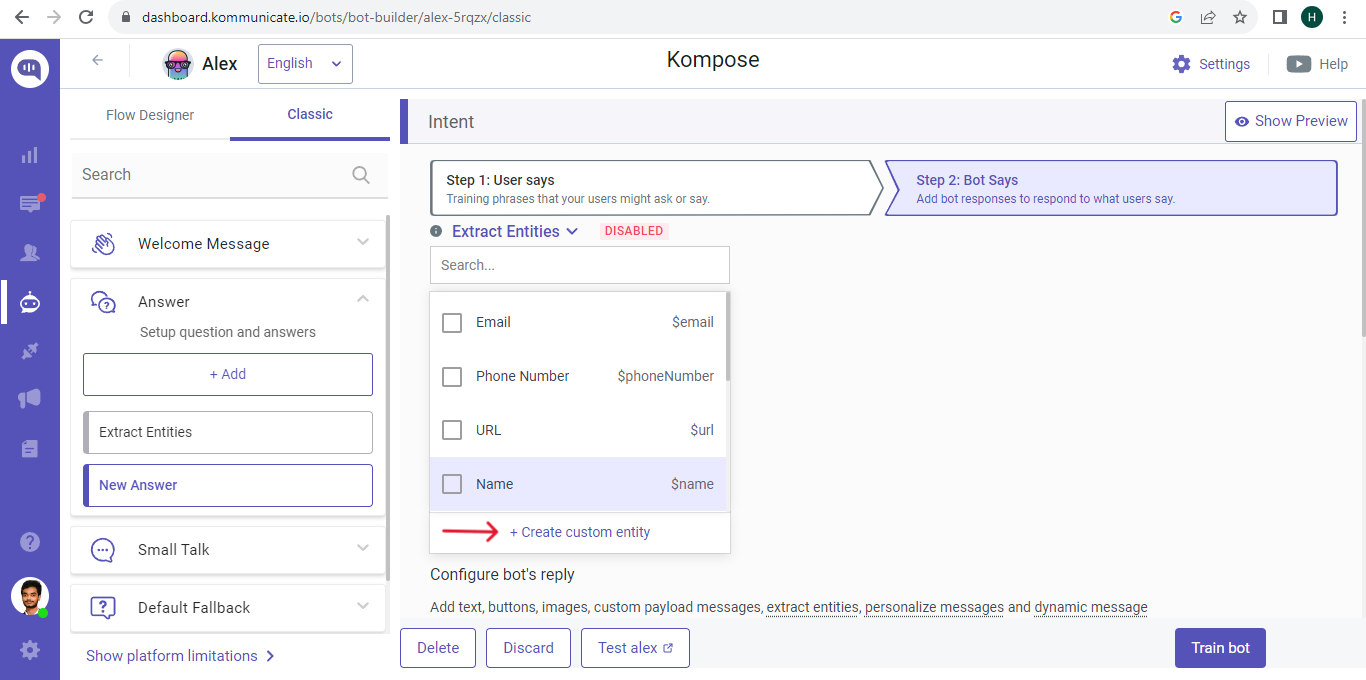
Step: 1
Click on the Extract Entities >> Create Custom Entity >> Fill the entity details as shown in the following images.
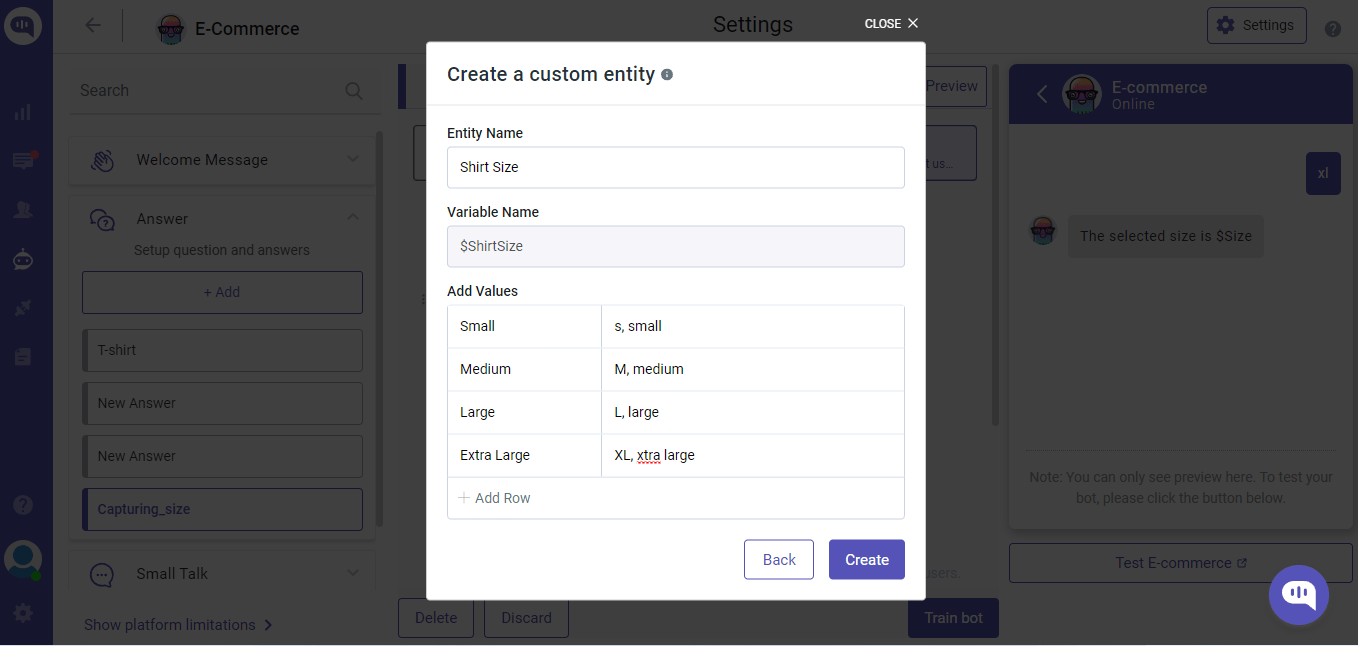
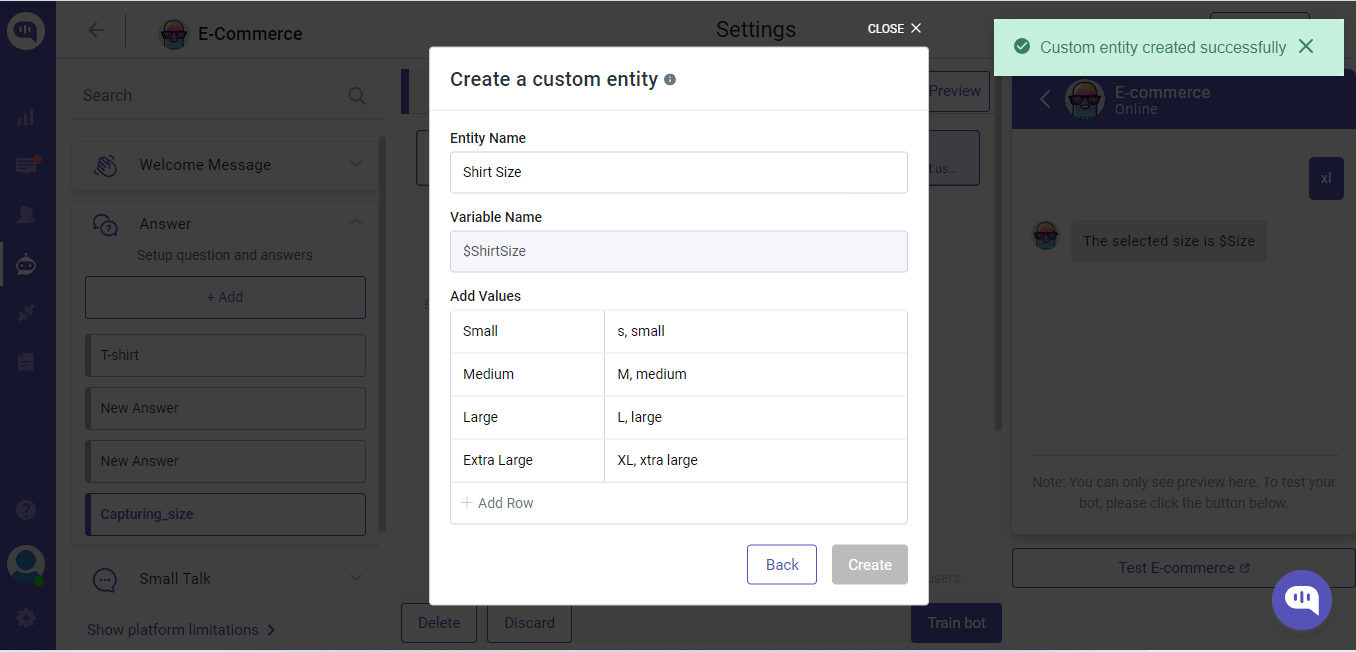
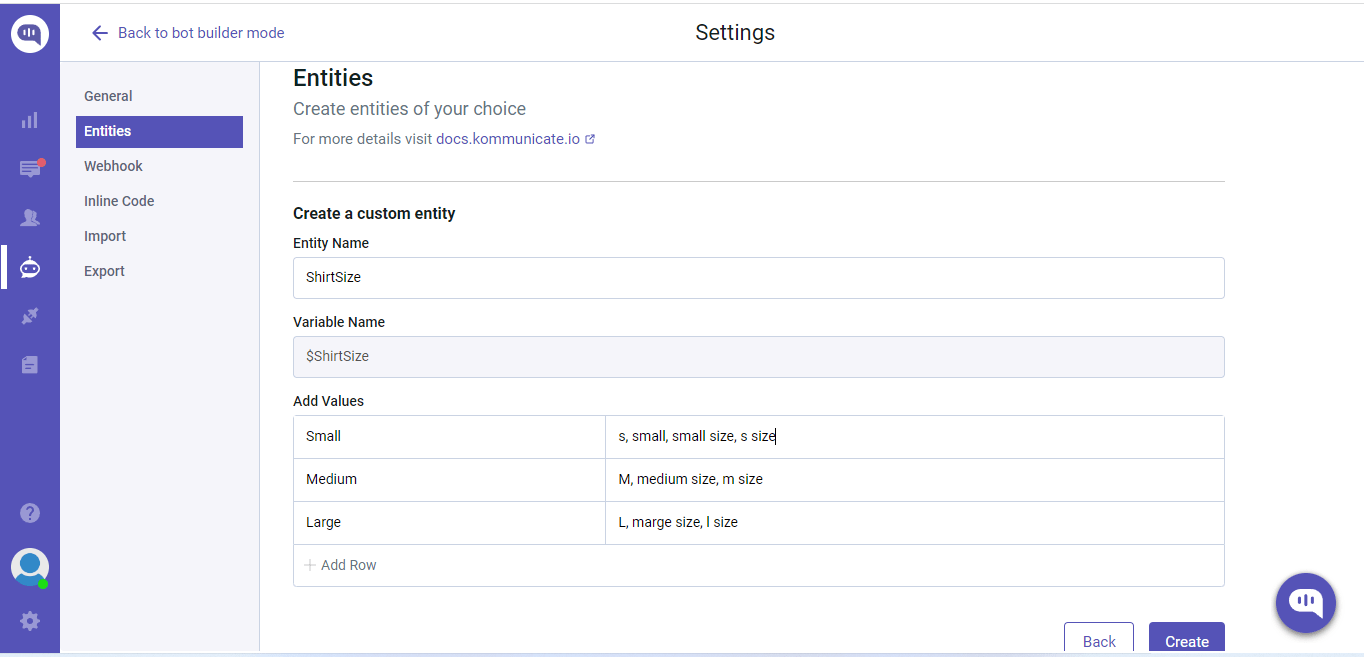
Provide the Entity name, Variable name, and the Values(entity type name and synonyms)
Entity name: A name given to the custom entity. Eg. Shirt Size
Variable name: It's automatically generated by the system using the Entity name filled. Eg. ShirtSize
Add values:
Entity type: Entity type for ShirtSize is small, medium, large, extra-large.
Enter synonyms: Synonyms for the entity type ShirtSize is M and Medium can be synonyms for the medium entity type.
Click on the +Add row link to add more entity types.
Step: 2
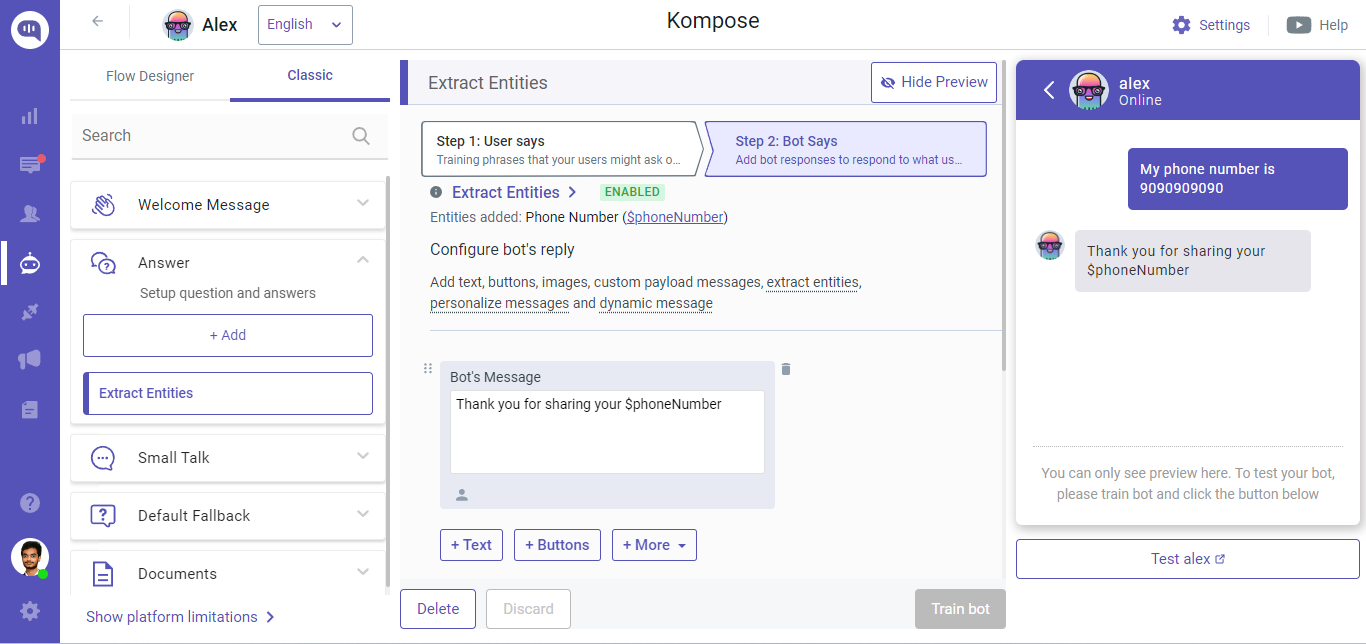
After creating the entity, go to Extract Entities and select the created entity as shown below;
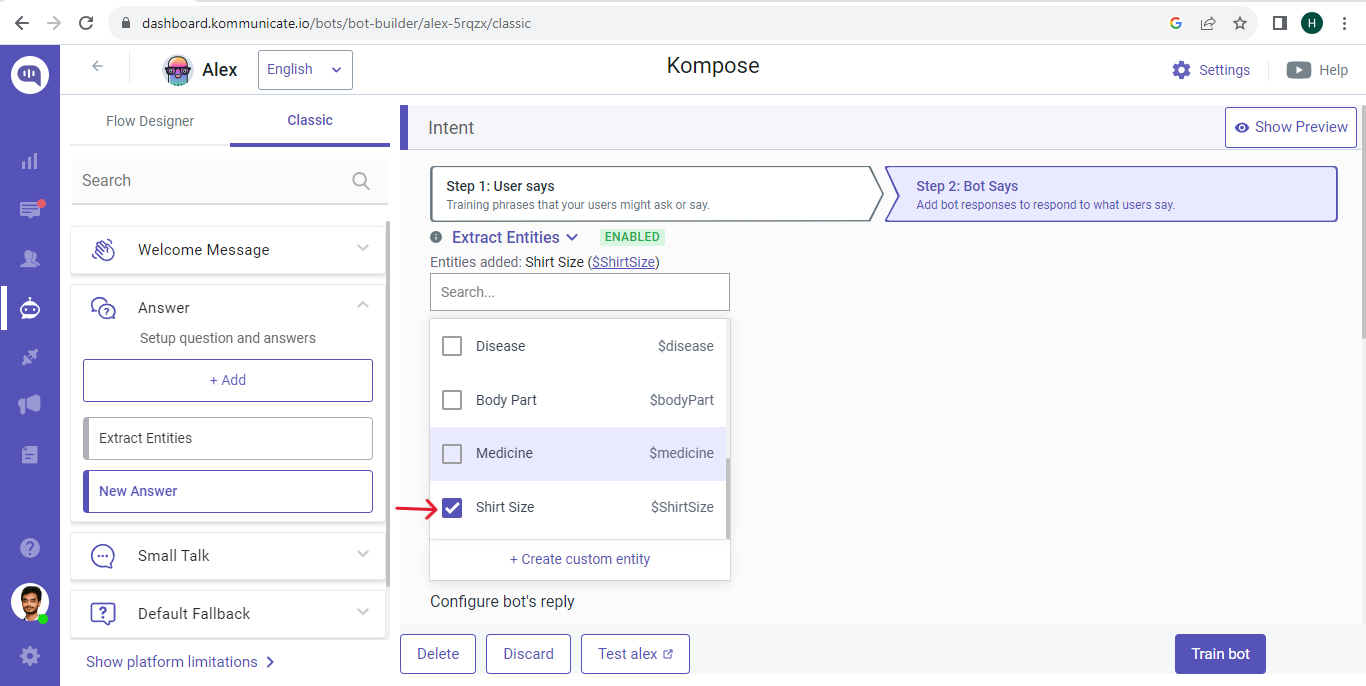
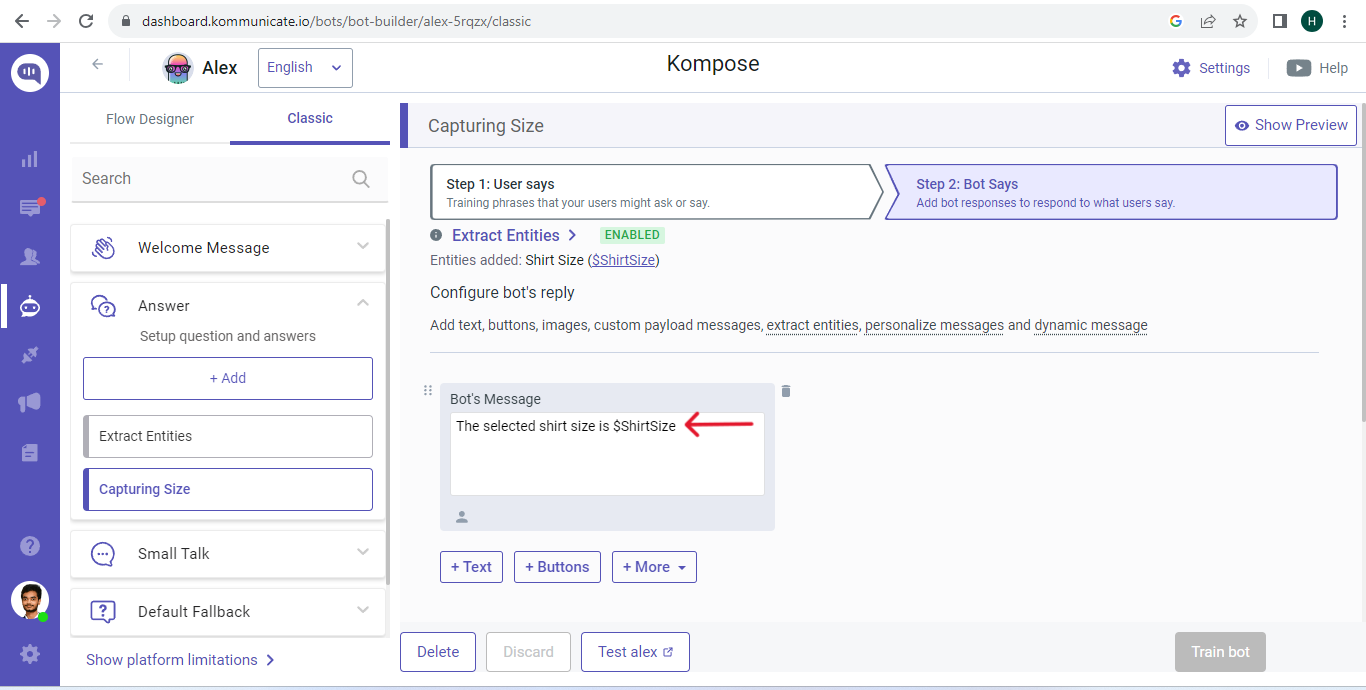
After selecting the entity, extract it using variable name as shown below
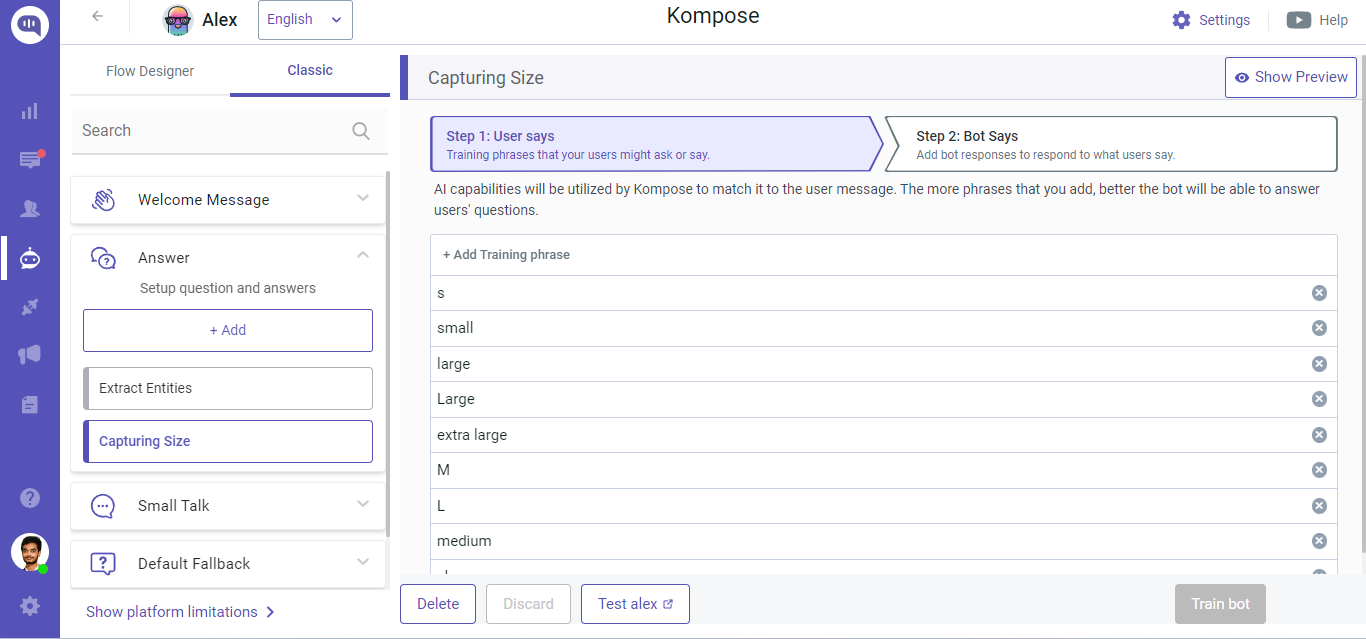
You have successfully created the entity and extracted it from the user input, now you will have to add the training phrases in the User says section of the same intent as shown below;
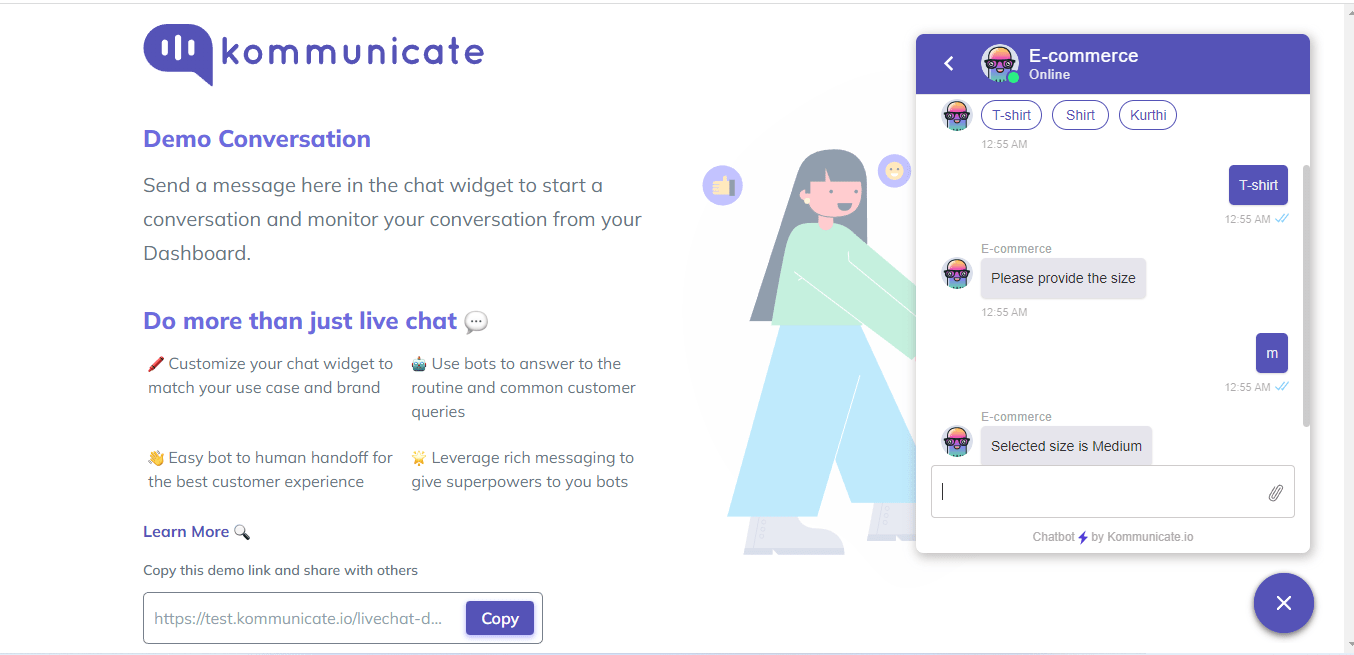
Entity extraction is enabled now, check out the following test page
2 Creating entities via the Entities tab on the Kompose Settings page
There is another way to create the entity, this will allow us to EDIT and DELETE the entity. Also, we can create entities and save them priorly.
Step 1: Go to Settings⚙️ available on the top right corner of the Kompose Bot builder
Step 2: Click on Create Entity >> Fill all the required fields and create the entity
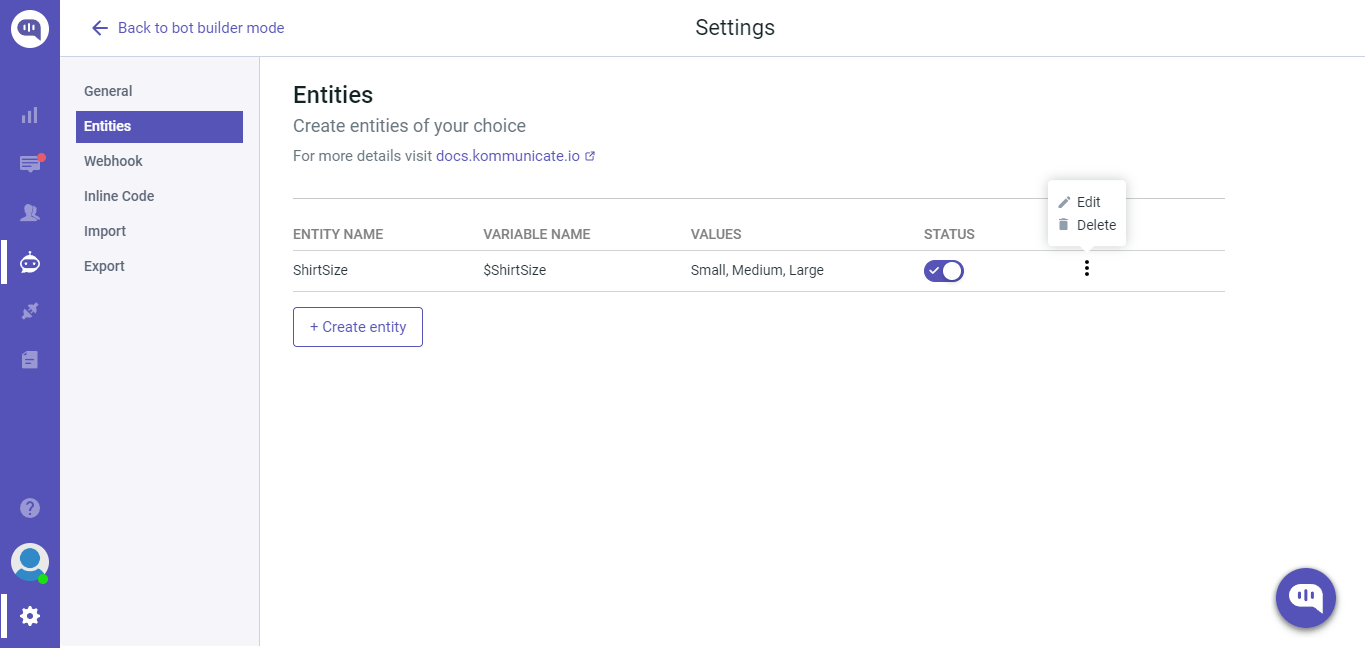
Step 3: You can manage the created entities. Edit, Delete, and Disable entities options are available in this section.
Webhooks in Kompose
Webhook feature in Kompose allows you to send responses to your user from your own custom webhook server. This is helpful when you need to return some data from your data base or need to send some responses based on your own custom logic.
Integrate your webhook with Kompose
Navigate to the
Bot Integrationsection >> SelectKompose>> Select Bot >> Click Setting ⚙️ >> WebhookThis section will ask you a webhook URL and request header for the webhook. Webhook URL is required at your backend server so that messages sent to bot can be forwarded to your server. You can use same webhook for multiple bots or can configure different webhook. Kommunicate will send the data to your webhook in below format:
{
    "botId": "bot id who has received the message. This id is same as shown in dashboard.",
    "key": "unique id for every message",
    "from": "user id who has sent the message",
  "message": "message sent by user to the bot",
  "nlpResponse": [ { "message": "Greetings!" } ],
  "matchedIntent":"greetings.hello",
    "groupId": "conversation id",
    "metadata": "extra information with message",
    "contentType": "content type of the message (text, html, location, etc)",
    "applicationKey": "your APP_ID shown in Dashboard Install section",
        "source": "identifies if message is sent from web or mobile",
    "eventName": "events ie. WELCOME , KOMMUNICATE_MEDIA_EVENT etc",
    "createdAt": "message sent time"
}
- Kompose sends the message to your webhook and waits for the response. The timeout limit for the webhook URL is set to the 30 seconds. Your webhook should return the array of message in response in below format:
[{
    "message": "A message can be simple as a plain text"
}, {
    "message": "A message can be a rich message containing metadata",
    "metadata": {
    "contentType": "300",
        "templateId": "6",
        "payload": [{
            "title": "Suggested Reply button 1",
            "message": "Suggested Reply button 1"
        }, {
            "title": "Suggested Reply button 2",
            "message": "Suggested Reply button 2"
        }]
    }
}]
Each object in message array is rendered as separate message in Kommunicate chat widget.
To use the webhook for a particular intent follow the below steps:
Navigate to the Bot Integration section click on Go to bot builder, and choose the Intent for which you want to use the Webhook.
Navigate to Bot says and enable Dynamic Message.
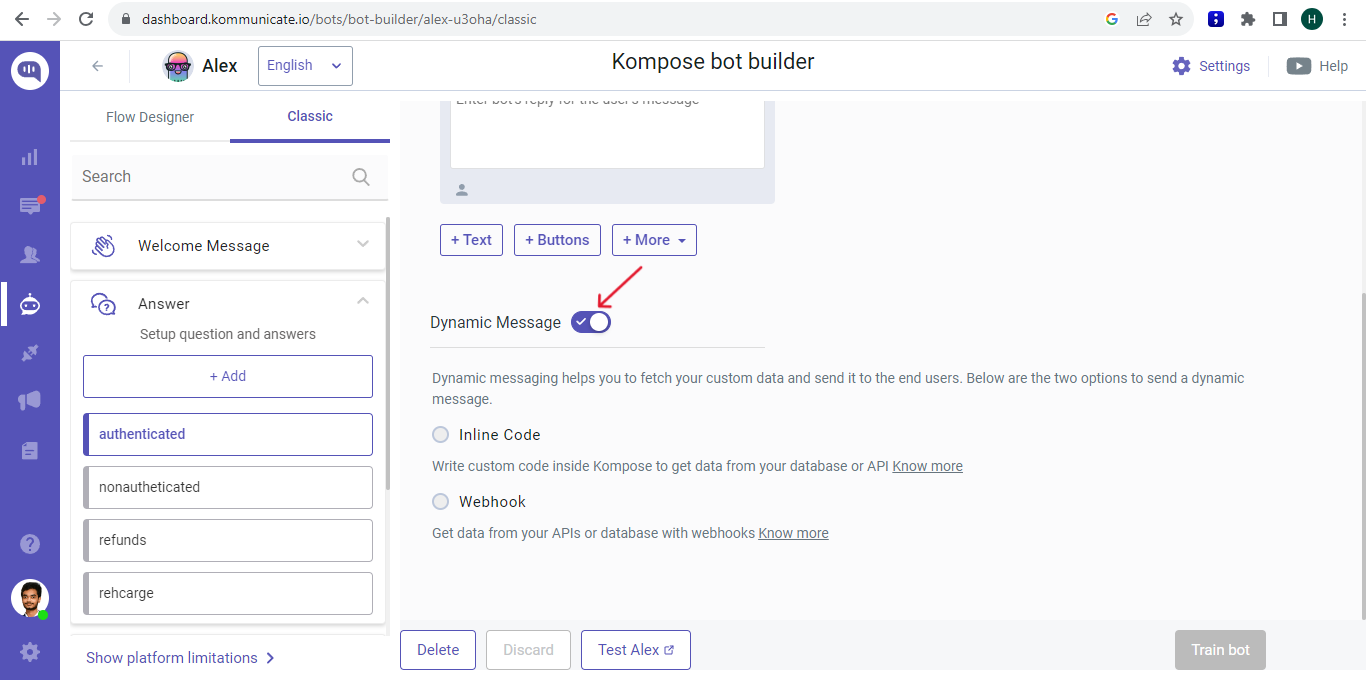
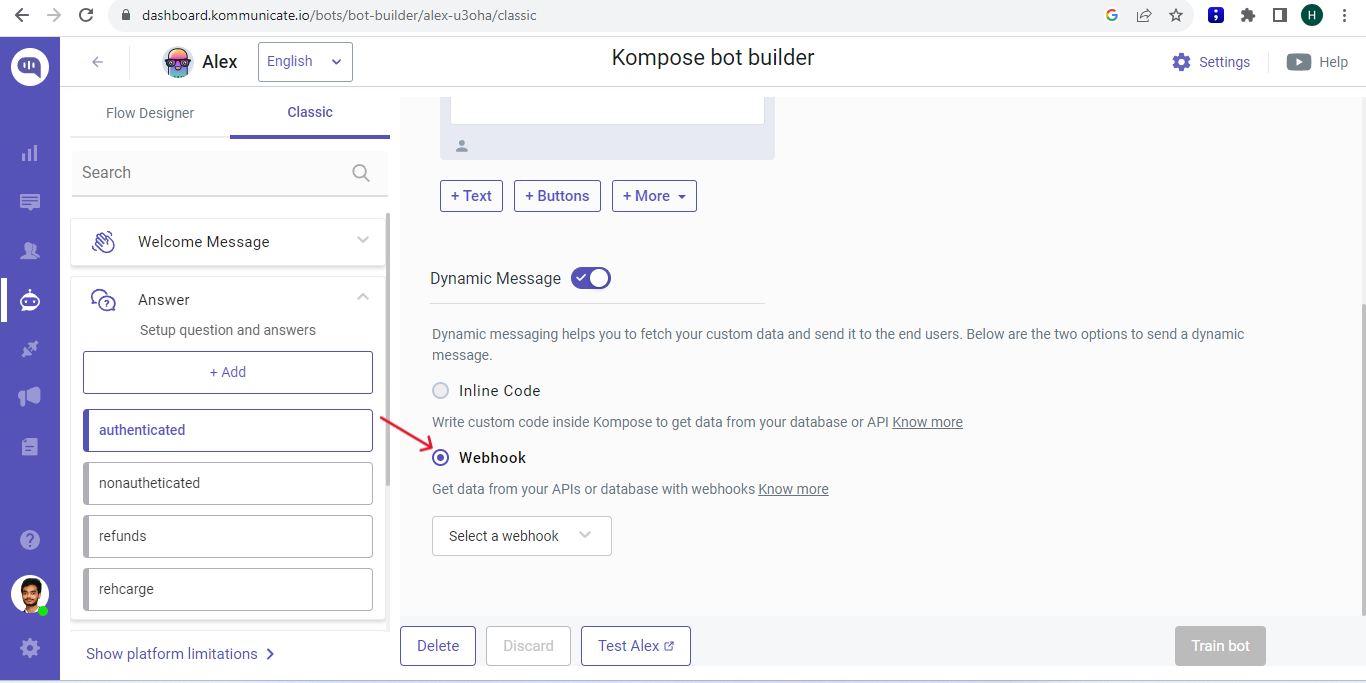
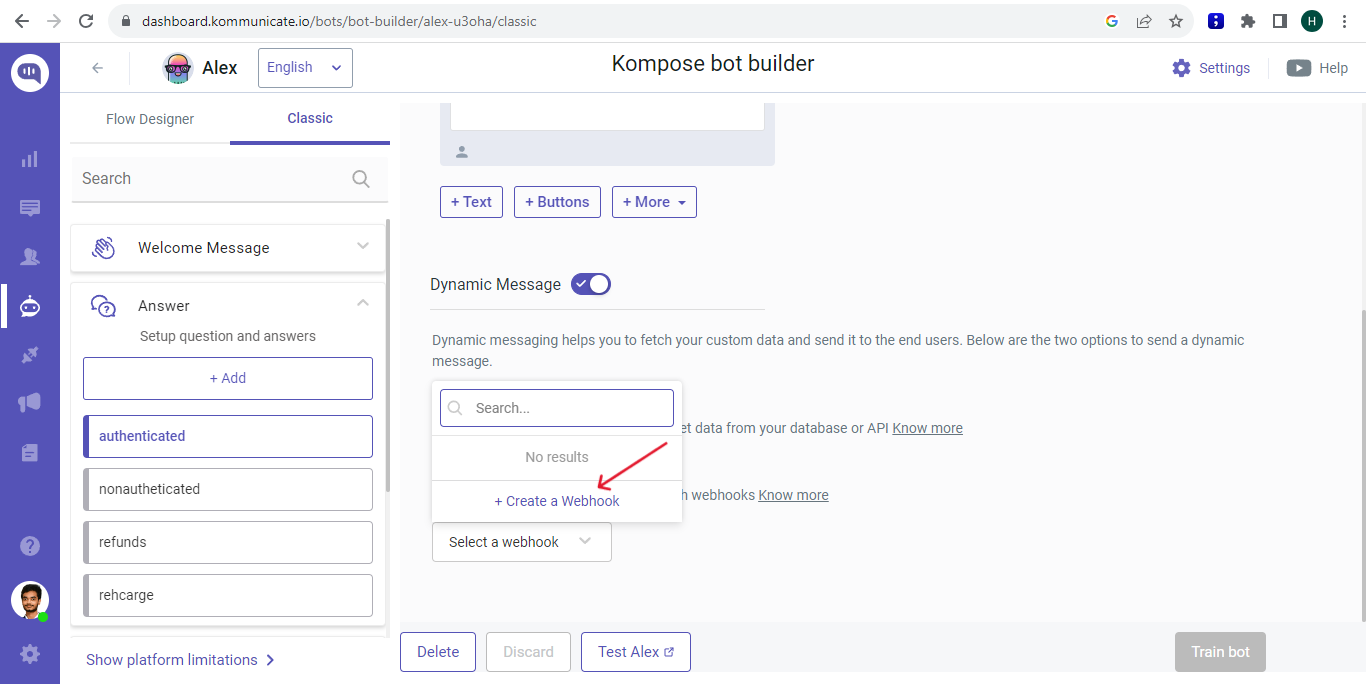
Next, choose Webhook and click on Create a Webhook.
Give your Webhook a name, enter your Webhook URL and click on Create.
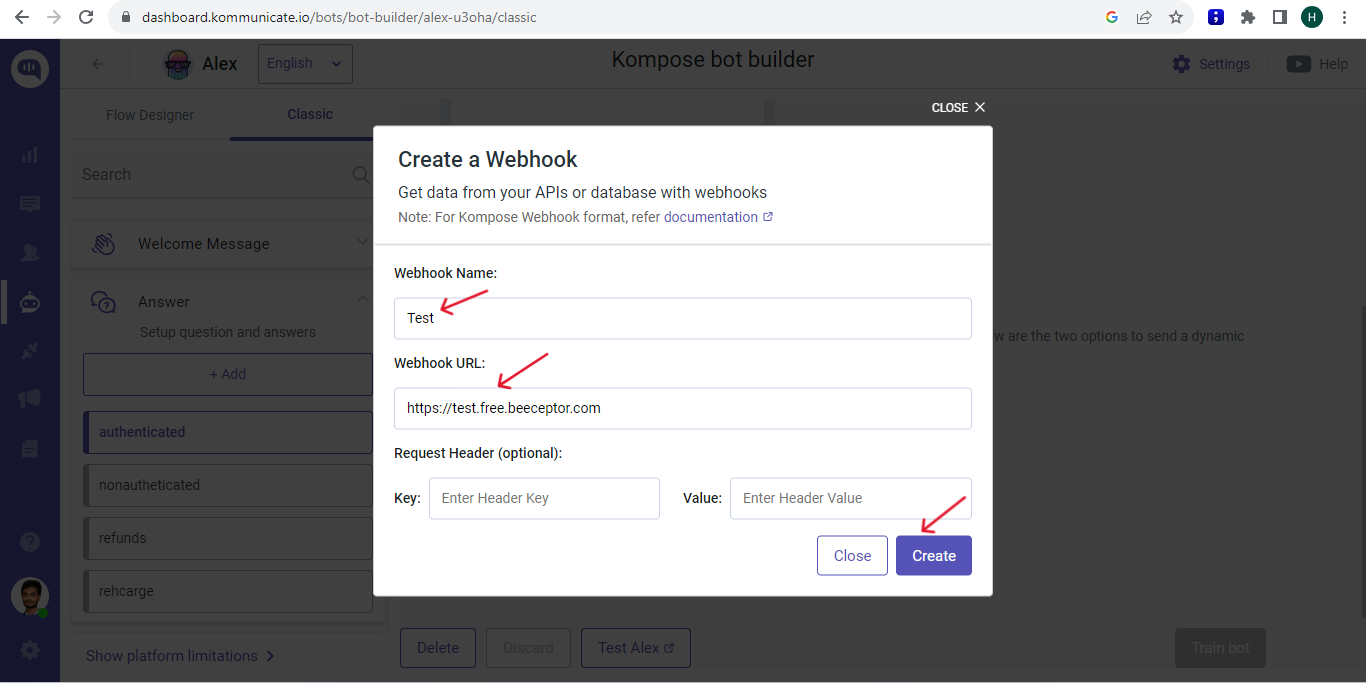
You have now successfully integrated the intent with your Webhook.
When you trigger the Intent for which you have used the Webhook, the message which you have used in the Webhook is displayed.
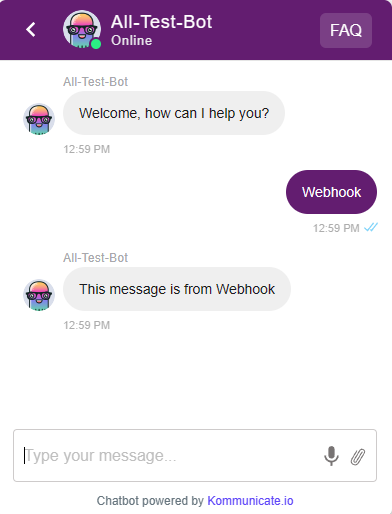
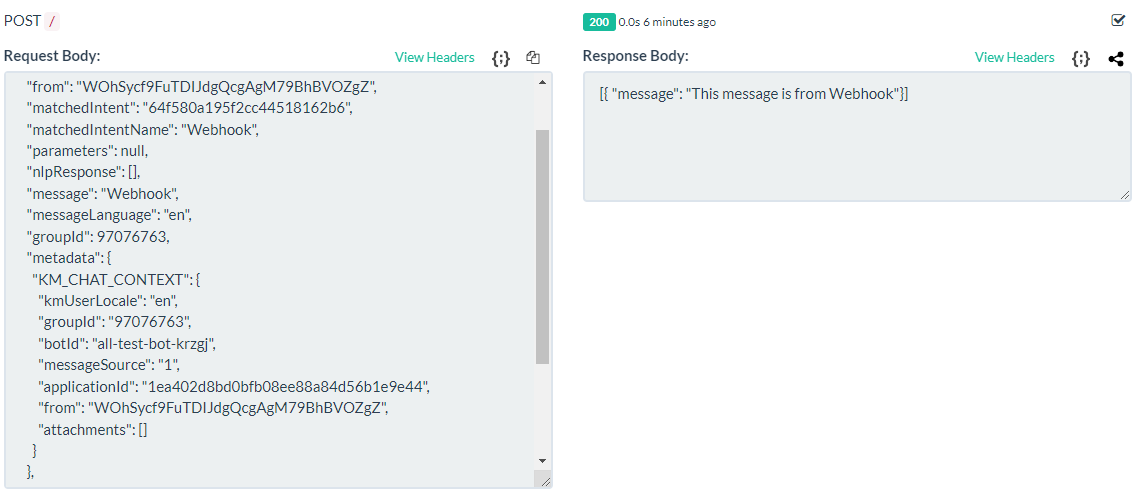
We have used Beeceptor as an example.
The sample Request and Response body are shown below.
Welcome message from bots
Kommunicate sends some specific events to your webhook in eventName property. When a user creates a new conversation Kommunicate sends eventName: WELCOME to your webhook. You can check for this property in payload and reply with a welcome message.
Skip bot welcome message
Skip the 'WELCOME' event from dialogflow by setting
"skipBotEvent":'["WELCOME_EVENT"]'
Skip bot welcome message through Settings
var defaultSettings = {
    "skipBotEvent": '["WELCOME_EVENT"]',
};
Kommunicate.updateSettings(defaultSettings);
Skip bot welcome message for a specific conversation
var conversationDetail = {
    "skipBotEvent":'["WELCOME_EVENT"]'
};

Kommunicate.startConversation(conversationDetail, function (response) { });
Send attachments to bot
When a user attaches a file or shares location, Kommunicate sends eventName: KOMMUNICATE_MEDIA_EVENT to your bot along with the attached file information. You can find the file information in KM_CHAT_CONTEXT object in metadata.
Below is the sample of webhook payload with attachment detail:
This is sample JSON for file attachment:
{
    "eventName": "KOMMUNICATE_MEDIA_EVENT",
    "metadata": {
        "KM_CHAT_CONTEXT": {
            "attachments": [{
                "type": "image/png", // media type (in form of type/subtype) . Use the regex 'type/*' to get the generic type
                "payload": {
                    "name": "file name",
                    "url": "file url",
                    "size": "size in bytes"
                }
            }]
        }
    },
    "createdAt": 1552638706610,

}
Attachment object for location message
{
    "attachments": [{
        "payload": {
            "lat": "Latitude",
            "lon": "Longitude"
        },
        "type": "location"
    }]
}
Bot Events
Bot Events signify communication that can't be captured easily through text or voice. Examples include clicking a 'Buy' button, and adding an item to the shopping cart.
Trigger event on Kompose platform
Call the following function to trigger an event for the Kompose bot.
var messagePxy = {
    "type": 5,
    "contentType": 10,
    "message": "Event: " + <EVENT_NAME>,
    "groupId": KommunicateGlobal.CURRENT_GROUP_DATA.tabId,
    "metadata": {
        "category": "HIDDEN",
        "KM_TRIGGER_EVENT": <EVENT_NAME> // Name of the intent
    },
    "source": 1
};
Kommunicate.sendMessage(messagePxy);
For example, if we want to trigger the welcome event, this is what we can do.
var messagePxy = {
    "type": 5,
    "contentType": 10,
    "message": "Event: " + "WELCOME",
    "groupId": KommunicateGlobal.CURRENT_GROUP_DATA.tabId,
    "metadata": {
        "category": "HIDDEN",
        "KM_TRIGGER_EVENT": "WELCOME"
    },
    "source": 1
};
Kommunicate.sendMessage(messagePxy);
Replace: <GROUP_ID> with the group id of the conversation in which you want to trigger the message.
GroupId value will be available in ’response’ of Kommunicate.startConversation call.
Click here to check all supported Events.
Extract WhatsApp Number in Kompose
How to get WhatsApp user’s number in Kompose webhook?
We need to setup a webhook in Kompose Intent first.
In webhook call, the user id is sent to your server.You can use that and get user’s phone number, and then do whatever you want to do e.g. storing it in your database, passing it to some CRM as leads or anything else.
Step 1. Setup the webhook
To setup the webhook, you need to log in into your Kommunicate dashboard then go to “Kompose - Bot Builder” ( https://dashboard.kommunicate.io/bots/bot-builder-list ). Here select the bot for which you want to add webhook, then open any intent scroll to the end and select “Webhook” check box, then either select any of the already created webhook or create a new one.
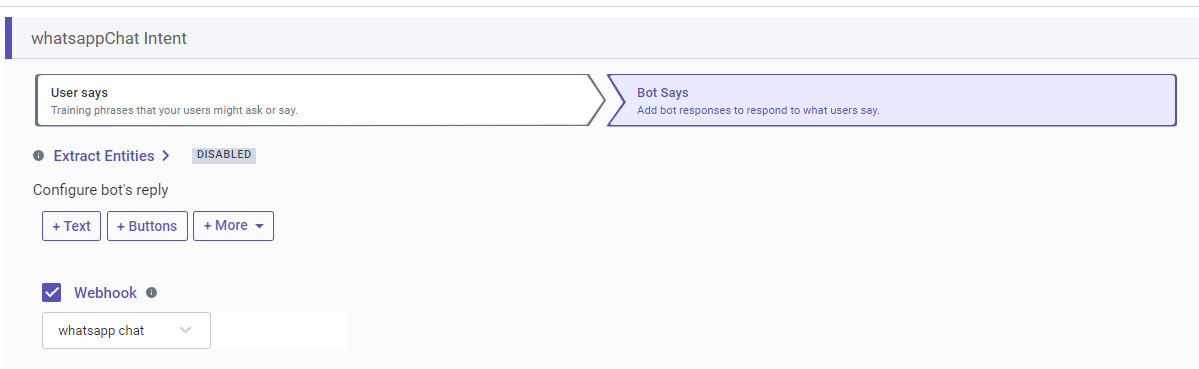
Step 2. Get user phone in your code
Now, whenever that particular intent will be triggered, the whole payload consisting of multiple details will come to your server as request body. Here is how it looks:
{
  "botId": "meet-greet-inb71",
  "key": "5-69234790-1662023652048",
  "from": "whatsapp:+919872409999",
  "matchedIntent": "631077918f0d142ade8ea4ad",
  "matchedIntentName": "whatsappChat Intent",
  "parameters": {},
  "nlpResponse": [],
  "message": "whatsapp chat",
  "groupId": 69234790,
  "metadata": {
    "INTEGRATION_CHANNEL_MESSAGE_ID": "ABEGkZhyQFGIAgo6xNGrMtJa8P2_",
    "KM_CHAT_CONTEXT": {
      "groupId": "69234790",
      "botId": "meet-greet-inb71",
      "messageSource": "12",
      "applicationId": "a546470a05536fa2e39da333fb2c8ea9",
      "from": "whatsapp:+919872409999",
      "attachments": []
    }
  },
  "contentType": 0,
  "applicationId": "a546470a05536fa2e39da333fb2c8ea9",
  "source": 12,
  "createdAt": 1662023652051,
  "eventName": ""
}

Inline Code
If you don't have servers to host your custom functions and calls in the form of Webhooks don’t worry. Now one can use Inline code, where you can write the code within the Kompose bot builder and it gets executed when the corresponding message is triggered. We call the Inline code a Dynamic message.
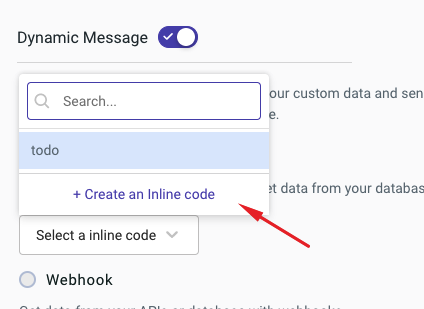
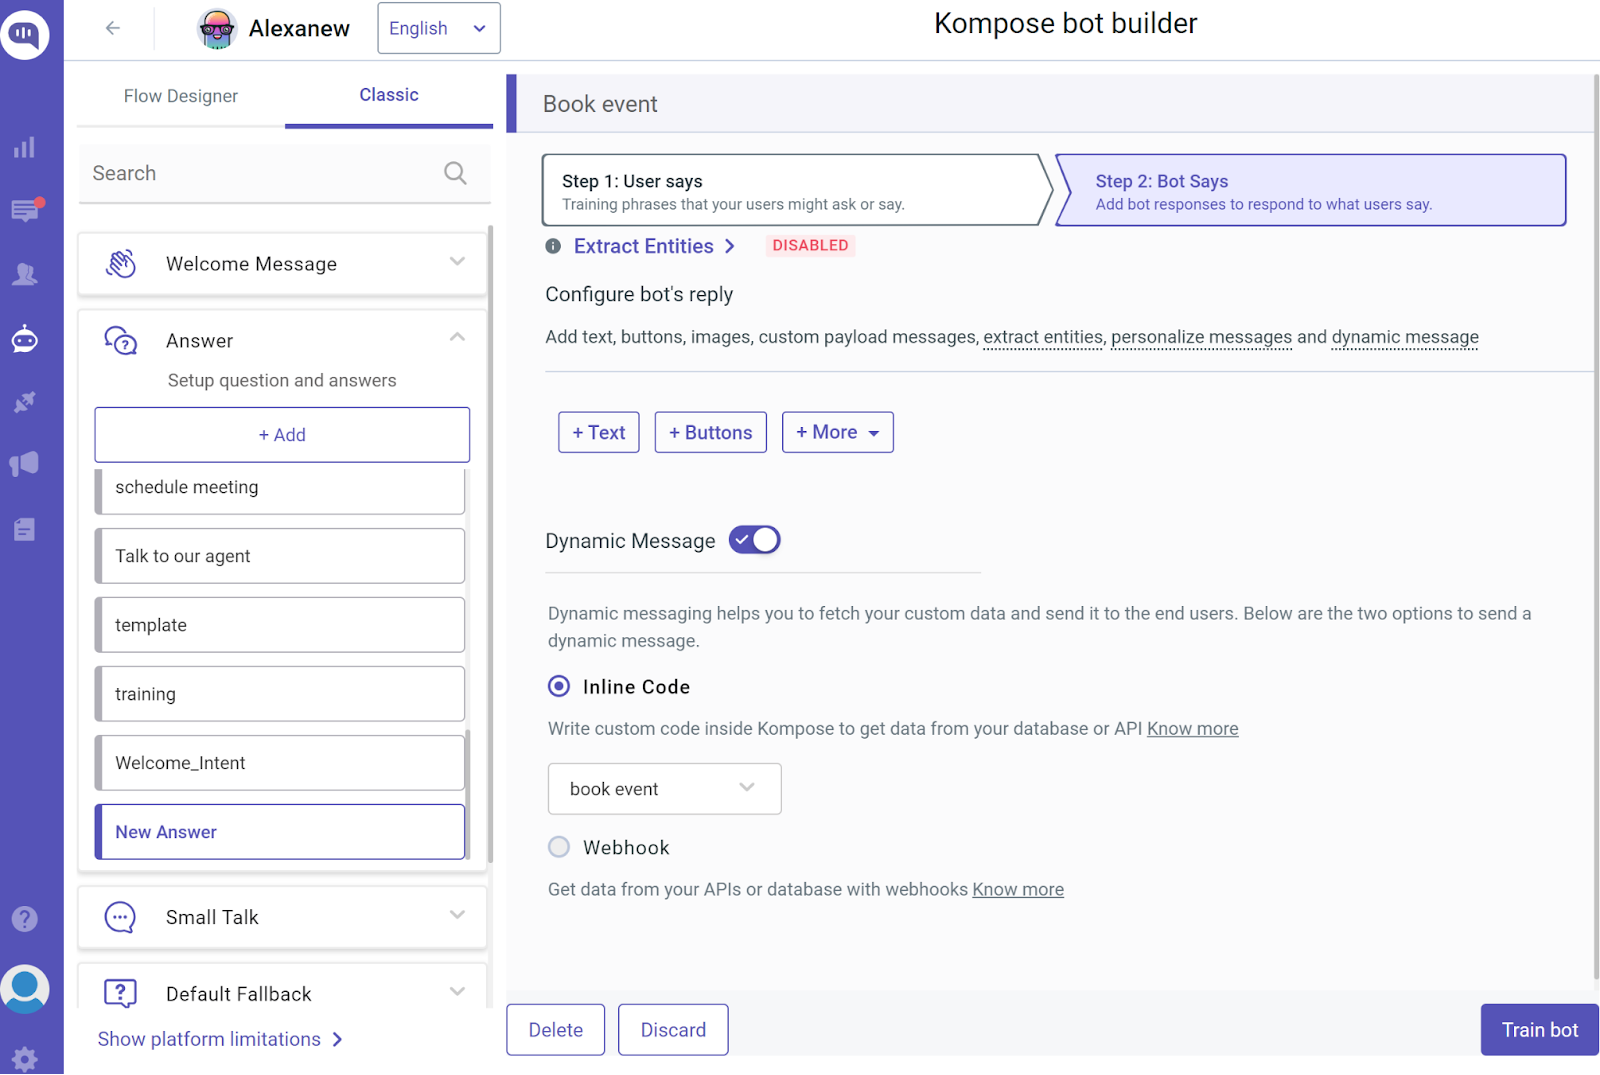
- Let’s start by creating Inline code. You can find create inline code option right on the bot builder page. Firstly delete any static message from the “Bot Says” like in the below screenshot.
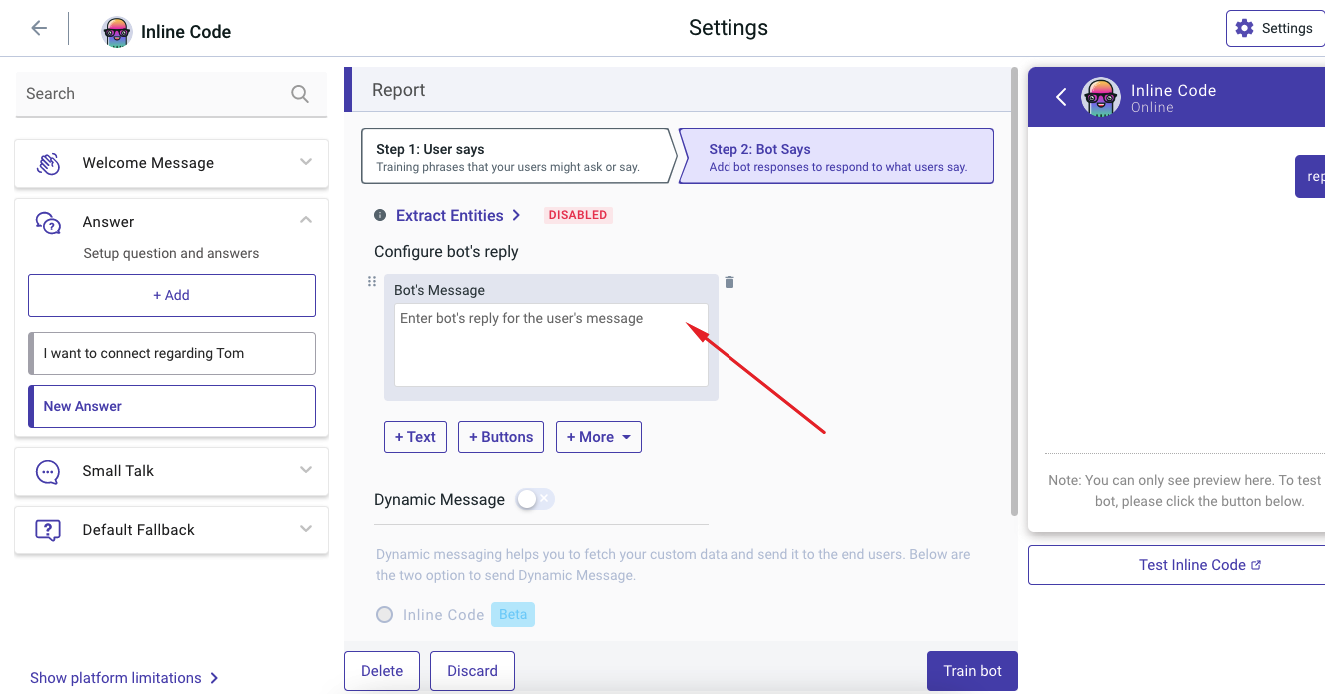
- Enable the “Dynamic Message” and select “Inline Code” and from the below drop-down click on the “Create an Inline Code” button.
- A modal will be opened, there enter a name for Code and desired script. Please don’t change the function name or arguments.
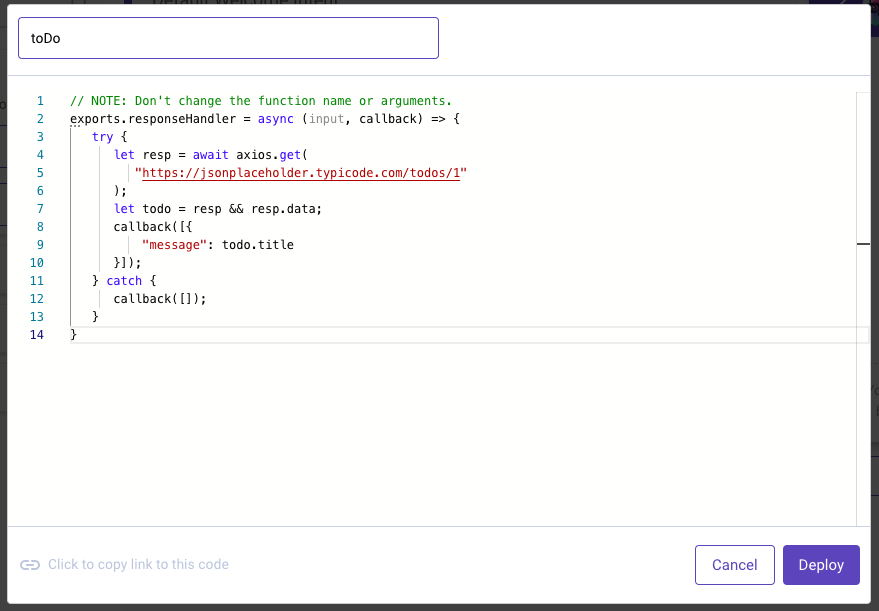
Click on Deploy to make the inline code live for use.
- Now select the created inline code to the bot answers & click on the Train bot.
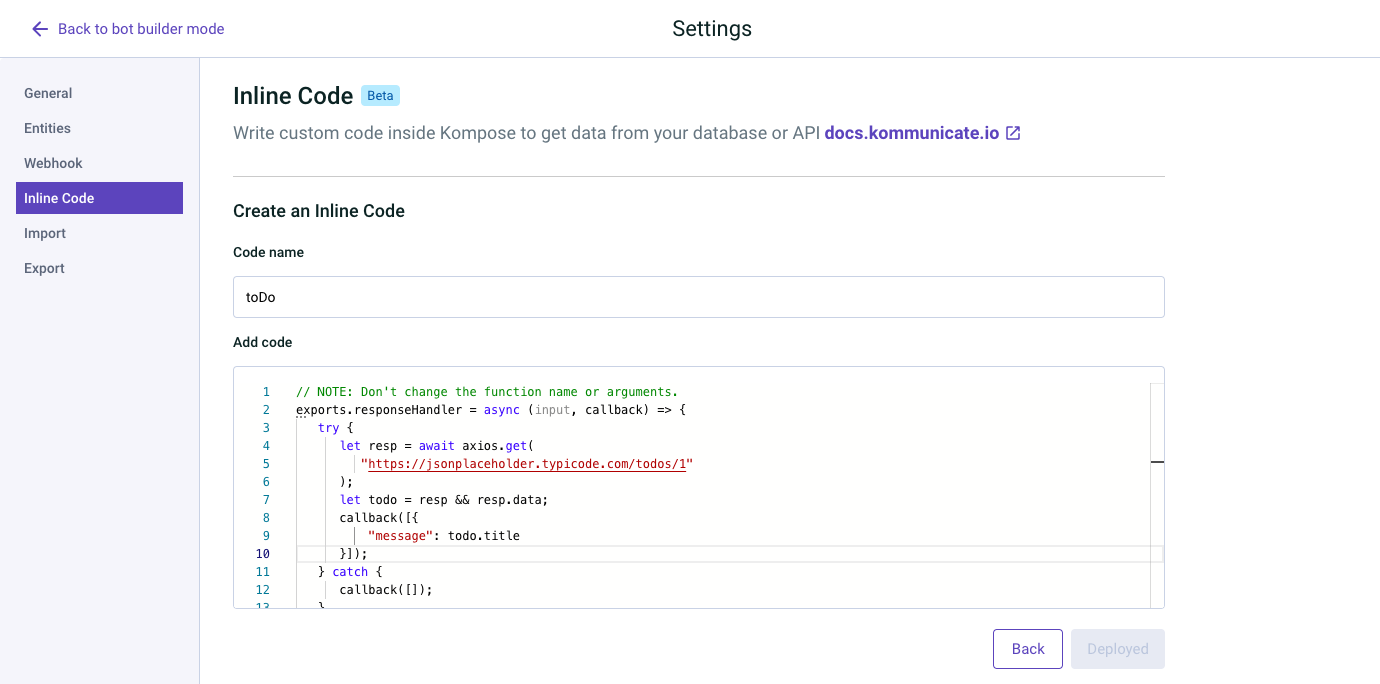
Alternatively, you can create an Inline Code by setting the Kompose Setting page. One can edit, disable/enable or delete from this page.
Inline Code Example
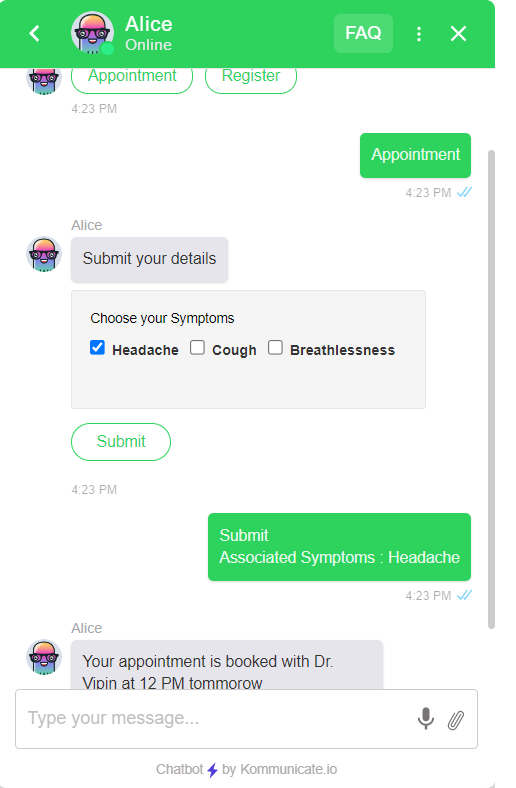
Doctor's Appointment Booking Chatbot using Inline Code:
We have created a Bot with pre-chat lead collection enabled and collecting the email of the user. In welcome message, we have added two buttons named "Appointment" and "Register". To handle appointment button, we have created an Intent with "Appointment" as a training phrase and asking patient to select their illness. Below is the payload used for illness selection.
{
    "message": "Submit your details",
    "metadata": {
        "payload": [
            {
                "data": {
                    "title": "Choose your Disease",
                    "name": "Associated Symptoms",
                    "options": [
                        {
                            "value": "Hypertension",
                            "label": "Hypertension"
                        },
                        {
                            "value": "Diabetes",
                            "label": "Diabetes"
                        },
                        {
                            "value": "Pneumonia",
                            "label": "Pneumonia"
                        },
                        {
                            "value": "Dermatitis",
                            "label": "Dermatitis"
                        }
                    ]
                },
                "type": "checkbox"
            },
            {
                "data": {
                    "name": "Submit",
                    "action": {
                        "postFormDataAsMessage": "true",
                        "postBackToKommunicate": "false",
                        "requestType": "json",
                        "formAction": ""
                    },
                    "type": "submit"
                },
                "type": "submit"
            }
        ],
        "templateId": "12",
        "contentType": "300"
    },
    "platform": "kommunicate"
}
To handle the "Submit" button, we created another intent named Submit and added a training phrase as "Submit" and "associated symptoms." To schedule an appointment, we created an inline code by navigating to the Settings option at the top-right corner of the bot builder page, selecting the Inline Code option, and clicking on the "Create Inline Code" button. We named this inline code Submit. This same inline code named Submit was selected by enabling Dynamic Message under the "Bot Says" section of the Submit intent. Below is the inline code used:
exports.responseHandler = async (input, callback) => {
  try {
    const getDateTimeOneHourLaterInIST = () => {
      let currentDate = new Date();
      currentDate.setMinutes(currentDate.getMinutes() + 330);

      currentDate.setHours(currentDate.getHours() + 1);

      let day = currentDate.getDate();
      let month = currentDate.getMonth() + 1;
      let year = currentDate.getFullYear();
      let formattedDate = `${day}/${month}/${year}`;

      let hours = currentDate.getHours();
      let minutes = currentDate.getMinutes();

      let ampm = hours >= 12 ? 'PM' : 'AM';

      hours = hours % 12;
      hours = hours ? hours : 12;

      minutes = minutes < 10 ? '0' + minutes : minutes;

      let formattedTime = `${hours}:${minutes} ${ampm}`;

      return `${formattedDate} at ${formattedTime}`;
    };

    let appointmentDateTime = getDateTimeOneHourLaterInIST();

    let resp = {
      "appointment": {
        "comment": {
          "body": "This is Body",
          "public": false
        },
        "book": "Your appointment is booked with ",
        "time": ` on ${appointmentDateTime}`
      },
      "Hypertension": {
        "bodyPart": "Heart",
        "medicines": ["Lisinopril", "Amlodipine", "Atenolol"],
        "doctor": "Dr. Smith"
      },
      "Diabetes": {
        "bodyPart": "Pancreas",
        "medicines": ["Metformin", "Glipizide", "Insulin"],
        "doctor": "Dr. Patel"
      },
      "Pneumonia": {
        "bodyPart": "Lungs",
        "medicines": ["Azithromycin", "Amoxicillin", "Oseltamivir"],
        "doctor": "Dr. Johnson"
      },
      "Dermatitis": {
        "bodyPart": "Skin",
        "medicines": ["Hydrocortisone", "Cetirizine", "Eucerin"],
        "doctor": "Dr. Williams"
      }
    };

    if (input.message.includes("Hypertension")) {
      callback([{
        "message": resp.appointment.book + resp.Hypertension.doctor + resp.appointment.time + "\n" + "Affected Body Part: " + resp.Hypertension.bodyPart + "\n" + "Prescribed Medicines are " + resp.Hypertension.medicines
      }]);
    } else if (input.message.includes("Diabetes")) {
      callback([{
        "message": resp.appointment.book + resp.Diabetes.doctor + resp.appointment.time + "\n" + "Affected Body Part: " + resp.Diabetes.bodyPart + "\n" + "Prescribed Medicines are " + resp.Diabetes.medicines
      }]);
    } else if (input.message.includes("Pneumonia")) {
      callback([{
        "message": resp.appointment.book + resp.Pneumonia.doctor + resp.appointment.time + "\n" + "Affected Body Part: " + resp.Pneumonia.bodyPart + "\n" + "Prescribed Medicines are " + resp.Pneumonia.medicines
      }]);
    } else if (input.message.includes("Dermatitis")) {
      callback([{
        "message": resp.appointment.book + resp.Dermatitis.doctor + resp.appointment.time + "\n" + "Affected Body Part: " + resp.Dermatitis.bodyPart + "\n" + "Prescribed Medicines are " + resp.Dermatitis.medicines
      }]);
    } else {
      callback([{
        "message": "No input selected"
      }]);
    }

  } catch (err) {
    console.log("Error: " + err);
    callback([{
      "message": "inline code failed"
    }]);
  }
};
"input" contains all the information regarding that particular intent. "callback" is used to send the message back to your bot. Here, we have used an input message and replied using a callback with the appropriate doctor name scheduled as per the selected illness.
Result:
Extract Entities Through Inline Code
Before extracting entities we need to consider few things here.
"1. Response Handler". It is a function which has two parameters. The first parameter is an object that contains the details of the message that triggers a particular intent, and the second parameter is a function that is responsible for generating the response from bot’s end.
Input
The input parameter is an object. It contains all the information which may be required to generate a response.
Such as, we require the data entered by the user in a form, group id or user id to perform any validation and messages sent by the user.
Sample JSON:
{
   "botId": "prhelpt-a8ju9", // the id of the bot which is supposed to reply
   "key": "5-541471-1628416506417", // unique key associated with a message
   "from": "8TXpRYy1bkAZGD4SHAcSatd4uM0b5WiEcM", // userId of the customer
   "matchedIntent": "608fdf42ab34748dd5355d94a", // intent id which got triggered
   "matchedIntentName": "A sample intent",
   "parameters": null, // this will contain extracted entity data
   "nlpResponse": [],
   "message": "Hello from the end user", // the user input which triggered this intent
   "groupId": 65781456, // the group id of the conversation
   "metadata": {
// data such as form response, etc will appear in KM_CHAT_CONTEXT
       "KM_CHAT_CONTEXT": {
           "formData": {
               "Name": "John",
               "Password": "john123",
               "userDetail": "some_secret_detail",
               "Gender": "male",
               "music_type": [
                   "metal",
                   "pop"
               ]
           },
       }
   },
  }
Extracted entities from the “parameters” property
{
   "botId":"new-bot-4-xf5i8",
   "key":"5-656651-16747851667298",
   "from":"8TXpRYy1bkXZhsUyqRiqTtd4uM0b5WiEcM",
   "matchedIntent":"63abc4ac48jfy6977d2350e07",
   "matchedIntentName":"my name is somename",
   "parameters":{
      "name":"John"
   },
   "nlpResponse":[ ],
   "message":"my name is John",
   "groupId":651451,
   "metadata":{ },
}
Callback
The callback is a function, it accepts an array of messages. The messages are objects. A message can be a plain text or it can be a rich message. Refer to the various types of rich messages supported by our platform here.
// example of a simple message
let message1 ={
   "message":"Hello Kommunicate"
}// example of a rich message with buttons
let message2 ={
   "message":"click on the buttons",
   "platform":"kommunicate",
   "metadata":{
      "contentType":"300",
      "templateId":"3",
      "payload":[
         {
            "type":"link",
            "url":"https://www.google.com",
            "name":"Go To Google"
         },
         {
            "type":"link",
            "url":"https://www.facebook.com",
            "name":"Go To Facebook",
            "openLinkInNewTab":false
         }
      ]
   }
}
callback([message1, message2]);;
Personalize
Nowadays, customers expect better and more personalized communication. A chatbot that addresses the customers by name gives more personalized or human-touch responses than one that does not.
Personalising Kompose chatbot responses make the conversation more interactive, interesting and customer feel happy.
There are 3 ways to personalize the Kompose chatbot responses.
User Information/Pre-chat form
Chat context
Conversation Info
User information/Pre-chat form
To send the personalized message to a end user, we can use the information shared by the user via pre-chat form.
Step 1: Create a Kompose chatbot, add the following bot response/message in the Default Welcome Intent. We have also added the possible user fields in the intent text box UI, use them to write the personalized welcome message.
Welcome Intent/Bot Message
Hello $user_name,
Thanks for contacting us, your email is $user_email and contact number is $user_phone.
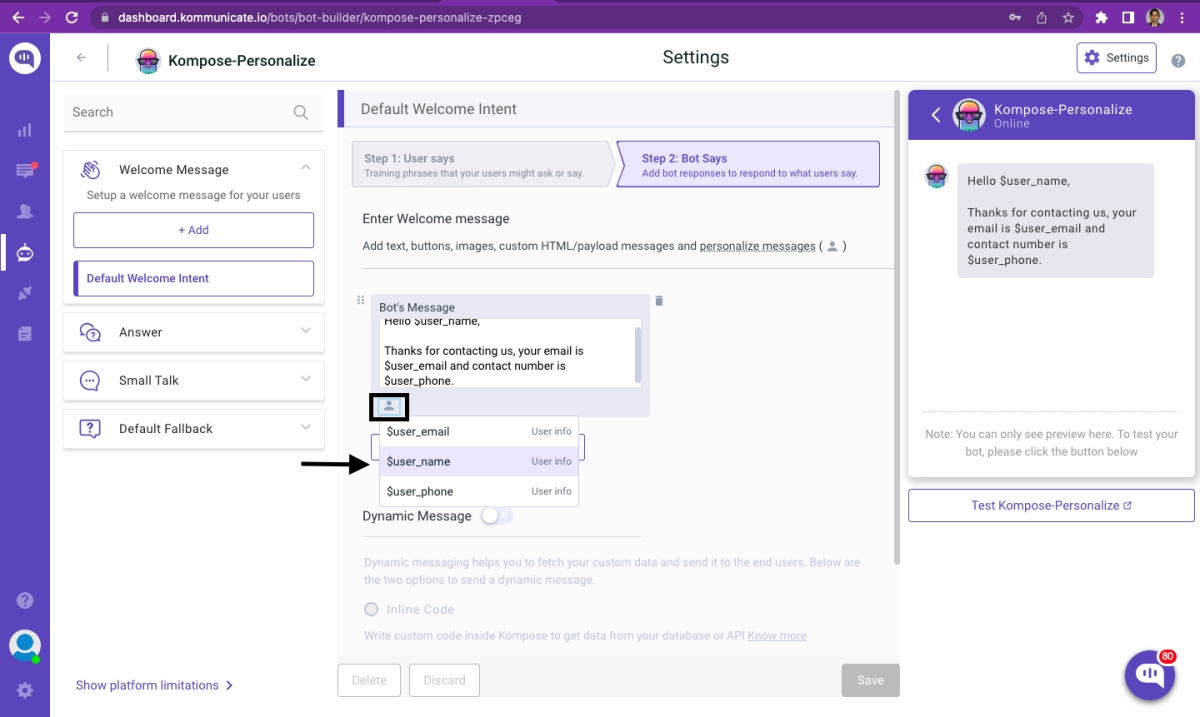
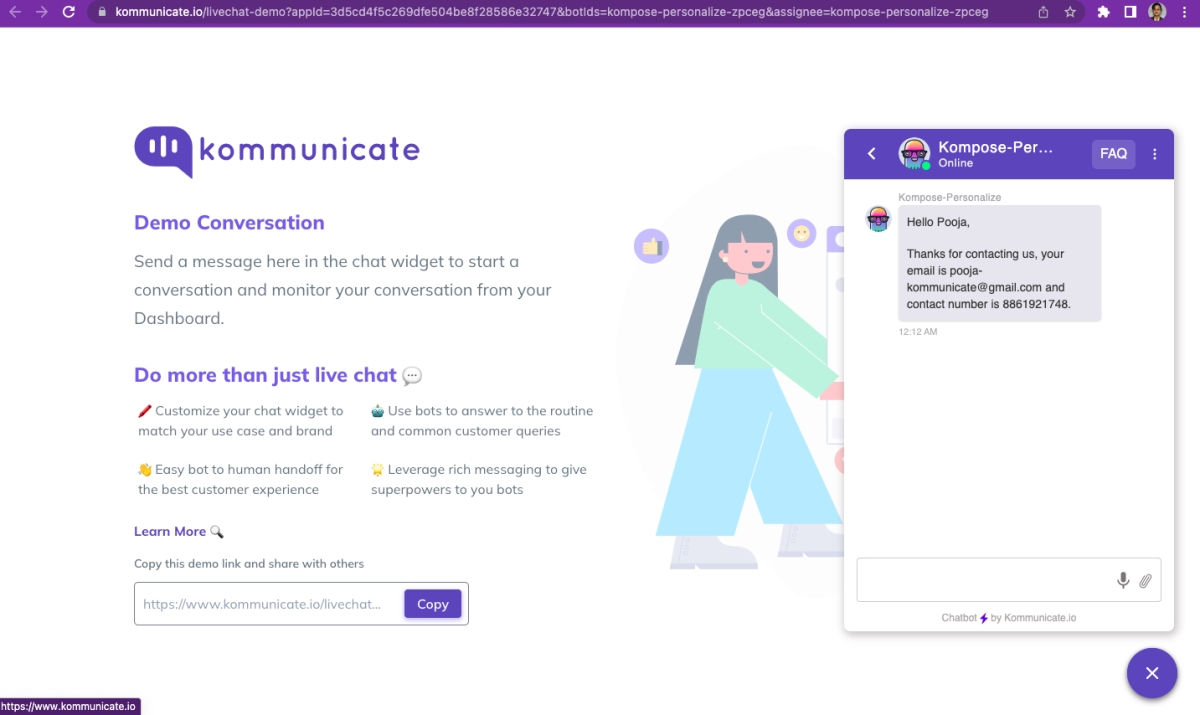
Step 2: The user information such as name, email and phone number will be fetched from the pre-chat data that was previously provided by the customer as shown below.

Step 3: The personalized message sent by the chatbot is shown below
Chat context
Generally, Chat context is used to send the user information to the Bot platform, the data we are passing in the chat context can be fetched and used to send personalised messages to the end user. We will be passing the user information(name, email and phone numbr) in the Kommunicate install script itself.
NOTE: Pre-chat form will be disabled in the Chat context case, if you use the Pre-chat form, the data passed via chat context will be overridden. The information passed via pre-chat form will be used by the chatbot to send the personalised message.
Install script with Chat Context user information:
(function(d, m){
        var kommunicateSettings =
            {"appId":"3d5cd4f5c269dfe504be8f28586e32747","popupWidget":true,"automaticChatOpenOnNavigation":true,"onInit": function() {
        var chatContext = {
              "name" : "PoojaGC", "mail" : "poojagc1@gmail.com", "phonenumber" : "8861921749"
            }
            Kommunicate.updateSettings({"KM_CHAT_CONTEXT":chatContext});
        }};
        var s = document.createElement("script"); s.type = "text/javascript"; s.async = true;
        s.src = "https://widget.kommunicate.io/v2/kommunicate.app";
        var h = document.getElementsByTagName("head")[0]; h.appendChild(s);
        window.kommunicate = m; m._globals = kommunicateSettings;
    })(document, window.kommunicate || {});
The data we have passed(name, email and phone number) in the chat context will be used to send the personalised message. The Kompose chatbot side, we will have to use the user fields such as $context_name, $context_mail and $context_phonenumber in the welcome intent.
Welcome Intent/Bot Message
Greetings!
Your email is $context_mail and contact number is $context_phonenumber,
let me know how can I help you?
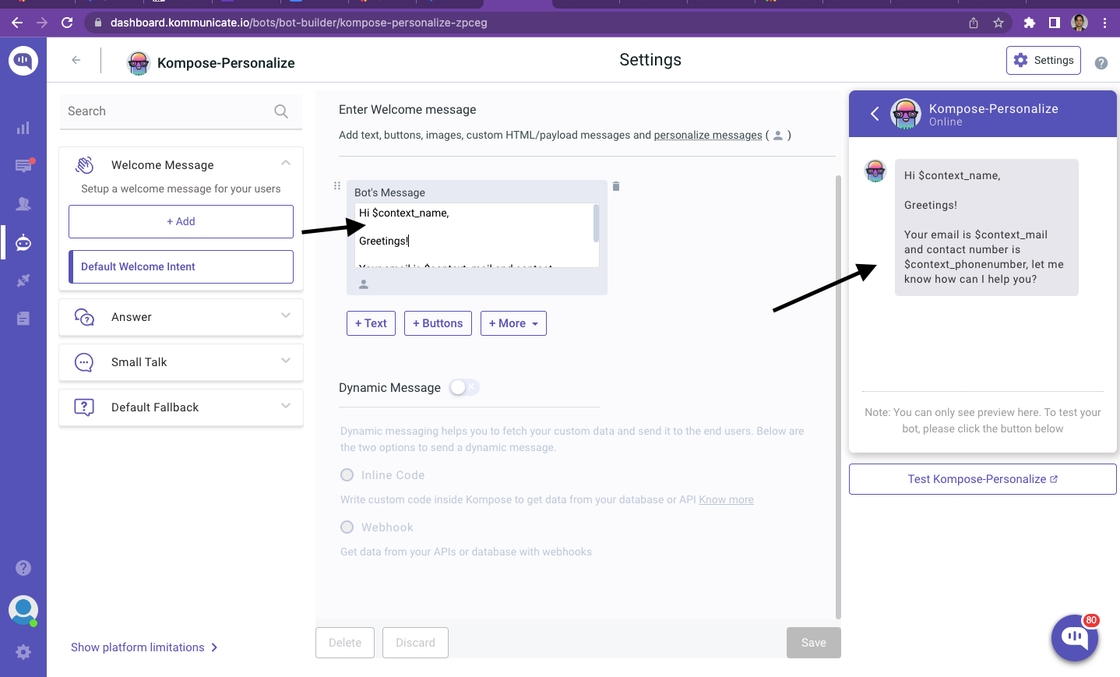
After adding the intent initiate the chat to see the personalised welcome message sent by the chatbot:
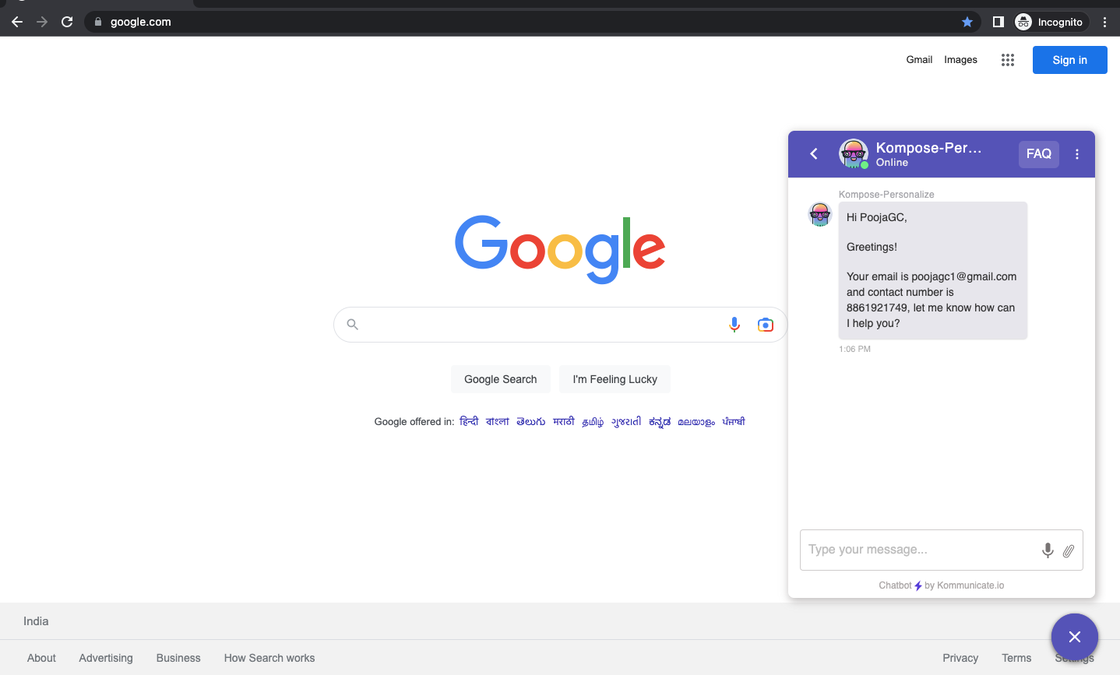
Conversation info
Conversation information is used to show the information on the Kommunicate dashboard. Using conversation information you can show the personalised messages to the user. Information can be fetched by passing the fields such as $conversation_name, $conversation_mail and $conversation_phonenumber.
Installation script
        var kommunicateSettings =
            {"appId":"3d5cd4f5c269dfe504be8f28586e32747","popupWidget":true,"automaticChatOpenOnNavigation":true};
        var s = document.createElement("script"); s.type = "text/javascript"; s.async = true;
        s.src = "https://widget.kommunicate.io/v2/kommunicate.app";
        var h = document.getElementsByTagName("head")[0]; h.appendChild(s);
        window.kommunicate = m; m._globals = kommunicateSettings;
    })(document, window.kommunicate || {});
/* NOTE : Use web server to view HTML files as real-time update will not work if you directly open the HTML file in the browser. */
NOTE: You will get the Group ID/Conversation ID right after the chat is initiated, later you will be passing the user information along with the conversation id/group id.
        {
          groupId: 82166542,  //Replace <GROUP_ID> with your <GROUP_ID> value
          metadata: {
              "name": "PoojaKP",
              "mail":"PoojaKP@gmail.com",
              "phonenumber": "88619217419",
          }
        };
Kommunicate.updateConversationMetadata(conversationInfo);
NOTE: You will have to pass the fields $conversation_name, $conversation_mail and $conversation_phonenumber in the follow up intents(shouldn’t be a welcome intent to fetch the information). Because the conversation ID/Group ID won’t be present before the welcome message sent, Group id will be created right after the conversation is started by sending the welcome message.
Example: Welcome Intent has normal Welcome message with 2 buttons Pricing and Details, you will be adding the following Bot Message/Intent in the follow up intent created for the button Details.
Bot Message/Follow up intent
Greetings!
Your email is $conversation_mail and contact number is $conversation_phonenumber,
let me know how can I help you?
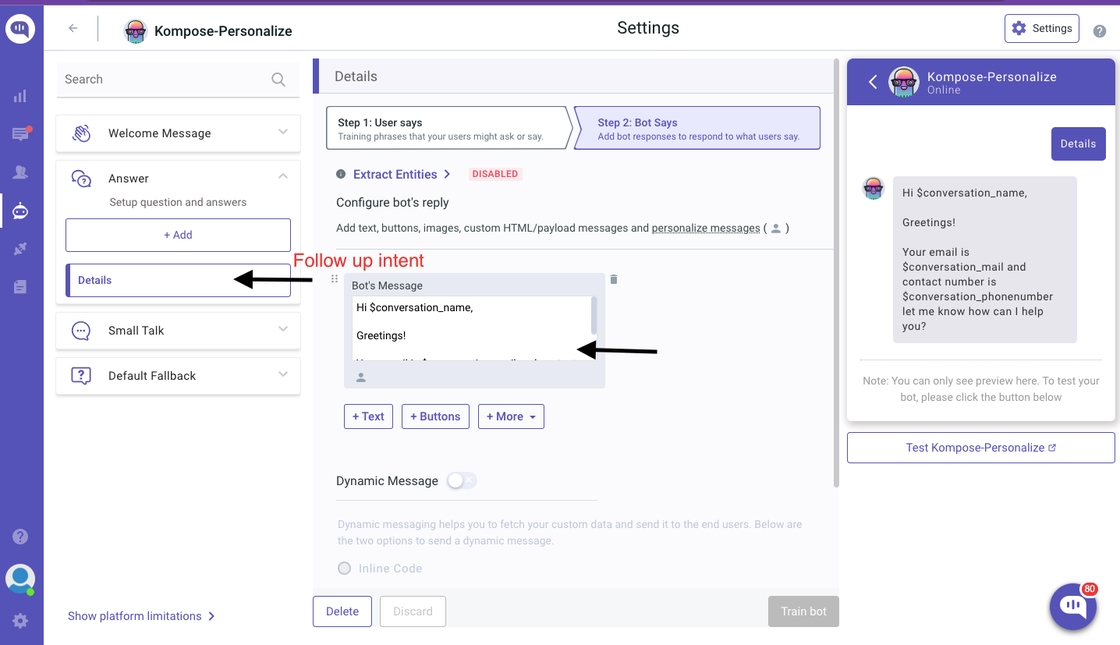
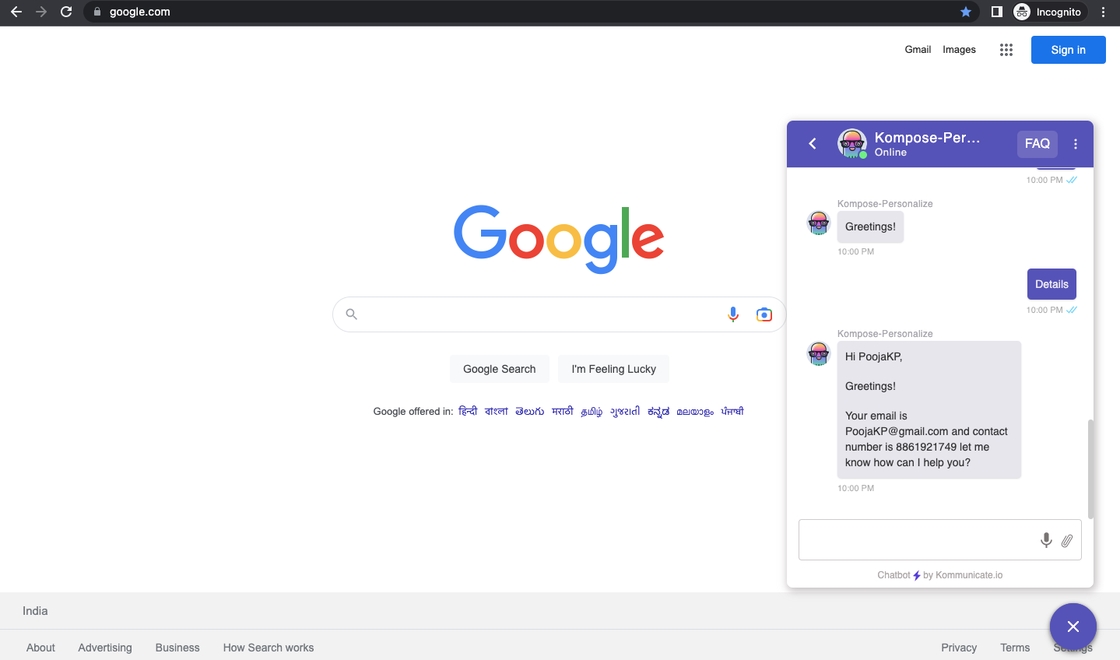
End user side receives the following personalized message once the user clicks on a button "Details" as per the above shared example.
Creating multilingual bots in the Kompose platform:
Navigate to the
Bot Integrationunder theBot Integrationssection, clickCreate a bot with Kompose. Once the bot is named, default bot language is selected, and the human handoff setting is configured, click onManage bots.Select the Kompose bot from the bots list, and click on
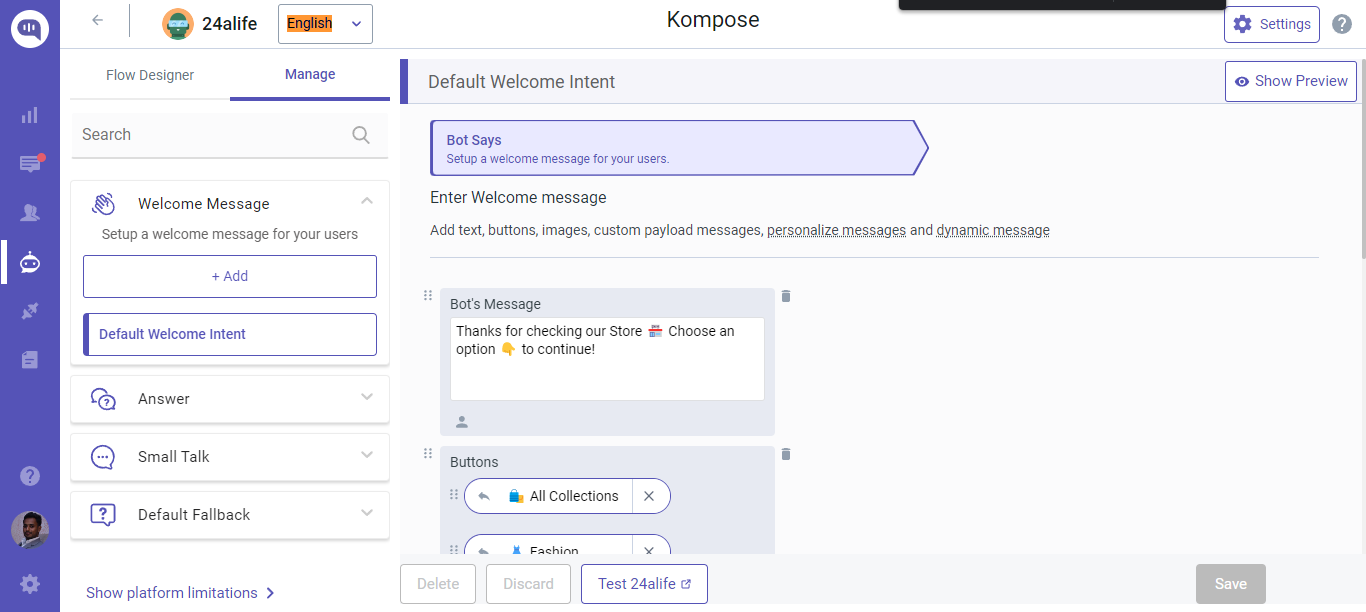
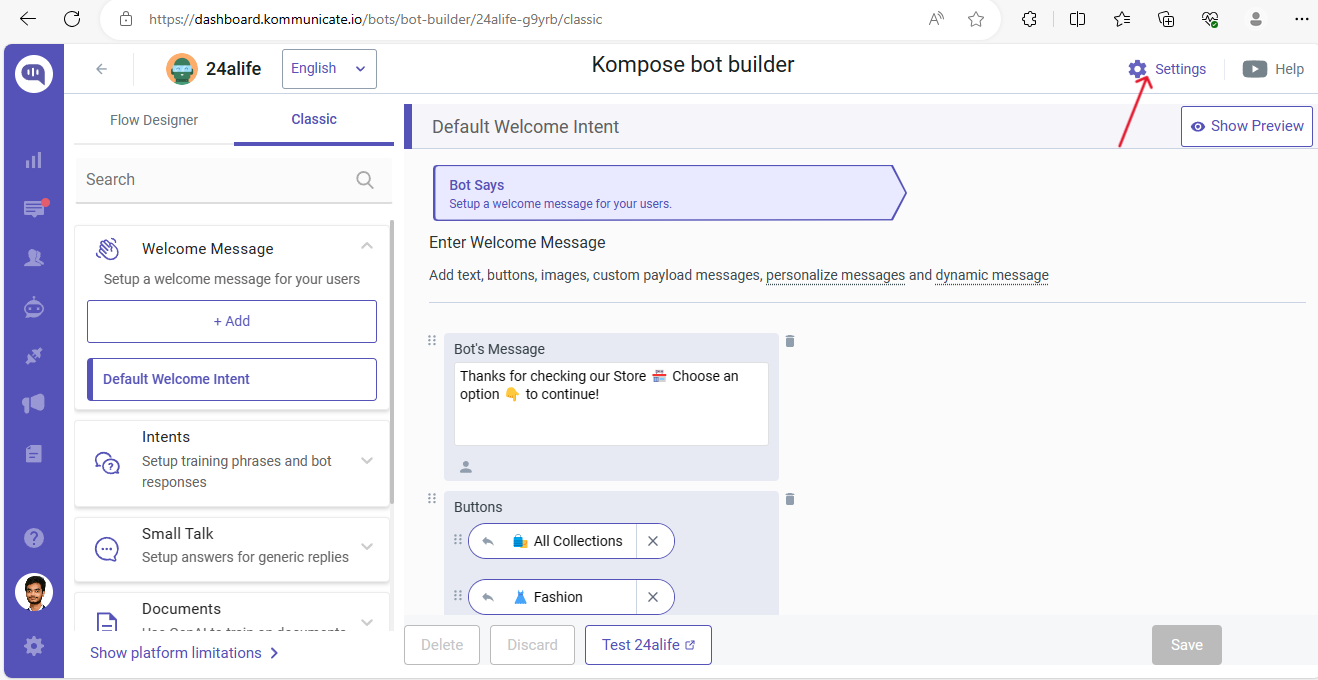
Go to Bot Builder. On the next page, you need to set up a Welcome Message.
In this case, we are creating a 24alife bot in the English language.
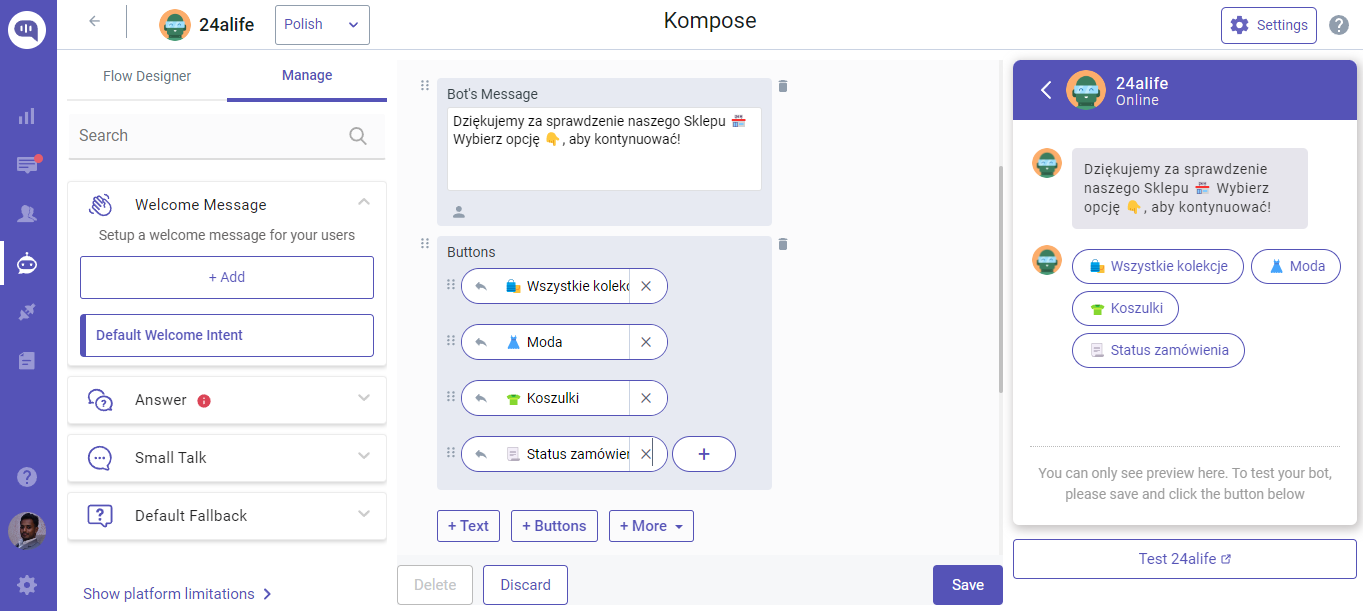
Once you finish adding the Welcome message and intents in the default language, the next step is to click on the language section again and select another language to which you want the bot to respond.
All the intents that are created in the English language are copied to the new language (Polish language for the bot shown here). These copied intents will be initially saved as "drafts"'.
The final step is to get the Intents translated into Polish as shown in the screenshot below. You can use a translator, such as Google Translate, to configure intents in different languages.
Before testing on your website or app, change the browser language to the language in which you want the bot messages to be shown.
No need to change the browser language when testing on the Kommunicate test environment.
To change the browser language in Google Chrome, go to Settings > Languages and move the preferred language to the top of the list.
Once you have changed the browser language, the bot will detect it and start the conversation in the same language.
If your website supports multiple languages and you wish to display the specific bot based on the website's chosen language, you can this script.
const languageCode = get lang code from dropdown;
const navigatorLanguage = window.navigator.language || window.navigator.userLanguage;

(function (d, m) {
  const kommunicateSettings = {
    appId: APP_ID,
    popupWidget: true,
    automaticChatOpenOnNavigation:true
    userLocale: languageCode || navigatorLanguage,
  };
  const s = document.createElement("script");
  s.type = "text/javascript";
  s.async = true;
  s.src = widgetUrl;
  const h = document.getElementsByTagName("head")[0];
  h.appendChild(s);
  window.kommunicate = m;
  m._globals = kommunicateSettings;
})(document, window.kommunicate || {});
Training Your Bot with GenAI Models
When training your bot using GenAI models like Documents or Web URLs, there is no need to translate these resources into multiple languages. Our bot is designed to understand and respond to end-users in the language in which the question is asked.
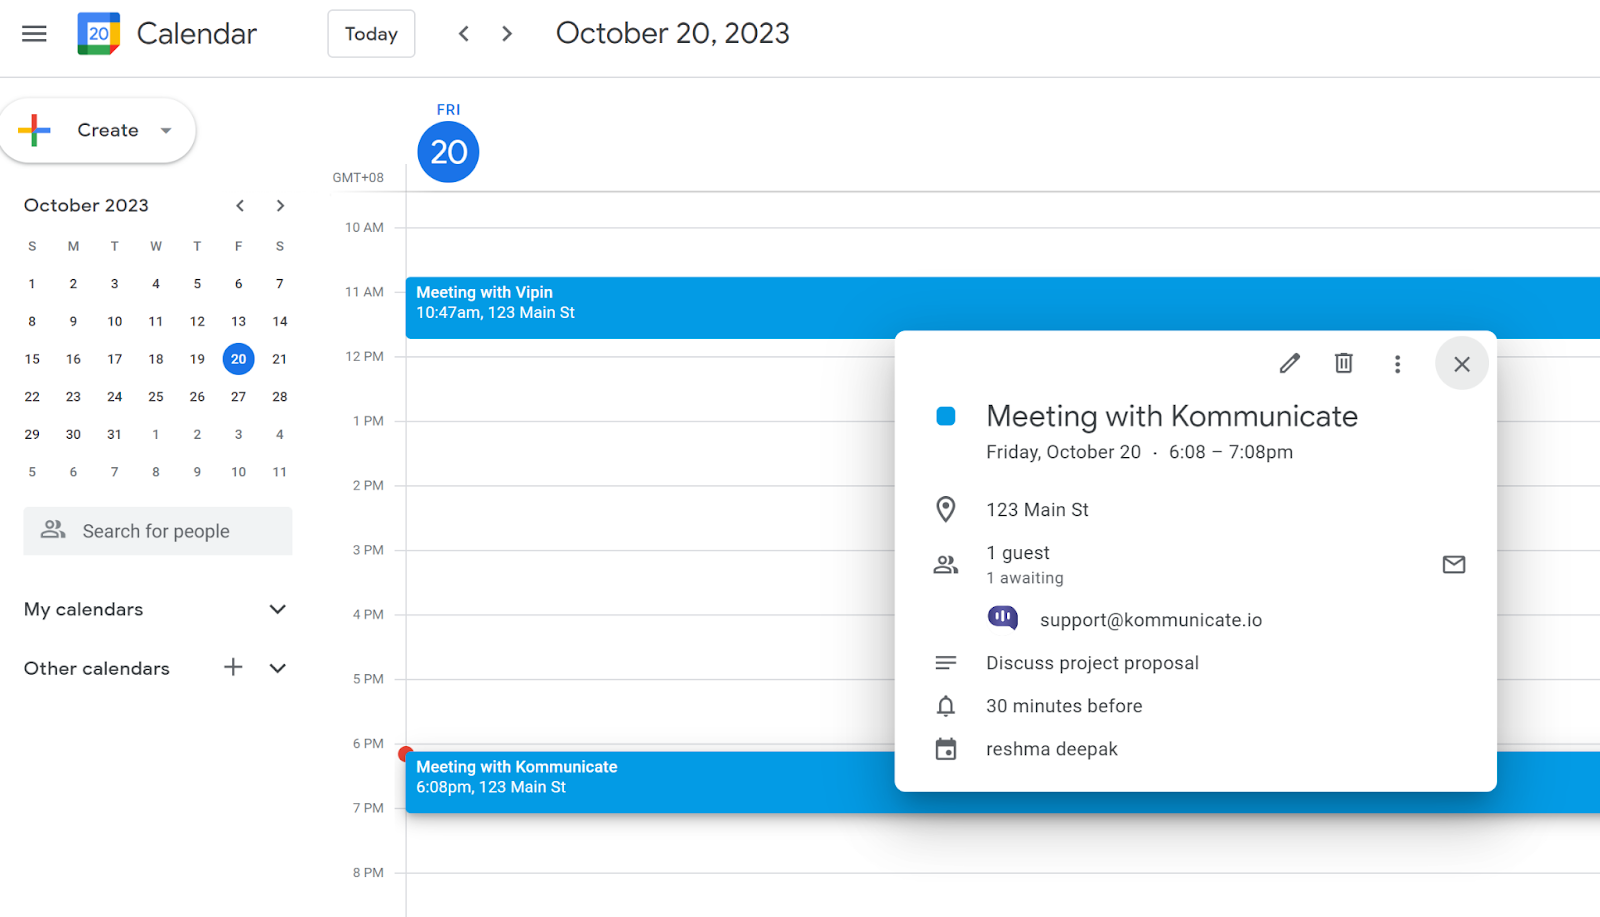
Google Calendar Event Creation through Kompose Inline Editor
You can create Google Calendar Events through Kompose Inline Editor. To achieve this, you can use the following function that leverages the Google API for event creation.
Before using this function, we need two types of credentials:
- Client ID and Client secret
- Access and Refresh token
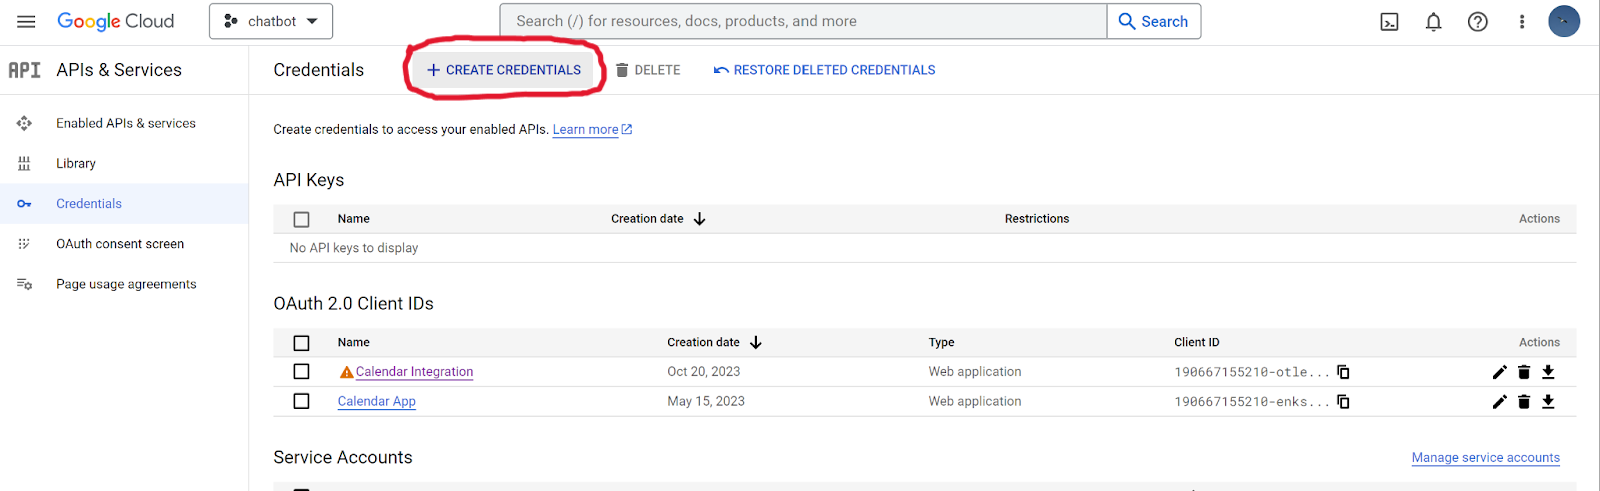
Client ID and Client secret
In order to get Client ID and client secret, you have to create an OAuth Client on Google Console. For this you have to click on Create Credentials in the above link.
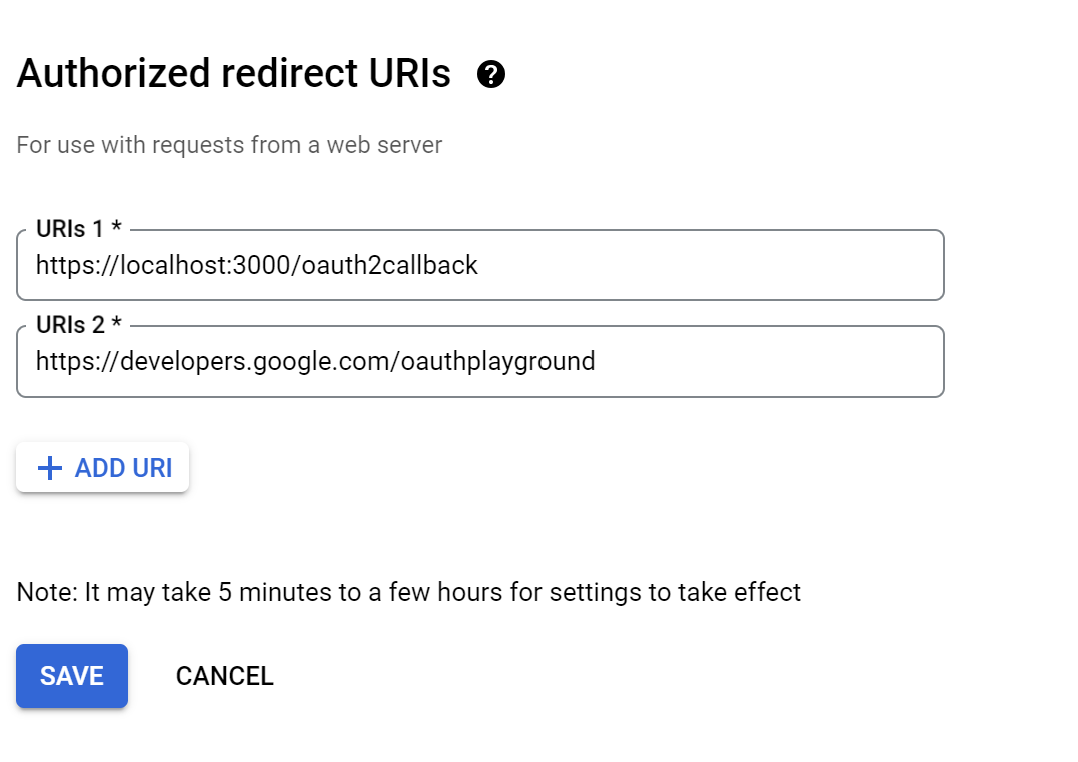
After that select OAuth Client Id then select Web Application and fill the details like shown below:
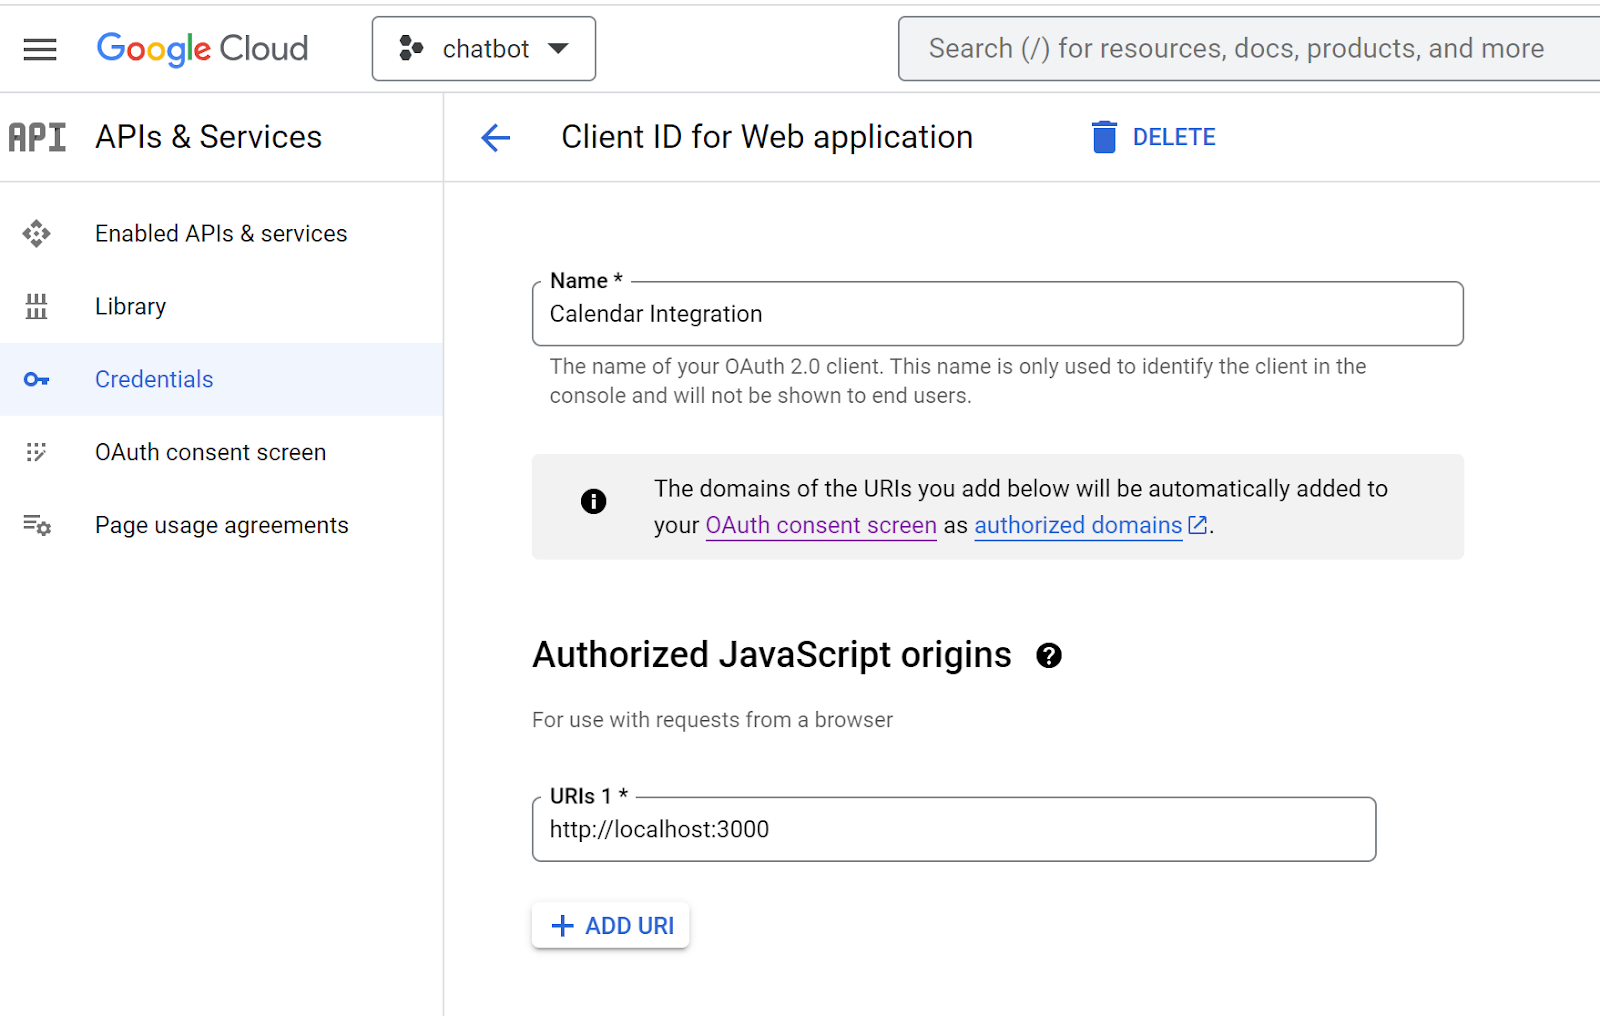
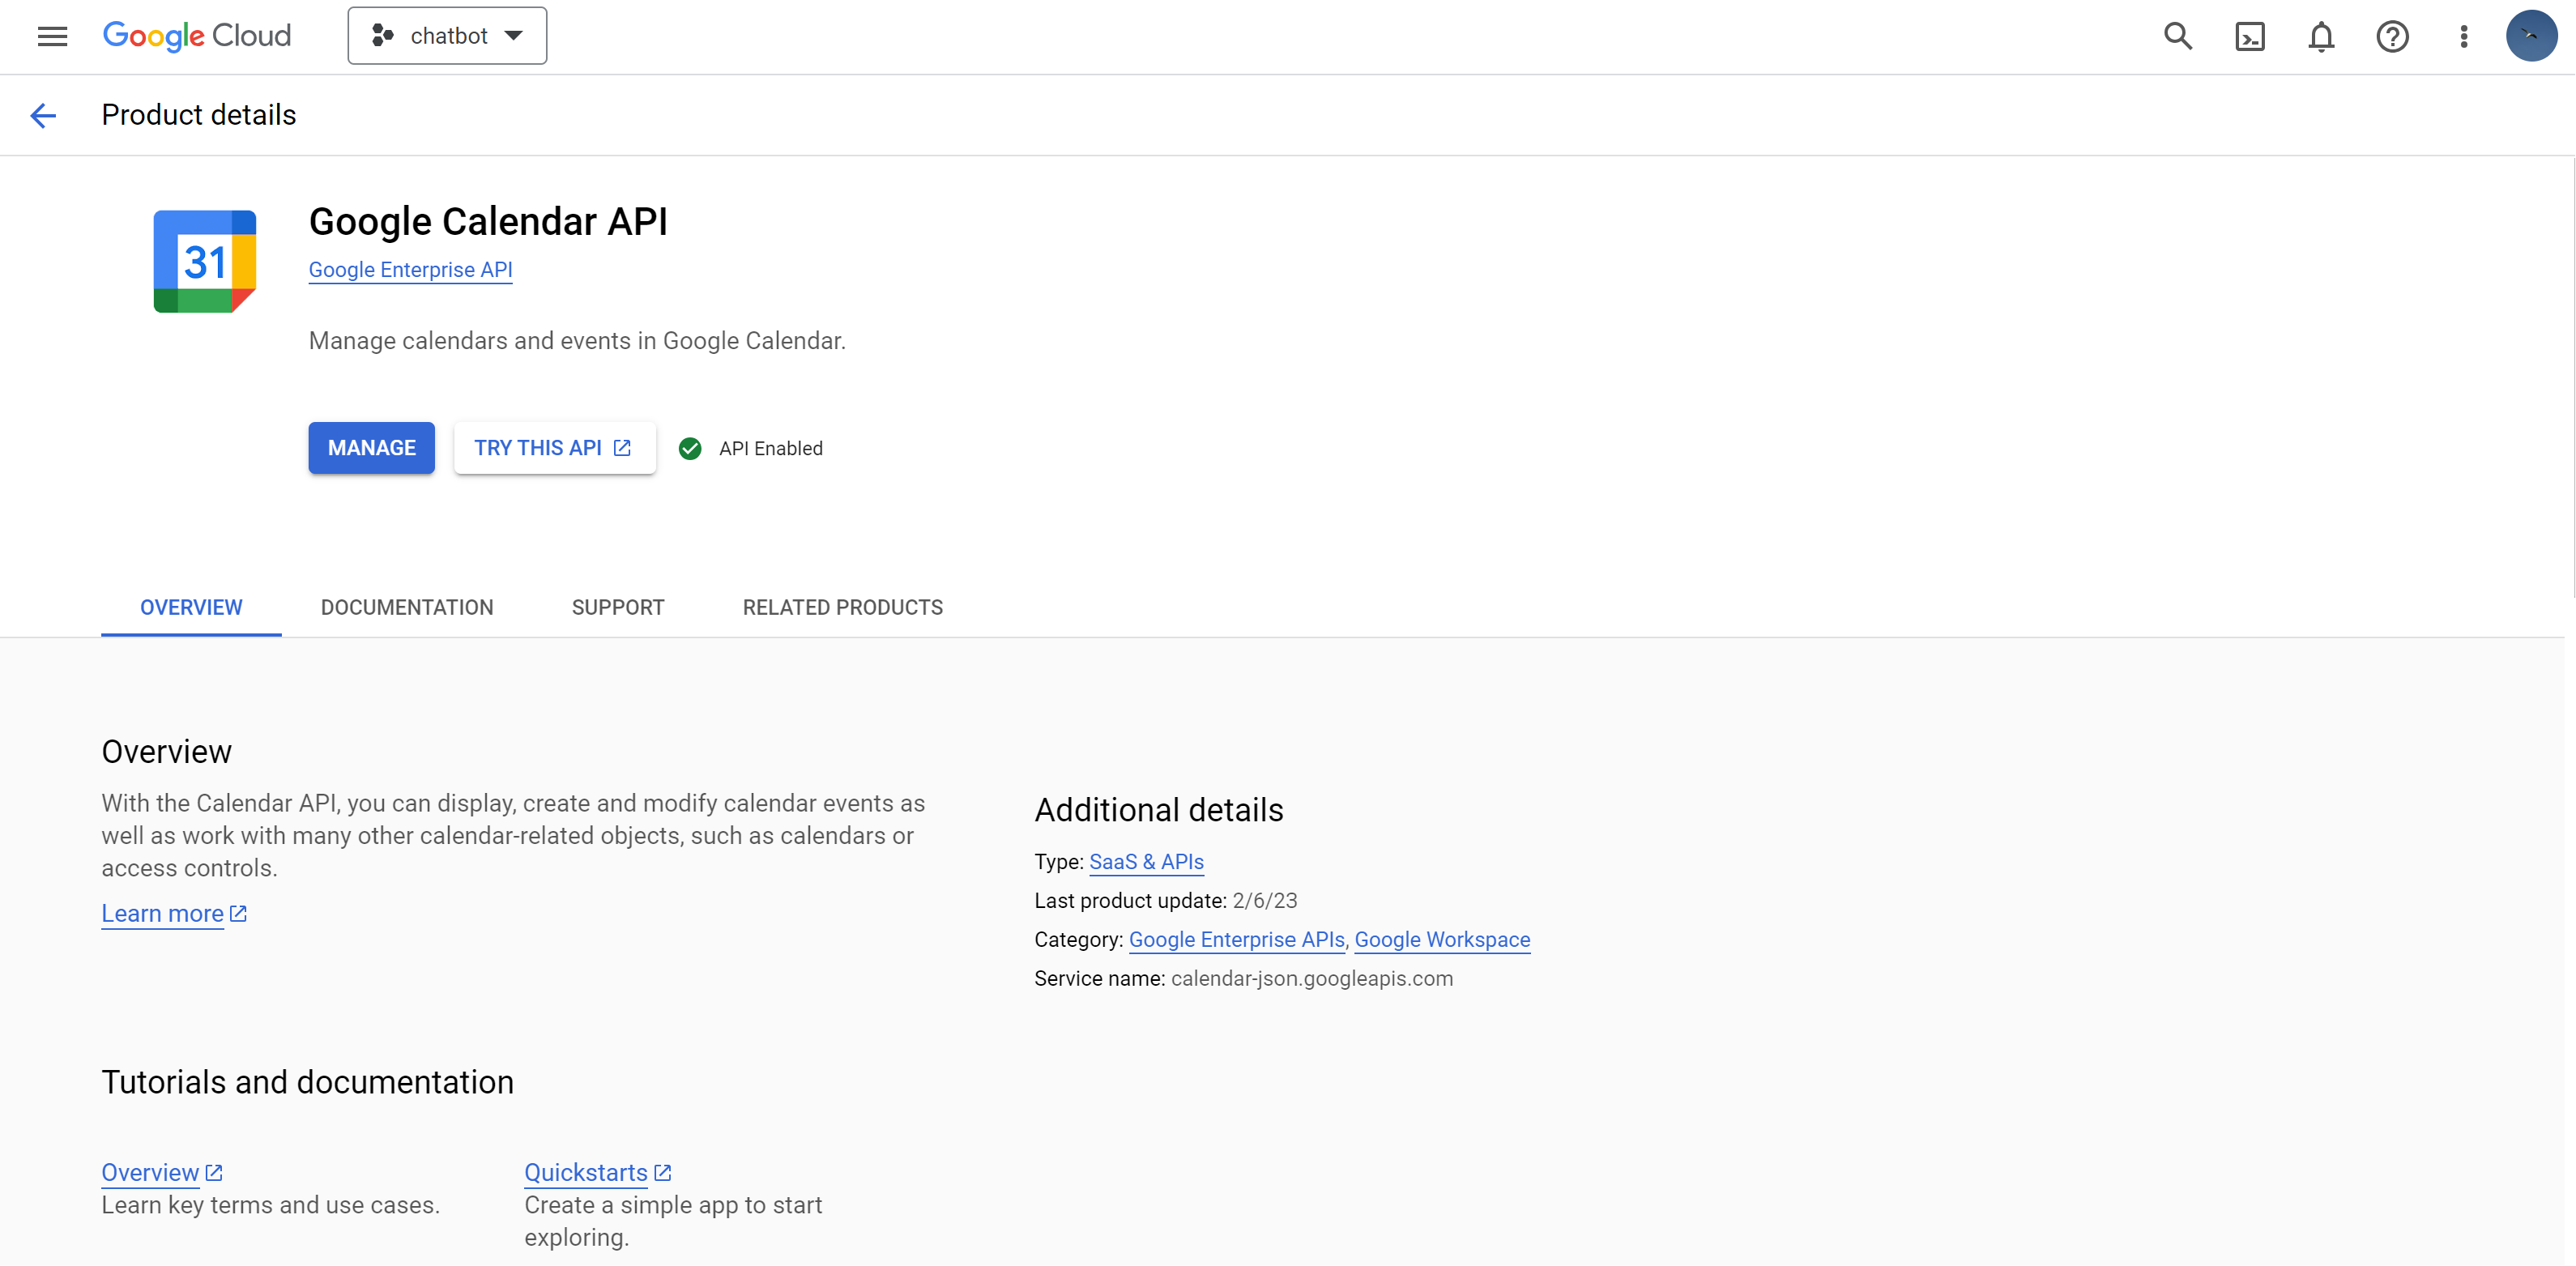
Make sure Google calendar API is enabled in the same project.
Once you complete this process, you will get Client ID and Client Secret. It can also be accessed from Credentials in APIs & Services.
Access and refresh token
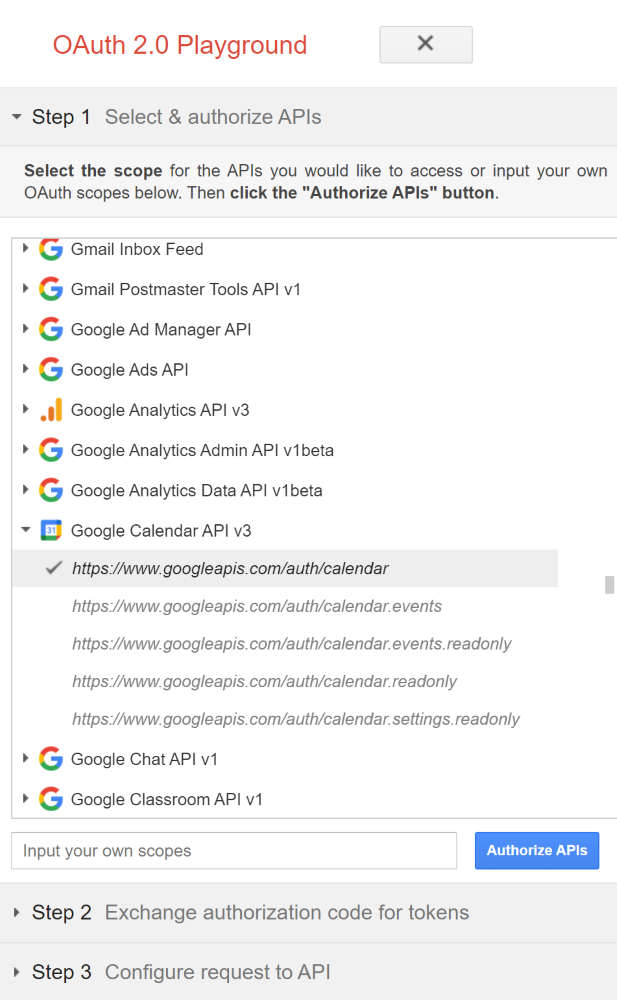
Use the above credentials in Google’s OAuth playground to generate the token.
Step 1: Select & Authorise APIs: Select (https://www.googleapis.com/auth/calendar) like shown below and click on Authorise APIs
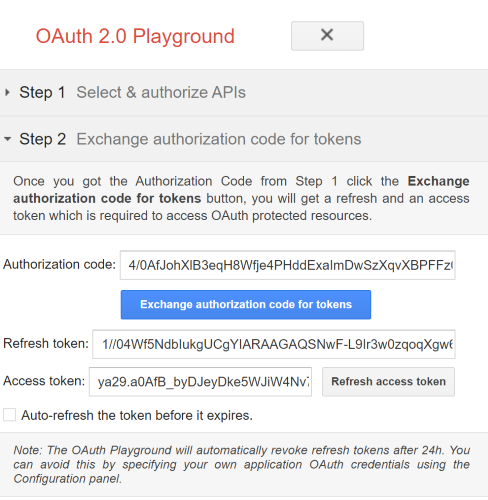
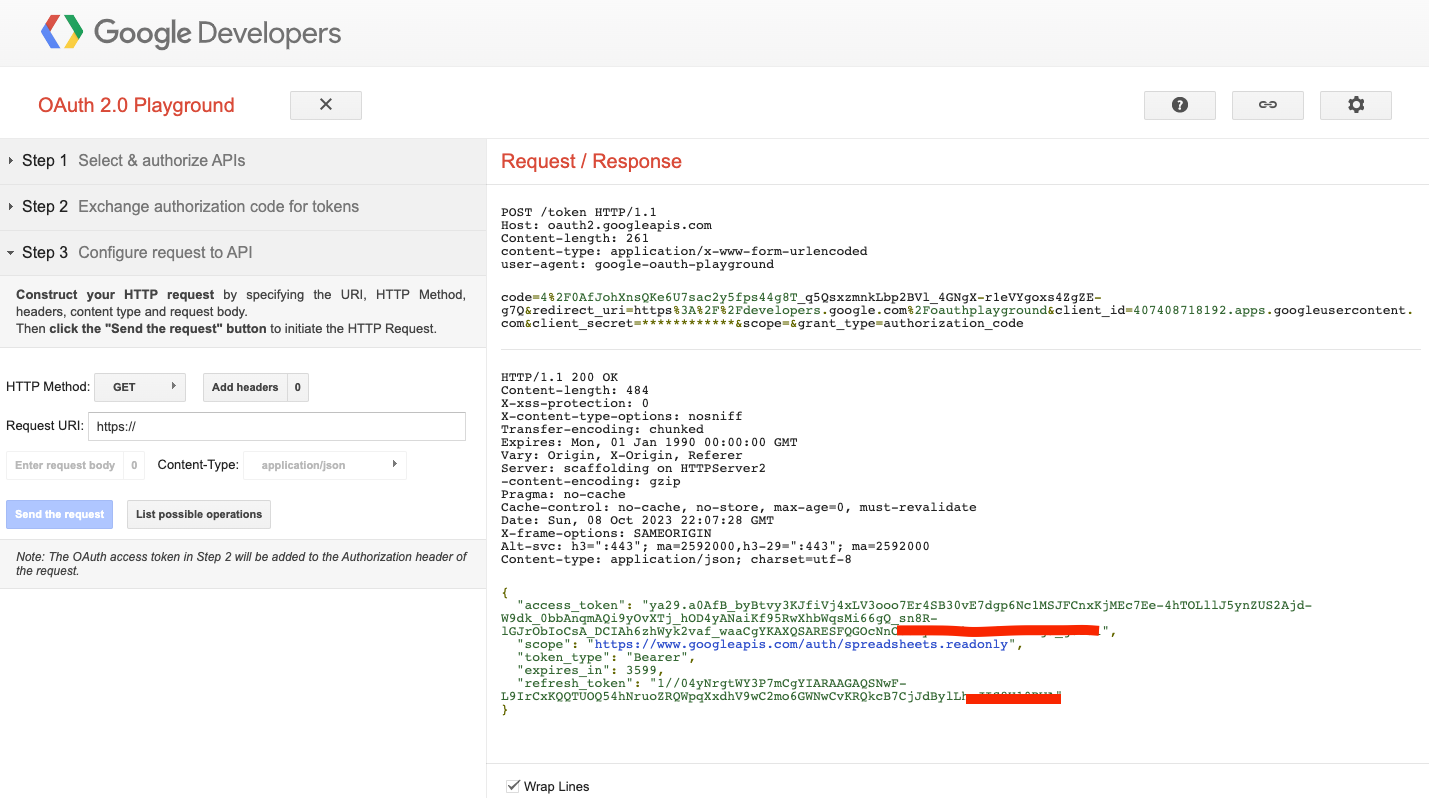
Step 2: Exchange authorization code for tokens: Once you get the Authorization Code from Step 1 click the Exchange authorization code for tokens button, you will get a refresh and an access token which is required to access OAuth protected resources.
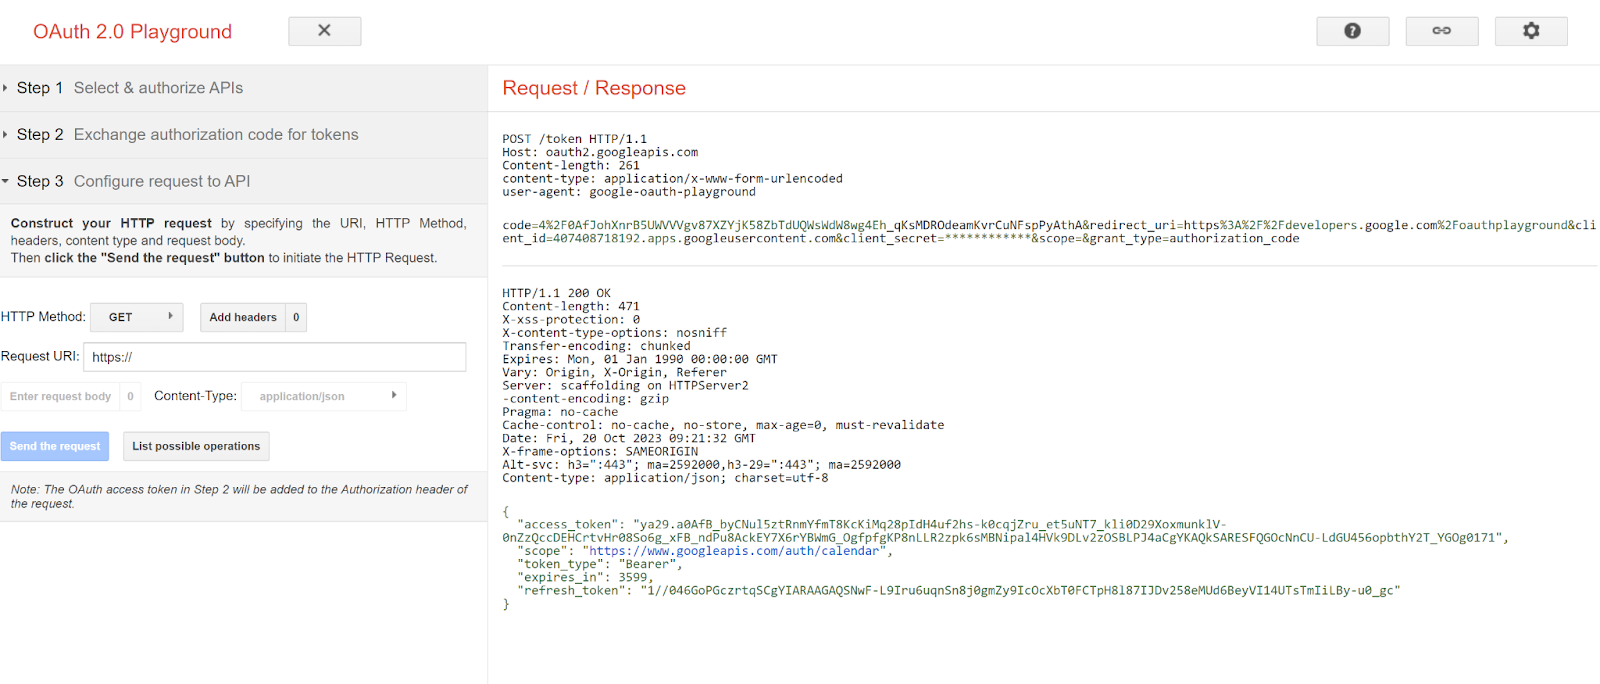
Step 3: Configure request to API
Click the Send the request button to initiate the HTTP Request. Save the generated access token and refresh token.
Steps to create Google Event using inline code in Kompose Bot Builder
Create an intent in Kompose bot Builder and in the Bot says section, select inline code by enabling Dynamic Messages and add the below function in that inline code and save the intent.You need to pass the details collected like Client ID, Secret, Access Token and Refresh Token in this function. You also have to pass the date, time and location of the event and also the attendee email in here.
exports.responseHandler = async (input, callback) => {
  // Get access and refresh token from this playground using your own client id and secret: https://developers.google.com/oauthplayground
  const ACCESS_TOKEN = "" //Pass Access Token
  const REFRESH_TOKEN = "" //Pass Refresh token
  const CLIENT_ID = ""; // Pass client ID
  const CLIENT_SECRET = ""; // Pass client secret
  const oauth2Client = new google.auth.OAuth2(
    CLIENT_ID,
    CLIENT_SECRET
  );

  try {
    oauth2Client.setCredentials({
      access_token: ACCESS_TOKEN,
      refresh_token: REFRESH_TOKEN,
      scope: "https://www.googleapis.com/auth/calendar",
      token_type: "Bearer"
    });

    const calendar = google.calendar({ version: "v3", auth: oauth2Client });

    const event = {
      summary: "Meeting with Kommunicate",//Give a brief summary of your event
      location: "123 Main St",//Enter location details
      description: "Discuss project proposal",//Enter brief description of your event
      start: {
        dateTime: new Date().toISOString(),
        timeZone: "America/Los_Angeles",
      },
      end: {
        dateTime: new Date(new Date().getTime() + 1000 * 60 * 60).toISOString(),
        timeZone: "America/Los_Angeles",
      },
      attendees: [{ email: "support@kommunicate.io" }],
      reminders: {
        useDefault: true,
      },
    };

    calendar.events.insert(
      { calendarId: "primary", resource: event },
      (err, res) => {
        if (err) {
          const errorMsg = err.message;
          callback([{ "message": errorMsg }]);
          return;
        }
        callback([{ "message": `Event created: ${res.data.htmlLink}` }]);
      }
    );
  } catch (error) {
    const errorMsg = error.message;
    callback([{ "message": errorMsg }]);
  }
}
Now when this intent is triggered bot will create an event on Google calendar and send the event link in the bot response. Email is hardcoded in the above function but you can customise this by using details like name and email from chat context (input.metadata.KM_CHAT_CONTEXT?.email) or personalisation. Inline editor function’s input param will contain all the details like user’s message, chat context etc.

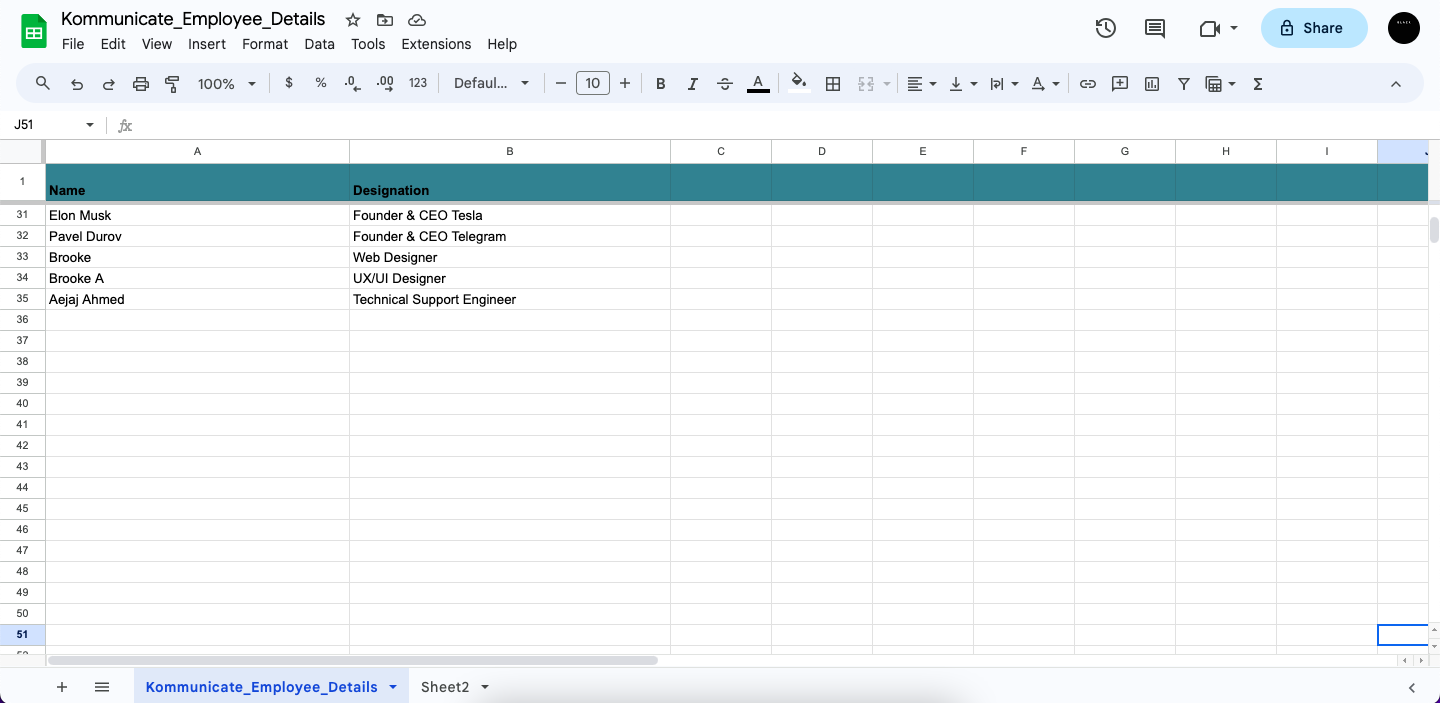
Google Sheet integration through inline code
We have introduced support for creating and retrieving Google Sheet data through the Inline editor and Apps Script. You can utilize the following function, which leverages the Google API for both sheet updation/creation and data retrieval.
1. Retrieve data from an existing Google sheet via Google Apps Script:
The example shown below will fetch the Kommunicate employees' details from Google Sheets to the Kompose bot using Apps Script.
A. Create the Google sheet with the desired data.
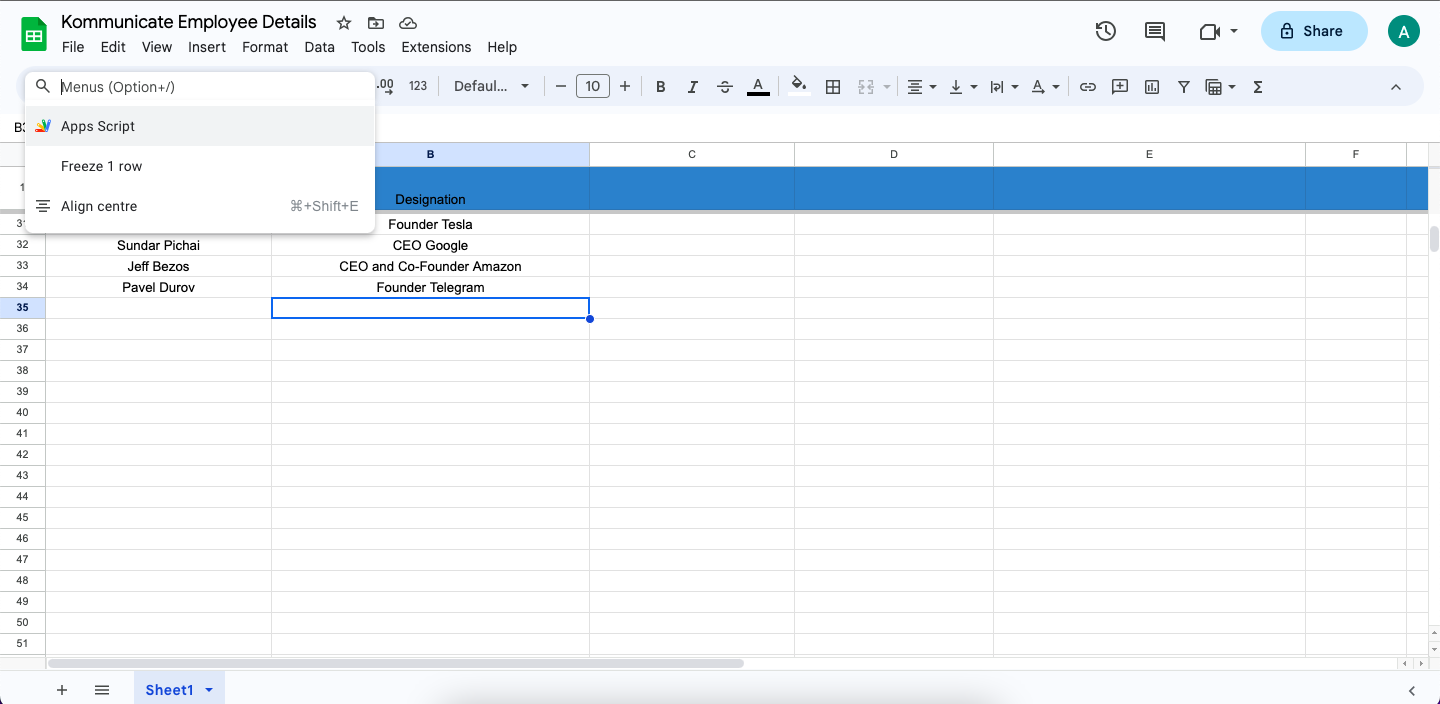
B. Go to Help and search for Apps Script.
Under Apps Script, paste this code
This code is used to get data from the sheet and to create a get request URL for a sheet:
function doGet(req) {
  const doc = SpreadsheetApp.getActiveSpreadsheet(),
    sheet = doc.getSheetByName("Employee_Details"),
    values = sheet.getDataRange().getValues();

  let data = [];

  for (let i = 0; i < values.length; i++) {
    let row = {};

    row["name"] = values[i][0];
    row["designation"] = values[i][1]

    data.push(row);
  }

  return ContentService.createTextOutput(JSON.stringify(data)).setMimeType(ContentService.MimeType.JSON);
}
Google Doc: Spreadsheet Service|Apps Script|Google for Developers
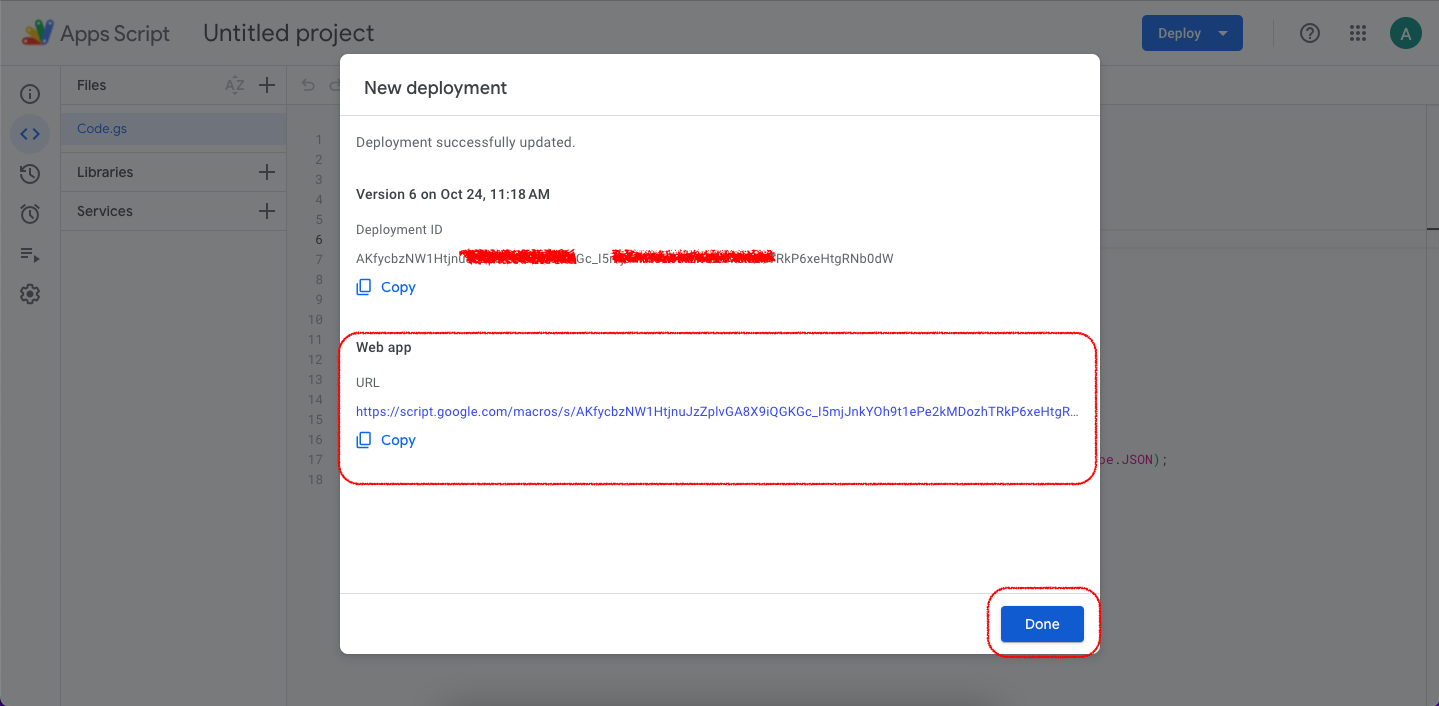
Now click on Deploy, select type as Web app, give a name, and deploy. This will give the Web App URL.
As a last step, we have to create a Kompose inline code function to retrieve the data from the above sheet and display the information when prompted as a bot reply.
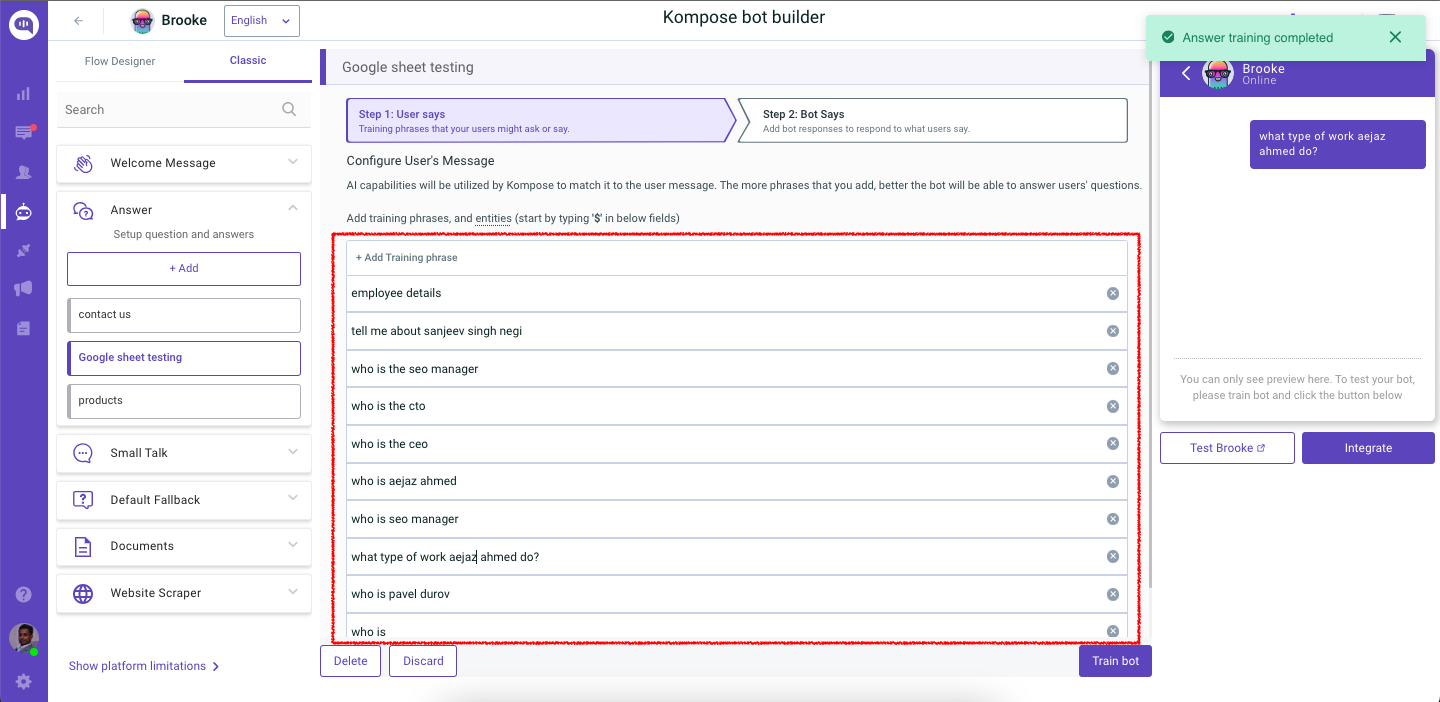
Create an intent, add some training phrases matching Google Sheet data, and use the below inline code.

exports.responseHandler = async (input, callback) => {
  try {
    const { message } = input;
    const splitMessage = message?.replace(/[?]/g, "")?.toLowerCase()?.trim()?.split(" ");
    const fallbackResponse = "Data not found for your query, please contact the developer";

    //user can pass their get url here
    const EMPLOYEE_DETAILS_RESPONSE =
      "https://script.googleusercontent.com/macros/echo?user_content_key=fTuL2HMwBwolBVGu49-Yz4AWNsKpbM6SdVGXF7QVk-ayNDYB7OLzOfgSCIB1b0cV4B4fXb4tlo2oDemN9CCS2h10ox_1xSncGQajx_ryfhECjZEnMtozHXDidNnjzme0rp7o1qi1rs4i0ZnnMpVEkAK_oJQW3sUKfehdBL4IuHOucwFv5VFYOfASKKRqeQEOwijqrnp_QtL293EStz9Jw9Md8uu&lib=M3imb7ly2NVxyO5kkvUDY_pAJLmWRozmf";

    const resp = await axios.get(EMPLOYEE_DETAILS_RESPONSE);

    if (!resp?.data || !splitMessage) {
      callback([{ message: fallbackResponse }]);
      return;
    }

    const response = resp.data;
    let responseForBot = "not found";
    let empName = "";

    for (const { name, designation } of response) {
      const lowerCaseName = name.toLowerCase().split(" ");

      if (splitMessage.some(msg => lowerCaseName.includes(msg))) {
        empName = name;
        responseForBot = designation;
      }
    }

    callback([
      {
        message: `${empName ? empName : "Employee"} is ${responseForBot} in kommunicate`,
        platform: "kommunicate",
      },
    ]);
  } catch (error) {
    callback([{ message: error.message }]);
  }
};
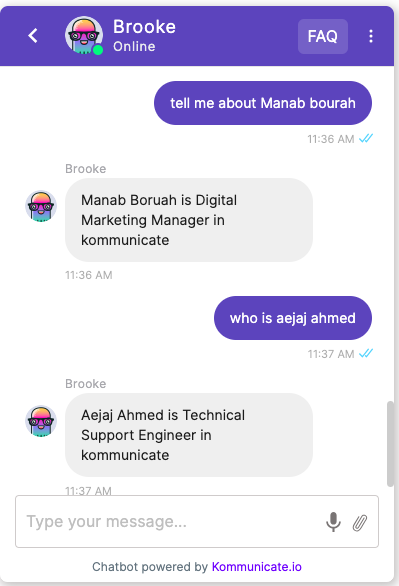
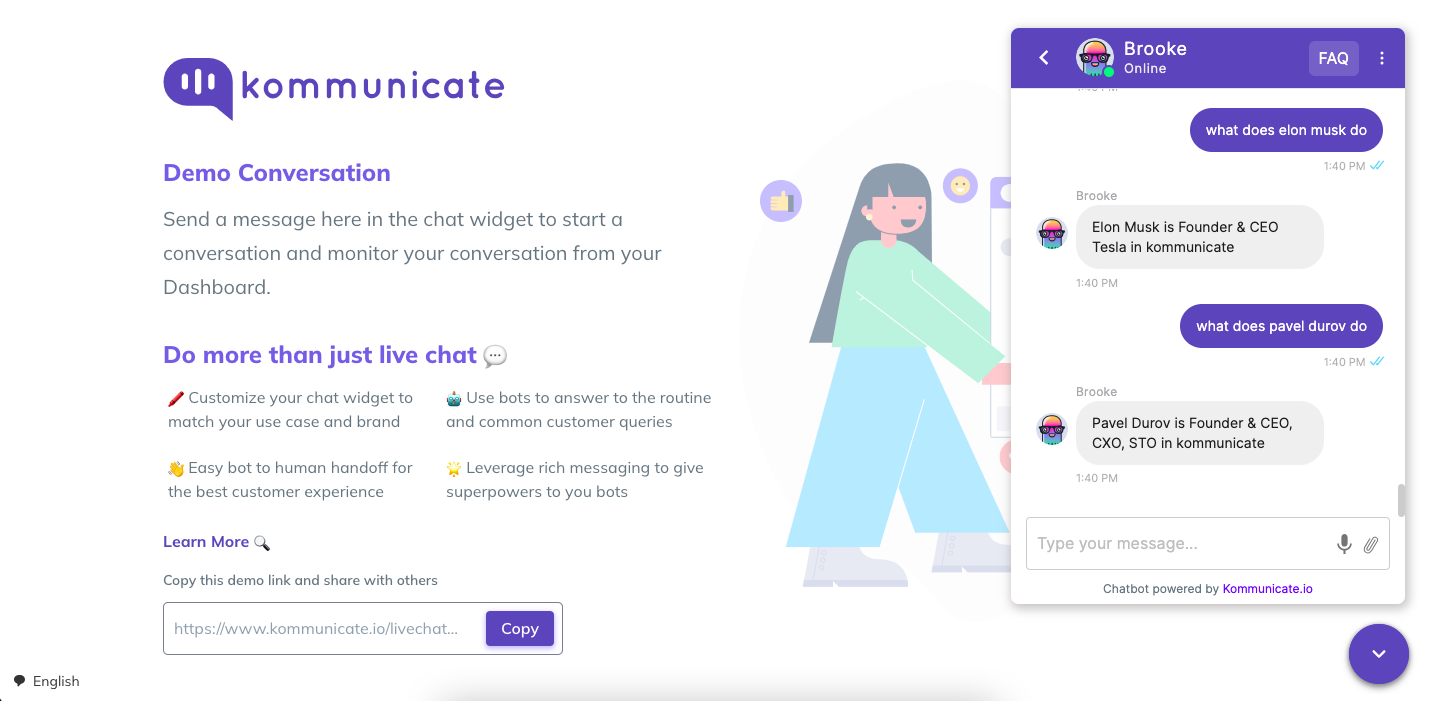
When the intent is matched, the bot will fetch the employee details and respond accordingly.
2. Retrieve data from existing Google Sheet via Inline Code:
A. Create the Google sheet with the desired data as outlined in the first step of the previous method.
B. Enable Google Sheet API and add Client ID and Client secret in OAuth Settings(Refer to this section).
C. Access and Refresh Token:

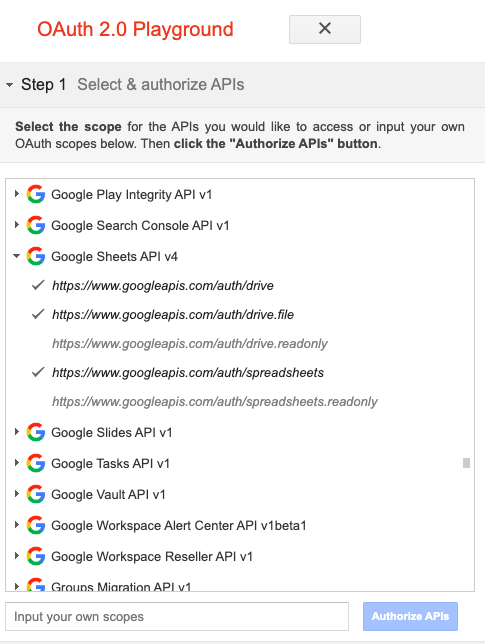
Use the above credentials in Google’s OAuth playground to generate the token. Pass the Client ID and Secret ID created above in the settings option of Playground, then select
https://www.googleapis.com/auth/spreadsheets.readonly like shown below and proceed with Authorize APIs.

D. Once tokens are generated, as a next step, we need to create an intent that will have this inline code function to retrieve the data and show it as a bot response. Ensure to add a few bot training phrases that match user questions and sheet data.
exports.responseHandler = async (input, callback) => {
  // Get access and refresh token from auth playground page
  // client ID and secret: https://developers.google.com/oauthplayground

  const ACCESS_TOKEN = "Your_Access_Token";
  const REFRESH_TOKEN = "Your_Refresh_Token";

  const CLIENT_ID = "Your_Client_ID";

  const CLIENT_SECRET = "Your_Client_Secret_Key";

  const oauth2Client = new google.auth.OAuth2(CLIENT_ID, CLIENT_SECRET);
  const SCOPES = ['https://www.googleapis.com/auth/spreadsheets.readonly'];

  try {
    const { message } = input;
    const splitMessage = message?.replace(/[?]/g, "")?.toLowerCase()?.trim()?.split(" ");
    const fallbackResponse = "Data not found for your query, please try again";

    oauth2Client.setCredentials({
      access_token: ACCESS_TOKEN,
      refresh_token: REFRESH_TOKEN,
      scope: SCOPES,
      token_type: "Bearer",
    });

    const sheets = google.sheets({ version: "v4", auth: oauth2Client });
    const spreadsheetId = "Your_Spreadsheet_ID"; //ID of the spreadsheet found in URL
    const range = "Employee_Details!A1:B32"; //Name and range of the spreadsheet within Spreadsheet. For example, Sheet1.

    sheets.spreadsheets.values.get(
      {
        spreadsheetId,
        range,
      },
      (err, res) => {
        if (err) {
          callback([{ message: `The API returned an error: ${err}` }]);
          return;
        }

        const rows = res?.data?.values;

        if (rows.length) {
          const keys = rows[0];
          const convertedData = [];

          for (let i = 1; i < rows.length; i++) {
            const obj = {};
            for (let j = 0; j < keys.length; j++) {
              obj[keys[j].toLowerCase()] = rows[i][j];
            }
            convertedData.push(obj);
          }

          let responseForBot = "not found";
          let empName = "";

          for (const { name, designation } of convertedData) {
            const lowerCaseName = name.toLowerCase().split(" ");

            if (splitMessage.some(msg => lowerCaseName.includes(msg))) {
              empName = name;
              responseForBot = designation;
            }
          }
          callback([
            {
              message: `${empName ? empName : "Employee"} is ${responseForBot} in kommunicate`,
              platform: "kommunicate",
            },
          ]);

          return;
        }

        callback([{ message: fallbackResponse }]);
      }
    );
  } catch (error) {
    const errorMsg = error.message;
    callback([{ message: errorMsg }]);
  }
};
3. Update data to existing Google sheet via Inline Code:
With this approach, you can update the Google sheet by retrieving information provided by the user through the chat widget.
A. Several of the steps outlined in the previous method will be consistent here as well (A, B, C). The key change is that we will utilize the Google Sheet API V4 for this process.
- https://www.googleapis.com/auth/spreadsheets
- https://www.googleapis.com/auth/drive
- https://www.googleapis.com/auth/drive.file
B. The next step is to create an intent and a form to collect information from users such as the sales form in the example shown below.
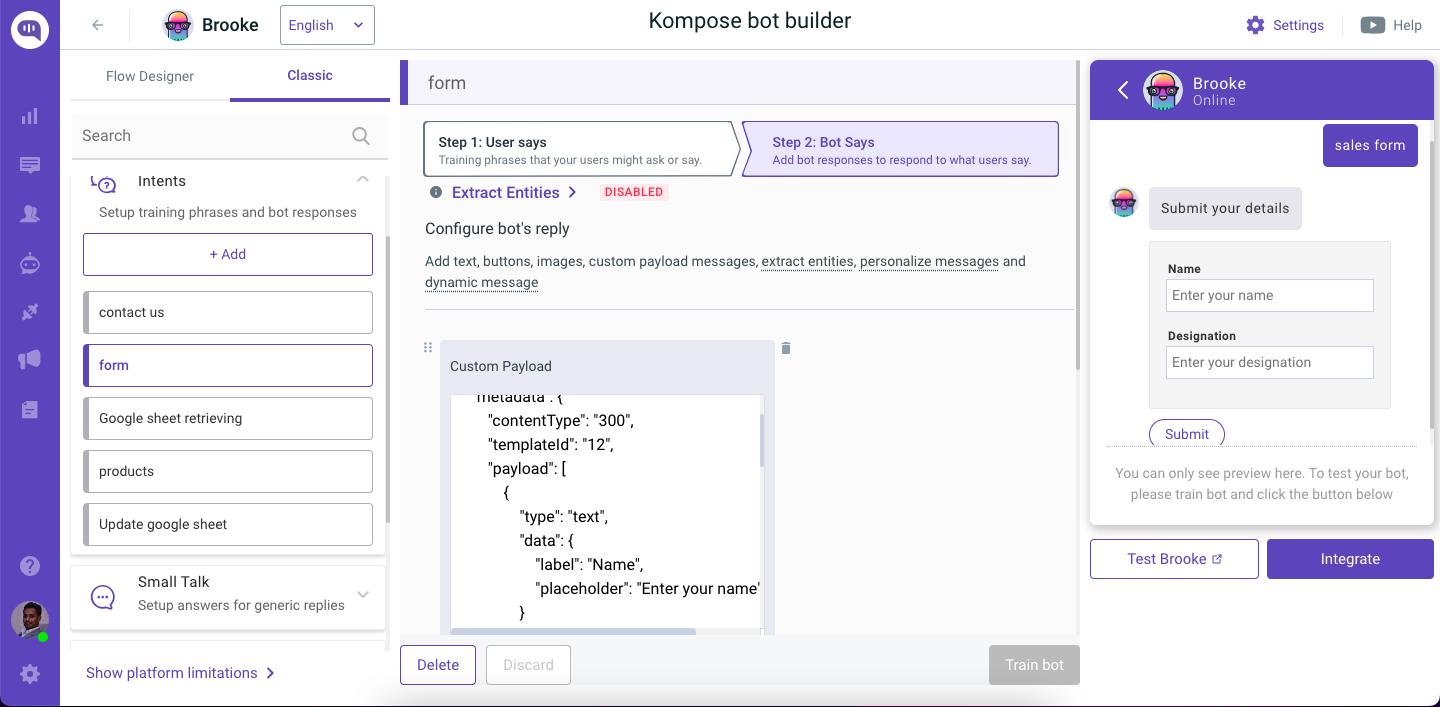
Payload to use inside the Form intent.
{
    "message": "Submit your details",
    "platform": "kommunicate",
    "metadata": {
        "contentType": "300",
        "templateId": "12",
        "payload": [
            {
                "type": "text",
                "data": {
                    "label": "Name",
                    "placeholder": "Enter your name"
                }
            },
            {
                "type": "text",
                "data": {
                    "label": "Designation",
                    "placeholder": "Enter your designation"
                }
            },
            {
                "type": "hidden",
                "data": {
                    "name": "userDetail",
                    "value": "some_secret_detail"
                }
            },
            {
                "type": "submit",
                "data": {
                    "action": {
                        "requestType": "postBackToBotPlatform",
                        "message": "submitting data...."
                    },
                    "type": "submit",
                    "name": "Submit"
                }
            }
        ]
    }
}
C. The final step is to create an intent to include an inline code & trigger the form intent, fill in the information, and submit to update the Google sheet.
exports.responseHandler = async (input, callback) => {

  const ACCESS_TOKEN = "Add your access token here";
  const REFRESH_TOKEN = "Add your refresh token here";

  const CLIENT_ID = "Add your client id here";

  const CLIENT_SECRET = "Add your client secret key here";

  const oauth2Client = new google.auth.OAuth2(CLIENT_ID, CLIENT_SECRET);
  const SCOPES = ["https://www.googleapis.com/auth/spreadsheets", "https://www.googleapis.com/auth/drive", "https://www.googleapis.com/auth/drive.file"];

  try {
    const { "KM_CHAT_CONTEXT": { formData } } = input.metadata;

    if(!formData) {
      callback([{ message: `No data to process` }]);
      return;
    }

    const fallbackResponse = "Unable to Update data in sheet, please try after some time or contact developer";

    oauth2Client.setCredentials({
      access_token: ACCESS_TOKEN,
      refresh_token: REFRESH_TOKEN,
      scope: SCOPES,
      token_type: "Bearer",
    });

    const sheets = google.sheets({ version: "v4", auth: oauth2Client });
    const spreadsheetId = "Add your spreadsheet id here";
    const range = "Kommunicate_Employee_Details!A:B";
    const values = [[ formData.Name, formData.Designation ]];

    sheets.spreadsheets.values.append(
      {
        spreadsheetId,
        range,
        resource: { values },
        valueInputOption: "RAW",
        includeValuesInResponse: true,
        insertDataOption: "INSERT_ROWS"
      },
      (err, res) => {
        if (err) {
          callback([{ message: `The API returned an error: ${err}` }]);
          return;
        }

        if (res.status === 200) {
          const response = res?.data?.updates;

          if (response) {
            callback([{ message: `Lead saved successfully` }]);
            return;
          }

          callback([{ message: fallbackResponse }]);
        }
      }
    );
  } catch (error) {
    const errorMsg = error.message;
    callback([{ message: errorMsg }]);
  }
};
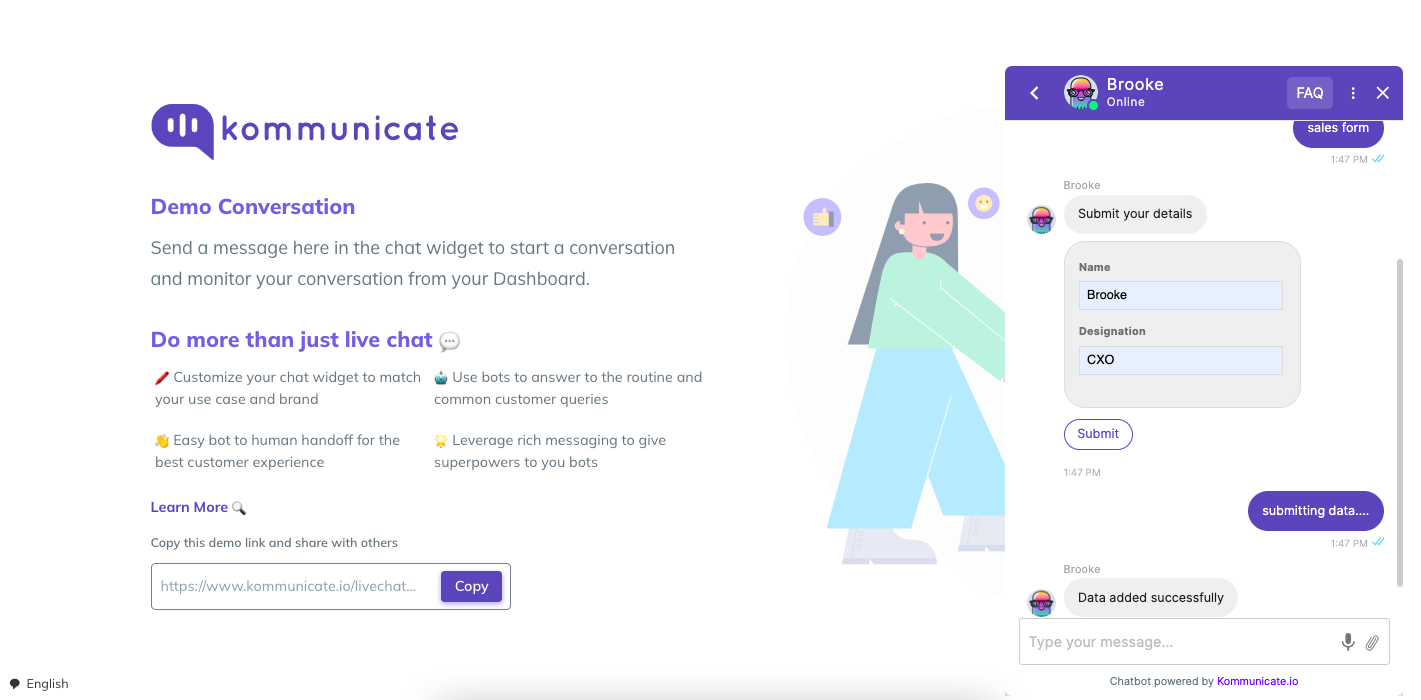
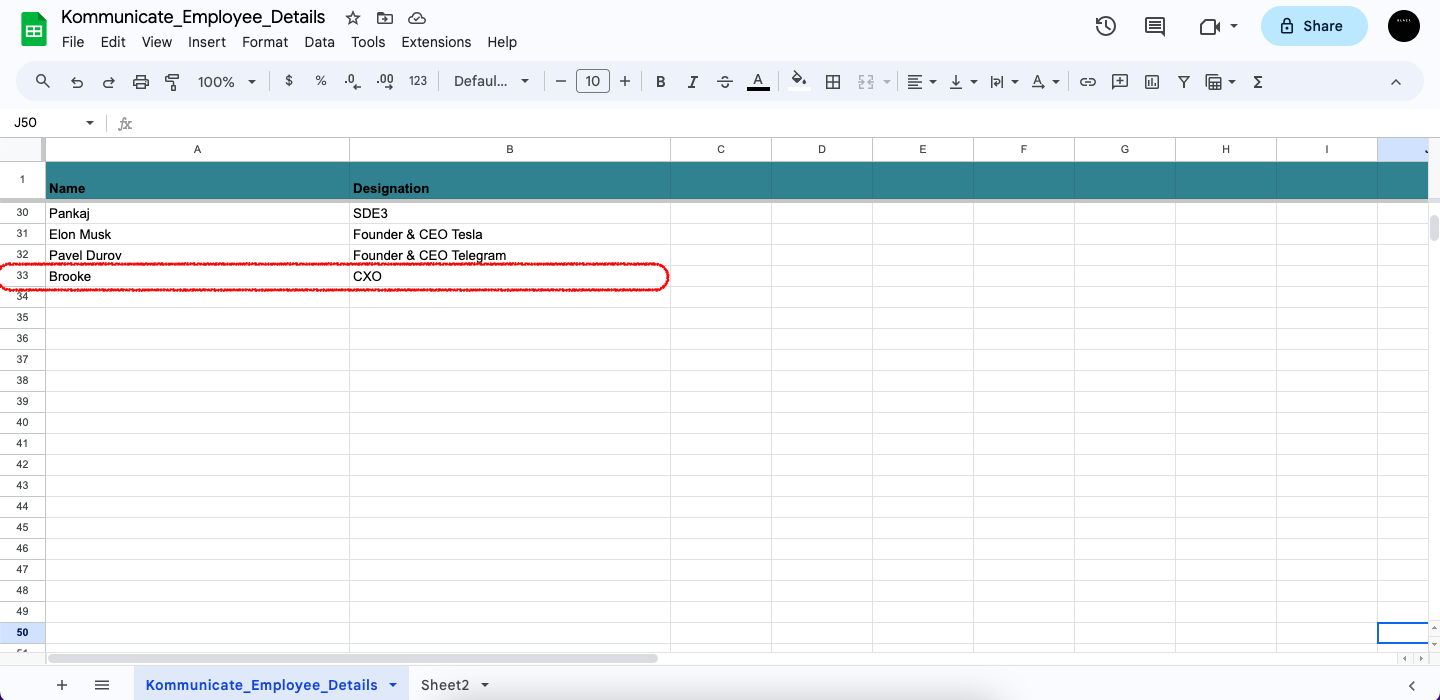
This example demonstrates the bot collecting information from the user, which is then updated in the Google sheet instantly.
Knowledge Source
Inside the Knowledge Source section, you can train the bot by connecting it to various data sources. These include uploading internal documents (such as PDF, CSV, DOCX, XLS, XLSX, and TXT), adding Web URLs, and integrating external knowledge bases from platforms like Zendesk and Salesforce. Once connected, the bot uses this information to generate accurate and contextual responses to user queries.
Additionally, bots trained using Documents, Web URLs, or Zendesk Knowledge Base can automatically respond in the user's language—there is no need to upload translated documents or multilingual web pages.
URLs:
Simply enter the URL of the website you want the bot to learn from. The system will scan and display the total number of pages it can scrape. After selecting the relevant pages, click Train to initiate the process. The bot will typically be trained within a few seconds.
Once the status shows Active, you can begin testing the bot with queries related to the content it was trained on.
Pages that are behind login screens or require authentication will not be accessible and therefore cannot be scraped or used for training.
Documents
You can upload files to train the bot on your organization’s specific content. Supported formats include PDF, CSV, DOCX, XLS, XLSX, and TXT. To get started, simply upload the document(s) that contain the information you want the bot to learn. Once the files are uploaded, click Upload to initiate the process.
The bot will analyze the content and complete training within a few seconds. When the training status changes to Active, you can begin testing the bot with relevant queries based on the uploaded material.
Ensure the documents are well-structured and readable. Scanned or image-based PDFs without selectable text may not be processed correctly.
If you prefer not to show the source of the answer in the bot's response, you can disable the “Display source of the answer in bot’s message” option when training the bot using uploaded documents or URLs.
Zendesk Knowledge Base Integration
Once you have integrated Zendesk Ticket or Messaging in the Integration section, the Knowledge Base section will automatically populate with the necessary credentials. The bot will then be trained on your Zendesk articles automatically, no manual action required.
Salesforce FAQ Integration
Integrating with Salesforce FAQ can be a transformative step for your organization, streamlining processes, enhancing customer relationships, and improving overall business efficiency. By addressing common FAQs and ensuring a smooth integration process, you can harness the full potential of Salesforce FAQ to drive your business forward.
Follow the steps below from creating FAQs on Salesforce to integrating it into the Kommunicate dashboard.
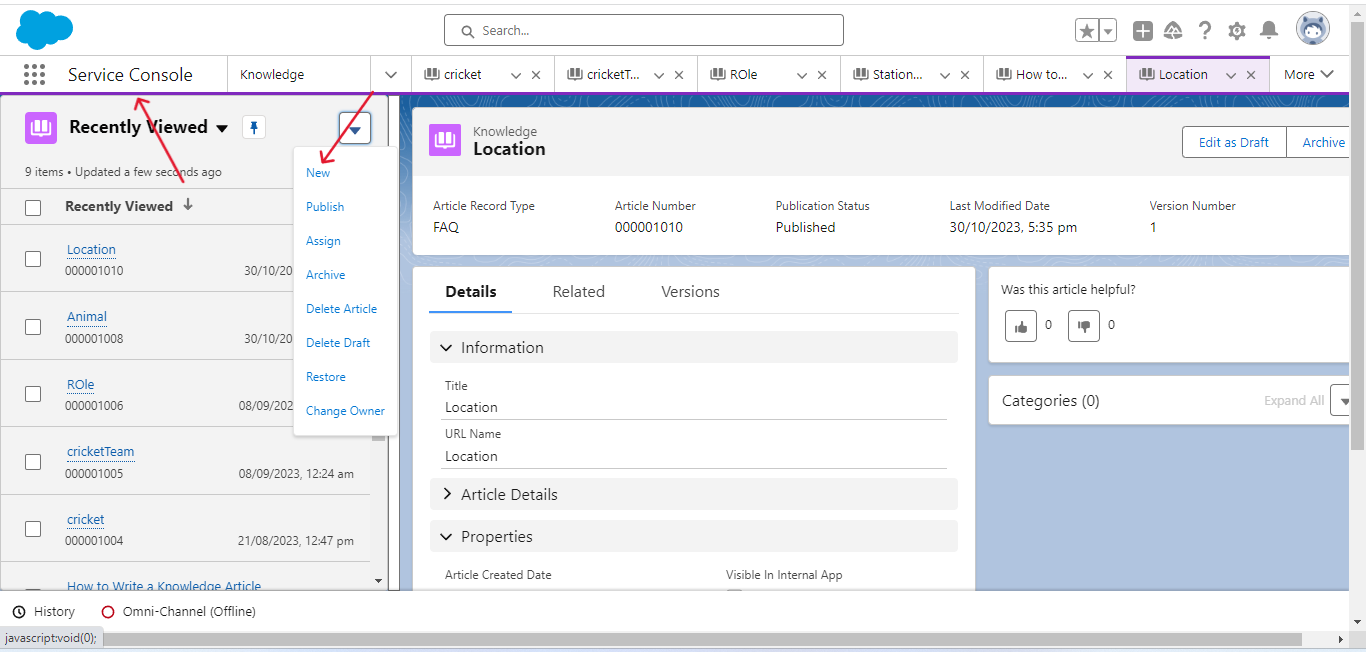
- Login to your Salesforce Account and navigate to
Service Console. Now, to create the Salesforce FAQ article click onNew.
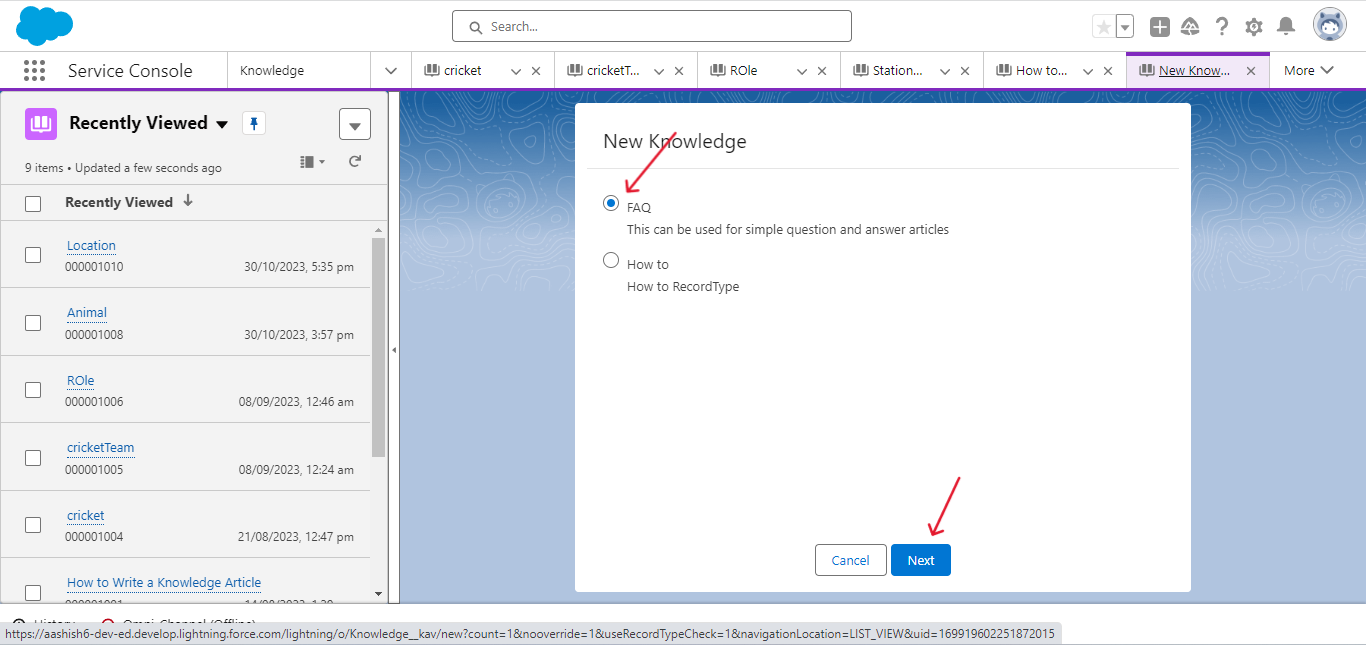
- Choose the Knowledge type as
FAQand click onNext.
- Give your FAQ article a
Titlein the proceeding page, theURLwill be chosen automatically. On the same page, you can add the Question and the relevant Answer of your choice. Once done click onSave.

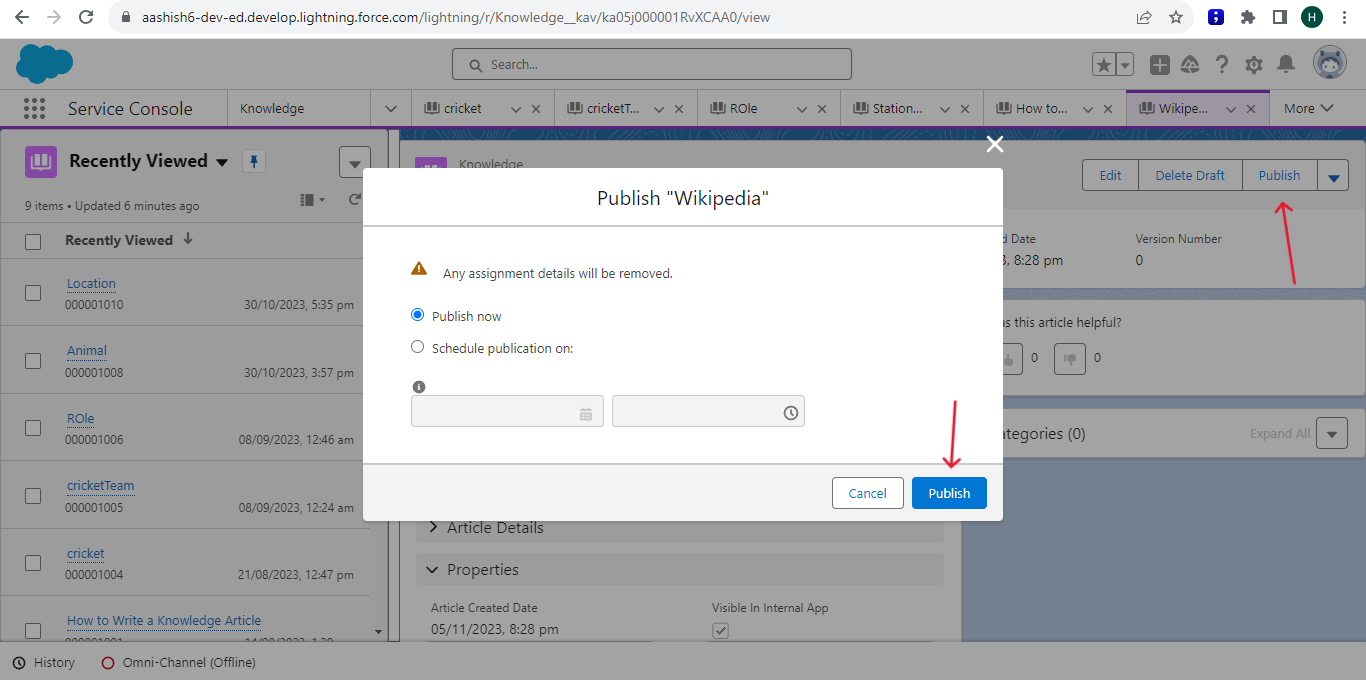
- The final step in creating the Salesforce FAQ article is to Publish it. Click on the Publish button on the top right corner as shown below.
You have now successfully created a Salesforce FAQ article. The final step is to integrate Salesforce FAQ with Kommunicate.
- Click on
Go to bot builderfor the bot you want to integrate with Salesforce FAQ and click onSettings.
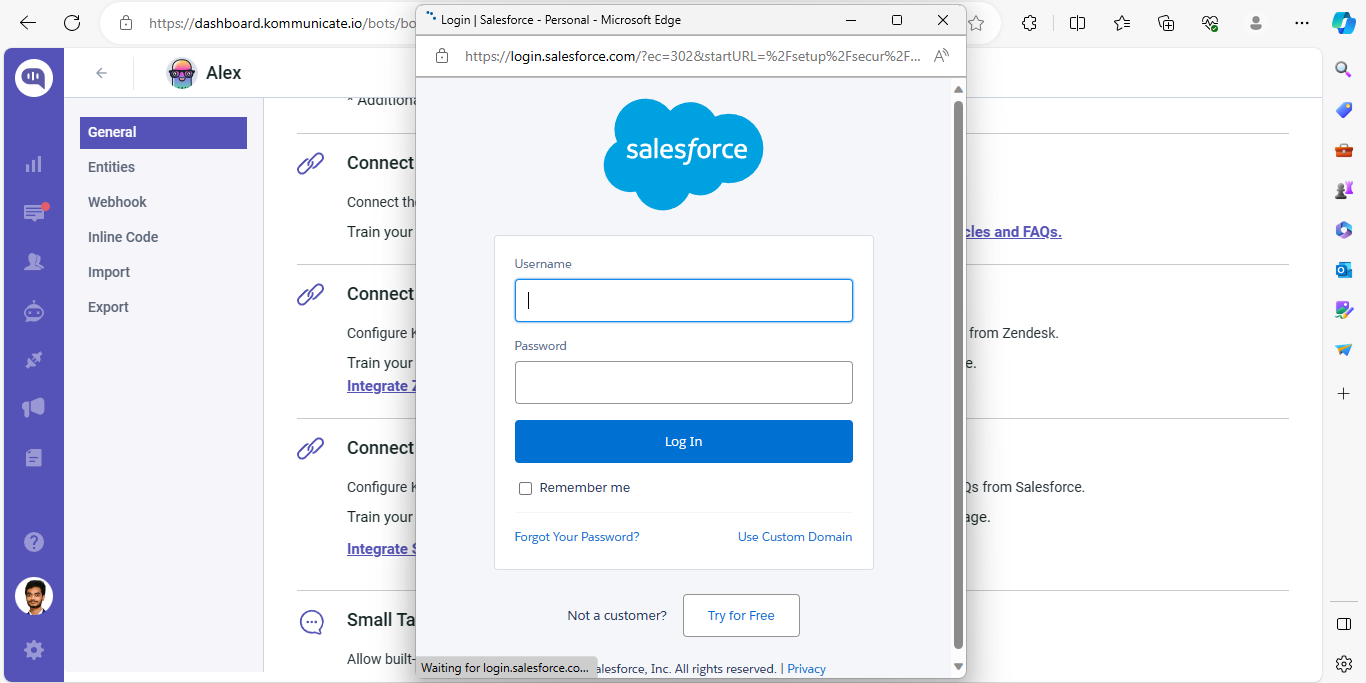
- Click on Integrate Salesforce, enter your Salesforce credentials and login.
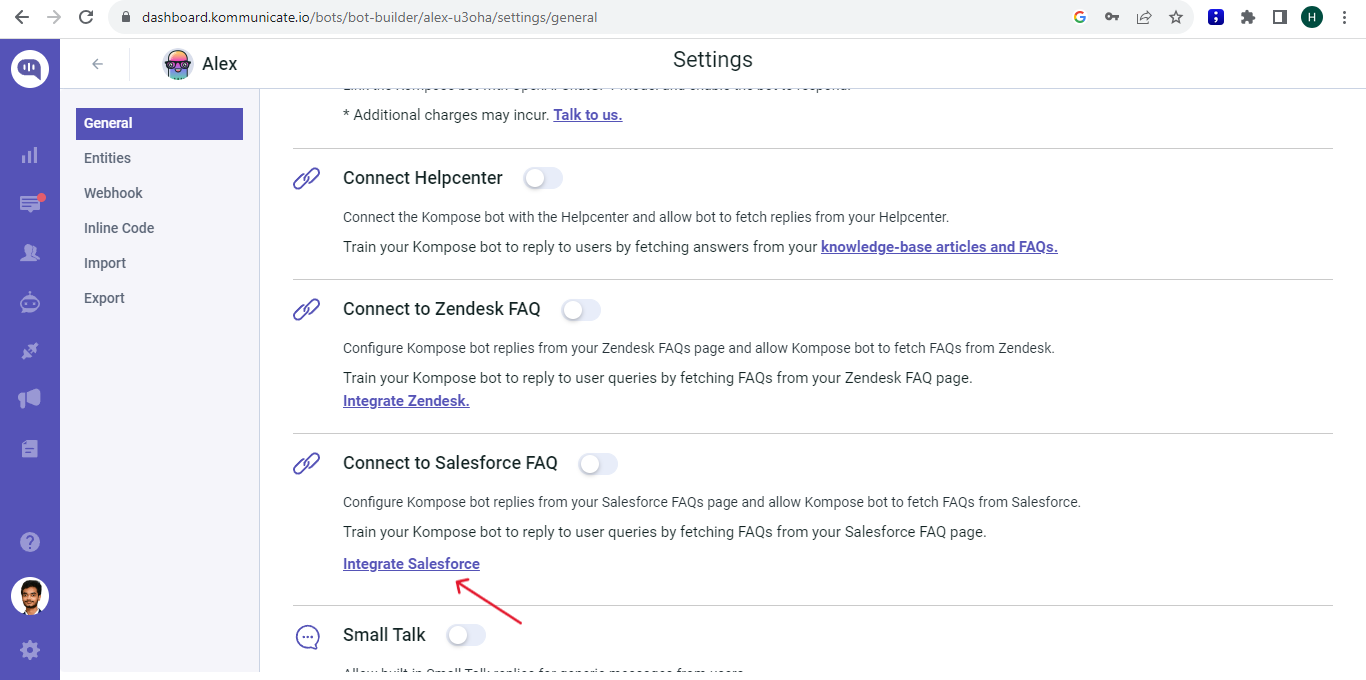
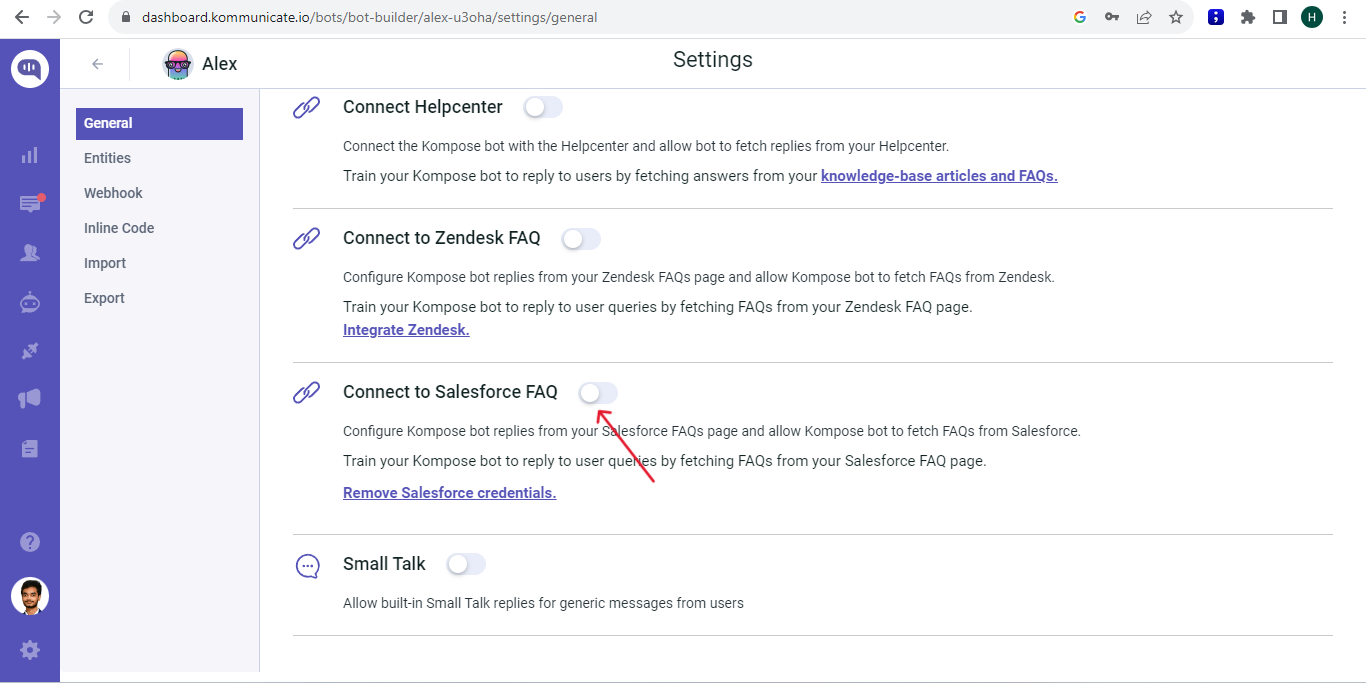
- Finally, toggle on the switch to connect with Salesforce FAQ.
To test your bot go back to the bot building page and click “Test your bot.” Ask your chatbot any questions from your Salesforce FAQ Article.

Bot Settings
The Bot Settings section (accessible from the top-right corner of the bot builder page) allows you to fine-tune your chatbot’s performance, tone, and behavior to suit your business needs. Below is a breakdown of all available settings:
1. Bot AI Model
Choose from a variety of powerful Large Language Models (LLMs):
- Kompose (Kommunicate’s native model)
- OpenAI
- Google Gemini
- Anthropic
These models differ in capabilities and response styles. You can test each to determine which suits your use case best.
2. Custom Instructions
Provide specific instructions to define how your bot should interact with users:
- Tone of Voice: Friendly, professional, casual, etc.
- Response Length: Short, or long (detailed answers).
- Other Instructions: Add any additional constraints or guidance (e.g., avoid giving legal advice, use simple language, etc.)
The more descriptive your instructions, the more accurate and aligned your bot’s replies will be.
3. Contextual Understanding
Enable this feature to allow the bot to remember previous user messages within a session:
- Retain chat history contextually
- Provide follow-up answers with improved relevance
- Support multi-turn conversations
Context is stored only for the duration of a single session.
4. Collect Bot Feedback
Let users give feedback on bot responses:
- Like / Dislike
- Helps assess response quality
- Useful for training and improving bot accuracy
5. Connect Helpcenter
Link your Kompose bot with your Kommunicate Helpcenter:
- Fetch answers directly from your Kommunicate knowledge base
- Keep support information consistent across channels
6. Small Talk
Enable predefined replies for casual or generic user inputs such as:
- "Hi there"
- "How are you?"
- "What's up?"
This adds a conversational tone and improves user experience.
7. Get Answers from Web
Enable this option if you want the bot to search the internet in addition to your existing trained content. This is especially useful when:
- You want the bot to provide users with the latest or trending information beyond your business data.
- You aim to enhance the bot’s ability to respond to queries that are not covered in your uploaded documents or knowledge base.
Once enabled, the bot will attempt to answer every question, even those outside your trained sources, by searching online. This may result in responses that are not specific to your business context. Use with caution if strict content control is required.